使用ResNet50进行图像分类
如何使用ResNet50模型对图像进行分类。
import os
import cv2
import numpy as np
from tensorflow.keras.applications.resnet50 import ResNet50, preprocess_input, decode_predictions
from tensorflow.keras.preprocessing import image# 设置代理
os.environ["HTTP_PROXY"] = "http://127.0.0.1:1080"
os.environ["HTTPS_PROXY"] = "http://127.0.0.1:1080"# 加载ResNet50模型
model = ResNet50(weights='imagenet')# 读取和预处理图像
def preprocess_image(img_path):# 加载图像并调整大小为(224, 224)img = image.load_img(img_path, target_size=(224, 224))# 将图像转换为numpy数组img_array = image.img_to_array(img)# 在第0轴上添加维度,将其变为(1, 224, 224, 3)img_array = np.expand_dims(img_array, axis=0)# 对图像进行预处理,以适应ResNet50模型的输入要求img_array = preprocess_input(img_array)return img_array# 加载图像
img_path = 'pandas.jpg'
img = preprocess_image(img_path)# 进行预测
predictions = model.predict(img)# 解码预测结果,获取前三个预测结果
decoded_predictions = decode_predictions(predictions, top=3)[0]# 打印结果
print("Predictions:")
for i, (imagenet_id, label, score) in enumerate(decoded_predictions):print(f"{i + 1}: {label} ({score:.2f})")# 显示图像
img = cv2.imread(img_path)
cv2.imshow('Image', img)
cv2.waitKey(0)
cv2.destroyAllWindows()-
测试图片:

-
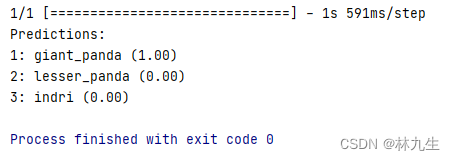
运行效果:

-
翻译一下


函数的基本使用)
)


![BUUCTF---[极客大挑战 2019]Http1](http://pic.xiahunao.cn/BUUCTF---[极客大挑战 2019]Http1)
)


