1.计算属性
<!DOCTYPE html>
<html lang="en">
<head><meta charset="UTF-8"><meta http-equiv="X-UA-Compatible" content="IE=edge"><meta name="viewport" content="width=device-width, initial-scale=1.0"><title>计算属性</title><script src="../js/vue.js"></script>
</head>
<body><div id="root">姓:<input type="text" v-model="firstName"><br><br>名:<input type="text" v-model="lastName"><br><br>姓名:<span>{{fullName}}</span></div><script>Vue.config.productionTip = false new Vue({el:'#root', data:{ firstName:'张',lastName:'三'},computed:{fullName:{get(){return this.firstName + '-' + this.lastName},set(value){const arr = value.split('-')this.firstName = arr[0]this.lastName = arr[1]}}}})</script>
</body>
</html>
效果:

总结:
计算属性:
定义:要用的属性不存在,需要通过已有属性计算得来。
原理:底层借助了Objcet.defineproperty()方法提供的getter和setter。
get函数什么时候执行?
初次读取时会执行一次
当依赖的数据发生改变时会被再次调用
优势:与methods实现相比,内部有缓存机制(复用),效率更高,调试方便
备注:
计算属性最终会出现在vm上,直接读取使用即可
如果计算属性要被修改,那必须写set函数去响应修改,且set中要引起计算时依赖的数据发生改变
如果计算属性确定不考虑修改,可以使用计算属性的简写形式
new Vue({el:'#root', data:{ firstName:'张',lastName:'三'},computed:{fullName(){return this.firstName + '-' + this.lastName}}
})
2.监视属性
2.1 监视属性基本用法
<!DOCTYPE html>
<html lang="en">
<head><meta charset="UTF-8"><meta http-equiv="X-UA-Compatible" content="IE=edge"><meta name="viewport" content="width=device-width, initial-scale=1.0"><title>监视属性</title><script src="../js/vue.js"></script>
</head>
<body><div id="root"><h2>今天天气好{{info}}!</h2><button @click="changeWeather">点击切换天气</button></div><script>Vue.config.productionTip = false new Vue({el:'#root', data:{ isHot:true,},computed:{info(){return this.isHot ? '炎热' : '凉爽' }},methods:{changeWeather(){this.isHot = !this.isHot}},watch:{isHot:{immediate:true, //初始化时让handler调用一下//handler什么时候调用?当isHot发生改变时handler(newValue,oldValue){console.log('isHot被修改了',newValue,oldValue)}}}})</script>
</body>
</html>

总结:
监视属性watch:
- 当被监视的属性变化时,回调函数自动调用
- 监视的属性必须存在,才能进行监视
- 监视有两种写法:
- 创建Vue时传入watch配置
- 通过
vm.$watch监视
vm.$watch('isHot',{immediate:true,handler(newValue,oldValue){console.log('isHot被修改了',newValue,oldValue)}
})
2.2 深度监视
<!DOCTYPE html>
<html lang="en">
<head><meta charset="UTF-8"><meta http-equiv="X-UA-Compatible" content="IE=edge"><meta name="viewport" content="width=device-width, initial-scale=1.0"><title>深度监视</title><script src="../js/vue.js"></script>
</head>
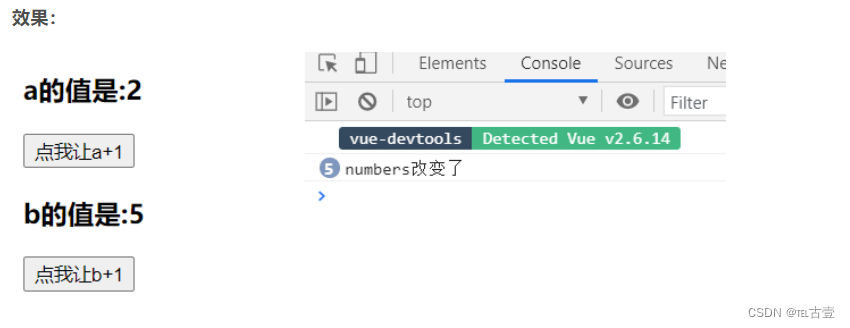
<body><div id="root"><h3>a的值是:{{numbers.a}}</h3><button @click="numbers.a++">点我让a+1</button><h3>b的值是:{{numbers.b}}</h3><button @click="numbers.b++">点我让b+1</button></div><script>Vue.config.productionTip = false new Vue({el:'#root', data:{ isHot:true,numbers:{a:1,b:1,}},watch:{//监视多级结构中所有属性的变化numbers:{deep:true,handler(){console.log('numbers改变了')}}//监视多级结构中某个属性的变化/* 'numbers.a':{handler(){console.log('a被改变了')}} */}})</script>
</body>
</html>

总结:
深度监视:
- Vue中的watch默认不监测对象内部值的改变(一层)
- 在watch中配置deep:true可以监测对象内部值的改变(多层)
备注:
- Vue自身可以监测对象内部值的改变,但Vue提供的watch默认不可以
- 使用watch时根据监视数据的具体结构,决定是否采用深度监视
2.3 监视属性简写
如果监视属性除了handler没有其他配置项的话,可以进行简写。
<script type="text/javascript">Vue.config.productionTip = false //阻止 vue 在启动时生成生产提示。const vm = new Vue({el:'#root',data:{isHot:true,},computed:{info(){return this.isHot ? '炎热' : '凉爽'}},methods: {changeWeather(){this.isHot = !this.isHot}},watch:{//正常写法isHot:{handler(newValue,oldValue){console.log('isHot被修改了',newValue,oldValue)}}, //简写isHot(newValue,oldValue){console.log('isHot被修改了',newValue,oldValue,this)}}})//正常写法vm.$watch('isHot',{handler(newValue,oldValue){console.log('isHot被修改了',newValue,oldValue)}})//简写vm.$watch('isHot',function(newValue,oldValue){console.log('isHot被修改了',newValue,oldValue,this)})
</script>
2.4 监听属性VS计算属性
总结:
computed和watch之间的区别:
- computed能完成的功能,watch都可以完成
- watch能完成的功能,computed不一定能完成,例如:watch可以进行异步操作
两个重要的小原则:
- 所有被Vue管理的函数,最好写成普通函数,这样this的指向才是vm 或 组件实例对象
- 所有不被Vue所管理的函数(定时器的回调函数、ajax的回调函数等、Promise的回调函数),最好写成箭头函数,这样this的指向才是vm 或 组件实例对象。
3. 绑定样式
<style>.basic{width: 400px;height: 100px;border: 1px solid black;}.happy{border: 4px solid red;;background-color: rgba(255, 255, 0, 0.644);background: linear-gradient(30deg,yellow,pink,orange,yellow);}.sad{border: 4px dashed rgb(2, 197, 2);background-color: gray;}.normal{background-color: skyblue;}.atguigu1{background-color: yellowgreen;}.atguigu2{font-size: 30px;text-shadow:2px 2px 10px red;}.atguigu3{border-radius: 20px;}
</style>
<div id="root"><!-- 绑定class样式--字符串写法,适用于:样式的类名不确定,需要动态指定 --><div class="basic" :class="mood" @click="changeMood">{{name}}</div> <br/><br/><!-- 绑定class样式--数组写法,适用于:要绑定的样式个数不确定、名字也不确定 --><div class="basic" :class="classArr">{{name}}</div> <br/><br/><!-- 绑定class样式--对象写法,适用于:要绑定的样式个数确定、名字也确定,但要动态决定用不用 --><div class="basic" :class="classObj">{{name}}</div> <br/><br/><!-- 绑定style样式--对象写法 --><div class="basic" :style="styleObj">{{name}}</div> <br/><br/><!-- 绑定style样式--数组写法 --><div class="basic" :style="styleArr">{{name}}</div>
</div>
<script type="text/javascript">Vue.config.productionTip = falseconst vm = new Vue({el:'#root',data:{name:'尚硅谷',mood:'normal',classArr:['atguigu1','atguigu2','atguigu3'],classObj:{atguigu1:false,atguigu2:false,},styleObj:{fontSize: '40px',color:'red',},styleObj2:{backgroundColor:'orange'},styleArr:[{fontSize: '40px',color:'blue',},{backgroundColor:'gray'}]},methods: {changeMood(){const arr = ['happy','sad','normal']const index = Math.floor(Math.random()*3)this.mood = arr[index]}},})
</script>
总结:
class样式:
写法:class="xxx",xxx可以是字符串、对象、数组
- 字符串写法适用于:类名不确定,要动态获取
- 对象写法适用于:要绑定多个样式,个数不确定,名字也不确定
- 数组写法适用于:要绑定多个样式,个数确定,名字也确定,但不确定用不用
style样式:
- :style="{fontSize: xxx}"其中xxx是动态值
- :style="[a,b]"其中a、b是样式对象


)
)
--树形DP没有上司的舞会)


)


)


