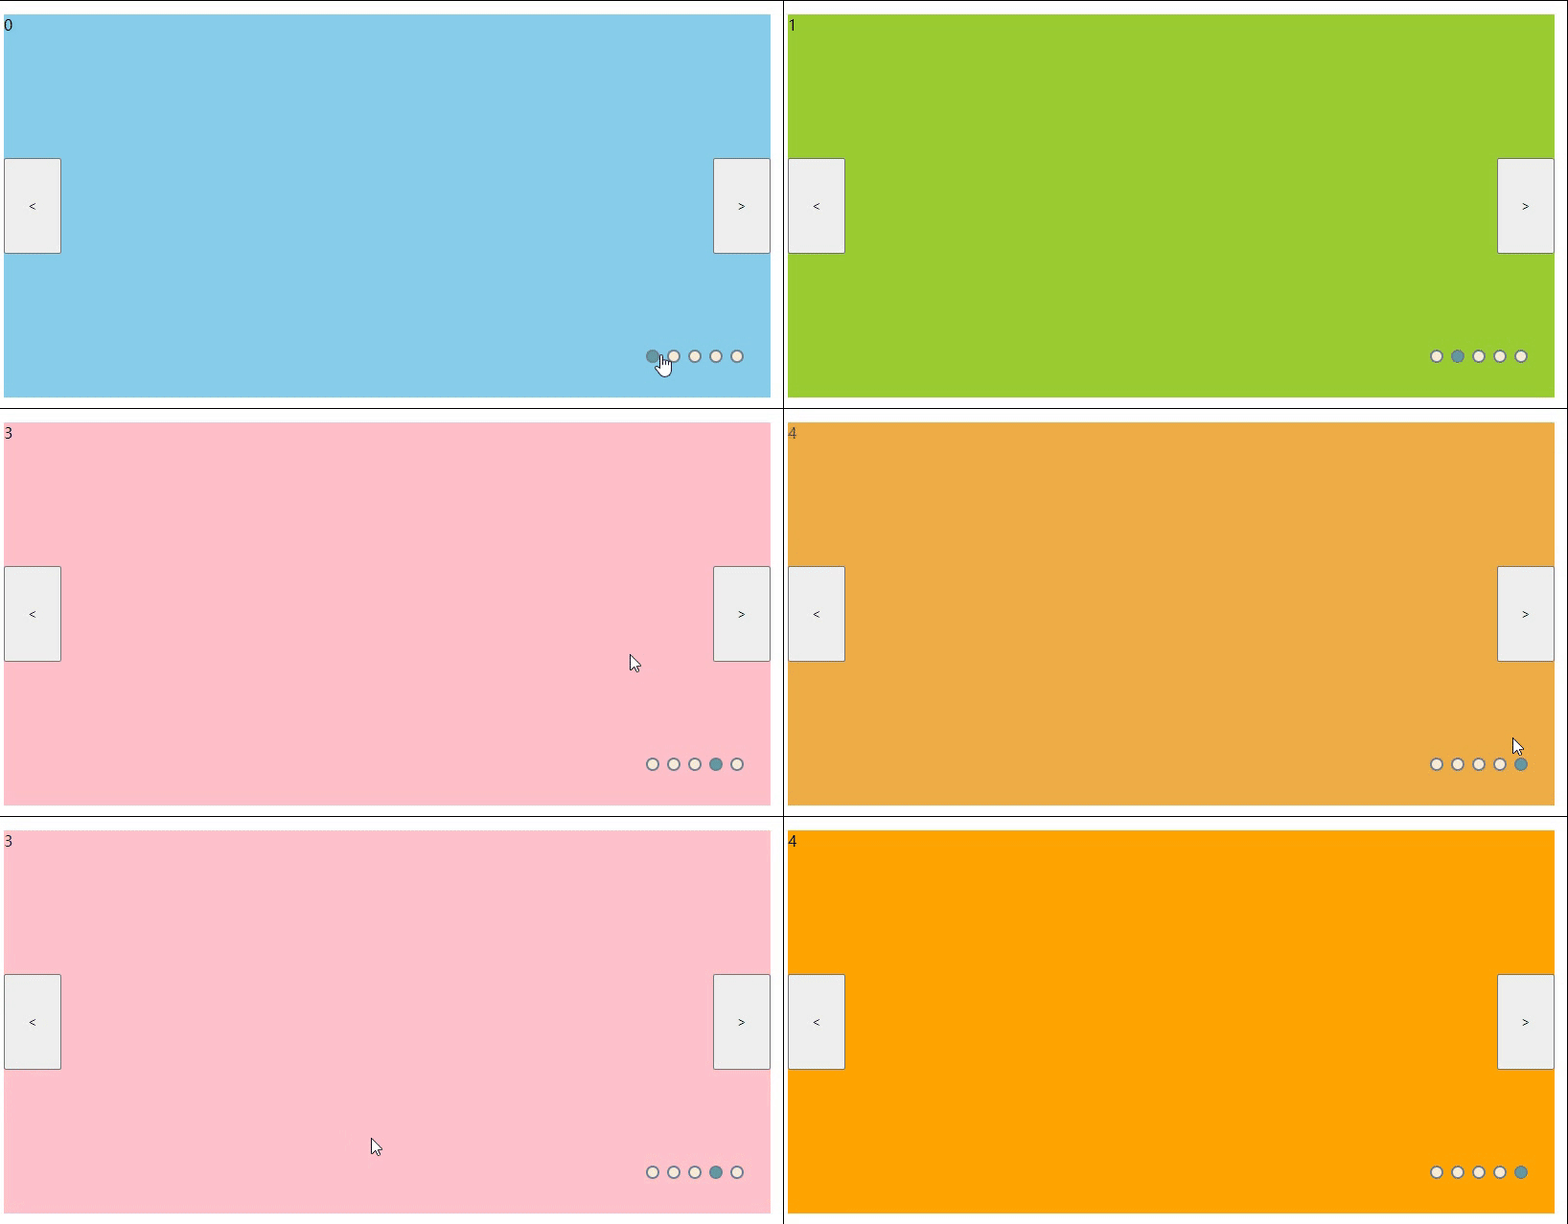
效果图
先来看下效果图,嫌麻烦就不用具体图片来实现了,主要是理清思路。(自动轮播,左右按钮切换图片,小圆点切换图片,鼠标移入暂停轮播,鼠标移出继续轮播)

HTML
首先是html内容,布局很简单,一个图片列表,一个点列表,两个按钮。注意data-index使用HTML5中的data-xx属性来嵌入自定义数据(下面JS代码会提到)。记得给默认显示的图片和对应的小圆点加上active类哦。
<div class="wrap"><ul class="list"><li class="item active">0</li><li class="item">1</li><li class="item">2</li><li class="item">3</li><li class="item">4</li></ul><ul class="pointList"><li class="point active" data-index = 0></li><li class="point" data-index = 1></li><li class="point" data-index = 2></li><li class="point" data-index = 3></li><li class="point" data-index = 4></li></ul><button class="btn" id="leftBtn"> < </button> <button class="btn" id="rightBtn"> > </button>
</div>
CSS
思路:父容器list相对定位,item绝对定位,实现让所有图片重叠在父容器内。利用z-index来设置图片高度,图片高度最高会显示在顶层上。那么整个容器中,左右切换按钮和小圆点始终要在最顶层,不能被图片覆盖,所以他们的z-index一定要比图片高。active是一个样式,给某张图片绑定这个样式就能在最上层显示。然后就是图片切换的渐变效果,opacity完全不透明到透明,再加个transition动画效果。最后就是cursor给小圆点添加“小手指”,其他就没什么好说的了。
<style>.wrap {width: 800px;height: 400px;position: relative;}
.list {width: 800px;height: 400px;position: relative;padding-left: 0px;}
.item {width: 100%;height: 100%;list-style: none;position: absolute;left: 0;opacity: 0;transition: all .8s;}
.item:nth-child(1) {background-color: skyblue;}
.item:nth-child(2) {background-color: yellowgreen;}
.item:nth-child(3) {background-color: rebeccapurple;}
.item:nth-child(4) {background-color: pink;}
.item:nth-child(5) {background-color: orange;}
.item.active {z-index: 10;opacity: 1;}
.btn {width: 60px;height: 100px;z-index: 100;top: 150px;position: absolute;}
#leftBtn {left: 0px;}
#rightBtn {right: 0px;}
.pointList {list-style: none;padding-left: 0px;position: absolute;right: 20px;bottom: 20px;z-index: 200;}
.point {width: 10px;height: 10px;background-color: antiquewhite;border-radius: 100%;float: left;margin-right: 8px;border-style: solid;border-width: 2px;border-color: slategray;cursor: pointer; }
.point.active{background-color: cadetblue;}</style>
Javascript
Index可以说是整个代码里面的"核心",先封装一个清除active的方法,这里面要清除图片的active(显示在最上层),比如切换到下一张图上张图的active就要清除。还有point的active(图片对应小圆点改变样式)。然后goIndex这个方法就是给图片和对应的小圆点同时加上active,左右按钮绑定的方法就不说了。
用getAttribute拿到刚才给li标签绑定的data-index属性,绑定图片index = pointindex,就能实现点击小圆点图片切换了。由于上面goIndex方法早已经绑定好了给图片添加active样式的时候也给小圆点添加的样式了,就可以实现图片切换小圆点跟随变化的效果。
<script>var items = document.querySelectorAll(".item");//图片节点var points = document.querySelectorAll(".point")//点var left = document.getElementById("leftBtn");var right = document.getElementById("rightBtn");var all = document.querySelector(".wrap")var index = 0;var time = 0;//定时器跳转参数初始化//封装一个清除active方法var clearActive = function () {for (i = 0; i < items.length; i++) {items[i].className = 'item';}for (j = 0; j < points.length; j++) {points[j].className = 'point';}}
//改变active方法var goIndex = function () {clearActive();items[index].className = 'item active';points[index].className = 'point active'}//左按钮事件var goLeft = function () {if (index == 0) {index = 4;} else {index--;}goIndex();}
//右按钮事件var goRight = function () {if (index < 4) {index++;} else {index = 0;}goIndex();}//绑定点击事件监听left.addEventListener('click', function () {goLeft();time = 0;//计时器跳转清零})
right.addEventListener('click', function () {goRight();time = 0;//计时器跳转清零})
for(i = 0;i < points.length;i++){points[i].addEventListener('click',function(){var pointIndex = this.getAttribute('data-index')index = pointIndex;goIndex();time = 0;//计时器跳转清零})}//计时器轮播效果var timer;function play(){timer = setInterval(() => {time ++;if(time == 20 ){goRight();time = 0;} },100)}play();//移入清除计时器all.onmousemove = function(){clearInterval(timer)}//移出启动计时器all.onmouseleave = function(){play();}</script>总结:这个简单的轮播图实现例子是第一次写最容易理解,逻辑最清晰的一种。下面我把完整的代码块放出来,直接复制粘贴就可以运行。
<!DOCTYPE html>
<html>
<head><style>.wrap {width: 800px;height: 400px;position: relative;}
.list {width: 800px;height: 400px;position: relative;padding-left: 0px;}
.item {width: 100%;height: 100%;list-style: none;position: absolute;left: 0;opacity: 0;transition: all .8s;}
.item:nth-child(1) {background-color: skyblue;}
.item:nth-child(2) {background-color: yellowgreen;}
.item:nth-child(3) {background-color: rebeccapurple;}
.item:nth-child(4) {background-color: pink;}
.item:nth-child(5) {background-color: orange;}
.item.active {z-index: 10;opacity: 1;}
.btn {width: 60px;height: 100px;z-index: 100;top: 150px;position: absolute;}
#leftBtn {left: 0px;}
#rightBtn {right: 0px;}
.pointList {list-style: none;padding-left: 0px;position: absolute;right: 20px;bottom: 20px;z-index: 200;}
.point {width: 10px;height: 10px;background-color: antiquewhite;border-radius: 100%;float: left;margin-right: 8px;border-style: solid;border-width: 2px;border-color: slategray;cursor: pointer; }
.point.active{background-color: cadetblue;}</style>
</head>
<body><div class="wrap"><ul class="list"><li class="item active">0</li><li class="item">1</li><li class="item">2</li><li class="item">3</li><li class="item">4</li></ul><ul class="pointList"><li class="point active" data-index = 0></li><li class="point" data-index = 1></li><li class="point" data-index = 2></li><li class="point" data-index = 3></li><li class="point" data-index = 4></li></ul><button class="btn" id="leftBtn"> < </button> <button class="btn" id="rightBtn"> > </button>
</div><script>var items = document.querySelectorAll(".item");//图片var points = document.querySelectorAll(".point")//点var left = document.getElementById("leftBtn");var right = document.getElementById("rightBtn");var all = document.querySelector(".wrap")var index = 0;var time = 0;//定时器跳转参数初始化//清除active方法var clearActive = function () {for (i = 0; i < items.length; i++) {items[i].className = 'item';}for (j = 0; j < points.length; j++) {points[j].className = 'point';}}
//改变active方法var goIndex = function () {clearActive();items[index].className = 'item active';points[index].className = 'point active'}//左按钮事件var goLeft = function () {if (index == 0) {index = 4;} else {index--;}goIndex();}
//右按钮事件var goRight = function () {if (index < 4) {index++;} else {index = 0;}goIndex();}//绑定点击事件监听left.addEventListener('click', function () {goLeft();time = 0;//计时器跳转清零})
right.addEventListener('click', function () {goRight();time = 0;//计时器跳转清零})
for(i = 0;i < points.length;i++){points[i].addEventListener('click',function(){var pointIndex = this.getAttribute('data-index')index = pointIndex;goIndex();time = 0;//计时器跳转清零})}//计时器var timer;function play(){timer = setInterval(() => {time ++;if(time == 20 ){goRight();time = 0;} },100)}play();//移入清除计时器all.onmousemove = function(){clearInterval(timer)}//移出启动计时器all.onmouseleave = function(){play();}</script>
</body>
</html>


![[职场] 公安管理学就业方向及前景 #媒体#笔记#笔记](http://pic.xiahunao.cn/[职场] 公安管理学就业方向及前景 #媒体#笔记#笔记)


22)


