使用 RPC 进行分布式管道并行
原文:
pytorch.org/tutorials/intermediate/dist_pipeline_parallel_tutorial.html译者:飞龙
协议:CC BY-NC-SA 4.0
作者:Shen Li
注意
 在github中查看并编辑本教程。
先决条件:
-
PyTorch 分布式概述
-
单机模型并行最佳实践
-
开始使用分布式 RPC 框架
-
RRef 辅助函数:RRef.rpc_sync()、RRef.rpc_async()和RRef.remote()
本教程使用 Resnet50 模型演示了如何使用torch.distributed.rpc API 实现分布式管道并行。这可以看作是单机模型并行最佳实践中讨论的多 GPU 管道并行的分布式对应。
注意
本教程要求使用 PyTorch v1.6.0 或更高版本。
注意
本教程的完整源代码可以在pytorch/examples找到。
基础知识
之前的教程开始使用分布式 RPC 框架展示了如何使用torch.distributed.rpc为 RNN 模型实现分布式模型并行。该教程使用一个 GPU 来托管EmbeddingTable,提供的代码可以正常工作。但是,如果一个模型存在于多个 GPU 上,就需要一些额外的步骤来增加所有 GPU 的摊销利用率。管道并行是一种可以在这种情况下有所帮助的范式之一。
在本教程中,我们以ResNet50作为示例模型,该模型也被单机模型并行最佳实践教程使用。类似地,ResNet50模型被分成两个分片,并且输入批次被分成多个部分并以流水线方式馈送到两个模型分片中。不同之处在于,本教程使用异步 RPC 调用来并行执行,而不是使用 CUDA 流来并行执行。因此,本教程中提出的解决方案也适用于跨机器边界。本教程的其余部分将以四个步骤呈现实现。
步骤 1:对 ResNet50 模型进行分区
这是准备步骤,实现了在两个模型分片中的ResNet50。下面的代码是从torchvision 中的 ResNet 实现借用的。ResNetBase模块包含了两个 ResNet 分片的共同构建块和属性。
import threadingimport torch
import torch.nn as nnfrom torchvision.models.resnet import Bottlenecknum_classes = 1000def conv1x1(in_planes, out_planes, stride=1):return nn.Conv2d(in_planes, out_planes, kernel_size=1, stride=stride, bias=False)class ResNetBase(nn.Module):def __init__(self, block, inplanes, num_classes=1000,groups=1, width_per_group=64, norm_layer=None):super(ResNetBase, self).__init__()self._lock = threading.Lock()self._block = blockself._norm_layer = nn.BatchNorm2dself.inplanes = inplanesself.dilation = 1self.groups = groupsself.base_width = width_per_groupdef _make_layer(self, planes, blocks, stride=1):norm_layer = self._norm_layerdownsample = Noneprevious_dilation = self.dilationif stride != 1 or self.inplanes != planes * self._block.expansion:downsample = nn.Sequential(conv1x1(self.inplanes, planes * self._block.expansion, stride),norm_layer(planes * self._block.expansion),)layers = []layers.append(self._block(self.inplanes, planes, stride, downsample, self.groups,self.base_width, previous_dilation, norm_layer))self.inplanes = planes * self._block.expansionfor _ in range(1, blocks):layers.append(self._block(self.inplanes, planes, groups=self.groups,base_width=self.base_width, dilation=self.dilation,norm_layer=norm_layer))return nn.Sequential(*layers)def parameter_rrefs(self):return [RRef(p) for p in self.parameters()]
现在,我们准备定义两个模型分片。对于构造函数,我们简单地将所有 ResNet50 层分成两部分,并将每部分移动到提供的设备上。这两个分片的forward函数接受输入数据的RRef,在本地获取数据,然后将其移动到预期的设备上。在将所有层应用于输入后,将输出移动到 CPU 并返回。这是因为 RPC API 要求张量驻留在 CPU 上,以避免在调用方和被调用方的设备数量不匹配时出现无效设备错误。
class ResNetShard1(ResNetBase):def __init__(self, device, *args, **kwargs):super(ResNetShard1, self).__init__(Bottleneck, 64, num_classes=num_classes, *args, **kwargs)self.device = deviceself.seq = nn.Sequential(nn.Conv2d(3, self.inplanes, kernel_size=7, stride=2, padding=3, bias=False),self._norm_layer(self.inplanes),nn.ReLU(inplace=True),nn.MaxPool2d(kernel_size=3, stride=2, padding=1),self._make_layer(64, 3),self._make_layer(128, 4, stride=2)).to(self.device)for m in self.modules():if isinstance(m, nn.Conv2d):nn.init.kaiming_normal_(m.weight, mode='fan_out', nonlinearity='relu')elif isinstance(m, nn.BatchNorm2d):nn.init.constant_(m.weight, 1)nn.init.constant_(m.bias, 0)def forward(self, x_rref):x = x_rref.to_here().to(self.device)with self._lock:out = self.seq(x)return out.cpu()class ResNetShard2(ResNetBase):def __init__(self, device, *args, **kwargs):super(ResNetShard2, self).__init__(Bottleneck, 512, num_classes=num_classes, *args, **kwargs)self.device = deviceself.seq = nn.Sequential(self._make_layer(256, 6, stride=2),self._make_layer(512, 3, stride=2),nn.AdaptiveAvgPool2d((1, 1)),).to(self.device)self.fc = nn.Linear(512 * self._block.expansion, num_classes).to(self.device)def forward(self, x_rref):x = x_rref.to_here().to(self.device)with self._lock:out = self.fc(torch.flatten(self.seq(x), 1))return out.cpu()
步骤 2:将 ResNet50 模型分片拼接成一个模块
然后,我们创建一个DistResNet50模块来组装两个分片并实现管道并行逻辑。在构造函数中,我们使用两个rpc.remote调用分别将两个分片放在两个不同的 RPC 工作进程上,并保留两个模型部分的RRef,以便它们可以在前向传递中引用。forward函数将输入批次分成多个微批次,并以管道方式将这些微批次馈送到两个模型部分。它首先使用rpc.remote调用将第一个分片应用于微批次,然后将返回的中间输出RRef转发到第二个模型分片。之后,它收集所有微输出的Future,并在循环后等待所有微输出。请注意,remote()和rpc_async()都会立即返回并异步运行。因此,整个循环是非阻塞的,并且将同时启动多个 RPC。通过中间输出y_rref保留了两个模型部分上一个微批次的执行顺序。跨微批次的执行顺序并不重要。最后,forward 函数将所有微批次的输出连接成一个单一的输出张量并返回。parameter_rrefs函数是一个辅助函数,用于简化分布式优化器的构建,稍后将使用它。
class DistResNet50(nn.Module):def __init__(self, num_split, workers, *args, **kwargs):super(DistResNet50, self).__init__()self.num_split = num_split# Put the first part of the ResNet50 on workers[0]self.p1_rref = rpc.remote(workers[0],ResNetShard1,args = ("cuda:0",) + args,kwargs = kwargs)# Put the second part of the ResNet50 on workers[1]self.p2_rref = rpc.remote(workers[1],ResNetShard2,args = ("cuda:1",) + args,kwargs = kwargs)def forward(self, xs):out_futures = []for x in iter(xs.split(self.num_split, dim=0)):x_rref = RRef(x)y_rref = self.p1_rref.remote().forward(x_rref)z_fut = self.p2_rref.rpc_async().forward(y_rref)out_futures.append(z_fut)return torch.cat(torch.futures.wait_all(out_futures))def parameter_rrefs(self):remote_params = []remote_params.extend(self.p1_rref.remote().parameter_rrefs().to_here())remote_params.extend(self.p2_rref.remote().parameter_rrefs().to_here())return remote_params
步骤 3:定义训练循环
在定义模型之后,让我们实现训练循环。我们使用一个专用的“主”工作进程来准备随机输入和标签,并控制分布式反向传递和分布式优化器步骤。首先创建一个DistResNet50模块的实例。它指定每个批次的微批次数量,并提供两个 RPC 工作进程的名称(即“worker1”和“worker2”)。然后定义损失函数,并使用parameter_rrefs()助手创建一个DistributedOptimizer来获取参数RRefs的列表。然后,主要训练循环与常规本地训练非常相似,只是它使用dist_autograd来启动反向传递,并为反向传递和优化器step()提供context_id。
import torch.distributed.autograd as dist_autograd
import torch.optim as optim
from torch.distributed.optim import DistributedOptimizernum_batches = 3
batch_size = 120
image_w = 128
image_h = 128def run_master(num_split):# put the two model parts on worker1 and worker2 respectivelymodel = DistResNet50(num_split, ["worker1", "worker2"])loss_fn = nn.MSELoss()opt = DistributedOptimizer(optim.SGD,model.parameter_rrefs(),lr=0.05,)one_hot_indices = torch.LongTensor(batch_size) \.random_(0, num_classes) \.view(batch_size, 1)for i in range(num_batches):print(f"Processing batch {i}")# generate random inputs and labelsinputs = torch.randn(batch_size, 3, image_w, image_h)labels = torch.zeros(batch_size, num_classes) \.scatter_(1, one_hot_indices, 1)with dist_autograd.context() as context_id:outputs = model(inputs)dist_autograd.backward(context_id, [loss_fn(outputs, labels)])opt.step(context_id)
步骤 4:启动 RPC 进程
最后,下面的代码展示了所有进程的目标函数。主要逻辑在run_master中定义。工作进程 passively 等待来自主进程的命令,因此只需运行init_rpc和shutdown,其中shutdown默认情况下将阻塞,直到所有 RPC 参与者完成。
import os
import timeimport torch.multiprocessing as mpdef run_worker(rank, world_size, num_split):os.environ['MASTER_ADDR'] = 'localhost'os.environ['MASTER_PORT'] = '29500'options = rpc.TensorPipeRpcBackendOptions(num_worker_threads=128)if rank == 0:rpc.init_rpc("master",rank=rank,world_size=world_size,rpc_backend_options=options)run_master(num_split)else:rpc.init_rpc(f"worker{rank}",rank=rank,world_size=world_size,rpc_backend_options=options)pass# block until all rpcs finishrpc.shutdown()if __name__=="__main__":world_size = 3for num_split in [1, 2, 4, 8]:tik = time.time()mp.spawn(run_worker, args=(world_size, num_split), nprocs=world_size, join=True)tok = time.time()print(f"number of splits = {num_split}, execution time = {tok  -  tik}")
使用异步执行实现批量 RPC 处理
原文:
pytorch.org/tutorials/intermediate/rpc_async_execution.html译者:飞龙
协议:CC BY-NC-SA 4.0
作者:Shen Li
注意
 在github中查看和编辑本教程。
先决条件:
-
PyTorch 分布式概述
-
使用分布式 RPC 框架入门
-
使用分布式 RPC 框架实现参数服务器
-
RPC 异步执行装饰器
本教程演示了如何使用@rpc.functions.async_execution装饰器构建批处理 RPC 应用程序,通过减少阻塞的 RPC 线程数量和在被调用方上合并 CUDA 操作来加速训练。这与TorchServe 的批量推理的思想相同。
注意
本教程需要 PyTorch v1.6.0 或更高版本。
基础知识
以前的教程展示了使用torch.distributed.rpc构建分布式训练应用程序的步骤,但没有详细说明在处理 RPC 请求时被调用方发生了什么。在 PyTorch v1.5 中,每个 RPC 请求将阻塞被调用方的一个线程来执行该请求中的函数,直到该函数返回。这对许多用例有效,但有一个注意事项。如果用户函数在 IO 上阻塞,例如,嵌套的 RPC 调用,或者信号,例如,等待不同的 RPC 请求解除阻塞,那么被调用方上的 RPC 线程将不得不空闲等待,直到 IO 完成或信号事件发生。结果,RPC 被调用方可能会使用比必要更多的线程。这个问题的原因是 RPC 将用户函数视为黑匣子,并且对函数中发生的事情知之甚少。为了允许用户函数产生并释放 RPC 线程,需要向 RPC 系统提供更多提示。
自 v1.6.0 以来,PyTorch 通过引入两个新概念来解决这个问题:
-
torch.futures.Future 类型,封装了异步执行,还支持安装回调函数。
-
@rpc.functions.async_execution 装饰器允许应用告诉被调用方目标函数将返回一个 future,并且在执行过程中可以暂停和多次产生。
有了这两个工具,应用代码可以将用户函数分解为多个较小的函数,将它们链接为Future对象上的回调,并返回包含最终结果的Future。在被调用方,当获取Future对象时,也会安装后续的 RPC 响应准备和通信作为回调,当最终结果准备好时将被触发。这样,被调用方不再需要阻塞一个线程并等待最终返回值准备好。请参考@rpc.functions.async_execution的 API 文档,了解简单示例。
除了减少被调用方上的空闲线程数量外,这些工具还有助于使批处理 RPC 处理更加简单和快速。本教程的以下两个部分演示了如何使用 @rpc.functions.async_execution 装饰器构建分布式批量更新参数服务器和批处理强化学习应用程序。
批量更新参数服务器
考虑一个具有一个参数服务器(PS)和多个训练器的同步参数服务器训练应用程序。在此应用程序中,PS 持有参数并等待所有训练器报告梯度。在每次迭代中,它等待直到从所有训练器接收到梯度,然后一次性更新所有参数。下面的代码显示了 PS 类的实现。update_and_fetch_model 方法使用 @rpc.functions.async_execution 装饰,并将被训练器调用。每次调用都返回一个将填充更新模型的 Future 对象。大多数训练器发起的调用只是将梯度累积到 .grad 字段中,立即返回,并在 PS 上释放 RPC 线程。最后到达的训练器将触发优化器步骤并消耗所有先前报告的梯度。然后它使用更新后的模型设置 future_model,进而通过 Future 对象通知其他训练器的所有先前请求,并将更新后的模型发送给所有训练器。
import threading
import torchvision
import torch
import torch.distributed.rpc as rpc
from torch import optimnum_classes, batch_update_size = 30, 5class BatchUpdateParameterServer(object):def __init__(self, batch_update_size=batch_update_size):self.model = torchvision.models.resnet50(num_classes=num_classes)self.lock = threading.Lock()self.future_model = torch.futures.Future()self.batch_update_size = batch_update_sizeself.curr_update_size = 0self.optimizer = optim.SGD(self.model.parameters(), lr=0.001, momentum=0.9)for p in self.model.parameters():p.grad = torch.zeros_like(p)def get_model(self):return self.model@staticmethod@rpc.functions.async_executiondef update_and_fetch_model(ps_rref, grads):# Using the RRef to retrieve the local PS instanceself = ps_rref.local_value()with self.lock:self.curr_update_size += 1# accumulate gradients into .grad fieldfor p, g in zip(self.model.parameters(), grads):p.grad += g# Save the current future_model and return it to make sure the# returned Future object holds the correct model even if another# thread modifies future_model before this thread returns.fut = self.future_modelif self.curr_update_size >= self.batch_update_size:# update the modelfor p in self.model.parameters():p.grad /= self.batch_update_sizeself.curr_update_size = 0self.optimizer.step()self.optimizer.zero_grad()# by settiing the result on the Future object, all previous# requests expecting this updated model will be notified and# the their responses will be sent accordingly.fut.set_result(self.model)self.future_model = torch.futures.Future()return fut
对于训练器,它们都使用来自 PS 的相同参数集进行初始化。在每次迭代中,每个训练器首先运行前向和反向传递以在本地生成梯度。然后,每个训练器使用 RPC 报告其梯度给 PS,并通过相同 RPC 请求的返回值获取更新后的参数。在训练器的实现中,目标函数是否标记为 @rpc.functions.async_execution 都没有区别。训练器只需使用 rpc_sync 调用 update_and_fetch_model,它将在训练器上阻塞,直到更新的模型返回。
batch_size, image_w, image_h = 20, 64, 64class Trainer(object):def __init__(self, ps_rref):self.ps_rref, self.loss_fn = ps_rref, torch.nn.MSELoss()self.one_hot_indices = torch.LongTensor(batch_size) \.random_(0, num_classes) \.view(batch_size, 1)def get_next_batch(self):for _ in range(6):inputs = torch.randn(batch_size, 3, image_w, image_h)labels = torch.zeros(batch_size, num_classes) \.scatter_(1, self.one_hot_indices, 1)yield inputs.cuda(), labels.cuda()def train(self):name = rpc.get_worker_info().name# get initial model parametersm = self.ps_rref.rpc_sync().get_model().cuda()# start trainingfor inputs, labels in self.get_next_batch():self.loss_fn(m(inputs), labels).backward()m = rpc.rpc_sync(self.ps_rref.owner(),BatchUpdateParameterServer.update_and_fetch_model,args=(self.ps_rref, [p.grad for p in m.cpu().parameters()]),).cuda()
本教程跳过了启动多个进程的代码,请参考 examples 仓库获取完整实现。请注意,可以在不使用 @rpc.functions.async_execution 装饰器的情况下实现批处理。但是,这将要求在 PS 上阻塞更多的 RPC 线程,或者使用另一轮 RPC 来获取更新的模型,后者将增加代码复杂性和通信开销。
本节使用一个简单的参数服务器训练示例来展示如何使用 @rpc.functions.async_execution 装饰器实现批处理 RPC 应用程序。在下一节中,我们将使用批处理重新实现之前的 使用分布式 RPC 框架入门 教程中的强化学习示例,并展示其对训练速度的影响。
批处理 CartPole 求解器
本节使用OpenAI Gym中的 CartPole-v1 作为示例,展示批处理 RPC 的性能影响。请注意,由于目标是演示@rpc.functions.async_execution的用法,而不是构建最佳 CartPole 求解器或解决最多不同的 RL 问题,我们使用非常简单的策略和奖励计算策略,并专注于多观察者单代理批处理 RPC 实现。我们使用与之前教程相似的Policy模型,如下所示。与之前的教程相比,不同之处在于其构造函数接受一个额外的batch参数,该参数控制F.softmax的dim参数,因为在批处理中,forward函数中的x参数包含来自多个观察者的状态,因此维度需要适当更改。其他一切保持不变。
import argparse
import torch.nn as nn
import torch.nn.functional as Fparser = argparse.ArgumentParser(description='PyTorch RPC Batch RL example')
parser.add_argument('--gamma', type=float, default=1.0, metavar='G',help='discount factor (default: 1.0)')
parser.add_argument('--seed', type=int, default=543, metavar='N',help='random seed (default: 543)')
parser.add_argument('--num-episode', type=int, default=10, metavar='E',help='number of episodes (default: 10)')
args = parser.parse_args()torch.manual_seed(args.seed)class Policy(nn.Module):def __init__(self, batch=True):super(Policy, self).__init__()self.affine1 = nn.Linear(4, 128)self.dropout = nn.Dropout(p=0.6)self.affine2 = nn.Linear(128, 2)self.dim = 2 if batch else 1def forward(self, x):x = self.affine1(x)x = self.dropout(x)x = F.relu(x)action_scores = self.affine2(x)return F.softmax(action_scores, dim=self.dim)
Observer的构造函数也相应地进行调整。它还接受一个batch参数,用于控制它使用哪个Agent函数来选择动作。在批处理模式下,它调用Agent上的select_action_batch函数,该函数将很快被介绍,并且此函数将被装饰为@rpc.functions.async_execution。
import gym
import torch.distributed.rpc as rpcclass Observer:def __init__(self, batch=True):self.id = rpc.get_worker_info().id - 1self.env = gym.make('CartPole-v1')self.env.seed(args.seed)self.select_action = Agent.select_action_batch if batch else Agent.select_action
与之前的教程使用分布式 RPC 框架入门相比,观察者的行为有些不同。它不是在环境停止时退出,而是在每个情节中始终运行n_steps次迭代。当环境返回时,观察者简单地重置环境并重新开始。通过这种设计,代理将从每个观察者接收固定数量的状态,因此可以将它们打包到固定大小的张量中。在每一步中,Observer使用 RPC 将其状态发送给Agent,并通过返回值获取动作。在每个情节结束时,它将所有步骤的奖励返回给Agent。请注意,run_episode函数将由Agent使用 RPC 调用。因此,此函数中的rpc_sync调用将是一个嵌套的 RPC 调用。我们也可以将此函数标记为@rpc.functions.async_execution,以避免在Observer上阻塞一个线程。然而,由于瓶颈是Agent而不是Observer,在Observer进程上阻塞一个线程应该是可以接受的。
import torchclass Observer:...def run_episode(self, agent_rref, n_steps):state, ep_reward = self.env.reset(), NUM_STEPSrewards = torch.zeros(n_steps)start_step = 0for step in range(n_steps):state = torch.from_numpy(state).float().unsqueeze(0)# send the state to the agent to get an actionaction = rpc.rpc_sync(agent_rref.owner(),self.select_action,args=(agent_rref, self.id, state))# apply the action to the environment, and get the rewardstate, reward, done, _ = self.env.step(action)rewards[step] = rewardif done or step + 1 >= n_steps:curr_rewards = rewards[start_step:(step + 1)]R = 0for i in range(curr_rewards.numel() -1, -1, -1):R = curr_rewards[i] + args.gamma * Rcurr_rewards[i] = Rstate = self.env.reset()if start_step == 0:ep_reward = min(ep_reward, step - start_step + 1)start_step = step + 1return [rewards, ep_reward]
Agent的构造函数还接受一个batch参数,用于控制如何对动作概率进行批处理。在批处理模式下,saved_log_probs包含一个张量列表,其中每个张量包含一个步骤中所有观察者的动作概率。没有批处理时,saved_log_probs是一个字典,其中键是观察者 ID,值是该观察者的动作概率列表。
import threading
from torch.distributed.rpc import RRefclass Agent:def __init__(self, world_size, batch=True):self.ob_rrefs = []self.agent_rref = RRef(self)self.rewards = {}self.policy = Policy(batch).cuda()self.optimizer = optim.Adam(self.policy.parameters(), lr=1e-2)self.running_reward = 0for ob_rank in range(1, world_size):ob_info = rpc.get_worker_info(OBSERVER_NAME.format(ob_rank))self.ob_rrefs.append(rpc.remote(ob_info, Observer, args=(batch,)))self.rewards[ob_info.id] = []self.states = torch.zeros(len(self.ob_rrefs), 1, 4)self.batch = batchself.saved_log_probs = [] if batch else {k:[] for k in range(len(self.ob_rrefs))}self.future_actions = torch.futures.Future()self.lock = threading.Lock()self.pending_states = len(self.ob_rrefs)
非批处理的select_action简单地通过策略运行状态,保存动作概率,并立即将动作返回给观察者。
from torch.distributions import Categoricalclass Agent:...@staticmethoddef select_action(agent_rref, ob_id, state):self = agent_rref.local_value()probs = self.policy(state.cuda())m = Categorical(probs)action = m.sample()self.saved_log_probs[ob_id].append(m.log_prob(action))return action.item()
通过批处理,状态存储在一个二维张量self.states中,使用观察者 ID 作为行 ID。然后,它通过安装回调函数到批处理生成的self.future_actions Future对象来链接一个Future,该对象将用特定行索引填充,使用观察者的 ID。最后到达的观察者将所有批处理状态一次性通过策略运行,并相应地设置self.future_actions。当这发生时,所有安装在self.future_actions上的回调函数将被触发,它们的返回值将用于填充链接的Future对象,进而通知Agent为其他观察者之前的所有 RPC 请求准备和通信响应。
class Agent:...@staticmethod@rpc.functions.async_executiondef select_action_batch(agent_rref, ob_id, state):self = agent_rref.local_value()self.states[ob_id].copy_(state)future_action = self.future_actions.then(lambda future_actions: future_actions.wait()[ob_id].item())with self.lock:self.pending_states -= 1if self.pending_states == 0:self.pending_states = len(self.ob_rrefs)probs = self.policy(self.states.cuda())m = Categorical(probs)actions = m.sample()self.saved_log_probs.append(m.log_prob(actions).t()[0])future_actions = self.future_actionsself.future_actions = torch.futures.Future()future_actions.set_result(actions.cpu())return future_action
现在让我们定义不同的 RPC 函数如何被串联在一起。Agent 控制每一集的执行。它首先使用 rpc_async 在所有观察者上启动集,并阻塞在返回的 futures 上,这些 futures 将填充观察者奖励。请注意,下面的代码使用 RRef 辅助函数 ob_rref.rpc_async() 在拥有 ob_rref RRef 的所有者上启动 run_episode 函数,并提供参数。然后将保存的动作概率和返回的观察者奖励转换为预期的数据格式,并启动训练步骤。最后,它重置所有状态并返回当前集的奖励。这个函数是运行一个集的入口点。
class Agent:...def run_episode(self, n_steps=0):futs = []for ob_rref in self.ob_rrefs:# make async RPC to kick off an episode on all observersfuts.append(ob_rref.rpc_async().run_episode(self.agent_rref, n_steps))# wait until all obervers have finished this episoderets = torch.futures.wait_all(futs)rewards = torch.stack([ret[0] for ret in rets]).cuda().t()ep_rewards = sum([ret[1] for ret in rets]) / len(rets)# stack saved probs into one tensorif self.batch:probs = torch.stack(self.saved_log_probs)else:probs = [torch.stack(self.saved_log_probs[i]) for i in range(len(rets))]probs = torch.stack(probs)policy_loss = -probs * rewards / len(rets)policy_loss.sum().backward()self.optimizer.step()self.optimizer.zero_grad()# reset variablesself.saved_log_probs = [] if self.batch else {k:[] for k in range(len(self.ob_rrefs))}self.states = torch.zeros(len(self.ob_rrefs), 1, 4)# calculate running rewardsself.running_reward = 0.5 * ep_rewards + 0.5 * self.running_rewardreturn ep_rewards, self.running_reward
代码的其余部分是正常的进程启动和日志记录,与其他 RPC 教程类似。在本教程中,所有观察者都 passively 等待来自 agent 的命令。请参考 examples 仓库获取完整的实现。
def run_worker(rank, world_size, n_episode, batch, print_log=True):os.environ['MASTER_ADDR'] = 'localhost'os.environ['MASTER_PORT'] = '29500'if rank == 0:# rank0 is the agentrpc.init_rpc(AGENT_NAME, rank=rank, world_size=world_size)agent = Agent(world_size, batch)for i_episode in range(n_episode):last_reward, running_reward = agent.run_episode(n_steps=NUM_STEPS)if print_log:print('Episode {}\tLast reward: {:.2f}\tAverage reward: {:.2f}'.format(i_episode, last_reward, running_reward))else:# other ranks are the observerrpc.init_rpc(OBSERVER_NAME.format(rank), rank=rank, world_size=world_size)# observers passively waiting for instructions from agentsrpc.shutdown()def main():for world_size in range(2, 12):delays = []for batch in [True, False]:tik = time.time()mp.spawn(run_worker,args=(world_size, args.num_episode, batch),nprocs=world_size,join=True)tok = time.time()delays.append(tok - tik)print(f"{world_size}, {delays[0]}, {delays[1]}")if __name__ == '__main__':main()
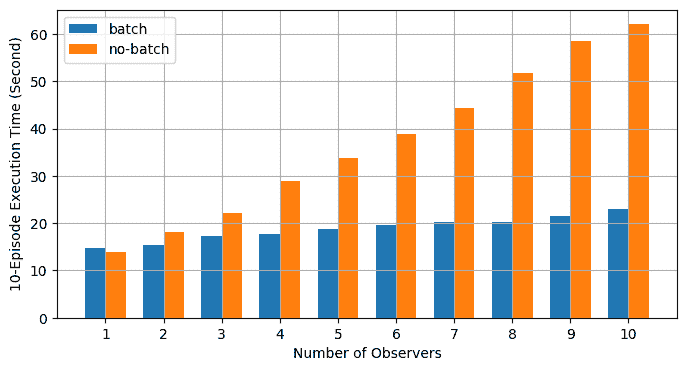
批处理 RPC 有助于将动作推断整合为更少的 CUDA 操作,从而减少摊销开销。上面的 main 函数在批处理和非批处理模式下运行相同的代码,使用不同数量的观察者,范围从 1 到 10。下面的图表显示了使用默认参数值时不同世界大小的执行时间。结果证实了我们的预期,批处理有助于加快训练速度。
了解更多
-
批量更新参数服务器源代码
-
批处理 CartPole 求解器
-
分布式自动微分
-
分布式管道并行
将分布式 DataParallel 与分布式 RPC 框架结合起来
原文:
pytorch.org/tutorials/advanced/rpc_ddp_tutorial.html译者:飞龙
协议:CC BY-NC-SA 4.0
作者:Pritam Damania 和 Yi Wang
注意
 在github中查看和编辑本教程。
本教程使用一个简单的示例来演示如何将DistributedDataParallel(DDP)与Distributed RPC framework结合起来,以将分布式数据并行与分布式模型并行结合起来训练一个简单的模型。示例的源代码可以在这里找到。
之前的教程,Getting Started With Distributed Data Parallel和Getting Started with Distributed RPC Framework,分别描述了如何执行分布式数据并行和分布式模型并行训练。尽管如此,有几种训练范式可能需要结合这两种技术。例如:
-
如果我们的模型有一个稀疏部分(大型嵌入表)和一个稠密部分(FC 层),我们可能希望将嵌入表放在参数服务器上,并使用DistributedDataParallel将 FC 层复制到多个训练器上。Distributed RPC framework可用于在参数服务器上执行嵌入查找。
-
启用混合并行,如PipeDream论文中所述。我们可以使用Distributed RPC framework将模型的阶段在多个工作节点上进行流水线处理,并使用DistributedDataParallel复制每个阶段(如果需要)。
在本教程中,我们将涵盖上述第 1 种情况。在我们的设置中,总共有 4 个工作节点:
-
1 个主节点,负责在参数服务器上创建一个嵌入表(nn.EmbeddingBag)。主节点还驱动两个训练器的训练循环。
-
1 个参数服务器,基本上在内存中保存嵌入表,并响应来自主节点和训练器的 RPC。
-
2 个训练器,它们存储一个在它们之间复制的 FC 层(nn.Linear),使用DistributedDataParallel。这些训练器还负责执行前向传播、反向传播和优化器步骤。
整个训练过程如下执行:
-
主节点创建一个RemoteModule,在参数服务器上保存一个嵌入表。
-
然后主节点启动训练循环,并将远程模块传递给训练器。
-
训练器创建一个
HybridModel,首先使用主节点提供的远程模块进行嵌入查找,然后执行包含在 DDP 中的 FC 层。 -
训练器执行模型的前向传播,并使用损失执行反向传播,使用Distributed Autograd。
-
在反向传播的过程中,首先计算 FC 层的梯度,然后通过 DDP 中的 allreduce 同步到所有训练器。
-
接下来,Distributed Autograd 将梯度传播到参数服务器,更新嵌入表的梯度。
-
最后,使用Distributed Optimizer来更新所有参数。
注意
如果结合 DDP 和 RPC,应始终使用Distributed Autograd进行反向传播。
现在,让我们逐个详细介绍每个部分。首先,我们需要在进行任何训练之前设置所有的 worker。我们创建 4 个进程,其中 rank 0 和 1 是我们的 Trainer,rank 2 是主节点,rank 3 是参数服务器。
我们使用 TCP init_method 在所有 4 个 worker 上初始化 RPC 框架。一旦 RPC 初始化完成,主节点会创建一个远程模块,该模块在参数服务器上保存了一个EmbeddingBag层,使用RemoteModule。然后主节点循环遍历每个 Trainer,并通过调用rpc_async在每个 Trainer 上调用_run_trainer来启动训练循环。最后,主节点在退出之前等待所有训练完成。
Trainer 首先为 DDP 初始化一个 world_size=2(两个 Trainer)的ProcessGroup,使用init_process_group。接下来,他们使用 TCP init_method 初始化 RPC 框架。请注意,RPC 初始化和 ProcessGroup 初始化中的端口是不同的。这是为了避免两个框架初始化之间的端口冲突。初始化完成后,Trainer 只需等待来自主节点的_run_trainer RPC。
参数服务器只是初始化 RPC 框架并等待来自 Trainer 和主节点的 RPC。
def run_worker(rank, world_size):r"""A wrapper function that initializes RPC, calls the function, and shuts downRPC."""# We need to use different port numbers in TCP init_method for init_rpc and# init_process_group to avoid port conflicts.rpc_backend_options = TensorPipeRpcBackendOptions()rpc_backend_options.init_method = "tcp://localhost:29501"# Rank 2 is master, 3 is ps and 0 and 1 are trainers.if rank == 2:rpc.init_rpc("master",rank=rank,world_size=world_size,rpc_backend_options=rpc_backend_options,)remote_emb_module = RemoteModule("ps",torch.nn.EmbeddingBag,args=(NUM_EMBEDDINGS, EMBEDDING_DIM),kwargs={"mode": "sum"},)# Run the training loop on trainers.futs = []for trainer_rank in [0, 1]:trainer_name = "trainer{}".format(trainer_rank)fut = rpc.rpc_async(trainer_name, _run_trainer, args=(remote_emb_module, trainer_rank))futs.append(fut)# Wait for all training to finish.for fut in futs:fut.wait()elif rank <= 1:# Initialize process group for Distributed DataParallel on trainers.dist.init_process_group(backend="gloo", rank=rank, world_size=2, init_method="tcp://localhost:29500")# Initialize RPC.trainer_name = "trainer{}".format(rank)rpc.init_rpc(trainer_name,rank=rank,world_size=world_size,rpc_backend_options=rpc_backend_options,)# Trainer just waits for RPCs from master.else:rpc.init_rpc("ps",rank=rank,world_size=world_size,rpc_backend_options=rpc_backend_options,)# parameter server do nothingpass# block until all rpcs finishrpc.shutdown()if __name__ == "__main__":# 2 trainers, 1 parameter server, 1 master.world_size = 4mp.spawn(run_worker, args=(world_size,), nprocs=world_size, join=True)
在讨论 Trainer 的细节之前,让我们先介绍一下 Trainer 使用的HybridModel。如下所述,HybridModel是使用一个远程模块进行初始化的,该远程模块在参数服务器上保存了一个嵌入表(remote_emb_module)和用于 DDP 的device。模型的初始化将一个nn.Linear层包装在 DDP 中,以便在所有 Trainer 之间复制和同步这个层。
模型的前向方法非常简单。它使用 RemoteModule 的forward在参数服务器上进行嵌入查找,并将其输出传递给 FC 层。
class HybridModel(torch.nn.Module):r"""The model consists of a sparse part and a dense part.1) The dense part is an nn.Linear module that is replicated across all trainers using DistributedDataParallel.2) The sparse part is a Remote Module that holds an nn.EmbeddingBag on the parameter server.This remote model can get a Remote Reference to the embedding table on the parameter server."""def __init__(self, remote_emb_module, device):super(HybridModel, self).__init__()self.remote_emb_module = remote_emb_moduleself.fc = DDP(torch.nn.Linear(16, 8).cuda(device), device_ids=[device])self.device = devicedef forward(self, indices, offsets):emb_lookup = self.remote_emb_module.forward(indices, offsets)return self.fc(emb_lookup.cuda(self.device))
接下来,让我们看一下 Trainer 的设置。Trainer 首先使用一个远程模块创建上述HybridModel,该远程模块在参数服务器上保存了嵌入表和自己的 rank。
现在,我们需要获取一个 RRefs 列表,其中包含我们想要使用DistributedOptimizer进行优化的所有参数。为了从参数服务器检索嵌入表的参数,我们可以调用 RemoteModule 的remote_parameters,这个方法基本上遍历了嵌入表的所有参数,并返回一个 RRefs 列表。Trainer 通过 RPC 在参数服务器上调用这个方法,以接收到所需参数的 RRefs 列表。由于 DistributedOptimizer 始终需要一个要优化的参数的 RRefs 列表,我们需要为 FC 层的本地参数创建 RRefs。这是通过遍历model.fc.parameters(),为每个参数创建一个 RRef,并将其附加到从remote_parameters()返回的列表中完成的。请注意,我们不能使用model.parameters(),因为它会递归调用model.remote_emb_module.parameters(),这是RemoteModule不支持的。
最后,我们使用所有的 RRefs 创建我们的 DistributedOptimizer,并定义一个 CrossEntropyLoss 函数。
def _run_trainer(remote_emb_module, rank):r"""Each trainer runs a forward pass which involves an embedding lookup on theparameter server and running nn.Linear locally. During the backward pass,DDP is responsible for aggregating the gradients for the dense part(nn.Linear) and distributed autograd ensures gradients updates arepropagated to the parameter server."""# Setup the model.model = HybridModel(remote_emb_module, rank)# Retrieve all model parameters as rrefs for DistributedOptimizer.# Retrieve parameters for embedding table.model_parameter_rrefs = model.remote_emb_module.remote_parameters()# model.fc.parameters() only includes local parameters.# NOTE: Cannot call model.parameters() here,# because this will call remote_emb_module.parameters(),# which supports remote_parameters() but not parameters().for param in model.fc.parameters():model_parameter_rrefs.append(RRef(param))# Setup distributed optimizeropt = DistributedOptimizer(optim.SGD,model_parameter_rrefs,lr=0.05,)criterion = torch.nn.CrossEntropyLoss()
现在我们准备介绍在每个训练器上运行的主要训练循环。get_next_batch只是一个辅助函数,用于生成训练的随机输入和目标。我们对多个 epochs 和每个 batch 运行训练循环:
-
为分布式自动求导设置Distributed Autograd Context。
-
运行模型的前向传播并检索其输出。
-
使用损失函数基于我们的输出和目标计算损失。
-
使用分布式自动求导来执行使用损失函数的分布式反向传播。
-
最后,运行一个分布式优化器步骤来优化所有参数。
def get_next_batch(rank):for _ in range(10):num_indices = random.randint(20, 50)indices = torch.LongTensor(num_indices).random_(0, NUM_EMBEDDINGS)# Generate offsets.offsets = []start = 0batch_size = 0while start < num_indices:offsets.append(start)start += random.randint(1, 10)batch_size += 1offsets_tensor = torch.LongTensor(offsets)target = torch.LongTensor(batch_size).random_(8).cuda(rank)yield indices, offsets_tensor, target# Train for 100 epochsfor epoch in range(100):# create distributed autograd contextfor indices, offsets, target in get_next_batch(rank):with dist_autograd.context() as context_id:output = model(indices, offsets)loss = criterion(output, target)# Run distributed backward passdist_autograd.backward(context_id, [loss])# Tun distributed optimizeropt.step(context_id)# Not necessary to zero grads as each iteration creates a different# distributed autograd context which hosts different gradsprint("Training done for epoch {}".format(epoch))
整个示例的源代码可以在这里找到。
使用管道并行性训练 Transformer 模型
原文:
pytorch.org/tutorials/intermediate/pipeline_tutorial.html译者:飞龙
协议:CC BY-NC-SA 4.0
注意
点击这里下载完整示例代码
作者:Pritam Damania
本教程演示了如何使用管道并行性在多个 GPU 上训练大型 Transformer 模型。本教程是使用 nn.Transformer 和 TorchText 进行序列到序列建模教程的延伸,并扩展了相同的模型,以演示如何使用管道并行性来训练 Transformer 模型。
先决条件:
- 管道并行性
- 使用 nn.Transformer 和 TorchText 进行序列到序列建模
定义模型
在本教程中,我们将把一个 Transformer 模型分成两个 GPU,并使用管道并行性来训练模型。该模型与使用 nn.Transformer 和 TorchText 进行序列到序列建模教程中使用的模型完全相同,但被分成两个阶段。最大数量的参数属于nn.TransformerEncoder层。nn.TransformerEncoder本身由nlayers个nn.TransformerEncoderLayer组成。因此,我们的重点是nn.TransformerEncoder,我们将模型分成一半的nn.TransformerEncoderLayer在一个 GPU 上,另一半在另一个 GPU 上。为此,我们将Encoder和Decoder部分提取到单独的模块中,然后构建一个代表原始 Transformer 模块的nn.Sequential。
import sys
import math
import torch
import torch.nn as nn
import torch.nn.functional as F
import tempfile
from torch.nn import TransformerEncoder, TransformerEncoderLayerif sys.platform == 'win32':print('Windows platform is not supported for pipeline parallelism')sys.exit(0)
if torch.cuda.device_count() < 2:print('Need at least two GPU devices for this tutorial')sys.exit(0)class Encoder(nn.Module):def __init__(self, ntoken, ninp, dropout=0.5):super(Encoder, self).__init__()self.pos_encoder = PositionalEncoding(ninp, dropout)self.encoder = nn.Embedding(ntoken, ninp)self.ninp = ninpself.init_weights()def init_weights(self):initrange = 0.1self.encoder.weight.data.uniform_(-initrange, initrange)def forward(self, src):# Need (S, N) format for encoder.src = src.t()src = self.encoder(src) * math.sqrt(self.ninp)return self.pos_encoder(src)class Decoder(nn.Module):def __init__(self, ntoken, ninp):super(Decoder, self).__init__()self.decoder = nn.Linear(ninp, ntoken)self.init_weights()def init_weights(self):initrange = 0.1self.decoder.bias.data.zero_()self.decoder.weight.data.uniform_(-initrange, initrange)def forward(self, inp):# Need batch dimension first for output of pipeline.return self.decoder(inp).permute(1, 0, 2)
PositionalEncoding模块注入了关于序列中标记的相对或绝对位置的一些信息。位置编码与嵌入具有相同的维度,因此可以将两者相加。在这里,我们使用不同频率的sine和cosine函数。
class PositionalEncoding(nn.Module):def __init__(self, d_model, dropout=0.1, max_len=5000):super(PositionalEncoding, self).__init__()self.dropout = nn.Dropout(p=dropout)pe = torch.zeros(max_len, d_model)position = torch.arange(0, max_len, dtype=torch.float).unsqueeze(1)div_term = torch.exp(torch.arange(0, d_model, 2).float() * (-math.log(10000.0) / d_model))pe[:, 0::2] = torch.sin(position * div_term)pe[:, 1::2] = torch.cos(position * div_term)pe = pe.unsqueeze(0).transpose(0, 1)self.register_buffer('pe', pe)def forward(self, x):x = x + self.pe[:x.size(0), :]return self.dropout(x)
加载和批处理数据
训练过程使用了来自torchtext的 Wikitext-2 数据集。要访问 torchtext 数据集,请按照github.com/pytorch/data上的说明安装 torchdata。
vocab 对象是基于训练数据集构建的,并用于将标记数值化为张量。从顺序数据开始,batchify()函数将数据集排列成列,将数据分成大小为batch_size的批次后,修剪掉任何剩余的标记。例如,以字母表作为序列(总长度为 26)和批次大小为 4,我们将字母表分成长度为 6 的 4 个序列:
[ A B C … X Y Z ] ⇒ [ [ A B C D E F ] [ G H I J K L ] [ M N O P Q R ] [ S T U V W X ] ] \begin{bmatrix} \text{A} & \text{B} & \text{C} & \ldots & \text{X} & \text{Y} & \text{Z} \end{bmatrix} \Rightarrow \begin{bmatrix} \begin{bmatrix}\text{A} \\ \text{B} \\ \text{C} \\ \text{D} \\ \text{E} \\ \text{F}\end{bmatrix} & \begin{bmatrix}\text{G} \\ \text{H} \\ \text{I} \\ \text{J} \\ \text{K} \\ \text{L}\end{bmatrix} & \begin{bmatrix}\text{M} \\ \text{N} \\ \text{O} \\ \text{P} \\ \text{Q} \\ \text{R}\end{bmatrix} & \begin{bmatrix}\text{S} \\ \text{T} \\ \text{U} \\ \text{V} \\ \text{W} \\ \text{X}\end{bmatrix} \end{bmatrix} [ABC…XYZ]⇒ ABCDEF GHIJKL MNOPQR STUVWX
模型将这些列视为独立的,这意味着无法学习G和F之间的依赖关系,但可以实现更高效的批处理。
import torch
from torchtext.datasets import WikiText2
from torchtext.data.utils import get_tokenizer
from torchtext.vocab import build_vocab_from_iteratortrain_iter = WikiText2(split='train')
tokenizer = get_tokenizer('basic_english')
vocab = build_vocab_from_iterator(map(tokenizer, train_iter), specials=["<unk>"])
vocab.set_default_index(vocab["<unk>"])def data_process(raw_text_iter):data = [torch.tensor(vocab(tokenizer(item)), dtype=torch.long) for item in raw_text_iter]return torch.cat(tuple(filter(lambda t: t.numel() > 0, data)))train_iter, val_iter, test_iter = WikiText2()
train_data = data_process(train_iter)
val_data = data_process(val_iter)
test_data = data_process(test_iter)device = torch.device("cuda")def batchify(data, bsz):# Divide the dataset into ``bsz`` parts.nbatch = data.size(0) // bsz# Trim off any extra elements that wouldn't cleanly fit (remainders).data = data.narrow(0, 0, nbatch * bsz)# Evenly divide the data across the ``bsz` batches.data = data.view(bsz, -1).t().contiguous()return data.to(device)batch_size = 20
eval_batch_size = 10
train_data = batchify(train_data, batch_size)
val_data = batchify(val_data, eval_batch_size)
test_data = batchify(test_data, eval_batch_size)
生成输入和目标序列的函数
get_batch()函数为 transformer 模型生成输入和目标序列。它将源数据细分为长度为bptt的块。对于语言建模任务,模型需要以下单词作为Target。例如,对于bptt值为 2,我们会得到i = 0 时的以下两个变量:
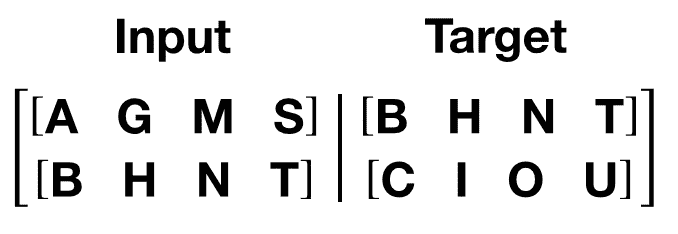
应该注意到,块沿着维度 0,与 Transformer 模型中的S维度一致。批量维度N沿着维度 1。
bptt = 25
def get_batch(source, i):seq_len = min(bptt, len(source) - 1 - i)data = source[i:i+seq_len]target = source[i+1:i+1+seq_len].view(-1)# Need batch dimension first for pipeline parallelism.return data.t(), target
模型规模和 Pipe 初始化
为了展示使用管道并行性训练大型 Transformer 模型,我们适当地扩展了 Transformer 层。我们使用了 4096 的嵌入维度,4096 的隐藏大小,16 个注意力头和 12 个总的 Transformer 层(nn.TransformerEncoderLayer)。这创建了一个拥有**~14 亿**参数的模型。
我们需要初始化RPC 框架,因为 Pipe 依赖于 RPC 框架通过RRef进行跨主机流水线扩展。我们需要仅使用单个 worker 初始化 RPC 框架,因为我们使用单个进程来驱动多个 GPU。
然后,在一个 GPU 上初始化 8 个 transformer 层,并在另一个 GPU 上初始化 8 个 transformer 层。
注意
为了提高效率,我们确保传递给Pipe的nn.Sequential只包含两个元素(对应两个 GPU),这允许 Pipe 仅使用两个分区并避免任何跨分区的开销。
ntokens = len(vocab) # the size of vocabulary
emsize = 4096 # embedding dimension
nhid = 4096 # the dimension of the feedforward network model in ``nn.TransformerEncoder``
nlayers = 12 # the number of ``nn.TransformerEncoderLayer`` in ``nn.TransformerEncoder``
nhead = 16 # the number of heads in the Multihead Attention models
dropout = 0.2 # the dropout valuefrom torch.distributed import rpc
tmpfile = tempfile.NamedTemporaryFile()
rpc.init_rpc(name="worker",rank=0,world_size=1,rpc_backend_options=rpc.TensorPipeRpcBackendOptions(init_method="file://{}".format(tmpfile.name),# Specifying _transports and _channels is a workaround and we no longer# will have to specify _transports and _channels for PyTorch# versions >= 1.8.1_transports=["ibv", "uv"],_channels=["cuda_ipc", "cuda_basic"],)
)num_gpus = 2
partition_len = ((nlayers - 1) // num_gpus) + 1# Add encoder in the beginning.
tmp_list = [Encoder(ntokens, emsize, dropout).cuda(0)]
module_list = []# Add all the necessary transformer blocks.
for i in range(nlayers):transformer_block = TransformerEncoderLayer(emsize, nhead, nhid, dropout)if i != 0 and i % (partition_len) == 0:module_list.append(nn.Sequential(*tmp_list))tmp_list = []device = i // (partition_len)tmp_list.append(transformer_block.to(device))# Add decoder in the end.
tmp_list.append(Decoder(ntokens, emsize).cuda(num_gpus - 1))
module_list.append(nn.Sequential(*tmp_list))from torch.distributed.pipeline.sync import Pipe# Build the pipeline.
chunks = 8
model = Pipe(torch.nn.Sequential(*module_list), chunks = chunks)def get_total_params(module: torch.nn.Module):total_params = 0for param in module.parameters():total_params += param.numel()return total_paramsprint ('Total parameters in model: {:,}'.format(get_total_params(model)))
Total parameters in model: 1,444,261,998
运行模型
CrossEntropyLoss用于跟踪损失,SGD实现随机梯度下降方法作为优化器。初始学习率设置为 5.0。StepLR用于通过 epoch 调整学习率。在训练期间,我们使用nn.utils.clip_grad_norm_函数将所有梯度一起缩放,以防止梯度爆炸。
criterion = nn.CrossEntropyLoss()
lr = 5.0 # learning rate
optimizer = torch.optim.SGD(model.parameters(), lr=lr)
scheduler = torch.optim.lr_scheduler.StepLR(optimizer, 1.0, gamma=0.95)import time
def train():model.train() # Turn on the train modetotal_loss = 0.start_time = time.time()ntokens = len(vocab)# Train only for 50 batches to keep script execution time low.nbatches = min(50 * bptt, train_data.size(0) - 1)for batch, i in enumerate(range(0, nbatches, bptt)):data, targets = get_batch(train_data, i)optimizer.zero_grad()# Since the Pipe is only within a single host and process the ``RRef``# returned by forward method is local to this node and can simply# retrieved via ``RRef.local_value()``.output = model(data).local_value()# Need to move targets to the device where the output of the# pipeline resides.loss = criterion(output.view(-1, ntokens), targets.cuda(1))loss.backward()torch.nn.utils.clip_grad_norm_(model.parameters(), 0.5)optimizer.step()total_loss += loss.item()log_interval = 10if batch % log_interval == 0 and batch > 0:cur_loss = total_loss / log_intervalelapsed = time.time() - start_timeprint('| epoch {:3d} | {:5d}/{:5d} batches | ''lr {:02.2f} | ms/batch {:5.2f} | ''loss {:5.2f} | ppl {:8.2f}'.format(epoch, batch, nbatches // bptt, scheduler.get_lr()[0],elapsed * 1000 / log_interval,cur_loss, math.exp(cur_loss)))total_loss = 0start_time = time.time()def evaluate(eval_model, data_source):eval_model.eval() # Turn on the evaluation modetotal_loss = 0.ntokens = len(vocab)# Evaluate only for 50 batches to keep script execution time low.nbatches = min(50 * bptt, data_source.size(0) - 1)with torch.no_grad():for i in range(0, nbatches, bptt):data, targets = get_batch(data_source, i)output = eval_model(data).local_value()output_flat = output.view(-1, ntokens)# Need to move targets to the device where the output of the# pipeline resides.total_loss += len(data) * criterion(output_flat, targets.cuda(1)).item()return total_loss / (len(data_source) - 1)
循环迭代。如果验证损失是迄今为止最好的,则保存模型。每个 epoch 后调整学习率。
best_val_loss = float("inf")
epochs = 3 # The number of epochs
best_model = Nonefor epoch in range(1, epochs + 1):epoch_start_time = time.time()train()val_loss = evaluate(model, val_data)print('-' * 89)print('| end of epoch {:3d} | time: {:5.2f}s | valid loss {:5.2f} | ''valid ppl {:8.2f}'.format(epoch, (time.time() - epoch_start_time),val_loss, math.exp(val_loss)))print('-' * 89)if val_loss < best_val_loss:best_val_loss = val_lossbest_model = modelscheduler.step()
/opt/conda/envs/py_3.10/lib/python3.10/site-packages/torch/optim/lr_scheduler.py:402: UserWarning:To get the last learning rate computed by the scheduler, please use `get_last_lr()`.| epoch   1 |    10/   50 batches | lr 5.00 | ms/batch 2955.60 | loss 51.97 | ppl 37278238304344674926592.00
| epoch   1 |    20/   50 batches | lr 5.00 | ms/batch 2626.09 | loss 39.16 | ppl 101468412802272112.00
| epoch   1 |    30/   50 batches | lr 5.00 | ms/batch 2627.16 | loss 45.74 | ppl 73373605537851539456.00
| epoch   1 |    40/   50 batches | lr 5.00 | ms/batch 2632.18 | loss 39.05 | ppl 90831844662671120.00
-----------------------------------------------------------------------------------------
| end of epoch   1 | time: 148.93s | valid loss  1.59 | valid ppl     4.92
-----------------------------------------------------------------------------------------
| epoch   2 |    10/   50 batches | lr 4.51 | ms/batch 2894.00 | loss 38.92 | ppl 79792098193225456.00
| epoch   2 |    20/   50 batches | lr 4.51 | ms/batch 2632.71 | loss 33.86 | ppl 508484255367480.44
| epoch   2 |    30/   50 batches | lr 4.51 | ms/batch 2630.00 | loss 29.47 | ppl 6267626426289.98
| epoch   2 |    40/   50 batches | lr 4.51 | ms/batch 2630.24 | loss 20.07 | ppl 521065165.54
-----------------------------------------------------------------------------------------
| end of epoch   2 | time: 148.40s | valid loss  0.54 | valid ppl     1.71
-----------------------------------------------------------------------------------------
| epoch   3 |    10/   50 batches | lr 4.29 | ms/batch 2891.16 | loss 13.75 | ppl 935925.21
| epoch   3 |    20/   50 batches | lr 4.29 | ms/batch 2629.50 | loss 10.74 | ppl 46322.74
| epoch   3 |    30/   50 batches | lr 4.29 | ms/batch 2629.95 | loss 10.97 | ppl 58152.80
| epoch   3 |    40/   50 batches | lr 4.29 | ms/batch 2629.52 | loss 11.29 | ppl 80130.60
-----------------------------------------------------------------------------------------
| end of epoch   3 | time: 148.36s | valid loss  0.24 | valid ppl     1.27
-----------------------------------------------------------------------------------------
用测试数据集评估模型
应用最佳模型来检查与测试数据集的结果。
test_loss = evaluate(best_model, test_data)
print('=' * 89)
print('| End of training | test loss {:5.2f} | test ppl {:8.2f}'.format(test_loss, math.exp(test_loss)))
print('=' * 89)
=========================================================================================
| End of training | test loss  0.21 | test ppl     1.23
=========================================================================================
脚本的总运行时间:(8 分钟 5.064 秒)
下载 Python 源代码:pipeline_tutorial.py
下载 Jupyter 笔记本:pipeline_tutorial.ipynb
由 Sphinx-Gallery 生成的图库
使用 Distributed Data Parallel 和 Pipeline Parallelism 训练 Transformer 模型
原文:
pytorch.org/tutorials/advanced/ddp_pipeline.html译者:飞龙
协议:CC BY-NC-SA 4.0
注意
点击这里下载完整示例代码
作者:Pritam Damania
本教程演示了如何使用Distributed Data Parallel和Pipeline Parallelism在多个 GPU 上训练大型 Transformer 模型。本教程是使用 nn.Transformer 和 TorchText 进行序列到序列建模教程的延伸,扩展了相同的模型以演示如何使用 Distributed Data Parallel 和 Pipeline Parallelism 来训练 Transformer 模型。
先决条件:
- 管道并行
- 使用 nn.Transformer 和 TorchText 进行序列到序列建模
- 使用分布式数据并行开始
定义模型
PositionalEncoding 模块向序列中的令牌注入了一些关于相对或绝对位置的信息。位置编码与嵌入的维度相同,因此可以将两者相加。在这里,我们使用不同频率的 sine 和 cosine 函数。
import sys
import os
import math
import torch
import torch.nn as nn
import torch.nn.functional as F
import tempfile
from torch.nn import TransformerEncoder, TransformerEncoderLayerclass PositionalEncoding(nn.Module):def __init__(self, d_model, dropout=0.1, max_len=5000):super(PositionalEncoding, self).__init__()self.dropout = nn.Dropout(p=dropout)pe = torch.zeros(max_len, d_model)position = torch.arange(0, max_len, dtype=torch.float).unsqueeze(1)div_term = torch.exp(torch.arange(0, d_model, 2).float() * (-math.log(10000.0) / d_model))pe[:, 0::2] = torch.sin(position * div_term)pe[:, 1::2] = torch.cos(position * div_term)pe = pe.unsqueeze(0).transpose(0, 1)self.pe = nn.Parameter(pe, requires_grad=False)def forward(self, x):x = x + self.pe[:x.size(0), :]return self.dropout(x)
在本教程中,我们将一个 Transformer 模型分割到两个 GPU 上,并使用管道并行来训练模型。除此之外,我们使用Distributed Data Parallel来训练这个管道的两个副本。我们有一个进程在 GPU 0 和 1 之间驱动一个管道,另一个进程在 GPU 2 和 3 之间驱动一个管道。然后,这两个进程使用 Distributed Data Parallel 来训练这两个副本。模型与使用 nn.Transformer 和 TorchText 进行序列到序列建模教程中使用的模型完全相同,但被分成了两个阶段。最多的参数属于nn.TransformerEncoder层。nn.TransformerEncoder本身由nlayers个nn.TransformerEncoderLayer组成。因此,我们的重点是nn.TransformerEncoder,我们将模型分割成一半的nn.TransformerEncoderLayer在一个 GPU 上,另一半在另一个 GPU 上。为此,我们将Encoder和Decoder部分提取到单独的模块中,然后构建一个代表原始 Transformer 模块的nn.Sequential。
if sys.platform == 'win32':print('Windows platform is not supported for pipeline parallelism')sys.exit(0)
if torch.cuda.device_count() < 4:print('Need at least four GPU devices for this tutorial')sys.exit(0)class Encoder(nn.Module):def __init__(self, ntoken, ninp, dropout=0.5):super(Encoder, self).__init__()self.pos_encoder = PositionalEncoding(ninp, dropout)self.encoder = nn.Embedding(ntoken, ninp)self.ninp = ninpself.init_weights()def init_weights(self):initrange = 0.1self.encoder.weight.data.uniform_(-initrange, initrange)def forward(self, src):# Need (S, N) format for encoder.src = src.t()src = self.encoder(src) * math.sqrt(self.ninp)return self.pos_encoder(src)class Decoder(nn.Module):def __init__(self, ntoken, ninp):super(Decoder, self).__init__()self.decoder = nn.Linear(ninp, ntoken)self.init_weights()def init_weights(self):initrange = 0.1self.decoder.bias.data.zero_()self.decoder.weight.data.uniform_(-initrange, initrange)def forward(self, inp):# Need batch dimension first for output of pipeline.return self.decoder(inp).permute(1, 0, 2)
启动多个进程进行训练
我们启动两个进程,每个进程在两个 GPU 上驱动自己的管道。对于每个进程,都会执行run_worker。
def run_worker(rank, world_size):
加载和批处理数据
训练过程使用了来自torchtext的 Wikitext-2 数据集。要访问 torchtext 数据集,请按照github.com/pytorch/data上的说明安装 torchdata。
vocab 对象是基于训练数据集构建的,并用于将令牌数值化为张量。从顺序数据开始,batchify() 函数将数据集排列成列,将数据分成大小为 batch_size 的批次后,修剪掉任何剩余的令牌。例如,对于字母表作为序列(总长度为 26)和批次大小为 4,我们将字母表分成长度为 6 的 4 个序列:
[ A B C … X Y Z ] ⇒ [ [ A B C D E F ] [ G H I J K L ] [ M N O P Q R ] [ S T U V W X ] ] \begin{bmatrix} \text{A} & \text{B} & \text{C} & \ldots & \text{X} & \text{Y} & \text{Z} \end{bmatrix} \Rightarrow \begin{bmatrix} \begin{bmatrix}\text{A} \\ \text{B} \\ \text{C} \\ \text{D} \\ \text{E} \\ \text{F}\end{bmatrix} & \begin{bmatrix}\text{G} \\ \text{H} \\ \text{I} \\ \text{J} \\ \text{K} \\ \text{L}\end{bmatrix} & \begin{bmatrix}\text{M} \\ \text{N} \\ \text{O} \\ \text{P} \\ \text{Q} \\ \text{R}\end{bmatrix} & \begin{bmatrix}\text{S} \\ \text{T} \\ \text{U} \\ \text{V} \\ \text{W} \\ \text{X}\end{bmatrix} \end{bmatrix} [ABC…XYZ]⇒ ABCDEF GHIJKL MNOPQR STUVWX
这些列被模型视为独立的,这意味着G和F之间的依赖关系无法被学习,但可以实现更高效的批处理。
# In 'run_worker'def print_with_rank(msg):print('[RANK {}]: {}'.format(rank, msg))from torchtext.datasets import WikiText2from torchtext.data.utils import get_tokenizerfrom torchtext.vocab import build_vocab_from_iteratortrain_iter = WikiText2(split='train')tokenizer = get_tokenizer('basic_english')vocab = build_vocab_from_iterator(map(tokenizer, train_iter), specials=["<unk>"])vocab.set_default_index(vocab["<unk>"])def data_process(raw_text_iter):data = [torch.tensor(vocab(tokenizer(item)), dtype=torch.long) for item in raw_text_iter]return torch.cat(tuple(filter(lambda t: t.numel() > 0, data)))train_iter, val_iter, test_iter = WikiText2()train_data = data_process(train_iter)val_data = data_process(val_iter)test_data = data_process(test_iter)device = torch.device(2 * rank)def batchify(data, bsz, rank, world_size, is_train=False):# Divide the dataset into ``bsz`` parts.nbatch = data.size(0) // bsz# Trim off any extra elements that wouldn't cleanly fit (remainders).data = data.narrow(0, 0, nbatch * bsz)# Evenly divide the data across the ``bsz`` batches.data = data.view(bsz, -1).t().contiguous()# Divide the data across the ranks only for training data.if is_train:data_per_rank = data.size(0) // world_sizedata = data[rank * data_per_rank : (rank + 1) * data_per_rank]return data.to(device)batch_size = 20eval_batch_size = 10train_data = batchify(train_data, batch_size, rank, world_size, True)val_data = batchify(val_data, eval_batch_size, rank, world_size)test_data = batchify(test_data, eval_batch_size, rank, world_size)
生成输入和目标序列的函数
get_batch()函数为变压器模型生成输入和目标序列。它将源数据细分为长度为bptt的块。对于语言建模任务,模型需要以下单词作为目标。例如,对于bptt值为 2,我们会得到以下两个变量,对于i = 0:
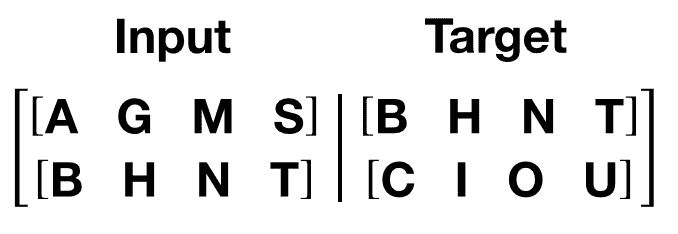
值得注意的是,块沿着维度 0,与变压器模型中的S维度一致。批处理维度N沿着维度 1。
# In 'run_worker'bptt = 35def get_batch(source, i):seq_len = min(bptt, len(source) - 1 - i)data = source[i:i+seq_len]target = source[i+1:i+1+seq_len].view(-1)# Need batch dimension first for pipeline parallelism.return data.t(), target
模型规模和 Pipe 初始化
为了演示使用管道并行性训练大型 Transformer 模型,我们适当扩展 Transformer 层。我们使用 4096 的嵌入维度,4096 的隐藏大小,16 个注意力头和 8 个总变压器层(nn.TransformerEncoderLayer)。这创建了一个具有**~10 亿**参数的模型。
我们需要初始化RPC 框架,因为 Pipe 依赖于 RPC 框架通过RRef允许未来扩展到跨主机流水线。我们需要使用单个 worker 初始化 RPC 框架,因为我们使用单个进程驱动多个 GPU。
然后,在一个 GPU 上初始化 8 个变压器层,并在另一个 GPU 上初始化 8 个变压器层。一个管道设置在 GPU 0 和 1 之间,另一个设置在 GPU 2 和 3 之间。然后使用DistributedDataParallel复制这两个管道。
# In 'run_worker'ntokens = len(vocab) # the size of vocabularyemsize = 4096 # embedding dimensionnhid = 4096 # the dimension of the feedforward network model in ``nn.TransformerEncoder``nlayers = 8 # the number of ``nn.TransformerEncoderLayer`` in ``nn.TransformerEncoder``nhead = 16 # the number of heads in the Multihead Attention modelsdropout = 0.2 # the dropout valuefrom torch.distributed import rpctmpfile = tempfile.NamedTemporaryFile()rpc.init_rpc(name="worker",rank=0,world_size=1,rpc_backend_options=rpc.TensorPipeRpcBackendOptions(init_method="file://{}".format(tmpfile.name),# Specifying _transports and _channels is a workaround and we no longer# will have to specify _transports and _channels for PyTorch# versions >= 1.8.1_transports=["ibv", "uv"],_channels=["cuda_ipc", "cuda_basic"],))# Number of GPUs for model parallelism.num_gpus = 2partition_len = ((nlayers - 1) // num_gpus) + 1# Add encoder in the beginning.tmp_list = [Encoder(ntokens, emsize, dropout).cuda(2 * rank)]module_list = []# Add all the necessary transformer blocks.for i in range(nlayers):transformer_block = TransformerEncoderLayer(emsize, nhead, nhid, dropout)if i != 0 and i % (partition_len) == 0:module_list.append(nn.Sequential(*tmp_list))tmp_list = []device = i // (partition_len)tmp_list.append(transformer_block.to(2 * rank + device))# Add decoder in the end.tmp_list.append(Decoder(ntokens, emsize).cuda(2 * rank + num_gpus - 1))module_list.append(nn.Sequential(*tmp_list))# Need to use 'checkpoint=never' since as of PyTorch 1.8, Pipe checkpointing# doesn't work with DDP.from torch.distributed.pipeline.sync import Pipechunks = 8model = Pipe(torch.nn.Sequential(*module_list), chunks = chunks, checkpoint="never")# Initialize process group and wrap model in DDP.from torch.nn.parallel import DistributedDataParallelimport torch.distributed as distos.environ['MASTER_ADDR'] = 'localhost'os.environ['MASTER_PORT'] = '29500'dist.init_process_group(backend="nccl", rank=rank, world_size=world_size)model = DistributedDataParallel(model)def get_total_params(module: torch.nn.Module):total_params = 0for param in module.parameters():total_params += param.numel()return total_paramsprint_with_rank('Total parameters in model: {:,}'.format(get_total_params(model)))
运行模型
交叉熵损失用于跟踪损失,SGD实现随机梯度下降方法作为优化器。初始学习率设置为 5.0。StepLR用于通过 epochs 调整学习率。在训练过程中,我们使用nn.utils.clip_grad_norm_函数将所有梯度一起缩放,以防止梯度爆炸。
# In 'run_worker'criterion = nn.CrossEntropyLoss()lr = 5.0 # learning rateoptimizer = torch.optim.SGD(model.parameters(), lr=lr)scheduler = torch.optim.lr_scheduler.StepLR(optimizer, 1.0, gamma=0.95)import timedef train():model.train() # Turn on the train modetotal_loss = 0.start_time = time.time()ntokens = len(vocab)# Train only for 50 batches to keep script execution time low.nbatches = min(50 * bptt, train_data.size(0) - 1)for batch, i in enumerate(range(0, nbatches, bptt)):data, targets = get_batch(train_data, i)optimizer.zero_grad()# Since the Pipe is only within a single host and process the ``RRef``# returned by forward method is local to this node and can simply# retrieved via ``RRef.local_value()``.output = model(data).local_value()# Need to move targets to the device where the output of the# pipeline resides.loss = criterion(output.view(-1, ntokens), targets.cuda(2 * rank + 1))loss.backward()torch.nn.utils.clip_grad_norm_(model.parameters(), 0.5)optimizer.step()total_loss += loss.item()log_interval = 10if batch % log_interval == 0 and batch > 0:cur_loss = total_loss / log_intervalelapsed = time.time() - start_timeprint_with_rank('| epoch {:3d} | {:5d}/{:5d} batches | ''lr {:02.2f} | ms/batch {:5.2f} | ''loss {:5.2f} | ppl {:8.2f}'.format(epoch, batch, nbatches // bptt, scheduler.get_last_lr()[0],elapsed * 1000 / log_interval,cur_loss, math.exp(cur_loss)))total_loss = 0start_time = time.time()def evaluate(eval_model, data_source):eval_model.eval() # Turn on the evaluation modetotal_loss = 0.ntokens = len(vocab)# Evaluate only for 50 batches to keep script execution time low.nbatches = min(50 * bptt, data_source.size(0) - 1)with torch.no_grad():for i in range(0, nbatches, bptt):data, targets = get_batch(data_source, i)output = eval_model(data).local_value()output_flat = output.view(-1, ntokens)# Need to move targets to the device where the output of the# pipeline resides.total_loss += len(data) * criterion(output_flat, targets.cuda(2 * rank + 1)).item()return total_loss / (len(data_source) - 1)
循环遍历 epochs。如果验证损失是迄今为止看到的最佳损失,则保存模型。每个 epoch 后调整学习率。
# In 'run_worker'best_val_loss = float("inf")epochs = 3 # The number of epochsbest_model = Nonefor epoch in range(1, epochs + 1):epoch_start_time = time.time()train()val_loss = evaluate(model, val_data)print_with_rank('-' * 89)print_with_rank('| end of epoch {:3d} | time: {:5.2f}s | valid loss {:5.2f} | ''valid ppl {:8.2f}'.format(epoch, (time.time() - epoch_start_time),val_loss, math.exp(val_loss)))print_with_rank('-' * 89)if val_loss < best_val_loss:best_val_loss = val_lossbest_model = modelscheduler.step()
用测试数据集评估模型
将最佳模型应用于测试数据集以检查结果。
# In 'run_worker'test_loss = evaluate(best_model, test_data)print_with_rank('=' * 89)print_with_rank('| End of training | test loss {:5.2f} | test ppl {:8.2f}'.format(test_loss, math.exp(test_loss)))print_with_rank('=' * 89)# Main execution
import torch.multiprocessing as mpif __name__=="__main__":world_size = 2mp.spawn(run_worker, args=(world_size, ), nprocs=world_size, join=True)
输出
[RANK 0]: | epoch   1 |    10/   50 batches | lr 5.00 | ms/batch 778.97 | loss 43.31 | ppl 6432469059895903232.00
[RANK 1]: | epoch   1 |    10/   50 batches | lr 5.00 | ms/batch 778.90 | loss 44.50 | ppl 21245447128217366528.00
[RANK 0]: | epoch   1 |    20/   50 batches | lr 5.00 | ms/batch 699.89 | loss 44.50 | ppl 21176949187407757312.00
[RANK 1]: | epoch   1 |    20/   50 batches | lr 5.00 | ms/batch 699.87 | loss 44.62 | ppl 23975861229620961280.00
[RANK 0]: | epoch   1 |    30/   50 batches | lr 5.00 | ms/batch 698.86 | loss 41.62 | ppl 1193312915629888256.00
[RANK 1]: | epoch   1 |    30/   50 batches | lr 5.00 | ms/batch 698.87 | loss 40.69 | ppl 471605759847546240.00
[RANK 0]: | epoch   1 |    40/   50 batches | lr 5.00 | ms/batch 698.34 | loss 45.20 | ppl 42812308420836458496.00
[RANK 1]: | epoch   1 |    40/   50 batches | lr 5.00 | ms/batch 698.33 | loss 45.68 | ppl 68839569686012223488.00
[RANK 1]: -----------------------------------------------------------------------------------------
[RANK 1]: | end of epoch   1 | time: 40.08s | valid loss  0.80 | valid ppl     2.22
[RANK 1]: -----------------------------------------------------------------------------------------
[RANK 0]: -----------------------------------------------------------------------------------------
[RANK 0]: | end of epoch   1 | time: 40.09s | valid loss  0.80 | valid ppl     2.22
[RANK 0]: -----------------------------------------------------------------------------------------
[RANK 0]: | epoch   2 |    10/   50 batches | lr 4.75 | ms/batch 768.51 | loss 36.34 | ppl 6063529544668166.00
[RANK 1]: | epoch   2 |    10/   50 batches | lr 4.75 | ms/batch 769.23 | loss 37.41 | ppl 17651211266236086.00
[RANK 0]: | epoch   2 |    20/   50 batches | lr 4.75 | ms/batch 699.57 | loss 28.97 | ppl 3798441739584.11
[RANK 1]: | epoch   2 |    20/   50 batches | lr 4.75 | ms/batch 699.56 | loss 29.28 | ppl 5203636967575.47
[RANK 0]: | epoch   2 |    30/   50 batches | lr 4.75 | ms/batch 699.04 | loss 28.43 | ppl 2212498693571.25
[RANK 1]: | epoch   2 |    30/   50 batches | lr 4.75 | ms/batch 699.05 | loss 28.33 | ppl 2015144761281.48
[RANK 0]: | epoch   2 |    40/   50 batches | lr 4.75 | ms/batch 699.10 | loss 23.30 | ppl 13121380184.92
[RANK 1]: | epoch   2 |    40/   50 batches | lr 4.75 | ms/batch 699.09 | loss 23.41 | ppl 14653799192.87
[RANK 0]: -----------------------------------------------------------------------------------------
[RANK 0]: | end of epoch   2 | time: 39.97s | valid loss  0.24 | valid ppl     1.27
[RANK 0]: -----------------------------------------------------------------------------------------
[RANK 1]: -----------------------------------------------------------------------------------------
[RANK 1]: | end of epoch   2 | time: 39.98s | valid loss  0.24 | valid ppl     1.27
[RANK 1]: -----------------------------------------------------------------------------------------
[RANK 0]: | epoch   3 |    10/   50 batches | lr 4.51 | ms/batch 769.36 | loss 12.80 | ppl 361681.11
[RANK 1]: | epoch   3 |    10/   50 batches | lr 4.51 | ms/batch 768.97 | loss 12.57 | ppl 287876.61
[RANK 0]: | epoch   3 |    20/   50 batches | lr 4.51 | ms/batch 698.27 | loss 12.01 | ppl 164364.60
[RANK 1]: | epoch   3 |    20/   50 batches | lr 4.51 | ms/batch 698.30 | loss 11.98 | ppl 159095.89
[RANK 0]: | epoch   3 |    30/   50 batches | lr 4.51 | ms/batch 697.75 | loss 10.90 | ppl 54261.91
[RANK 1]: | epoch   3 |    30/   50 batches | lr 4.51 | ms/batch 697.72 | loss 10.89 | ppl 53372.39
[RANK 0]: | epoch   3 |    40/   50 batches | lr 4.51 | ms/batch 699.49 | loss 10.78 | ppl 47948.35
[RANK 1]: | epoch   3 |    40/   50 batches | lr 4.51 | ms/batch 699.50 | loss 10.79 | ppl 48664.42
[RANK 0]: -----------------------------------------------------------------------------------------
[RANK 0]: | end of epoch   3 | time: 39.96s | valid loss  0.38 | valid ppl     1.46
[RANK 0]: -----------------------------------------------------------------------------------------
[RANK 1]: -----------------------------------------------------------------------------------------
[RANK 1]: | end of epoch   3 | time: 39.96s | valid loss  0.38 | valid ppl     1.46
[RANK 1]: -----------------------------------------------------------------------------------------
[RANK 0]: =========================================================================================
[RANK 0]: | End of training | test loss  0.33 | test ppl     1.39
[RANK 0]: =========================================================================================
[RANK 1]: =========================================================================================
[RANK 1]: | End of training | test loss  0.33 | test ppl     1.39
[RANK 1]: =========================================================================================
脚本的总运行时间:(0 分钟 0.000 秒)
下载 Python 源代码:ddp_pipeline.py
下载 Jupyter 笔记本:ddp_pipeline.ipynb
Sphinx-Gallery 生成的图库
使用 Join 上下文管理器进行不均匀输入的分布式训练
原文:
pytorch.org/tutorials/advanced/generic_join.html译者:飞龙
协议:CC BY-NC-SA 4.0
作者:Andrew Gu
注意
 在github中查看并编辑此教程。
注意
Join在 PyTorch 1.10 中作为原型功能引入。此 API 可能会更改。
在本教程中,您将看到:
-
Join上下文管理器的概述。
-
如何使用
DistributedDataParallel与上下文管理器的示例。 -
如何使用上下文管理器与
DistributedDataParallel和ZeroRedundancyOptimizer的示例。 -
将关键字参数传递给上下文管理器的示例。
-
深入了解Join上下文管理器的工作原理。
-
一个示例,展示如何使一个玩具类与上下文管理器兼容。
要求
-
PyTorch 1.10+
-
使用分布式数据并行开始
-
使用 ZeroRedundancyOptimizer 对优化器状态进行分片
什么是Join?
在使用分布式数据并行开始 - 基本用例中,您看到了使用DistributedDataParallel执行数据并行训练的一般框架。这隐式地在每次反向传播中安排所有规约,以在各个 rank 之间同步梯度。这种集体通信需要来自进程组中所有 rank 的参与,因此,如果一个 rank 的输入较少,那么其他 rank 将挂起或出错(取决于后端)。更一般地说,对于执行每次迭代同步集体通信的任何类,这个问题都会持续存在。
Join是一个上下文管理器,用于围绕您的每个 rank 训练循环,以便在不均匀输入下进行训练。上下文管理器允许提前耗尽输入的 rank(即join提前)来模拟尚未加入的 rank 执行的集体通信。通信被模拟的方式由钩子指定。
使用Join与DistributedDataParallel
PyTorch 的DistributedDataParallel与Join上下文管理器完全兼容。以下是一个示例用法:
import os
import torch
import torch.distributed as dist
import torch.multiprocessing as mp
from torch.distributed.algorithms.join import Join
from torch.nn.parallel import DistributedDataParallel as DDPBACKEND = "nccl"
WORLD_SIZE = 2
NUM_INPUTS = 5def worker(rank):os.environ['MASTER_ADDR'] = 'localhost'os.environ['MASTER_PORT'] = '29500'dist.init_process_group(BACKEND, rank=rank, world_size=WORLD_SIZE)model = DDP(torch.nn.Linear(1, 1).to(rank), device_ids=[rank])# Rank 1 gets one more input than rank 0inputs = [torch.tensor([1]).float() for _ in range(NUM_INPUTS + rank)]num_inputs = 0with Join([model]):for input in inputs:num_inputs += 1loss = model(input).sum()loss.backward()print(f"Rank {rank} has exhausted all {num_inputs} of its inputs!")def main():mp.spawn(worker, nprocs=WORLD_SIZE, join=True)if __name__ == "__main__":main()
这将产生以下输出(其中来自 rank 0 和 rank 1 的print()可能是任意顺序):
Rank 0 has exhausted all 5 of its inputs!
Rank 1 has exhausted all 6 of its inputs!
注意
DistributedDataParallel在引入这个通用的Join上下文管理器之前提供了自己的join()上下文管理器。在上面的示例中,使用with Join([model]):等同于使用with model.join():。现有的DistributedDataParallel.join()的一个限制是它不允许多个参与类,例如DistributedDataParallel和ZeroRedundancyOptimizer一起。
使用Join与DistributedDataParallel和ZeroRedundancyOptimizer
Join上下文管理器不仅适用于单个类,还适用于多个类一起。PyTorch 的ZeroRedundancyOptimizer也与上下文管理器兼容,因此,在这里,我们将检查如何修改之前的示例以同时使用DistributedDataParallel和ZeroRedundancyOptimizer:
from torch.distributed.optim import ZeroRedundancyOptimizer as ZeRO
from torch.optim import Adamdef worker(rank):os.environ['MASTER_ADDR'] = 'localhost'os.environ['MASTER_PORT'] = '29500'dist.init_process_group(BACKEND, rank=rank, world_size=WORLD_SIZE)model = DDP(torch.nn.Linear(1, 1).to(rank), device_ids=[rank])optim = ZeRO(model.parameters(), Adam, lr=0.01)# Rank 1 gets one more input than rank 0inputs = [torch.tensor([1]).float() for _ in range(NUM_INPUTS + rank)]num_inputs = 0# Pass both `model` and `optim` into `Join()`with Join([model, optim]):for input in inputs:num_inputs += 1loss = model(input).sum()loss.backward()optim.step()print(f"Rank {rank} has exhausted all {num_inputs} of its inputs!")
这将产生与之前相同的输出。显著的变化是额外将ZeroRedundancyOptimizer实例传递给Join()。
传递关键字参数
类可以提供关键字参数,在运行时修改它们在上下文管理器中的行为。例如,DistributedDataParallel提供了一个参数divide_by_initial_world_size,确定梯度是由初始世界大小还是有效世界大小(即非加入等级的数量)除以。这样的关键字参数可以直接传递到上下文管理器中。
with Join([model, optim], divide_by_initial_world_size=False):for input in inputs:...
警告
传递给上下文管理器的关键字参数在所有参与类之间共享。这不应该是一个限制,因为我们不希望出现多个Joinable需要相同参数的不同设置的情况。尽管如此,这是需要记住的一点。
Join是如何工作的?
现在我们已经看到了如何使用Join上下文管理器的一些初步示例,让我们深入了解它的工作原理。这将为您提供对其提供的全部功能的更深入了解,并为您准备好制作自己的自定义类。在这里,我们将介绍Join类以及支持类Joinable和JoinHook。
Joinable
首先,与Join上下文管理器兼容的类必须继承自抽象基类Joinable。特别是,Joinable必须实现:
join_hook(self, **kwargs) -> JoinHook
这将返回Joinable的JoinHook实例,确定加入的进程应如何模拟Joinable执行的每次迭代集体通信。
join_device(self) -> torch.device
这将返回一个设备,该设备将由Join上下文管理器用于执行集体通信,例如torch.device("cuda:0")或torch.device("cpu")。
join_process_group(self) -> ProcessGroup
这将返回要由Join上下文管理器用于执行集体通信的进程组。
特别是,join_device和join_process_group是必需的属性,以确保上下文管理器可以安排加入和未加入进程之间的集体通信。一个用法是使用全局归约在每次迭代中计算非加入进程的数量。另一个用法是实现throw_on_early_termination=True所需的机制,我们将在下面稍后解释。
DistributedDataParallel和ZeroRedundancyOptimizer已经继承自Joinable并实现了上述方法,这就是为什么我们可以直接在之前的示例中使用它们。
Joinable类应确保调用Joinable构造函数,因为它初始化了一个JoinConfig实例,该实例在上下文管理器内部用于确保正确性。这将保存在每个Joinable中作为一个字段_join_config。
JoinHook
接下来,让我们来分解JoinHook类。一个JoinHook提供了两个进入上下文管理器的入口点:
main_hook(self) -> None
这个钩子在每个已加入的等级中被重复调用,同时存在一个尚未加入的等级。它旨在模拟每个训练迭代中由Joinable执行的集体通信(例如,在一个前向传递、反向传递和优化器步骤中)。
post_hook(self, is_last_joiner: bool) -> None
这个钩子在所有等级都加入后被调用。它传递了一个额外的bool参数is_last_joiner,指示该等级是否是最后加入的等级之一。该参数可能对同步有用。
为了给出这些钩子可能看起来像什么的具体示例,ZeroRedundancyOptimizer提供的主要钩子每次执行一步优化器,因为加入的等级仍然负责更新和同步其参数的片段,DistributedDataParallel提供的后钩子将最终更新的模型从最后加入的等级之一广播到所有等级,以确保它在所有等级上都是相同的。
Join
最后,让我们看看这些如何适应 Join 类本身。
__init__(self, joinables: List[Joinable], enable: bool = True, throw_on_early_termination: bool = False)
正如我们在前面的示例中看到的,构造函数接受参与训练循环的 Joinable 类的列表。这些应该是在每次迭代中执行集体通信的类。
enable 是一个 bool,如果您知道不会有不均匀的输入,可以将其设置为 False,在这种情况下,上下文管理器类似于 contextlib.nullcontext() 变得无效。这也可能会禁用参与的 Joinable 中的与连接相关的计算。
throw_on_early_termination 是一个 bool,如果检测到不均匀的输入,可以将其设置为 True,以便每个等级在那一刻引发异常。这对于不符合上下文管理器要求的情况非常有用,这种情况最典型的是当来自不同类的集体通信可能任意交错时,例如在使用具有 SyncBatchNorm 层的模型时使用 DistributedDataParallel。在这种情况下,应将此参数设置为 True,以便应用逻辑可以捕获异常并确定如何继续。
-
核心逻辑发生在
__exit__()方法中,当存在未连接的等级时循环调用每个Joinable的主要钩子,然后一旦所有等级都加入,调用它们的后处理钩子。主要钩子和后处理钩子都按照传入的Joinable的顺序进行迭代。 -
上下文管理器需要来自未连接进程的心跳。因此,每个
Joinable类应在其每次迭代的集体通信之前调用Join.notify_join_context()。上下文管理器将确保只有第一个传入的Joinable实际发送心跳。
警告
如上所述关于 throw_on_early_termination,Join 上下文管理器与某些类的组合不兼容。Joinable 的 JoinHook 必须是可序列化的,因为每个钩子在继续下一个之前完全执行。换句话说,两个钩子不能重叠。此外,目前主要钩子和后处理钩子都按照相同的确定性顺序进行迭代。如果这看起来是一个主要限制,我们可以修改 API 以允许自定义排序。
使玩具类与 Join 兼容
由于上一节介绍了几个概念,让我们通过一个玩具示例来实践。在这里,我们将实现一个类,该类在其等级加入之前计算所有等级看到的输入数量。这应该提供一个基本的想法,说明您如何使自己的类与 Join 上下文管理器兼容。
具体来说,以下代码使每个等级打印出(1)在其加入之前所有等级看到的输入数量和(2)所有等级看到的总输入数量。
import os
import torch
import torch.distributed as dist
import torch.multiprocessing as mp
from torch.distributed.algorithms.join import Join, Joinable, JoinHookBACKEND = "nccl"
WORLD_SIZE = 2
NUM_INPUTS = 5class CounterJoinHook(JoinHook):r"""Join hook for :class:`Counter`.Arguments:counter (Counter): the :class:`Counter` object using this hook.sync_max_count (bool): whether to sync the max count once all ranksjoin."""def __init__(self,counter,sync_max_count):self.counter = counterself.sync_max_count = sync_max_countdef main_hook(self):r"""Shadows the counter's all-reduce by all-reducing a dim-1 zero tensor."""t = torch.zeros(1, device=self.counter.device)dist.all_reduce(t)def post_hook(self, is_last_joiner: bool):r"""Synchronizes the max count across all :class:`Counter` s if``sync_max_count=True``."""if not self.sync_max_count:returnrank = dist.get_rank(self.counter.process_group)common_rank = self.counter.find_common_rank(rank, is_last_joiner)if rank == common_rank:self.counter.max_count = self.counter.count.detach().clone()dist.broadcast(self.counter.max_count, src=common_rank)class Counter(Joinable):r"""Example :class:`Joinable` that counts the number of training iterationsthat it participates in."""def __init__(self, device, process_group):super(Counter, self).__init__()self.device = deviceself.process_group = process_groupself.count = torch.tensor([0], device=device).float()self.max_count = torch.tensor([0], device=device).float()def __call__(self):r"""Counts the number of inputs processed on this iteration by all ranksby all-reducing a dim-1 one tensor; increments its own internal count."""Join.notify_join_context(self)t = torch.ones(1, device=self.device).float()dist.all_reduce(t)self.count += tdef join_hook(self, **kwargs) -> JoinHook:r"""Return a join hook that shadows the all-reduce in :meth:`__call__`.This join hook supports the following keyword arguments:sync_max_count (bool, optional): whether to synchronize the maximumcount across all ranks once all ranks join; default is ``False``."""sync_max_count = kwargs.get("sync_max_count", False)return CounterJoinHook(self, sync_max_count)@propertydef join_device(self) -> torch.device:return self.device@propertydef join_process_group(self):return self.process_groupdef find_common_rank(self, rank, to_consider):r"""Returns the max rank of the ones to consider over the process group."""common_rank = torch.tensor([rank if to_consider else -1], device=self.device)dist.all_reduce(common_rank, op=dist.ReduceOp.MAX, group=self.process_group)common_rank = common_rank.item()return common_rankdef worker(rank):assert torch.cuda.device_count() >= WORLD_SIZEos.environ['MASTER_ADDR'] = 'localhost'os.environ['MASTER_PORT'] = '29500'dist.init_process_group(BACKEND, rank=rank, world_size=WORLD_SIZE)counter = Counter(torch.device(f"cuda:{rank}"), dist.group.WORLD)inputs = [torch.tensor([1]).float() for _ in range(NUM_INPUTS + rank)]with Join([counter], sync_max_count=True):for _ in inputs:counter()print(f"{int(counter.count.item())} inputs processed before rank {rank} joined!")print(f"{int(counter.max_count.item())} inputs processed across all ranks!")def main():mp.spawn(worker, nprocs=WORLD_SIZE, join=True)if __name__ == "__main__":main()
由于等级 0 看到 5 个输入,等级 1 看到 6 个输入,因此产生输出:
10 inputs processed before rank 0 joined!
11 inputs processed across all ranks!
11 inputs processed before rank 1 joined!
11 inputs processed across all ranks!
一些要强调的关键点:
-
Counter实例在每次迭代中执行一次全局归约,因此主要钩子也执行一次全局归约以进行遮蔽。 -
Counter类在其__call__()方法的开头调用Join.notify_join_context(),因为这是在其每次迭代的集体通信之前的位置(即其全局归约)。 -
is_last_joiner参数用于确定后处理中的广播源。 -
我们传递
sync_max_count关键字参数给上下文管理器,然后将其转发到Counter的连接钩子。



![[word] word页面视图放大后,影响打印吗? #笔记#学习方法](https://img-blog.csdnimg.cn/img_convert/2c901225278c93deb13e6db4722ee5af.jpeg)



![[Python] opencv - 什么是直方图?如何绘制图像的直方图?](https://img-blog.csdnimg.cn/direct/522a2286cfbb4a6c9042e6c9e2c15a6c.png)