本章概要
- 多表映射概念
- 对一映射
- 对多映射
- 多表映射总结
- 多表映射优化
- 多表映射总结
3.1 多表映射概念
- 多表查询结果映射思路
开发中有很多** 多表查询**需求,这种情况如何让进行处理?
MyBatis思想是:数据库不可能永远是你所想或所需的那个样子。
我们希望每个数据库都具备良好的第三范式或BCNF范式,可惜它们并不都是那样。
如果能有一种数据库映射模式,完美适配所有的应用程序查询需求,那就太好了,而ResultMap就是MyBatis就是完美答案。
官方例子:如何映射下面这个语句?
<!-- 非常复杂的语句 -->
<select id="selectBlogDetails" resultMap="detailedBlogResultMap">selectB.id as blog_id,B.title as blog_title,B.author_id as blog_author_id,A.id as author_id,A.username as author_username,A.password as author_password,A.email as author_email,A.bio as author_bio,A.favourite_section as author_favourite_section,P.id as post_id,P.blog_id as post_blog_id,P.author_id as post_author_id,P.created_on as post_created_on,P.section as post_section,P.subject as post_subject,P.draft as draft,P.body as post_body,C.id as comment_id,C.post_id as comment_post_id,C.name as comment_name,C.comment as comment_text,T.id as tag_id,T.name as tag_namefrom Blog Bleft outer join Author A on B.author_id = A.idleft outer join Post P on B.id = P.blog_idleft outer join Comment C on P.id = C.post_idleft outer join Post_Tag PT on PT.post_id = P.idleft outer join Tag T on PT.tag_id = T.idwhere B.id = #{id}
</select>
你可能想把它映射到一个智能的对象模型,这个对象表示了一篇博客,它由某位作者所写,有很多的博文,每篇博文有零或多条的评论和标签。 我们先来看看下面这个完整的例子,它是一个非常复杂的结果映射(假设作者,博客,博文,评论和标签都是类型别名)。
虽然它看起来令人望而生畏,但其实非常简单。
<!-- 非常复杂的结果映射 -->
<resultMap id="detailedBlogResultMap" type="Blog"><constructor><idArg column="blog_id" javaType="int"/></constructor><result property="title" column="blog_title"/><association property="author" javaType="Author"><id property="id" column="author_id"/><result property="username" column="author_username"/><result property="password" column="author_password"/><result property="email" column="author_email"/><result property="bio" column="author_bio"/><result property="favouriteSection" column="author_favourite_section"/></association><collection property="posts" ofType="Post"><id property="id" column="post_id"/><result property="subject" column="post_subject"/><association property="author" javaType="Author"/><collection property="comments" ofType="Comment"><id property="id" column="comment_id"/></collection><collection property="tags" ofType="Tag" ><id property="id" column="tag_id"/></collection></collection>
</resultMap>
现在可能看不懂,接下来要学习将多表查询结果使用
ResultMap标签映射到实体类对象上!
学习目标:
- 多表查询语句
- 使用多表结果承接实体类设计
- 使用
ResultMap完成多表结果映射
- 实体类设计方案
多表关系回顾:(双向查看)
- 一对一
- 夫妻关系,人和身份证号
- 一对多| 多对一
- 用户和用户的订单,锁和钥匙
- 多对多
- 老师和学生,部门和员工
- 实体类设计关系(查询):(单向查看)
- 对一 : 夫妻一方对应另一方,订单对应用户都是对一关系
实体类设计:对一关系下,类中只要包含单个对方对象类型属性即可!
例如:
public class Customer {private Integer customerId;private String customerName;}public class Order {private Integer orderId;private String orderName;private Customer customer;// 体现的是对一的关系}
- 对多: 用户对应的订单,讲师对应的学生或者学生对应的讲师都是对多关系
实体类设计:
对多关系下,类中只要包含对方类型集合属性即可!
public class Customer {private Integer customerId;private String customerName;private List<Order> orderList;// 体现的是对多的关系
}public class Order {private Integer orderId;private String orderName;private Customer customer;// 体现的是对一的关系}//查询客户和客户对应的订单集合  不要管!
多表结果实体类设计小技巧:
- 对一,属性中包含对方对象
- 对多,属性中包含对方对象集合
只有真实发生多表查询时,才需要设计和修改实体类,否则不提前设计和修改实体类!
无论多少张表联查,实体类设计都是两两考虑!
在查询映射的时候,只需要关注本次查询相关的属性!例如:查询订单和对应的客户,就不要关注客户中的订单集合!
- 多表映射案例准备
数据库:
CREATE TABLE `t_customer` (`customer_id` INT NOT NULL AUTO_INCREMENT, `customer_name` CHAR(100), PRIMARY KEY (`customer_id`) );CREATE TABLE `t_order` ( `order_id` INT NOT NULL AUTO_INCREMENT, `order_name` CHAR(100), `customer_id` INT, PRIMARY KEY (`order_id`) ); INSERT INTO `t_customer` (`customer_name`) VALUES ('c01');INSERT INTO `t_order` (`order_name`, `customer_id`) VALUES ('o1', '1');
INSERT INTO `t_order` (`order_name`, `customer_id`) VALUES ('o2', '1');
INSERT INTO `t_order` (`order_name`, `customer_id`) VALUES ('o3', '1');
实际开发时,一般在开发过程中,不给数据库表设置外键约束。
原因是避免调试不方便。
一般是功能开发完成,再加外键约束检查是否有bug。
实体类设计:
稍后会进行订单关联客户查询,也会进行客户关联订单查询,所以在这先练习设计
@Data
public class Customer {private Integer customerId;private String customerName;private List<Order> orderList;// 体现的是对多的关系}
@Data
public class Order {private Integer orderId;private String orderName;private Customer customer;// 体现的是对一的关系}
相关依赖
<dependency><groupId>org.projectlombok</groupId><artifactId>lombok</artifactId><version>1.18.28</version>
</dependency>
3.2 对一映射
- 需求说明
- 根据ID查询订单,以及订单关联的用户的信息!
OrderMapper接口
public interface OrderMapper {Order selectOrderWithCustomer(Integer orderId);
}
OrderMapper.xml配置文件
<!-- 创建resultMap实现“对一”关联关系映射 -->
<!-- id属性:通常设置为这个resultMap所服务的那条SQL语句的id加上“ResultMap” -->
<!-- type属性:要设置为这个resultMap所服务的那条SQL语句最终要返回的类型 -->
<resultMap id="selectOrderWithCustomerResultMap" type="order"><!-- 先设置Order自身属性和字段的对应关系 --><id column="order_id" property="orderId"/><result column="order_name" property="orderName"/><!-- 使用association标签配置“对一”关联关系 --><!-- property属性:在Order类中对一的一端进行引用时使用的属性名 --><!-- javaType属性:一的一端类的全类名 --><association property="customer" javaType="customer"><!-- 配置Customer类的属性和字段名之间的对应关系 --><id column="customer_id" property="customerId"/><result column="customer_name" property="customerName"/></association></resultMap><!-- Order selectOrderWithCustomer(Integer orderId); -->
<select id="selectOrderWithCustomer" resultMap="selectOrderWithCustomerResultMap">SELECT order_id,order_name,c.customer_id,customer_nameFROM t_order oLEFT JOIN t_customer cON o.customer_id=c.customer_idWHERE o.order_id=#{orderId}</select>
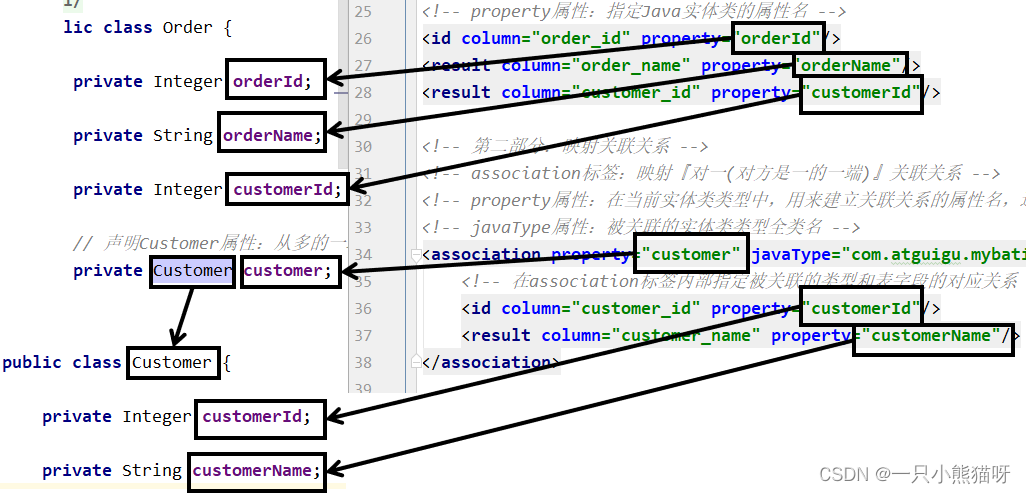
对应关系可以参考下图:

Mybatis全局注册mybatis-config.xml文件
<?xml version="1.0" encoding="UTF-8" ?>
<!DOCTYPE configurationPUBLIC "-//mybatis.org//DTD Config 3.0//EN""http://mybatis.org/dtd/mybatis-3-config.dtd">
<configuration><settings><!-- 开启驼峰式映射--><setting name="mapUnderscoreToCamelCase" value="true"/><!-- 开启logback日志输出-->
<!--        <setting name="logImpl" value="SLF4J"/>--></settings><typeAliases><!-- 给实体类起别名 --><package name="com.atguigu.entity"/></typeAliases><!-- environments表示配置Mybatis的开发环境,可以配置多个环境,在众多具体环境中,使用default属性指定实际运行时使用的环境。default属性的取值是environment标签的id属性的值。 --><environments default="development"><!-- environment表示配置Mybatis的一个具体的环境 --><environment id="development"><!-- Mybatis的内置的事务管理器 --><transactionManager type="JDBC"/><!-- 配置数据源 --><dataSource type="POOLED"><!-- 建立数据库连接的具体信息 --><property name="driver" value="com.mysql.cj.jdbc.Driver"/><property name="url" value="jdbc:mysql://localhost:3306/mybatis-example"/><property name="username" value="root"/><property name="password" value="root"/></dataSource></environment></environments><mappers><!-- Mapper注册:指定Mybatis映射文件的具体位置 --><!-- mapper标签:配置一个具体的Mapper映射文件 --><!-- resource属性:指定Mapper映射文件的实际存储位置,这里需要使用一个以类路径根目录为基准的相对路径 --><!--    对Maven工程的目录结构来说,resources目录下的内容会直接放入类路径,所以这里我们可以以resources目录为基准 --><mapper resource="mappers/OrderMapper.xml"/></mappers></configuration>
junit测试程序
public class MyBatisTest {private SqlSession session;// junit会在每一个@Test方法前执行@BeforeEach方法@BeforeEachpublic void init() throws IOException {session = new SqlSessionFactoryBuilder().build(Resources.getResourceAsStream("mybatis-config.xml")).openSession();}@Testpublic void testRelationshipToOne() {OrderMapper orderMapper = session.getMapper(OrderMapper.class);// 查询Order对象,检查是否同时查询了关联的Customer对象Order order = orderMapper.selectOrderWithCustomer(2);System.out.println(order);}// junit会在每一个@Test方法后执行@@AfterEach方法@AfterEachpublic void clear() {session.commit();session.close();}
}

- 关键词
- 在“对一”关联关系中,配置比较多,但是关键词就只有:
association和javaType
3.3 对多映射
- 需求说明
- 查询客户和客户关联的订单信息!
CustomerMapper接口
public interface CustomerMapper {Customer selectCustomerWithOrderList(Integer customerId);}
CustomerMapper.xml文件
<?xml version="1.0" encoding="UTF-8" ?>
<!DOCTYPE mapperPUBLIC "-//mybatis.org//DTD Mapper 3.0//EN""https://mybatis.org/dtd/mybatis-3-mapper.dtd">
<!-- namespace等于mapper接口类的全限定名,这样实现对应 -->
<mapper namespace="com.atguigu.mapper.CustomerMapper"><!-- 配置resultMap实现从Customer到OrderList的“对多”关联关系 --><resultMap id="selectCustomerWithOrderListResultMap" type="customer"><!-- 映射Customer本身的属性 --><id column="customer_id" property="customerId"/><result column="customer_name" property="customerName"/><!-- collection标签:映射“对多”的关联关系 --><!-- property属性:在Customer类中,关联“多”的一端的属性名 --><!-- ofType属性:集合属性中元素的类型 --><collection property="orderList" ofType="order"><!-- 映射Order的属性 --><id column="order_id" property="orderId"/><result column="order_name" property="orderName"/></collection></resultMap><!-- Customer selectCustomerWithOrderList(Integer customerId); --><select id="selectCustomerWithOrderList" resultMap="selectCustomerWithOrderListResultMap">SELECT c.customer_id,c.customer_name,o.order_id,o.order_nameFROM t_customer cLEFT JOIN t_order oON c.customer_id=o.customer_idWHERE c.customer_id=#{customerId}</select>
</mapper>
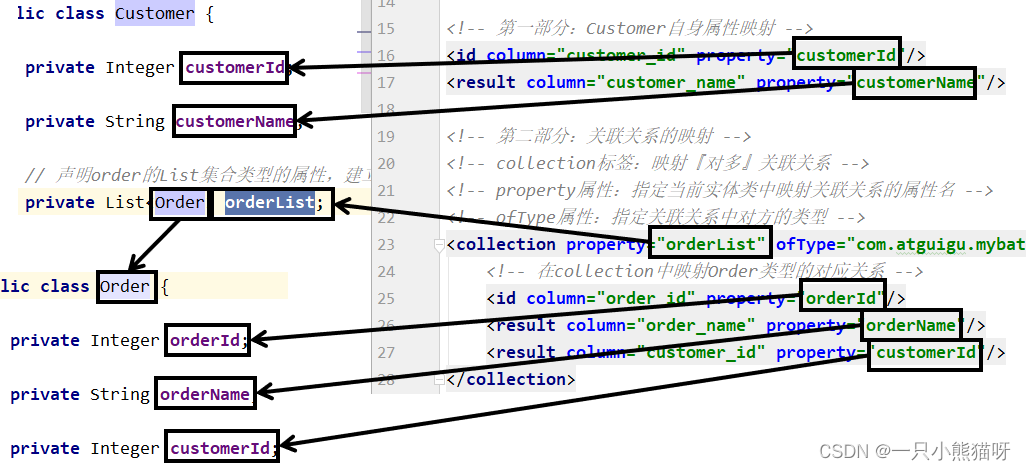
对应关系可以参考下图:

Mybatis全局注册mybatis-config.xml文件
<?xml version="1.0" encoding="UTF-8" ?>
<!DOCTYPE configurationPUBLIC "-//mybatis.org//DTD Config 3.0//EN""http://mybatis.org/dtd/mybatis-3-config.dtd">
<configuration><settings><!-- 开启驼峰式映射--><setting name="mapUnderscoreToCamelCase" value="true"/><!-- 开启logback日志输出--><!--        <setting name="logImpl" value="SLF4J"/>--></settings><typeAliases><!-- 给实体类起别名 --><package name="com.atguigu.entity"/></typeAliases><!-- environments表示配置Mybatis的开发环境,可以配置多个环境,在众多具体环境中,使用default属性指定实际运行时使用的环境。default属性的取值是environment标签的id属性的值。 --><environments default="development"><!-- environment表示配置Mybatis的一个具体的环境 --><environment id="development"><!-- Mybatis的内置的事务管理器 --><transactionManager type="JDBC"/><!-- 配置数据源 --><dataSource type="POOLED"><!-- 建立数据库连接的具体信息 --><property name="driver" value="com.mysql.cj.jdbc.Driver"/><property name="url" value="jdbc:mysql://localhost:3306/mybatis-example"/><property name="username" value="root"/><property name="password" value="root"/></dataSource></environment></environments><mappers><!-- Mapper注册:指定Mybatis映射文件的具体位置 --><!-- mapper标签:配置一个具体的Mapper映射文件 --><!-- resource属性:指定Mapper映射文件的实际存储位置,这里需要使用一个以类路径根目录为基准的相对路径 --><!--    对Maven工程的目录结构来说,resources目录下的内容会直接放入类路径,所以这里我们可以以resources目录为基准 --><mapper resource="mappers/OrderMapper.xml"/><mapper resource="mappers/CustomerMapper.xml"/></mappers></configuration>
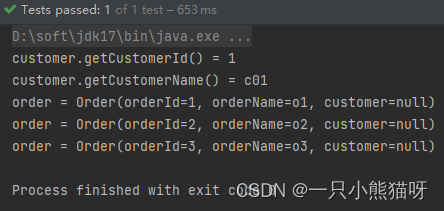
junit测试程序
@Test
public void testRelationshipToMulti() {CustomerMapper customerMapper = session.getMapper(CustomerMapper.class);// 查询Customer对象同时将关联的Order集合查询出来Customer customer = customerMapper.selectCustomerWithOrderList(1);System.out.println("customer.getCustomerId() = " + customer.getCustomerId());System.out.println("customer.getCustomerName() = " + customer.getCustomerName());List<Order> orderList = customer.getOrderList();for (Order order : orderList) {System.out.println("order = " + order);}
}

- 关键词
- 在“对多”关联关系中,同样有很多配置,但是提炼出来最关键的就是:“collection”和“ofType”
3.4 多表映射总结
3.4.1 多表映射优化
| setting属性 | 属性含义 | 可选值 | 默认值 |
|---|---|---|---|
| autoMappingBehavior | 指定 MyBatis 应如何自动映射列到字段或属性。 NONE 表示关闭自动映射;PARTIAL 只会自动映射没有定义嵌套结果映射的字段。 FULL 会自动映射任何复杂的结果集(无论是否嵌套)。 | NONE, PARTIAL, FULL | PARTIAL |
我们可以将autoMappingBehavior设置为full,进行多表resultMap映射的时候,可以省略符合列和属性命名映射规则(列名=属性名,或者开启驼峰映射也可以自定映射)的result标签!
修改
mybati-sconfig.xml:
<!--开启resultMap自动映射 -->
<setting name="autoMappingBehavior" value="FULL"/>
修改
CustomerMapper.xml
<resultMap id="customerMap" type="customer"><id property="customerId" column="customer_id" /><!-- 开启自动映射,并且开启驼峰式支持!可以省略 result!--><!--        <result property="customerName" column="customer_name" />--><collection property="orderList" ofType="order" ><id property="orderId" column="order_id" /><!--            <result property="orderName" column="order_name" />--></collection>
</resultMap>
<select id="selectCustomerWithOrderList" resultMap="customerMap">SELECT c.customer_id,c.customer_name,o.order_id,o.order_nameFROM t_customer cLEFT JOIN t_order oON c.customer_id=o.customer_idWHERE c.customer_id=#{customerId}
</select>
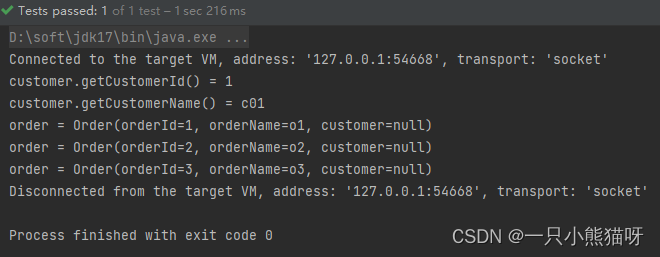
测试:
@Testpublic void testRelationshipToMulti() {CustomerMapper customerMapper = session.getMapper(CustomerMapper.class);// 查询Customer对象同时将关联的Order集合查询出来Customer customer = customerMapper.selectCustomerWithOrderList(1);System.out.println("customer.getCustomerId() = " + customer.getCustomerId());System.out.println("customer.getCustomerName() = " + customer.getCustomerName());List<Order> orderList = customer.getOrderList();for (Order order : orderList) {System.out.println("order = " + order);}}

3.4.2 多表映射总结
| 关联关系 | 配置项关键词 | 所在配置文件和具体位置 |
|---|---|---|
| 对一 | association标签、javaType属性、property属性 | Mapper配置文件中的resultMap标签内 |
| 对多 | collection标签、ofType属性、property属性 | Mapper配置文件中的resultMap标签内 |


)

后置钩子用法)


)


)
