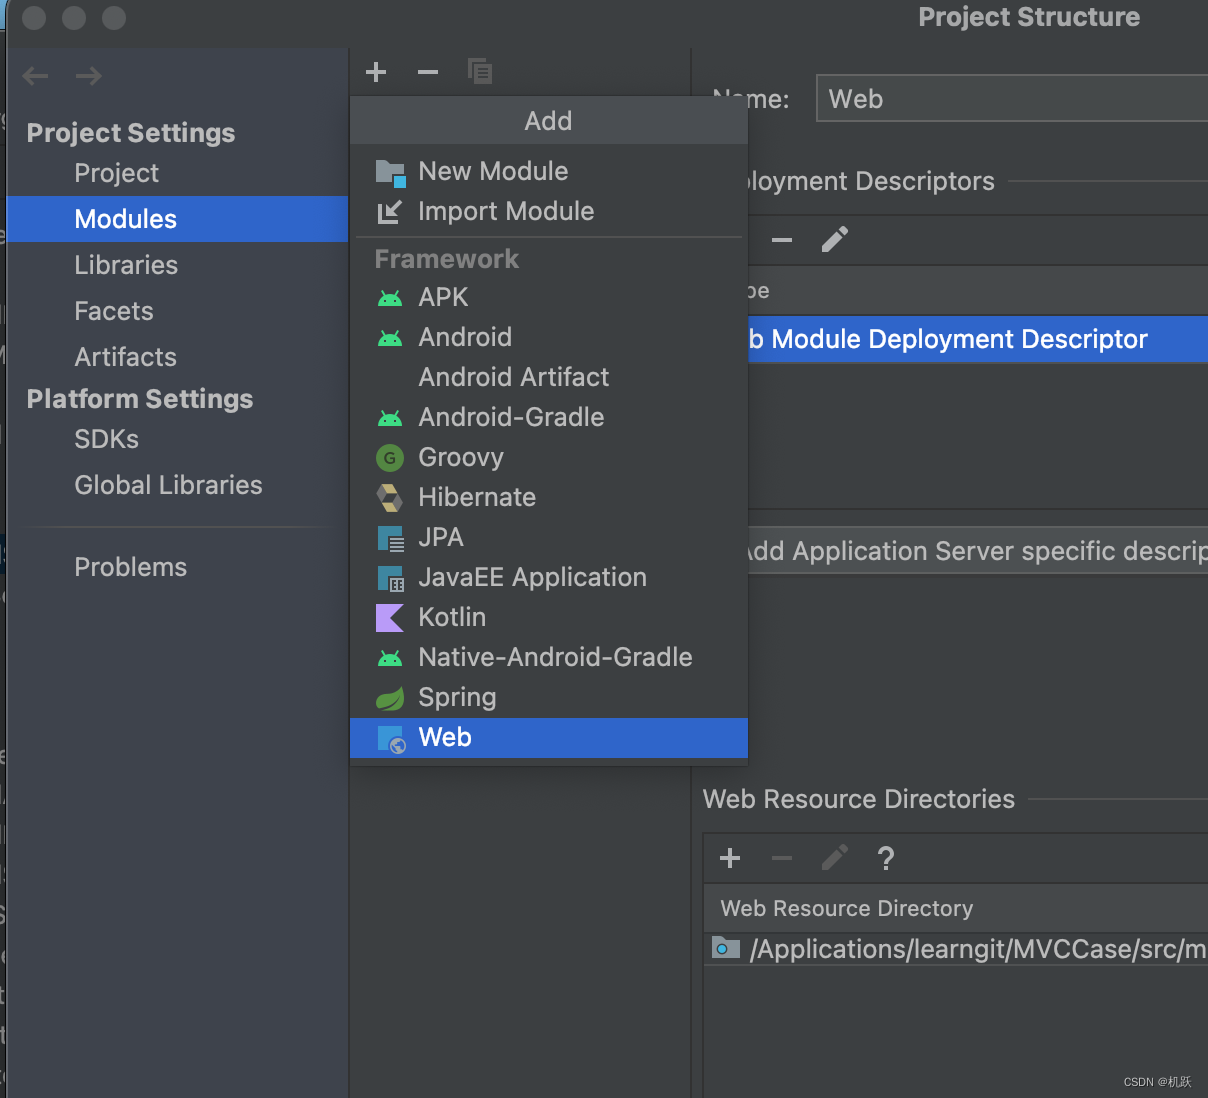
在idea中创建好项目后,添加web项目
然后打开idea的setting,跳转到下面的页面,下载maven插件。

出现下面的选项,才正确。

添加好web项目后,打开pom文件,添加相应的依赖:
<?xml version="1.0" encoding="UTF-8"?>
<project xmlns="http://maven.apache.org/POM/4.0.0"xmlns:xsi="http://www.w3.org/2001/XMLSchema-instance"xsi:schemaLocation="http://maven.apache.org/POM/4.0.0 http://maven.apache.org/xsd/maven-4.0.0.xsd"><modelVersion>4.0.0</modelVersion><groupId>org.example</groupId><artifactId>MVCCase</artifactId><version>1.0-SNAPSHOT</version><packaging>war</packaging><properties><maven.compiler.source>8</maven.compiler.source><maven.compiler.target>8</maven.compiler.target><project.build.sourceEncoding>UTF-8</project.build.sourceEncoding></properties><dependencies>
<!--        下面俩个依赖是写servlet的--><dependency><groupId>javax.servlet</groupId><artifactId>javax.servlet-api</artifactId><version>3.1.0</version><scope>provided</scope><!--provided在编译和测试环境有效  --></dependency><dependency><groupId>javax.servlet.jsp</groupId><artifactId>jsp-api</artifactId><version>2.2</version><scope>provided</scope></dependency><!--        下面俩个依赖是连接数据库时用到的--><dependency><groupId>org.mybatis</groupId><artifactId>mybatis</artifactId><version>3.5.5</version></dependency><dependency><groupId>mysql</groupId><artifactId>mysql-connector-java</artifactId><version>8.0.21</version></dependency><!--        下面俩个依赖是工具依赖,在写jsp时会用到--><dependency><groupId>jstl</groupId><artifactId>jstl</artifactId><version>1.2</version></dependency><dependency><groupId>taglibs</groupId><artifactId>standard</artifactId><version>1.1.2</version></dependency></dependencies><build><plugins><plugin><groupId>org.apache.tomcat.maven</groupId><artifactId>tomcat7-maven-plugin</artifactId><version>2.2</version><configuration><port>8080</port><path>/</path></configuration></plugin></plugins></build>
</project>
千万别忘了,写上<packaging>war</packaging> 把打包方式改成打war包。
下面图片是要进行操作的数据库信息:

因为操作数据库过程中用到了mybatis,所以需要配置相应的xml文件,详细的配置过程在前面的Mybatis简化JDBC开发文章中写过。下面这是brandMapper.xml的内容。
<?xml version="1.0" encoding="UTF-8" ?>
<!DOCTYPE mapperPUBLIC "-//mybatis.org//DTD Mapper 3.0//EN""https://mybatis.org/dtd/mybatis-3-mapper.dtd">
<!--<mapper namespace="test">-->
<mapper namespace="org.example.Mapper.brandMapper"><resultMap id="brandResultMap" type="brand"><result column="brand_name" property="brandName"></result><result column="company_name" property="companyName"></result></resultMap>
</mapper>
然后创建对应的实体类pojo,接口方法类Mapper和方法实现类service。
pojo实体类:
package org.example.pojo;public class brand {private Integer id;private String brandName;private String companyName;private Integer ordered;private String description;private Integer status;public brand(Integer id, String brandName, String companyName, Integer ordered, String description, Integer status) {this.id = id;this.brandName = brandName;this.companyName = companyName;this.ordered = ordered;this.description = description;this.status = status;}public brand() {}public Integer getId() {return id;}public void setId(Integer id) {this.id = id;}public String getBrandName() {return brandName;}public void setBrandName(String brandName) {this.brandName = brandName;}public String getCompanyName() {return companyName;}public void setCompanyName(String companyName) {this.companyName = companyName;}public Integer getOrdered() {return ordered;}public void setOrdered(Integer ordered) {this.ordered = ordered;}public String getDescription() {return description;}public void setDescription(String description) {this.description = description;}public Integer getStatus() {return status;}public void setStatus(Integer status) {this.status = status;}}
接口方法类Mapper
先写一个查询所有的方法,因为此处需要实现的功能比较简单,所以用注解就行了。
public interface brandMapper {//查询全部@Select("select * from db.brand")@ResultMap("brandResultMap")List<brand>selectAll();
}
方法实现类service
import java.util.List;import org.apache.ibatis.session.SqlSession;
import org.apache.ibatis.session.SqlSessionFactory;
import org.example.Mapper.brandMapper;
import org.example.pojo.brand;
import org.example.util.SqlSessionFactoryUtils;public class brandService {String resource = "mybatis-config.xml";InputStream inputStream = null;inputStream = Resources.getResourceAsStream(resource);SqlSessionFactory sqlSessionFactory = new SqlSessionFactoryBuilder().build(inputStream);//调用brandMapper中的selectAll方法。public List<brand> selectAll(){//获取sessionSqlSession sqlSession = sqlSessionFactory.openSession();brandMapper brandMapper = sqlSession.getMapper(brandMapper.class);List<brand> brands = brandMapper.selectAll();sqlSession.close();return brands;}
}
下面让我们写展示brand信息的jsp页面:
注意:<%@ taglib prefix="c" uri="http://java.sun.com/jstl/core_rt" %>,只有声明该配置,才能应用pom文件中配置的工具jstl依赖。
jstl工具中有<c:foreach> 相当于Java中的for循环和<c:if>标签相当于Java语句中的if语句。
<%--Created by IntelliJ IDEA.User: quwenhaoDate: 2023/12/28Time: 17:46To change this template use File | Settings | File Templates.
--%>
<%@ page contentType="text/html;charset=UTF-8" language="java" isELIgnored="false" %>
<%@ taglib prefix="c" uri="http://java.sun.com/jstl/core_rt" %>
<html>
<head><title>Title</title>
</head>
<body><h1>${user.username},欢迎您</h1><input type="button" value="新增" id="addBrand"><br>
<hr>
<table border="1" cellspacing="0" width="800"><tr><td>序号</td><td>品牌名称</td><td>企业名称</td><td>排序</td><td>品牌介绍</td><td>状态</td><td>操作</td></tr><c:forEach items="${brands}" var="brand" varStatus="Status">
<-- var 属性是为多个brands中的一个个体命名  varStatus是为每条信息前的序号命名,设置为index是序号从1开始递增--><tr align="center"><%--      <td>${brand.id}</td>--%><td>${Status.index}</td><td>${brand.brandName}</td><td>${brand.companyName}</td><td>${brand.ordered}</td><td>${brand.description}</td><c:if test="${brand.status ==1}"><td>启用</td></c:if><c:if test="${brand.status !=1}"><td>禁用</td></c:if><td><a href="#">修改</a> <a href="#">删除</a> </td></c:forEach></table></body>
</html>
下面到了写jsp页面中信息的来源了 Servlet。新建一个Servlet
package org.example.web;import javax.servlet.*;
import javax.servlet.http.*;
import javax.servlet.annotation.WebServlet;
import java.io.IOException;
import java.util.List;import org.example.pojo.brand;
import org.example.service.brandService;@WebServlet("/brandSelectAllService")
public class brandSelectAllService extends HttpServlet {private brandService brandService=new brandService();@Overrideprotected void doGet(HttpServletRequest request, HttpServletResponse response) throws ServletException, IOException {//1调用对应的brandService方法List<brand> brands = brandService.selectAll();//2存入request对象中request.setAttribute("brands",brands);//3.转发到brand.jsprequest.getRequestDispatcher("/brand.jsp").forward(request,response);}@Overrideprotected void doPost(HttpServletRequest request, HttpServletResponse response) throws ServletException, IOException {this.doGet(request, response);}
}
在该Servlet中调用前面声明的查询数据库的方法,获取数据库信息后,在将获取的brands数据转发到brand.jsp页面中。
然后我们可以写一个index.html文件来登陆brands
<!DOCTYPE html>
<html lang="en">
<head><meta charset="UTF-8"><title>Title</title>
</head>
<body>
<a href="/brandSelectAllService">登陆</a>
</body>
</html>
点击登陆就会进入查询Servlet中,执行查询所有方法,然后在跳转到brands.jsp页面中展示信息。
下面来看看效果:
点击tomcat7:run 运行tomcat
出现这个后,就可以在浏览器中试着打开我们自己写的jsp了 .。打开浏览器输入网址http://localhost:8080/index.html,点击登陆就可以查询到数据库所有信息了。


)
:物业满意度调查,选择适合的调查方法至关重要)

】)


