Python-PyQt5树莓派上位机
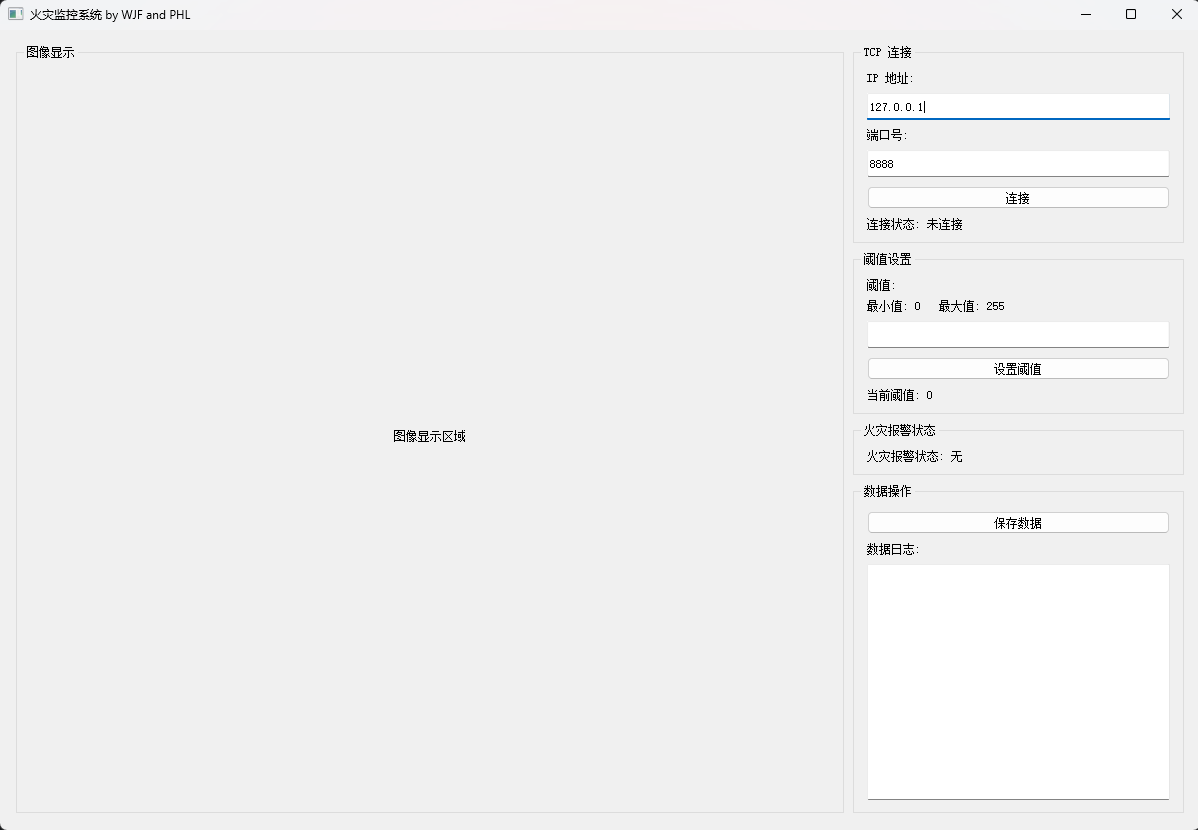
一个使用PythonQT设计的树莓派的上位机,功能大概如下
1.笔记本电脑与树莓派的通讯是否成功显示(给个信号显示判断是否通讯成功);
2.阈值的设置显示;
3.图像成像的显示;
4.是否发生火灾报警显示。
5.当前像素灰度值最大值和最小值显示。
6.对以上主要信息数据(时间年月日时分秒信息、阈值数据、灰度值最大值和最小值、是否发生火灾报警信息)的采集保存,用excel或txt存就行。
界面AppView.py
import sysfrom PyQt5.QtWidgets import (QApplication, QWidget, QLabel, QPushButton, QLineEdit, QGroupBox, QVBoxLayout,QHBoxLayout, QTextEdit)
from PyQt5.QtCore import Qtclass AppView(QWidget):def __init__(self):super().__init__()self.initUI()def initUI(self):# 最外层的水平布局hboxlayout = QHBoxLayout()# 最右侧的按钮以及信息显示rvboxlayout = QVBoxLayout()# 左侧的图像部分lvboxlayout = QVBoxLayout()# 创建分组框connection_group = QGroupBox("TCP 连接")threshold_group = QGroupBox("阈值设置")image_group = QGroupBox("图像显示")# interval_group = QGroupBox("时间间隔设置")alarm_group = QGroupBox("火灾报警状态")data_group = QGroupBox("数据操作")# 分组框布局connection_layout = QVBoxLayout()threshold_layout = QVBoxLayout()image_layout = QVBoxLayout()interval_layout = QVBoxLayout()alarm_layout = QVBoxLayout()data_layout = QVBoxLayout()# TCP连接部分self.ip_input = QLineEdit()self.port_input = QLineEdit()self.connect_button = QPushButton('连接')self.connection_status = QLabel('连接状态: 未连接')connection_layout.addWidget(QLabel('IP 地址:'))connection_layout.addWidget(self.ip_input)connection_layout.addWidget(QLabel('端口号:'))connection_layout.addWidget(self.port_input)connection_layout.addWidget(self.connect_button)connection_layout.addWidget(self.connection_status)connection_group.setLayout(connection_layout)# 阈值设置部分self.threshold_input = QLineEdit()self.set_threshold_button = QPushButton('设置阈值')self.min_max_label = QLabel('最小值: 0   最大值: 255')self.threshold_value_label = QLabel('当前阈值: 0')threshold_layout.addWidget(QLabel('阈值:'))threshold_layout.addWidget(self.min_max_label)  # 显示最小值和最大值threshold_layout.addWidget(self.threshold_input)threshold_layout.addWidget(self.set_threshold_button)threshold_layout.addWidget(self.threshold_value_label)threshold_group.setLayout(threshold_layout)# 图像显示部分self.image_label = QLabel('图像显示区域')self.image_label.setFixedSize(800, 600)self.image_label.setAlignment(Qt.AlignCenter)  # 图像居中显示self.image_label.setScaledContents(True)  # 图像缩放以填充整个 QLabel 区域image_layout.addWidget(self.image_label)# self.min_max_label = QLabel('最小值: 0   最大值: 255')# image_layout.addWidget(self.min_max_label)  # 显示最小值和最大值image_group.setLayout(image_layout)# 时间间隔设置部分# self.interval_input = QLineEdit()# self.set_interval_button = QPushButton('设置间隔')# interval_layout.addWidget(QLabel('时间间隔 (ms):'))# interval_layout.addWidget(self.interval_input)# interval_layout.addWidget(self.set_interval_button)# interval_group.setLayout(interval_layout)# 火灾报警状态self.alarm_status = QLabel('火灾报警状态: 无')alarm_layout.addWidget(self.alarm_status)alarm_group.setLayout(alarm_layout)# 数据操作部分self.save_button = QPushButton('保存数据')self.data_display = QTextEdit()data_layout.addWidget(self.save_button)data_layout.addWidget(QLabel('数据日志:'))data_layout.addWidget(self.data_display)data_group.setLayout(data_layout)# 添加分组框到栅格布局rvboxlayout.addWidget(connection_group)rvboxlayout.addWidget(threshold_group)# rvboxlayout.addWidget(interval_group)rvboxlayout.addWidget(alarm_group)rvboxlayout.addWidget(data_group)hboxlayout.addWidget(image_group)hboxlayout.addLayout(rvboxlayout)# 设置外层布局self.setLayout(hboxlayout)self.setWindowTitle('火灾监控系统 by WJF and PHL')self.resize(1200, 800)  # 调整窗口初始大小if __name__ == '__main__':app = QApplication(sys.argv)view = AppView()view.show()sys.exit(app.exec_())
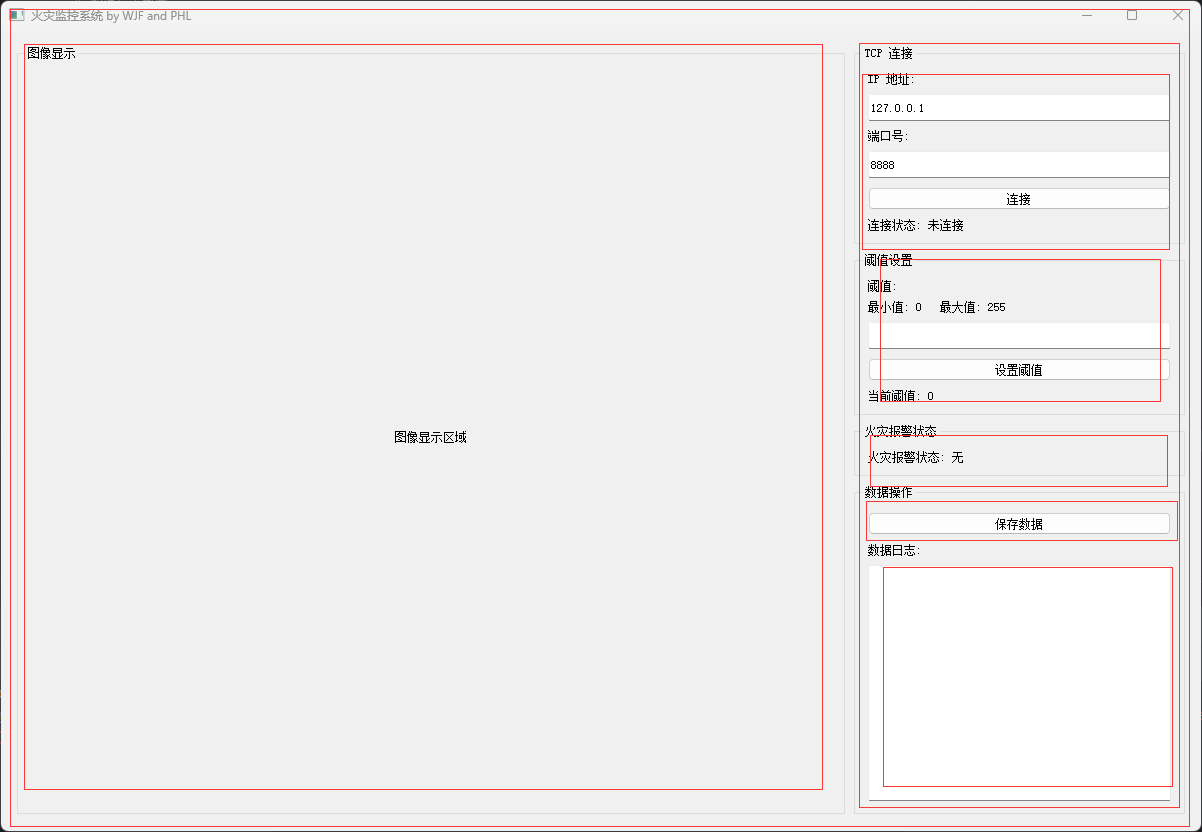
布局大概如下

最外面是一个QHBoxLayout水平布局将图像显示和信息显示和设置区域分成左右两部分
最右边是一个QVBoxLayout垂直布局从上到下分别是
threshold_group = QGroupBox("阈值设置")
image_group = QGroupBox("图像显示")
alarm_group = QGroupBox("火灾报警状态")
data_group = QGroupBox("数据操作")
服务器端RaspberryPiServer.py
import pickle
import socket
import struct
import threadingimport cv2class RaspberryPiServer:def __init__(self, host, port):self.server_socket = socket.socket(socket.AF_INET, socket.SOCK_STREAM)self.server_socket.bind((host, port))self.server_socket.listen(1)print(f"服务器启动,监听 {host}:{port}")self.minthreshold = 25self.maxthreshold = 150self.isFire = Trueself.threshold = 50  # 示例阈值self.capture = cv2.VideoCapture(0)  # 打开默认摄像头def set_threshold(self, threshold):try:self.threshold = int(threshold)print(f'阈值已设置为: {self.threshold}')except ValueError:print('无效的阈值')def encode_image(self):  # 图像编码ret, frame = self.capture.read()cv2.waitKey(1)if ret:_, img_encoded = cv2.imencode('.jpg', frame)return img_encoded.tobytes()return Nonedef send_data(self, client_socket):  # 发送数据image_data = self.encode_image()if image_data:data = {"image": image_data, "threshold": self.threshold, "isFire": self.isFire, "minthreshold": self.minthreshold, "maxthreshold": self.maxthreshold}packed_data = pickle.dumps(data)client_socket.sendall(struct.pack(">L", len(packed_data)))client_socket.sendall(packed_data)client_socket.recv(1024)  # 等待客户端确认def handle_client(self, client_socket):while True:try:# 发送图像数据self.send_data(client_socket)# 非阻塞地检查是否有来自客户端的数据client_socket.settimeout(0.1)  # 设置短暂超时try:request = client_socket.recv(1024).decode()if request.startswith("SET_THRESHOLD"):new_threshold = request.split(":")[1]self.set_threshold(new_threshold)except socket.timeout:pass  # 没有接收到数据,继续下一次循环except Exception as e:print(f"处理客户端请求时出错: {e}")breakclient_socket.close()def start(self):while True:client_socket, addr = self.server_socket.accept()print(f"接收到来自 {addr} 的连接")threading.Thread(target=self.handle_client, args=(client_socket,)).start()if __name__ == '__main__':server = RaspberryPiServer('127.0.0.1', 6958)server.start()
首先是构造方法
创建了TCP的Socket对象用于网络通信
设置了一些默认的阈值
创建了VideoCapture对象用于读取摄像头的图像
def __init__(self, host, port):self.server_socket = socket.socket(socket.AF_INET, socket.SOCK_STREAM)self.server_socket.bind((host, port))self.server_socket.listen(1)print(f"服务器启动,监听 {host}:{port}")self.minthreshold = 25self.maxthreshold = 150self.isFire = Trueself.threshold = 50 # 示例阈值self.capture = cv2.VideoCapture(0) # 打开默认摄像头
set_threshold方法
用于设置阈值,仅仅为模拟,如果需要设置其他值可以拓展修改此方法
def set_threshold(self, threshold):try:self.threshold = int(threshold)print(f'阈值已设置为: {self.threshold}')except ValueError:print('无效的阈值')
encode_image方法
用于将图像编码成字节流
def encode_image(self): # 图像编码ret, frame = self.capture.read()# 读取图像cv2.waitKey(1) # 延迟一毫秒if ret: # 读取成功_, img_encoded = cv2.imencode('.jpg', frame) # 编码成.jpg格式return img_encoded.tobytes() # 变成字节流return None
send_data方法
用于发送数据
def send_data(self, client_socket): # 发送数据image_data = self.encode_image() # 将图片编码if image_data:# 如果有图片数据# 将图片和阈值鞥数据一起发送data = {"image": image_data, "threshold": self.threshold, "isFire": self.isFire, "minthreshold": self.minthreshold, "maxthreshold": self.maxthreshold}packed_data = pickle.dumps(data)client_socket.sendall(struct.pack(">L", len(packed_data)))client_socket.sendall(packed_data)client_socket.recv(1024) # 等待客户端确认
pickle.dumps(data):pickle是Python中用于序列化和反序列化对象结构的模块。dumps函数将Python对象(如字典、列表等)转换成字节流,以便可以通过网络发送。data是需要被发送的原始数据。
struct.pack(">L", len(packed_data)):struct模块在Python中用于处理字节和Python基本数据类型之间的转换。pack函数将Python数据(此处为数据长度)打包为结构化的二进制格式。">L"是格式字符串,表示“大端序”(网络字节序)的无符号长整型。len(packed_data)是获取序列化后数据的长度。
client_socket.sendall(struct.pack(">L", len(packed_data))):- 这里
client_socket是一个TCP套接字对象,用于网络通信。 sendall方法用于发送数据。在这里,它发送的是打包后的数据长度信息。
- 这里
client_socket.sendall(packed_data):- 再次使用
sendall方法,这次是发送实际的序列化数据。
- 再次使用
client_socket.recv(1024):recv方法用于接收数据。这里指定了最大接收数据的大小为1024字节。- 这行代码通常用于等待并接收来自客户端的响应或确认。
handle_client方法
def handle_client(self, client_socket):while True:try:# 发送图像数据self.send_data(client_socket)# 非阻塞地检查是否有来自客户端的数据client_socket.settimeout(0.1) # 设置短暂超时try:request = client_socket.recv(1024).decode() # 解码if request.startswith("SET_THRESHOLD"): new_threshold = request.split(":")[1]self.set_threshold(new_threshold)except socket.timeout:pass # 没有接收到数据,继续下一次循环except Exception as e:print(f"处理客户端请求时出错: {e}")breakclient_socket.close()
start方法
def start(self):while True:client_socket, addr = self.server_socket.accept()print(f"接收到来自 {addr} 的连接")threading.Thread(target=self.handle_client, args=(client_socket,)).start()
AppModel.py
import socket
import struct
import pickle
import cv2
import numpy as npclass AppModel:def __init__(self):self.client_socket = Noneself.connected = Falsedef connect(self, ip, port):try:self.client_socket = socket.socket(socket.AF_INET, socket.SOCK_STREAM)self.client_socket.connect((ip, int(port)))self.connected = Truereturn "连接成功"except Exception as e:return f"连接失败: {e}"def receiveData(self):try:data_size = struct.unpack(">L", self.client_socket.recv(4))[0]received_payload = b""remaining_size = data_sizewhile remaining_size > 0:received_payload += self.client_socket.recv(remaining_size)remaining_size = data_size - len(received_payload)data = pickle.loads(received_payload)if data:image_data = data["image"]image = cv2.imdecode(np.frombuffer(image_data, np.uint8), cv2.IMREAD_COLOR)threshold = data["threshold"]isFire = data["isFire"]minthreshold = data["minthreshold"]maxthreshold = data["maxthreshold"]self.client_socket.sendall(b"ack")return image, threshold, isFire, minthreshold, maxthresholdreturn None, None, None, None, Noneexcept Exception as e:return None, None, None, None, Nonedef disconnect(self):if self.client_socket:self.client_socket.close()self.connected = False
connect方法
def connect(self, ip, port):try:self.client_socket = socket.socket(socket.AF_INET, socket.SOCK_STREAM)self.client_socket.connect((ip, int(port)))self.connected = Truereturn "连接成功"except Exception as e:return f"连接失败: {e}"
def connect(self, ip, port):- 这是一个定义在类中的方法,
self代表类的实例。 ip和port是方法的参数,分别表示要连接的服务器的IP地址和端口号。
- 这是一个定义在类中的方法,
try和except Exception as e:- 这是Python中的异常处理结构。
try块中的代码是可能会引发异常的代码,而except块用于处理异常。 - 如果
try块中的代码运行出错,程序执行将跳转到except块。
- 这是Python中的异常处理结构。
self.client_socket = socket.socket(socket.AF_INET, socket.SOCK_STREAM):- 这行代码创建了一个新的套接字对象。
socket.AF_INET表示该套接字用于IPv4地址。socket.SOCK_STREAM表示该套接字是基于流的TCP协议。
self.client_socket.connect((ip, int(port))):- 使用
connect方法来建立到指定IP地址和端口的TCP连接。 ip是目标服务器的IP地址,int(port)将端口号转换为整数。
- 使用
self.connected = True:- 这行代码设置一个实例变量(或称为属性)
connected为True,通常用于表示连接已成功建立。
- 这行代码设置一个实例变量(或称为属性)
return "连接成功":- 如果连接建立成功,方法返回一个字符串表示成功。
receiveData方法
def receiveData(self):try:data_size = struct.unpack(">L", self.client_socket.recv(4))[0]received_payload = b""remaining_size = data_sizewhile remaining_size > 0:received_payload += self.client_socket.recv(remaining_size)remaining_size = data_size - len(received_payload)data = pickle.loads(received_payload)if data:image_data = data["image"]image = cv2.imdecode(np.frombuffer(image_data, np.uint8), cv2.IMREAD_COLOR)threshold = data["threshold"]isFire = data["isFire"]minthreshold = data["minthreshold"]maxthreshold = data["maxthreshold"]self.client_socket.sendall(b"ack")return image, threshold, isFire, minthreshold, maxthresholdreturn None, None, None, None, Noneexcept Exception as e:return None, None, None, None, None
接收数据长度
-
data_size = struct.unpack(">L", self.client_socket.recv(4))[0]:
self.client_socket.recv(4):从TCP套接字接收前4个字节。这四个字节通常包含了随后要接收的数据的长度。struct.unpack(">L", ...):使用struct模块解析这4个字节。">L"表示使用大端序格式解析一个无符号长整型。data_size存储后续数据的总字节大小。
接收数据主体
received_payload = b"":- 初始化一个空字节对象
received_payload,用于累积接收到的数据。
- 初始化一个空字节对象
- 循环
while remaining_size > 0:- 循环直到所有预定长度的数据被接收完毕。
received_payload += self.client_socket.recv(remaining_size):- 从套接字接收数据,追加到
received_payload。每次调用recv最多接收remaining_size指定的字节数。
- 从套接字接收数据,追加到
remaining_size = data_size - len(received_payload):- 更新剩余要接收的数据的字节数。这是为了处理TCP流式传输中可能出现的数据分片情况。
处理接收到的数据
-
data = pickle.loads(received_payload):- 使用
pickle.loads将接收到的字节流反序列化为原始Python对象。这意味着发送方用pickle.dumps序列化了数据。
- 使用
-
提取和处理数据:
-
如果
data不为空,则提取数据中的字段:
image_data = data["image"]:提取图像数据。image = cv2.imdecode(np.frombuffer(image_data, np.uint8), cv2.IMREAD_COLOR):将图像数据转换为OpenCV可处理的图像格式。threshold,isFire,minthreshold,maxthreshold:提取其他相关数据。
-
-
self.client_socket.sendall(b"ack"):- 发送确认消息(
ack)回发送方,表示数据已成功接收。
- 发送确认消息(
返回值
-
return image, threshold, isFire, minthreshold, maxthreshold或
return None, None, None, None, None:
- 如果数据成功接收并处理,返回提取的值;如果出现异常或数据为空,返回一系列
None。
- 如果数据成功接收并处理,返回提取的值;如果出现异常或数据为空,返回一系列
AppController.py
import sys
from datetime import datetimefrom PyQt5.QtWidgets import QApplication, QMessageBox
from PyQt5.QtCore import pyqtSignal, QThread, Qt
from AppView import AppView
from AppModel import AppModel
import numpy as np
from PyQt5.QtGui import QImage, QPixmapclass DataReceiverThread(QThread):dataReceived = pyqtSignal(list)def __init__(self, model):super().__init__()self.model = modelself.isRunning = Truedef run(self):while self.isRunning:image, threshold, isFire, minthreshold, maxthreshold = self.model.receiveData()if image is not None and threshold is not None:self.dataReceived.emit([image, threshold, isFire, minthreshold, maxthreshold])def stop(self):self.isRunning = Falseself.wait()class AppController:def __init__(self, view):self.view = viewself.model = AppModel()self.dataReceiverThread = Noneself.view.connect_button.clicked.connect(self.connectToRaspberry)self.view.save_button.clicked.connect(self.save_data)self.view.set_threshold_button.clicked.connect(self.send_threshold_to_raspberry)self.view.ip_input.setText("127.0.0.1")self.view.port_input.setText("6958")self.last_log_time = datetime.now()  # 初始化上次记录日志的时间def connectToRaspberry(self):ip = self.view.ip_input.text()port = self.view.port_input.text()result = self.model.connect(ip, port)self.view.connection_status.setText(f"连接状态: {result}")if result == "连接成功":QMessageBox.information(self.view, "连接状态", "连接成功!", QMessageBox.Ok)# by WJF and PHLQMessageBox.information(self.view, "作者", "WJF and PHL!", QMessageBox.Ok)self.dataReceiverThread = DataReceiverThread(self.model)self.dataReceiverThread.dataReceived.connect(self.updateData)self.dataReceiverThread.start()def updateData(self, receivedData: list):image = receivedData[0]threshold = receivedData[1]isFire = receivedData[2]minthreshold = receivedData[3]maxthreshold = receivedData[4]height, width, channel = image.shapebytesPerLine = 3 * widthqImg = QImage(image.data, width, height, bytesPerLine, QImage.Format_RGB888).rgbSwapped()pixmap = QPixmap.fromImage(qImg)# 确定QLabel的大小label_size = self.view.image_label.size()# 调整图像大小以填充QLabelscaled_pixmap = pixmap.scaledToWidth(label_size.width(), Qt.SmoothTransformation)# 或者使用 scaledToHeight:# scaled_pixmap = pixmap.scaledToHeight(label_size.height(), Qt.SmoothTransformation)# 将调整大小后的图像设置到QLabelself.view.image_label.setPixmap(scaled_pixmap)self.view.image_label.setPixmap(pixmap)self.view.threshold_value_label.setText(f'当前阈值: {threshold}')self.view.alarm_status.setText(f'火灾报警状态: {isFire}')self.view.min_max_label.setText(f'最小值: {minthreshold}   最大值: {maxthreshold}')self.add_log_entry(threshold, isFire, minthreshold, maxthreshold)def add_log_entry(self, threshold, isFire, minthreshold, maxthreshold):current_time = datetime.now()if (current_time - self.last_log_time).total_seconds() > 5:  # 比如每10秒记录一次self.last_log_time = current_time  # 更新上次记录日志的时间# 获取当前日志框中的文本current_text = self.view.data_display.toPlainText()# 获取当前时间戳timestamp = current_time.strftime("%Y-%m-%d %H:%M:%S")# 创建要添加的新日志条目new_log_entry = (f'[{timestamp}] 当前阈值: {threshold} \n 'f'火灾报警状态: {isFire}\n'f'最小值: {minthreshold}   最大值: {maxthreshold}\n')# 将新日志条目添加到当前文本后面self.view.data_display.setPlainText(current_text + new_log_entry)def save_data(self):# 获取文本编辑框中的文本data = self.view.data_display.toPlainText()# 获取当前时间戳来命名文件timestamp = datetime.now().strftime("%Y-%m-%d_%H-%M-%S")file_name = f"log_{timestamp}.txt"# 打开文件以保存数据(这里示意保存到文件)with open(f'./log/{file_name}', 'w') as file:file.write(data)def disconnectFromRaspberry(self):if self.dataReceiverThread:self.dataReceiverThread.stop()self.model.disconnect()def send_threshold_to_raspberry(self):threshold = self.view.threshold_input.text()if self.model.connected:try:self.model.client_socket.sendall(f"SET_THRESHOLD:{threshold}".encode())print(f'已发送阈值: {threshold}')except Exception as e:print(f'发送阈值失败: {e}')if __name__ == '__main__':app = QApplication(sys.argv)view = AppView()controller = AppController(view)view.show()sys.exit(app.exec_())
DataReceiverThread(数据接收线程)
- 继承自
QThread,用于在后台接收数据。 dataReceived = pyqtSignal(list):定义一个信号,当接收到数据时发射。__init__(self, model):构造函数,接收一个模型对象(model),用于调用数据接收方法。run(self):重写QThread的run方法,在一个循环中调用模型的receiveData方法接收数据,然后通过dataReceived信号发送数据。stop(self):停止线程的方法。
AppController(应用控制器)
__init__(self, view):构造函数,初始化视图(view),模型(model),以及数据接收线程(dataReceiverThread)。设置按钮的点击事件和初始值。connectToRaspberry(self):处理连接到树莓派的逻辑,启动数据接收线程。updateData(self, receivedData):接收到数据后的处理方法。更新GUI的不同部分,如图像显示和状态标签。add_log_entry(self, ...):添加日志条目到文本框。save_data(self):将日志数据保存到文本文件。disconnectFromRaspberry(self):处理从树莓派断开连接的逻辑。send_threshold_to_raspberry(self):向树莓派发送阈值设置的方法。
主程序入口
if __name__ == '__main__':这是Python程序的标准入口点。- 创建
QApplication和AppView实例,并显示视图。 - 创建
AppController实例,将视图传递给控制器。 - 启动事件循环。
run方法,在一个循环中调用模型的receiveData方法接收数据,然后通过dataReceived`信号发送数据。
stop(self):停止线程的方法。
AppController(应用控制器)
__init__(self, view):构造函数,初始化视图(view),模型(model),以及数据接收线程(dataReceiverThread)。设置按钮的点击事件和初始值。connectToRaspberry(self):处理连接到树莓派的逻辑,启动数据接收线程。updateData(self, receivedData):接收到数据后的处理方法。更新GUI的不同部分,如图像显示和状态标签。add_log_entry(self, ...):添加日志条目到文本框。save_data(self):将日志数据保存到文本文件。disconnectFromRaspberry(self):处理从树莓派断开连接的逻辑。send_threshold_to_raspberry(self):向树莓派发送阈值设置的方法。
主程序入口
if __name__ == '__main__':这是Python程序的标准入口点。- 创建
QApplication和AppView实例,并显示视图。 - 创建
AppController实例,将视图传递给控制器。 - 启动事件循环。


——电子琴弹奏)


