一、一级路由与重定向
1、创建 App.vue
在父组件中导入子组件 Navbar
<template><div><navbar></navbar></div>
</template><style lang="scss"></style><script>
import navbar from '@/components/Navbar'export default {components: {navbar}
}
</script>
2、创建 Navbar.vue 组件
App.vue 导入了 Navbar 组件,所以需要创建该组件;使用 router-link 作为跳转标签;而 router-view 看作一个插槽,点击相应的跳转标签,就根据路径到 myrouter.js 找与跳转标签中的路径一致的 path,根据 myrouter.js 文件中路径与组件的映射关系,显示相应的组件
<template><div><router-link to="/film" active-class="mycolor">电影</router-link><router-link to="/video" active-class="mycolor">视频</router-link><router-link to="/center" active-class="mycolor">我的</router-link><router-view></router-view></div>
</template><!-- 设置点击后的文字颜色 -->
<style lang="scss" scoped>
.mycolor {color: red;
}
</style>
3、配置 main.js 文件
在这导入路由的的配置文件 myrouter.js,并显式使用 use(router) 来绑定路由
import { createApp } from 'vue'
import App from './App.vue'
import router from '@/myrouter'createApp(App).use(router).mount('#app')
4、配置路由
创建 myrouter.js 文件,配置路径与组件的映射关系
import { createRouter, createWebHistory } from 'vue-router'
import Film from './views/Film.vue'
import Center from '@/views/Center.vue'
import Video from '@/views/Video.vue'const routes = [{path: '/film',component: Film},{path: '/center/',component: Center},{path: '/video',component: Video},{// path: '/:catchAll(.*)*',将匹配所有内容并将其放在 `$route.params.pathMatch` 下path: '/:pathMatch(.*)*',// 将匹配以 `/user-` 开头的所有内容,并将其放在 `$route.params.afterUser` 下// { path: '/user-:afterUser(.*)', component: UserGeneric },//重定向,当没有匹配路径时重定向到 /filmredirect: '/film'}
]const myrouter = createRouter({history: createWebHistory(process.env.BASE_URL),routes
})export default myrouter
5、创建子组件
5.1、Film.vue
<template><div class="film"><h1>This is an film page</h1></div>
</template>
5.2、Video.vue
<template><div class="video"><h1>This is an video page</h1></div>
</template>
5.2、Center.vue
<template><div class="center"><h1>This is an center page</h1></div>
</template>
6、页面展示
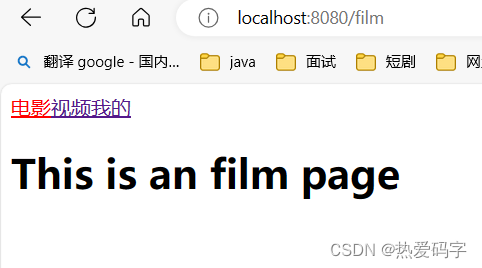
当分别点击 电影 视频 我的 三个标签后,分别展示 Film.vue Video.vue Center.vue 3个组件内容

A:以下为通过监听浏览器 hashchange 事件(监听浏览器地址栏路径的切换)实现的简单路由
<script setup>
import { ref, computed } from 'vue'
import Film from './views/Film'
import Cneter from './views/Center'
import Video from './views/Video'const routes = {'/': Film,'/center': Cneter
}const currentPath = ref(window.location.hash)window.addEventListener('hashchange', () => {currentPath.value = window.location.hash
})const currentView = computed(() => {return routes[currentPath.value.slice(1) || '/'] || Video
})
</script><template><div><a href="#/">Film</a><a href="#/center">Center</a><a href="#/non-exist">Video</a><component :is="currentView" /></div>
</template>
B:main.js 文件
import { createApp } from 'vue'
import App from './App.vue'createApp(App).mount('#app')
二、二级路由与重定向
上述第一种一级路由写法中, App.vue 、Navbar.vue 、main.js 、Video.vue、Center.vue 不作修改
1、Film.vue
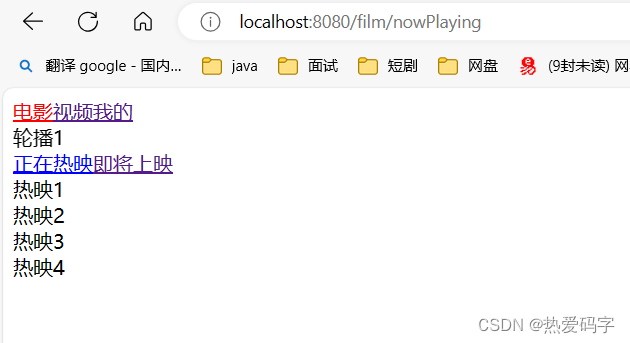
增加 轮播、正在热映、即将上映 三个组件
<template><div class="film"><filmCarousel></filmCarousel><router-link to="/film/nowPlaying" active-class="mycolor">正在热映</router-link><router-link to="/film/comingSoon" active-class="mycolor">即将上映</router-link><router-view></router-view></div>
</template><script>
import filmCarousel from '@/components/film/FilmCarousel.vue'
export default {components: {filmCarousel}
}
</script>
<style lang="scss" scoped>
.mycolor {color: blue;
}
</style>
新增
轮播组件:FilmCarousel.vue
正在热映:FilmNowPlaying.vue
即将上映:FilmCommingsoon.vue
2、myrouter.js
增加 /film 路径下的二级路由与重定向
import { createRouter, createWebHistory } from 'vue-router'
import Film from './views/Film.vue'
import Center from '@/views/Center.vue'
import Video from '@/views/Video.vue'
import FilmNowPlaying from '@/components/film/FilmNowPlaying.vue'
import FilmCommingsoon from '@/components/film/FilmCommingsoon.vue'const routes = [{path: '/film',component: Film,children: [{ path: 'nowPlaying', component: FilmNowPlaying },{ path: 'comingSoon', component: FilmCommingsoon },// 重定向:当 /film 路径下没有匹配的路径时重定向到 /film/nowPlaying{ path: '', redirect: '/film/nowPlaying' }]},{path: '/center/',component: Center},{path: '/video',component: Video},{// path: '/:catchAll(.*)',重定向,当没有匹配路径时重定向到 /filmpath: '/:pathMatch(.*)',redirect: '/film'}
]const myrouter = createRouter({history: createWebHistory(process.env.BASE_URL),routes
})export default myrouter
3、新增的三个子组件
A、FilmCarousel.vue
<!-- 电影-轮播 -->
<template><div class="swiper-container"><div class="swiper-wrapper"><div class="swiper-slide" v-for="(item,index) in dataList" :key="index">{{ item }}</div></div></div>
</template><script>
import Swiper from 'swiper'
import 'swiper/swiper-bundle.css'
export default {data() {return { dataList: [] }},mounted() {this.dataList = ['轮播1', '轮播2', '轮播4', '轮播4']},updated() {const mySwiper = new Swiper('.swiper-container', {loop: true,autoplay: { delay: 1000, disableOnInteraction: false },scrollbar: false,slidesPerView: 1,slidesPerGroup: 1})}
}
</script><style scoped>
.swiper-container {width: 100%; /* 根据需要进行调整 */overflow: hidden;
}
</style>
B、FilmNowPlaying.vue
<!-- 电影-正在热映 -->
<template><div><div v-for="(item,index) in dataList" :key="index">{{ item }} </div></div>
</template>
<script>
export default {data() {return { dataList: ['热映1', '热映2', '热映3', '热映4'] }}
}
</script>
C、FilmCommingsoon.vue
<!-- 电影-即将上映 -->
<template><div><div v-for="(item,index) in dataList" :key="index">{{ item }}</div></div>
</template>
<script>
export default {data() {return { dataList: ['即将上映1', '即将上映2', '即将上映3', '即将上映4'] }}
}
</script>
4、页面展示

三、动态路由
这里一共整理了 5 种传参方式,分别为
1、路径字符串/ 拼接参数
2、路径字符串?拼接参数
3、path + query
4、name + query
5、name + params
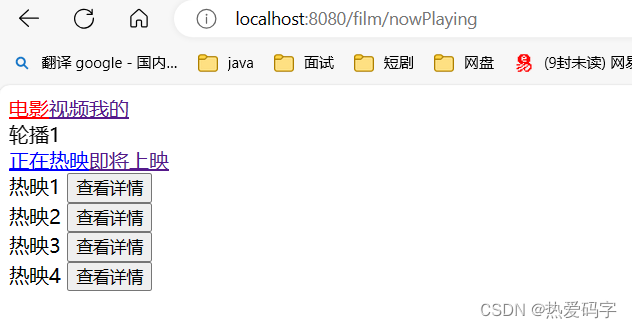
1、在 FilmNowPlaying.vue 中增加 查看详情 按钮
<!-- 电影-正在热映 -->
<template><div><div v-for="(item,index) in dataList" :key="index">{{ item }} <button @click="checkDetail(index)"> 查看详情</button></div></div>
</template>
<script>
export default {data() {return { dataList: ['热映1', '热映2', '热映3', '热映4'] }},methods: {checkDetail(index) {// 1、路径字符串/ 拼接参数// this.$router.push('/film/detail/' + index)// 2、路径字符串?拼接参数this.$router.push('/film/detail?index=' + index)// 3、path + query// this.$router.push({//   path: 'detail',//   query: {//     index: index//   }// })// 4、name + query// this.$router.push({//   name: 'detail',//   query: {//     index: index//   }// })// 5、name + params// this.$router.push({//   name: 'detail',//   params: {//     index: index//   }// })}}
}
</script>
2、新增 FilmDetail.vue 组件
<!-- 详情页面 -->
<template><div>详情页面</div>
</template><script>
import { useRouter } from 'vue-router'
export default {mounted() {// 1、路径字符串/ 拼接参数// console.log(this.$route.params.index)// 2、路径字符串?拼接参数console.log(this.$route.query.index)// 3、path + query// console.log(this.$route.query.index)// 4、name + query// console.log(this.$route.query.index)// 5、name + params// console.log(this.$route.params.index)}
}
</script>
3、myrouter.js
import { createRouter, createWebHistory } from 'vue-router'
import Film from './views/Film.vue'
import Center from '@/views/Center.vue'
import Video from '@/views/Video.vue'
import FilmNowPlaying from '@/components/film/FilmNowPlaying.vue'
import FilmCommingsoon from '@/components/film/FilmCommingsoon.vue'
import FilmDetail from '@/components/film/FilmDetail.vue'
const routes = [{path: '/film',component: Film,children: [{ path: 'nowPlaying', component: FilmNowPlaying },{ path: 'comingSoon', component: FilmCommingsoon },// 重定向:当 /film 路径下没有匹配的路径时重定向到 /film/nowPlaying{ path: '', redirect: '/film/nowPlaying' },// 1、路径字符串/ 拼接参数// { path: 'detail/:index', component: FilmDetail },// 2、路径字符串?拼接参数{ path: 'detail', component: FilmDetail }// 3、path + query// { path: 'detail', component: FilmDetail },// 4、name + query// { path: 'detail', name: 'detail', component: FilmDetail },// 5、name + params// { path: 'detail/:index', name: 'detail', component: FilmDetail },]},{path: '/center/',component: Center},{path: '/video',component: Video},{// path: '/:catchAll(.*)', 重定向,当没有匹配路径时重定向到 /filmpath: '/:pathMatch(.*)',redirect: '/film'}
]const myrouter = createRouter({history: createWebHistory(process.env.BASE_URL),routes
})export default myrouter
4、页面展示

四、路由语法介绍
1、动态路由匹配
1.1 、路径参数 用冒号 : 表示,当一个路由被匹配时,它的 params 的值将在每个组件中以 this.$route.params
的形式暴露出来。因此跨域通过 this. $route.params.index 获取参数
1.2、在同一个路由中设置有多个 路径参数,它们会映射到 $route.params 上的相应字段。例如:
| 匹配模式 | 匹配路径 | $route.params |
|---|---|---|
| /users/:username | /users/eduardo | { username: 'eduardo' } |
| /users/:username/posts/:postId | /users/eduardo/posts/123 | { username: 'eduardo', postId: '123' } |
2、路由匹配语法
1、在参数中自定义正则
const routes = [// /:orderId -> 仅匹配数字{ path: '/:orderId(\\d+)' },// /:productName -> 匹配其他任何内容{ path: '/:productName' },
]
2、可重复的参数
2.1、匹配规则
const routes = [// /:chapters ->  匹配 /one, /one/two, /one/two/three, 等{ path: '/:chapters+' },// /:chapters -> 匹配 /, /one, /one/two, /one/two/three, 等{ path: '/:chapters*' },// 仅匹配数字// 匹配 /1, /1/2, 等{ path: '/:chapters(\\d+)+' },// 匹配 /, /1, /1/2, 等{ path: '/:chapters(\\d+)*' },
]
2.2、传参
// 给定 { path: '/:chapters*', name: 'chapters' },
router.resolve({ name: 'chapters', params: { chapters: [] } }).href
// 产生 /
router.resolve({ name: 'chapters', params: { chapters: ['a', 'b'] } }).href
// 产生 /a/b// 给定 { path: '/:chapters+', name: 'chapters' },
router.resolve({ name: 'chapters', params: { chapters: [] } }).href
// 抛出错误,因为 `chapters` 为空
3.可选参数
也可以通过使用 ? 修饰符(0 个或 1 个)将一个参数标记为可选:
const routes = [// 匹配 /users 和 /users/posva{ path: '/users/:userId?' },// 匹配 /users 和 /users/42{ path: '/users/:userId(\\d+)?' },
]
3、编程式导航
3.1、push()
当点击 时,内部会调用这个方法,所以点击 相当于调用 router.push(…) :
| 声明式 | 编程式 |
|---|---|
<router-link :to="..."> | router.push(...) |
该方法的参数可以是一个字符串路径,或者一个描述地址的对象。例如:
// 字符串路径
router.push('/users/eduardo')// 带有路径的对象
router.push({ path: '/users/eduardo' })// 命名的路由,并加上参数,让路由建立 url
router.push({ name: 'user', params: { username: 'eduardo' } })// 带查询参数,结果是 /register?plan=private
router.push({ path: '/register', query: { plan: 'private' } })// 带 hash,结果是 /about#team
router.push({ path: '/about', hash: '#team' })
注意:如果提供了 path,params 会被忽略,上述例子中的 query 并不属于这种情况;
params不能与path一起使用
当指定 params 时,可提供 string 或 number 参数(或者对于可重复的参数可提供一个数组)。任何其他类型(如对象、布尔等)都将被自动字符串化。对于可选参数,你可以提供一个空字符串(“”)或 null 来移除它。
3.2、替换当前位置
它的作用类似于 router.push,唯一不同的是,它在导航时不会向 history 添加新记录,正如它的名字所暗示的那样——它取代了当前的条目。
| 声明式 | 编程式 |
|---|---|
<router-link :to="..." replace> | router.replace(...) |
也可以直接在传递给 router.push 的 to 参数中增加一个属性 replace: true :
router.push({ path: '/home', replace: true })
// 相当于
router.replace({ path: '/home' })
3.3、横跨历史
该方法采用一个整数作为参数,表示在历史堆栈中前进或后退多少步,类似于 window.history.go(n)。
// 向前移动一条记录,与 router.forward() 相同
router.go(1)// 返回一条记录,与 router.back() 相同
router.go(-1)// 前进 3 条记录
router.go(3)// 如果没有那么多记录,静默失败
router.go(-100)
router.go(100)
4、命名视图
有时候想同时 (同级) 展示多个视图,而不是嵌套展示;需要在 < router-view > 标签中 命名 name 属性; 如果 router-view 没有设置名字,那么默认为 default。
App.vue
<template><h1>Named Views</h1><ul><li><router-link to="/">First page</router-link></li><li><router-link to="/other">Second page</router-link></li></ul><!-- 没有name属性,默认default --><router-view class="view one"></router-view><!-- name="a",对应 router.js 中的components,匹配components中的key,从而具体组件 --><router-view class="view two" name="a"></router-view><router-view class="view three" name="b"></router-view>
</template><script>
export default {name: "App",
};
</script>
router.js
import { createRouter, createWebHistory } from 'vue-router'
import First from './views/First.vue'
import Second from './views/Second.vue'
import Third from './views/Third.vue'export const router = createRouter({history: createWebHistory(),routes: [{path: '/',components: {default: First,a: Second,b: Third,},},{path: '/other',components: {default: Third,a: Second,b: First,},},],
})
5、重定向和别名
5.1、重定向
- 重定向也是通过 routes 配置来完成,下面例子是从 /home 重定向到 /:
const routes = [{ path: '/home', redirect: '/' }]
- 重定向的目标也可以是一个命名的路由:
const routes = [{ path: '/home', redirect: { name: 'homepage' } }]
- 甚至是一个方法,动态返回重定向目标:
const routes = [{// /search/screens -> /search?q=screenspath: '/search/:searchText',redirect: to => {// 方法接收目标路由作为参数// return 重定向的字符串路径/路径对象return { path: '/search', query: { q: to.params.searchText } }},},{path: '/search',// ...},
]
- 也可以重定向到相对位置:
const routes = [{// 将总是把/users/123/posts重定向到/users/123/profile。path: '/users/:id/posts',redirect: to => {// 该函数接收目标路由作为参数// 相对位置不以`/`开头// 或 { path: 'profile'}return 'profile'},},
]
5.2、别名
将 / 别名为 /home,意味着当用户访问 /home 时,URL 仍然是 /home,但会被匹配为用户正在访问 /。
const routes = [{ path: '/', component: Homepage, alias: '/home' }]
通过别名,可以自由地将 UI 结构映射到一个任意的 URL,而不受配置的嵌套结构的限制。使别名以 / 开头,以使嵌套路径中的路径成为绝对路径。甚至可以将两者结合起来,用一个数组提供多个别名:
const routes = [{path: '/users',component: UsersLayout,children: [// 为这 3 个 URL 呈现 UserList// - /users// - /users/list// - /people//   别名:/people 将可以代表 /users //   别名:list 作为子节点的别名,最后结构为:/users/list{ path: '', component: UserList, alias: ['/people', 'list'] },],},
]
如果路由有参数,请确保在任何绝对别名中包含它们:
const routes = [{path: '/users/:id',component: UsersByIdLayout,children: [// 为这 3 个 URL 呈现 UserDetails// - /users/24// - /users/24/profile// - /24{ path: 'profile', component: UserDetails, alias: ['/:id', ''] },],},
]
)


)


)


与IDEA轻松管理远程代码库的完整指南)
)