前言
源码在我github的guide-spring仓库中,可以克隆下来 直接执行。
我们本文主要来介绍依赖注入的使用示例及其原理
依赖注入
什么是依赖注入
依赖注入(Dependency Injection,简称DI)是一种设计模式,它用于实现对象之间的松散耦合。在依赖注入中,一个对象不再负责创建或查找它所依赖的对象,而是将这些依赖关系通过外部传递进来,外部指的就是 IoC 容器,IoC 容器负责对象的创建、管理和注入,我们也常说 DI 是实现 IoC 的一种具体技术。这种方式有助于提高代码的可维护性、可测试性,同时降低了组件之间的耦合度。
依赖注入的方式
注入的方式有以下几种:
- setter方法注入
- 构造器注入
- 字段注入
- 方法注入
- 接口回调注入
setter方法和构造器注入方式
其中setter方法注入和构造器注入在xml配置手动注入时,比较常见,使用方法可以参考下面的示例代码:
xml 配置
<?xml version="1.0" encoding="UTF-8"?>
<beans xmlns="http://www.springframework.org/schema/beans"xmlns:xsi="http://www.w3.org/2001/XMLSchema-instance"xmlns:util="http://www.springframework.org/schema/util"xsi:schemaLocation="http://www.springframework.org/schema/beanshttp://www.springframework.org/schema/beans/spring-beans.xsdhttp://www.springframework.org/schema/utilhttp://www.springframework.org/schema/util/spring-util.xsd"><bean id="user" class="com.markus.spring.ioc.overview.domain.User"><!-- 属性注入 --><property name="id" value="1"/><property name="username" value="markus zhang"/></bean><bean id="user-by-constructor" class="com.markus.spring.ioc.overview.domain.User"><!-- 构造器注入 --><constructor-arg index="0" value="2"/><constructor-arg index="1" value="luna"/></bean>
</beans>
Java 代码
package com.markus.spring.dependency.injection;import com.markus.spring.ioc.overview.domain.User;
import org.springframework.context.support.ClassPathXmlApplicationContext;/*** @author: markus* @date: 2023/12/24 10:57 AM* @Description: setter方法和构造器注入 示例* @Blog: https://markuszhang.com* It's my honor to share what I've learned with you!*/
public class SetterAndConstructorInjectionDemo {public static void main(String[] args) {ClassPathXmlApplicationContext context = new ClassPathXmlApplicationContext("classpath:/META-INF/dependency-inject.xml");User user = context.getBean("user", User.class);System.out.println(user);User userByConstructor = context.getBean("user-by-constructor", User.class);System.out.println(userByConstructor);context.close();}
}
控制台

接口回调注入
字段和方法注入的方式我们放在下面的自动绑定来说。接下来先把接口回调的注入方式介绍一下。
准备一个Java Bean
我们在原本 User 这个 Java Bean 的基础上,让其实现 BeanNameAware 接口并重写其 setBeanName 方法,这样就可以在 IoC 创建该 Bean 的时候完成 beanName 属性值的回调注入。
package com.markus.spring.ioc.overview.domain;import org.springframework.beans.factory.BeanNameAware;import javax.annotation.PostConstruct;
import javax.annotation.PreDestroy;/*** @Author: zhangchenglong06* @Date: 2023/11/27* @Description:*/
public class User implements BeanNameAware {private Long id;private String username;private String beanName;public User() {System.out.println("开始初始化");}public User(Long id, String username) {this.id = id;this.username = username;}@Overridepublic void setBeanName(String name) {this.beanName = name;}
}
编写一个示例代码
package com.markus.spring.dependency.injection;import com.markus.spring.ioc.overview.domain.User;
import org.springframework.context.support.ClassPathXmlApplicationContext;/*** @author: markus* @date: 2023/12/24 11:06 AM* @Description: 接口回调注入 示例* @Blog: https://markuszhang.com* It's my honor to share what I've learned with you!*/
public class InterfaceCallbackInjectionDemo {public static void main(String[] args) {ClassPathXmlApplicationContext context = new ClassPathXmlApplicationContext("classpath:/META-INF/dependency-inject.xml");User user = context.getBean("user", User.class);System.out.println("User Bean Name is [ " + user.getBeanName() + " ]");context.close();}
}
控制台

手动注入的弊端
前面我们了解通过属性注入、构造器注入的使用方式,看似比较简单、方便,但试想,如果有注入集合场景的时候,我们通过手动注入应该如何实现呢?下面来掩饰一下:
xml配置
<?xml version="1.0" encoding="UTF-8"?>
<beans xmlns="http://www.springframework.org/schema/beans"xmlns:xsi="http://www.w3.org/2001/XMLSchema-instance"xmlns:util="http://www.springframework.org/schema/util"xsi:schemaLocation="http://www.springframework.org/schema/beanshttp://www.springframework.org/schema/beans/spring-beans.xsdhttp://www.springframework.org/schema/utilhttp://www.springframework.org/schema/util/spring-util.xsd"><bean id="user" class="com.markus.spring.ioc.overview.domain.User"><!-- 属性注入 --><property name="id" value="1"/><property name="username" value="markus zhang"/></bean><bean id="user-by-constructor" class="com.markus.spring.ioc.overview.domain.User"><!-- 构造器注入 --><constructor-arg index="0" value="2"/><constructor-arg index="1" value="luna"/></bean><bean id="user-list-holder" class="com.markus.spring.ioc.overview.domain.UserListHolder"><property name="users"><list><ref bean="user"/><ref bean="user-by-constructor"/><!-- 依次增加 --></list></property></bean>
</beans>
示例代码
package com.markus.spring.dependency.injection;import com.markus.spring.ioc.overview.domain.User;
import com.markus.spring.ioc.overview.domain.UserListHolder;
import org.springframework.context.support.ClassPathXmlApplicationContext;/*** @author: markus* @date: 2023/12/24 10:57 AM* @Description: setter方法和构造器注入 示例* @Blog: https://markuszhang.com* It's my honor to share what I've learned with you!*/
public class SetterAndConstructorInjectionDemo {public static void main(String[] args) {ClassPathXmlApplicationContext context = new ClassPathXmlApplicationContext("classpath:/META-INF/dependency-inject.xml");UserListHolder userListHolder = context.getBean("user-list-holder", UserListHolder.class);System.out.println(userListHolder);context.close();}
}
控制台

我们的目的就是将容器中的所有 User 类型的 Bean 注入到 UserListHolder 中,试想如果容器中不断的增加新的 User 类型的 Bean,那么通过手动注入的方式则会每次都需要去修改 UserListHolder 这个 Bean,这非常的不便,下面我们就来介绍下 Spring 框架提供的 自动绑定(Autowiring)特性。
自动绑定
使用和优点
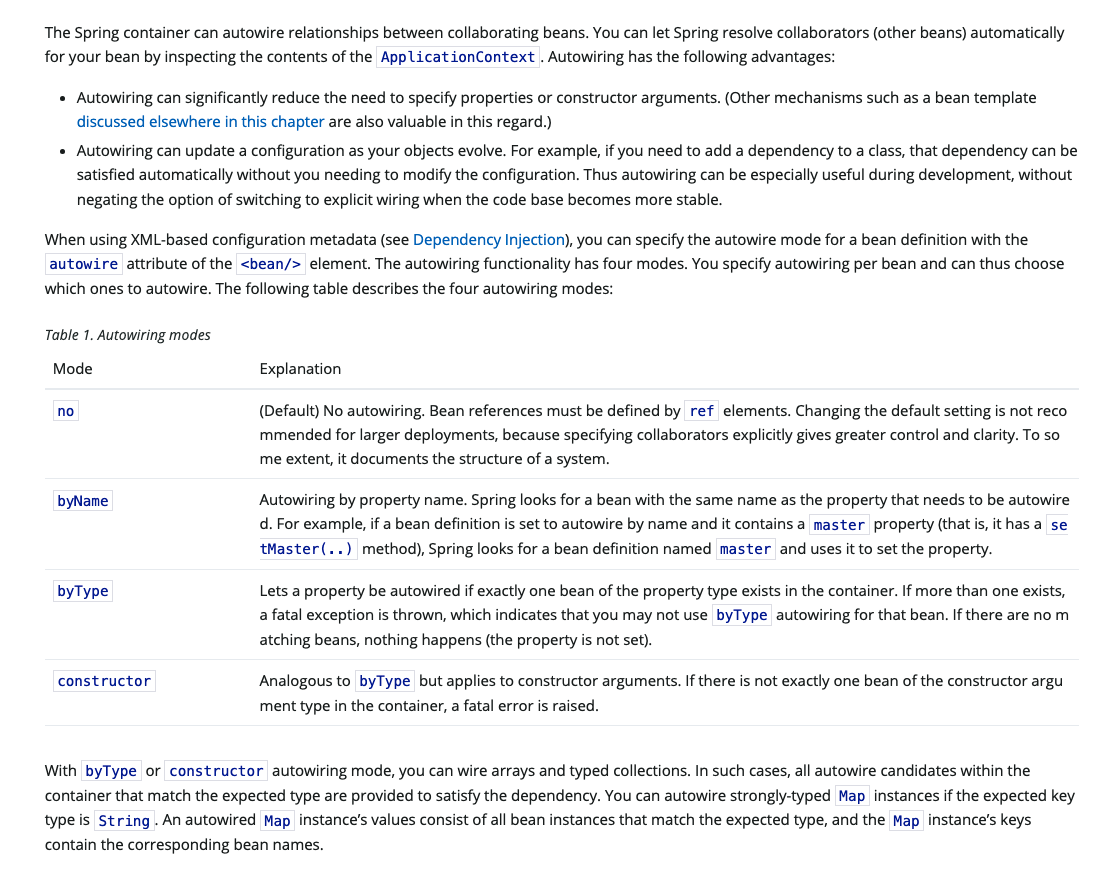
我们先来看下官方对于自动绑定的说明:原文链接

上面解释了自动装配的功能以及其优势和自动绑定的方式。大致意思是说:Spring IoC 容器可以自动绑定协作 Bean 之间的关系。我们可以让 Spring 通过查找 ApplicationContext 中的内容将其自动解析注入到你的 Bean 中。自动装配有以下优点:
- 自动装配可以显著减少手动配置需要的属性或者构造器的参数
- 自动装配可以随着对象的发展自动更新配置,例如如果需要向类中添加依赖项,则无需修改配置即可满足该依赖项。
也给出了基于 XMl 配置元信息场景下,如何使用自动绑定以及自动绑定的几种模式:
- no : 默认状态,无自动绑定
- byName : 通过属性名进行自动绑定
- byType : 通过类型进行自动绑定
- constructor : 和 byType 相似,不同的是 constructor 是应用与构造器参数上
我们回到上面在手动注入的弊端中所提到的例子,我们通过自动绑定稍加改造即可完成即便容器中增加多少或者删除多少 User 类型的 Bean 配置都不需要更改 UserListHolder 的配置完成其内容的自动更新。
<?xml version="1.0" encoding="UTF-8"?>
<beans xmlns="http://www.springframework.org/schema/beans"xmlns:xsi="http://www.w3.org/2001/XMLSchema-instance"xmlns:util="http://www.springframework.org/schema/util"xsi:schemaLocation="http://www.springframework.org/schema/beanshttp://www.springframework.org/schema/beans/spring-beans.xsdhttp://www.springframework.org/schema/utilhttp://www.springframework.org/schema/util/spring-util.xsd"><bean id="user" class="com.markus.spring.ioc.overview.domain.User"><!-- 属性注入 --><property name="id" value="1"/><property name="username" value="markus zhang"/></bean><bean id="user-by-constructor" class="com.markus.spring.ioc.overview.domain.User"><!-- 构造器注入 --><constructor-arg index="0" value="2"/><constructor-arg index="1" value="luna"/></bean><bean id="user-list-holder" class="com.markus.spring.ioc.overview.domain.UserListHolder"autowire="byType"> <!--通过类型 自动绑定-->
<!-- <property name="users">-->
<!-- <list>-->
<!-- <ref bean="user"/>-->
<!-- <ref bean="user-by-constructor"/>-->
<!-- <!– 依次增加 –>-->
<!-- </list>-->
<!-- </property>--></bean>
</beans>再次执行下上面的程序,依然正常执行。
我们通过自定绑定可以注入很多类型,包括数组、集合、Map以及外部化配置,下面我们用 @Autowired 和 @Value 注解完成这些功能。
package com.markus.spring.dependency.injection;import com.markus.spring.ioc.overview.domain.User;
import com.markus.spring.ioc.overview.domain.UserHolder;
import org.springframework.beans.factory.ObjectFactory;
import org.springframework.beans.factory.annotation.Autowired;
import org.springframework.beans.factory.annotation.Value;
import org.springframework.context.annotation.*;import java.util.Collection;
import java.util.Map;
import java.util.Optional;/*** @Author: zhangchenglong06* @Date: 2023/12/18* @Description: @Autowired 注解注入示例*/
@Configuration
@PropertySource("classpath:/META-INF/application.properties")
public class AtAutowiredAnnotationInjectionDemo {@Autowiredprivate Optional<User> optionalUser;@Autowiredprivate ObjectFactory<User> userObjectFactory;/*** @Autowired 注入流程* 1. 先按照名称查找* 2. 再按照类型查找*/@Autowiredprivate User user1;@Autowiredprivate Collection<User> users;@Autowiredprivate Map<String, User> userMap;@Autowiredprivate User[] userArrays;private User userFromMethodInjection;@Autowiredpublic void setUserFromMethodInjection(User user) {this.userFromMethodInjection = user;}@Autowiredprivate UserHolder userHolder;@Value("${my_site}")private String mySite;public static void main(String[] args) {AnnotationConfigApplicationContext context = new AnnotationConfigApplicationContext();context.register(AtAutowiredAnnotationInjectionDemo.class);context.refresh();AtAutowiredAnnotationInjectionDemo demo = context.getBean(AtAutowiredAnnotationInjectionDemo.class);System.out.println("demo.optionalUser : " + demo.optionalUser.get());System.out.println("demo.userObjectFactory : " + demo.userObjectFactory.getObject());System.out.println("demo.user : " + demo.user1);System.out.println("demo.users : " + demo.users);System.out.println("demo.userMap : " + demo.userMap);System.out.print("demo.userArrays : [ ");for (User userArray : demo.userArrays) {System.out.print(userArray.getBeanName() + " ");}System.out.println("]");System.out.println("demo.userFromMethodInjection : " + demo.userFromMethodInjection);System.out.println("demo.userHolder : " + demo.userHolder);System.out.println("demo.mySite : " + demo.mySite);context.close();}@Bean("user1")public User user1() {User user = new User();user.setId(1L);user.setUsername("Markus Zhang");return user;}@Bean("user2")@Primarypublic User user2() {User user = new User();user.setId(2L);user.setUsername("Luna");return user;}@Beanpublic UserHolder userHolder(@Autowired User user) {UserHolder userHolder = new UserHolder();userHolder.setUser(user);return userHolder;}
}
我们来看下控制台

缺点
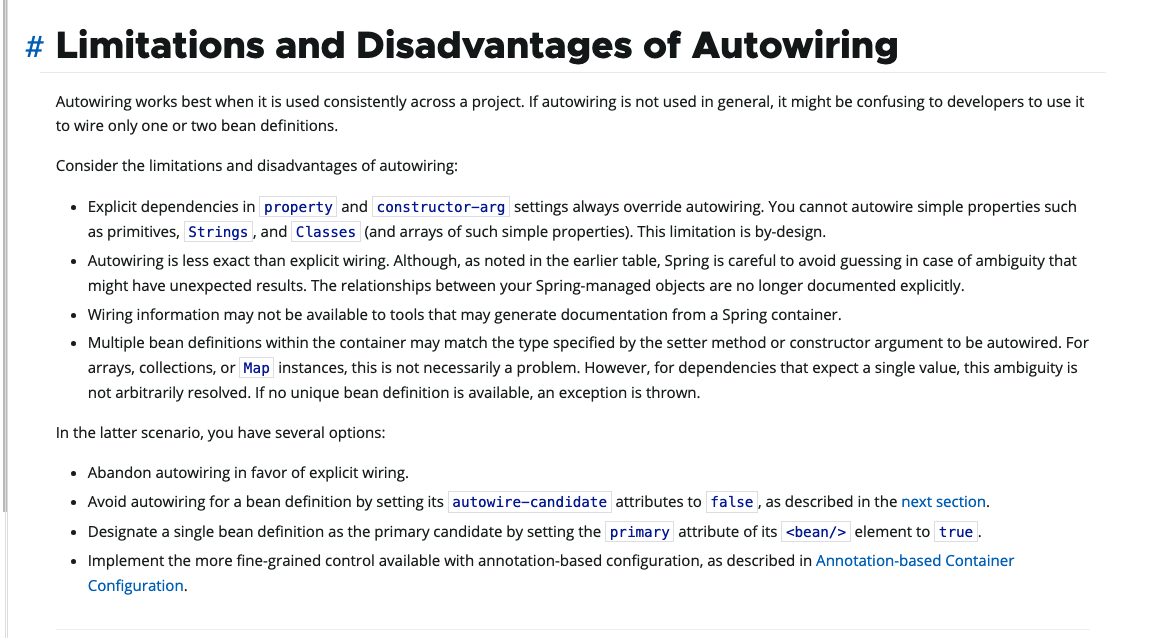
一项技术的落地,有它顺应时代的诉求,也一定会有它的局限性,我们通过官网来叙述下 自动绑定(Autowiring) 有什么限制或者缺点:原文链接

上面大概描述了 自动绑定的缺点和官方给你的建议:
- 缺点
- 显示注入比自动绑定优先级更高,它总会覆盖自动绑定的属性
- 不能注入简单属性,例如原语类型 String、int等,这是框架设计的限制(ps: 不过这些类型我们可以通过 @Value 实现,前面给出了例子)
- 自动绑定没有显示绑定精确,尽管 Spring 已经很小心地处理以避免歧义,但还是会有意想不到的结果
- 绑定信息不会以可视化的形式展示出来
- 多个 BeanDefinition 的情况下,在注入 集合、数组、Map等场景时问题不大,但是在注入单个 Bean 时,可能会产生问题,如果 Spring 在进行注入时找不到唯一 Bean 则会抛出异常
- 建议
- 避免使用自动绑定,采用显示绑定
- 如果某个 Bean 不想被注入到其他 Bean 中,则可通过 autowired-candidate 属性设置为 false 来跳过注入
- 在注入单个 Bean 的场景中,我们可以把目标 Bean 的 primary 属性设置为 true
- 通过注解驱动实现更精细粒度的控制
依赖注入原理
Bean 生命周期
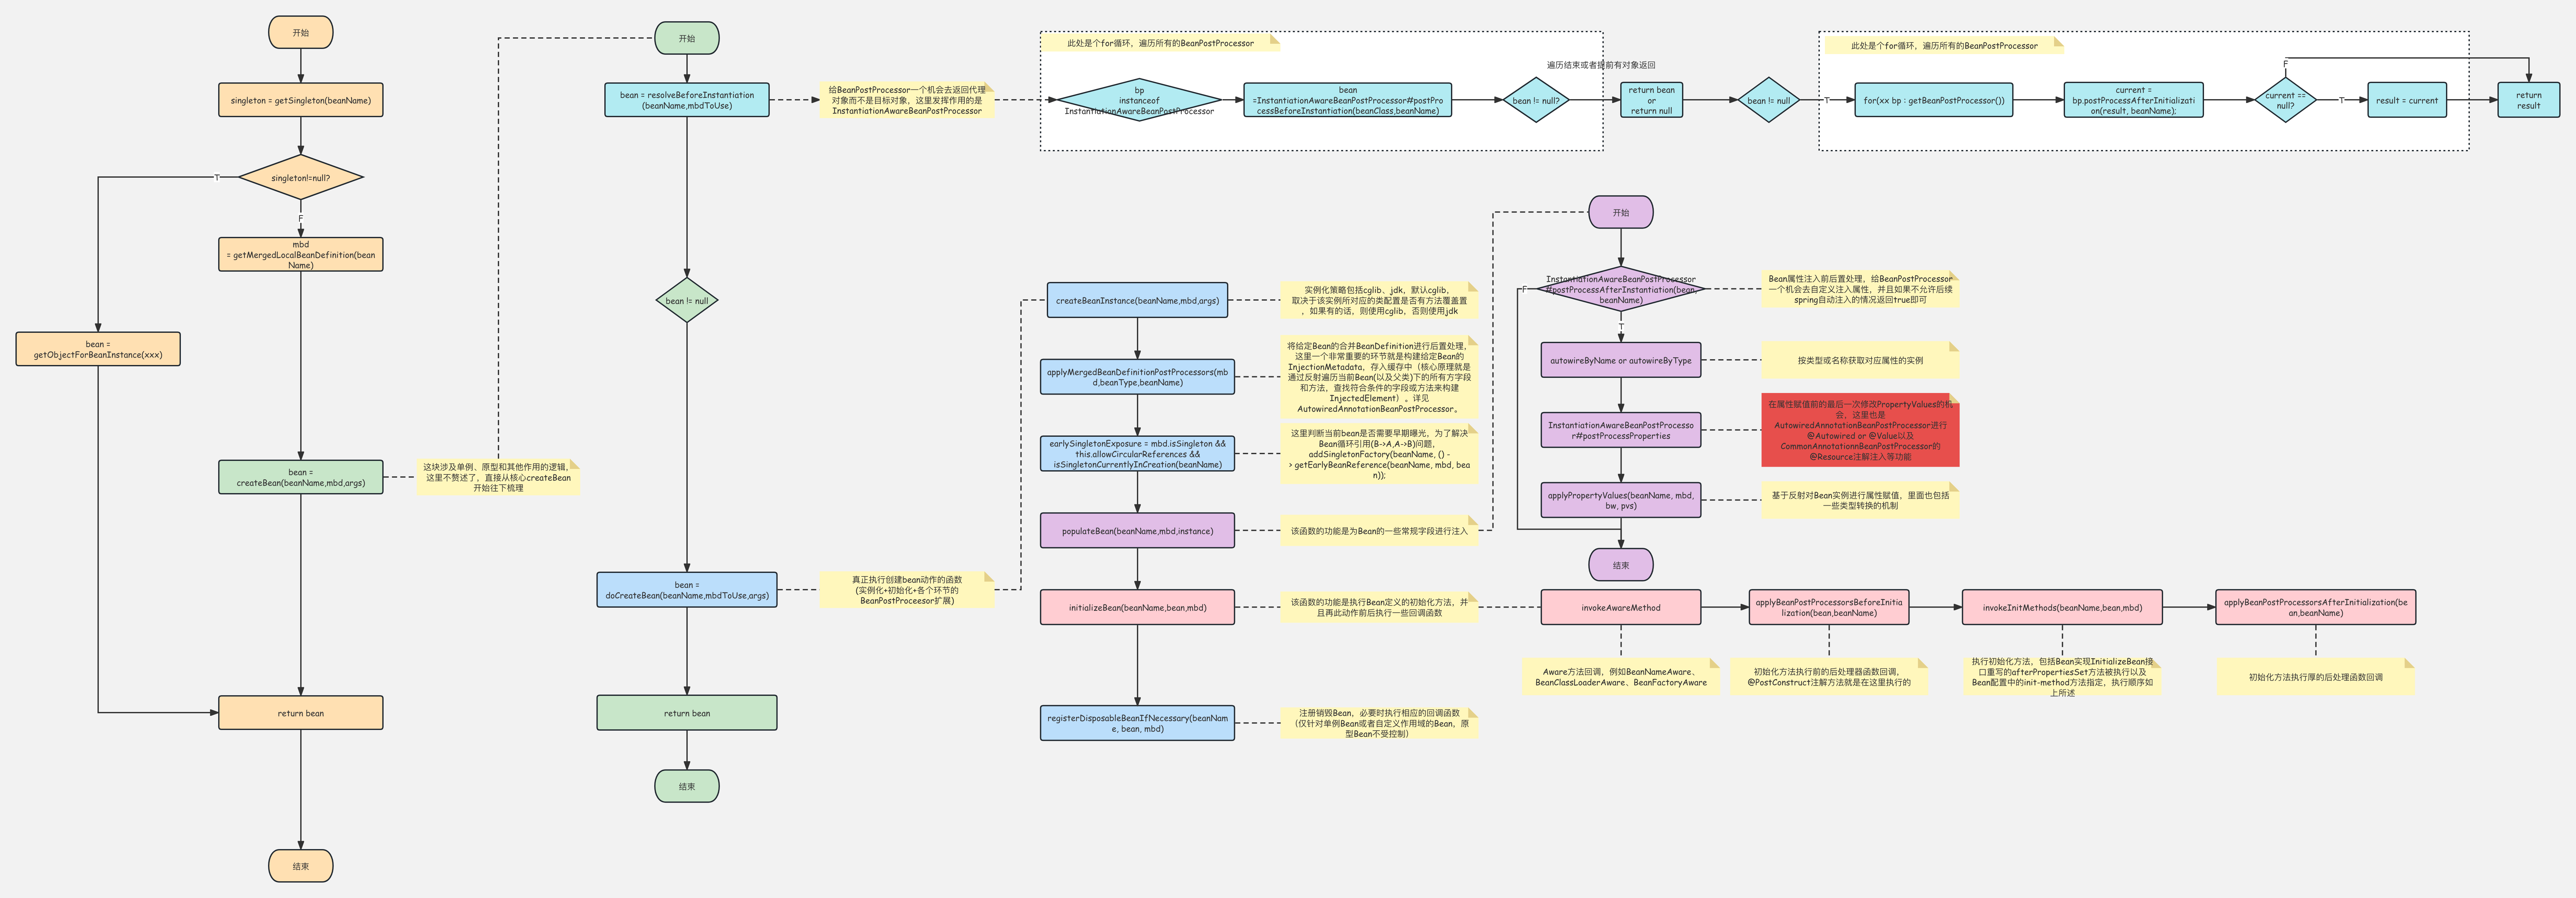
在说依赖注入前,我们先来整体看下 Spring Bean 的生命周期,然后再来说依赖注入发生在哪个阶段,接着再去对应源码处解析其原理

上图是 Bean 整个生命周期图,我们放大来看构造器注入和 setter 方法注入所在的环节:

构造器注入
我们把 Spring 源码拷贝出来:
// org.springframework.beans.factory.support.AbstractAutowireCapableBeanFactory#createBeanInstance
protected BeanWrapper createBeanInstance(String beanName, RootBeanDefinition mbd, @Nullable Object[] args) {// ... 其他流程省略// Candidate constructors for autowiring?Constructor<?>[] ctors = determineConstructorsFromBeanPostProcessors(beanClass, beanName);if (ctors != null || mbd.getResolvedAutowireMode() == AUTOWIRE_CONSTRUCTOR ||mbd.hasConstructorArgumentValues() || !ObjectUtils.isEmpty(args)) {return autowireConstructor(beanName, mbd, ctors, args);}// No special handling: simply use no-arg constructor.return instantiateBean(beanName, mbd);
}
可以看到 Spring 在判断是否进行 构造器注入 的条件有以下几种(满足其一即可):
- 构造器列表不为空
- BeanDefinition 的 autowireMode 设置为 AUTOWIRE_CONSTRUCTOR
- BeanDefinition 指定了构造器参数
- args 参数不为空(ps: 这个通常为空)
否则不进行特殊处理,直接使用无参构造器进行实例化(通过 cglib 或者 jdk 动态代理),这块不进行细节介绍了。
下面我们进入到 autowireConstructor 方法,看看里面做了什么:
public BeanWrapper autowireConstructor(String beanName, RootBeanDefinition mbd,@Nullable Constructor<?>[] chosenCtors, @Nullable Object[] explicitArgs) {BeanWrapperImpl bw = new BeanWrapperImpl();this.beanFactory.initBeanWrapper(bw);Constructor<?> constructorToUse = null;ArgumentsHolder argsHolderToUse = null;Object[] argsToUse = null;if (explicitArgs != null) {argsToUse = explicitArgs;}else {// ... 其他细节忽略// 需要去解析构造器boolean autowiring = (chosenCtors != null ||mbd.getResolvedAutowireMode() == AutowireCapableBeanFactory.AUTOWIRE_CONSTRUCTOR);ConstructorArgumentValues resolvedValues = null;int minNrOfArgs;if (explicitArgs != null) {minNrOfArgs = explicitArgs.length;}else {ConstructorArgumentValues cargs = mbd.getConstructorArgumentValues();resolvedValues = new ConstructorArgumentValues();minNrOfArgs = resolveConstructorArguments(beanName, mbd, bw, cargs, resolvedValues);}// 以参数个数的多少对构造器进行排序(顺序从多到少)AutowireUtils.sortConstructors(candidates);int minTypeDiffWeight = Integer.MAX_VALUE;Set<Constructor<?>> ambiguousConstructors = null;LinkedList<UnsatisfiedDependencyException> causes = null;// 遍历 构造器,找到最合适的构造器进行实例化for (Constructor<?> candidate : candidates) {int parameterCount = candidate.getParameterCount();if (constructorToUse != null && argsToUse != null && argsToUse.length > parameterCount) {// 找到了最适合的构造器,后面不需要再找了break;}if (parameterCount < minNrOfArgs) {continue;}ArgumentsHolder argsHolder;Class<?>[] paramTypes = candidate.getParameterTypes();if (resolvedValues != null) {// ... 省略细节// 核心方法,是解析当前候选构造器参数对应的参数值argsHolder = createArgumentArray(beanName, mbd, resolvedValues, bw, paramTypes, paramNames,getUserDeclaredConstructor(candidate), autowiring, candidates.length == 1);// ... 省略细节}// ... 省略int typeDiffWeight = (mbd.isLenientConstructorResolution() ?argsHolder.getTypeDifferenceWeight(paramTypes) : argsHolder.getAssignabilityWeight(paramTypes));// 如果这个构造器最近接匹配的话,就选择这个构造器进行实例化// Choose this constructor if it represents the closest match.if (typeDiffWeight < minTypeDiffWeight) {constructorToUse = candidate;argsHolderToUse = argsHolder;argsToUse = argsHolder.arguments;minTypeDiffWeight = typeDiffWeight;ambiguousConstructors = null;}// ... }// ... 省略其他细节}bw.setBeanInstance(instantiate(beanName, mbd, constructorToUse, argsToUse));return bw;}
总结一下:
- 获取候选构造器集合
- 对构造器集合进行排序(根据参数数量从多到少进行排序)
- 遍历构造器集合,依次解析构造器的参数对应的值(核心方法 createArgumentArray)
- 解析出值以后,通过反射计算出类型差异权重(Spring 设计出来的一个算法,有兴趣的可以了解下 org.springframework.util.MethodInvoker#getTypeDifferenceWeight)
- 如果差异结果最匹配,就选择这个构造器进行实例化
我们再深入到createArgumentArray方法中去看下
private ArgumentsHolder createArgumentArray(String beanName, RootBeanDefinition mbd, @Nullable ConstructorArgumentValues resolvedValues,BeanWrapper bw, Class<?>[] paramTypes, @Nullable String[] paramNames, Executable executable,boolean autowiring, boolean fallback) throws UnsatisfiedDependencyException {// ... 省略细节for (int paramIndex = 0; paramIndex < paramTypes.length; paramIndex++) {if (valueHolder != null) {// ... 省略细节}else {// ... 省略细节try {// 核心在这,依次解析构造器中的参数值Object autowiredArgument = resolveAutowiredArgument(methodParam, beanName, autowiredBeanNames, converter, fallback);args.rawArguments[paramIndex] = autowiredArgument;args.arguments[paramIndex] = autowiredArgument;args.preparedArguments[paramIndex] = autowiredArgumentMarker;args.resolveNecessary = true;}catch (BeansException ex) {throw new UnsatisfiedDependencyException(mbd.getResourceDescription(), beanName, new InjectionPoint(methodParam), ex);}}// ... 省略细节}// ... 省略细节return args;}我们可以看到createArgumentArray方法中主要做的事情就是遍历构造器的参数,依次解析其参数值,我们再往下看一下resolveAutowiredArgument方法,看下它是如何解析出具体值的。
protected Object resolveAutowiredArgument(MethodParameter param, String beanName,@Nullable Set<String> autowiredBeanNames, TypeConverter typeConverter, boolean fallback) {// ... 省略细节try {// 这块就是最最最最最最最核心的函数了,我们在揭幕到这return this.beanFactory.resolveDependency(new DependencyDescriptor(param, true), beanName, autowiredBeanNames, typeConverter);}// ... 省略细节}
可以看到 依赖注入实现原理中最最最最核心的函数 org.springframework.beans.factory.config.AutowireCapableBeanFactory#resolveDependency(xxx) 露出水面了😄,我们这里先不深入解析,点到为止。
总结一下:构造器注入发生在 Bean 生命周期中 实例化 Bean 阶段,也就是 createBeanInstance 函数中,这个函数主要目的就是选择出 Bean 对象中最合适的构造器完成对 Bean 的实例化,在选择构造器的过程中,会有一步判断 用户是否选择进行构造器自动绑定的逻辑,如果用户选择了构造器自动绑定,那么 Spring 框架会通过反射获取该类的所有构造器,选择出最适合的构造器进行实例化。而在选择构造器的过程中,会对构造器的参数进行解析,解析出来以后,通过对比差异(Spring 实现了一套类型与参数值的差异算法,有兴趣的同学可以深入了解下org.springframework.util.MethodInvoker#getTypeDifferenceWeight)来决定最终用来实例化的构造器。而在解析参数值时,我们探究到 resolveDependency这个函数,通过这个函数可以解析出来当前参数所对应的值。
构造器注入原理就如上所述了。
setter方法注入
同样,我们也先把实现setter方法注入的入口函数先拷贝出来
// org.springframework.beans.factory.support.AbstractAutowireCapableBeanFactory#populateBean
protected void populateBean(String beanName, RootBeanDefinition mbd, @Nullable BeanWrapper bw) {// ... 省略细节PropertyValues pvs = (mbd.hasPropertyValues() ? mbd.getPropertyValues() : null);int resolvedAutowireMode = mbd.getResolvedAutowireMode();if (resolvedAutowireMode == AUTOWIRE_BY_NAME || resolvedAutowireMode == AUTOWIRE_BY_TYPE) {MutablePropertyValues newPvs = new MutablePropertyValues(pvs);// Add property values based on autowire by name if applicable.if (resolvedAutowireMode == AUTOWIRE_BY_NAME) {autowireByName(beanName, mbd, bw, newPvs);}// Add property values based on autowire by type if applicable.if (resolvedAutowireMode == AUTOWIRE_BY_TYPE) {autowireByType(beanName, mbd, bw, newPvs);}pvs = newPvs;}// ... 省略细节
}
我们省略其他的细节,重点看下这个函数里面对于自动绑定的处理,可以看到,框架通过判断 BeanDefinition 的 autowiredMode 属性来决定执行 autowireByName 还是 autowireByType 函数。
autowiredByName
protected void autowireByName(String beanName, AbstractBeanDefinition mbd, BeanWrapper bw, MutablePropertyValues pvs) {String[] propertyNames = unsatisfiedNonSimpleProperties(mbd, bw);// 获取属性名for (String propertyName : propertyNames) {if (containsBean(propertyName)) {// 通过属性名称进行依赖查找Object bean = getBean(propertyName);pvs.add(propertyName, bean);registerDependentBean(propertyName, beanName);if (logger.isTraceEnabled()) {logger.trace("Added autowiring by name from bean name '" + beanName +"' via property '" + propertyName + "' to bean named '" + propertyName + "'");}}else {if (logger.isTraceEnabled()) {logger.trace("Not autowiring property '" + propertyName + "' of bean '" + beanName +"' by name: no matching bean found");}}}
}
autowiredByType
protected void autowireByType(String beanName, AbstractBeanDefinition mbd, BeanWrapper bw, MutablePropertyValues pvs) {TypeConverter converter = getCustomTypeConverter();if (converter == null) {converter = bw;}Set<String> autowiredBeanNames = new LinkedHashSet<>(4);String[] propertyNames = unsatisfiedNonSimpleProperties(mbd, bw);for (String propertyName : propertyNames) {try {PropertyDescriptor pd = bw.getPropertyDescriptor(propertyName);// Don't try autowiring by type for type Object: never makes sense,// even if it technically is a unsatisfied, non-simple property.if (Object.class != pd.getPropertyType()) {MethodParameter methodParam = BeanUtils.getWriteMethodParameter(pd);// Do not allow eager init for type matching in case of a prioritized post-processor.boolean eager = !(bw.getWrappedInstance() instanceof PriorityOrdered);DependencyDescriptor desc = new AutowireByTypeDependencyDescriptor(methodParam, eager);// 解析依赖值Object autowiredArgument = resolveDependency(desc, beanName, autowiredBeanNames, converter);if (autowiredArgument != null) {pvs.add(propertyName, autowiredArgument);}for (String autowiredBeanName : autowiredBeanNames) {registerDependentBean(autowiredBeanName, beanName);if (logger.isTraceEnabled()) {logger.trace("Autowiring by type from bean name '" + beanName + "' via property '" +propertyName + "' to bean named '" + autowiredBeanName + "'");}}autowiredBeanNames.clear();}}catch (BeansException ex) {throw new UnsatisfiedDependencyException(mbd.getResourceDescription(), beanName, propertyName, ex);}}
}
通过类型注入中,我们也看到了这个核心函数resolveDependency,通过其将属性参数值解析出来并完成注入。
总结一下:setter方法注入有两种方式,一是通过名称注入;二是通过类型注入。在通过名称注入的方式中,框架采用依赖查找完成;在通过类型注入的方式中,框架采用解析依赖完成。
依赖来源
前面我们解释了构造器注入和setter方法注入两种方式的原理,追溯到底层我们发现,两者都会通过org.springframework.beans.factory.config.AutowireCapableBeanFactory#resolveDependency(xxx)这个函数获取解析后的参数值(setter方法通过名称注入的时候,采用的依赖查找除外)。
这里我们可以得到一个结论:依赖注入的来源主要来源于 getBean(xxx) 和 resolveDependency(xxx) 两处,接下来我们将深入探究这两个来源。
getBean(xxx)的来源
getBean就是依赖查找,追溯getBean(xxx)的来源等价于追溯依赖查找的来源。
依赖查找的来源包括:
- BeanDefinition
- 用户配置
- Spring 内建
- 单例对象
- 用户使用 API 注册
- Spring 内建
用户配置的 BeanDefinition 元信息我们就不介绍了,对于 Spring 内建 BeanDefinition 的注册,如下图所示:
org.springframework.context.annotation.AnnotationConfigUtils#registerAnnotationConfigProcessors(org.springframework.beans.factory.support.BeanDefinitionRegistry, java.lang.Object)

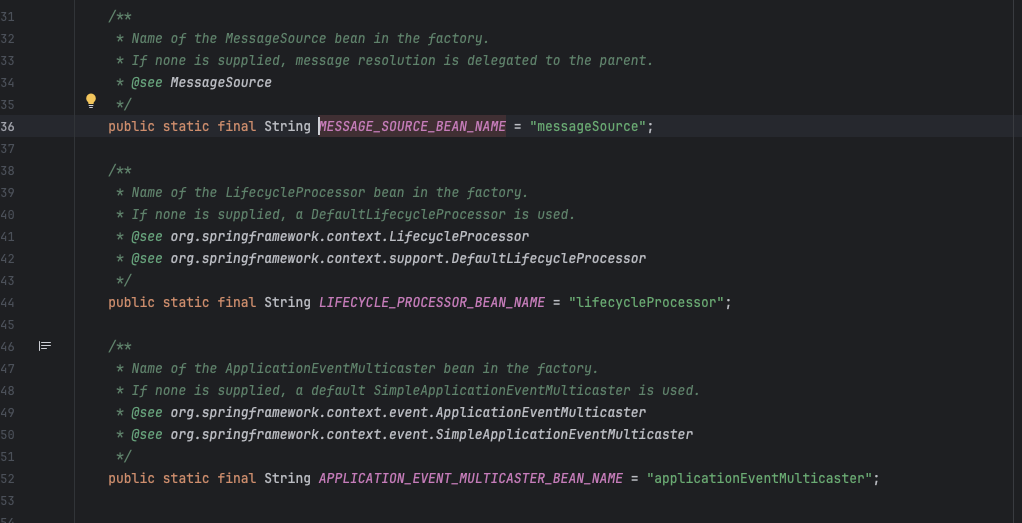
我们再来看下 Spring 内建单例对象
org.springframework.context.support.AbstractApplicationContext#prepareBeanFactory

org.springframework.context.support.AbstractApplicationContext#initMessageSource
org.springframework.context.support.AbstractApplicationContext#initApplicationEventMulticaster
org.springframework.context.support.AbstractApplicationContext#initLifecycleProcessor

最终,依赖查找的来源这两项:
- org.springframework.beans.factory.support.BeanDefinitionRegistry#registerBeanDefinition
- org.springframework.beans.factory.config.SingletonBeanRegistry#registerSingleton
resolveDependency(xxx)的来源
针对 resolveDependency 依赖来源,我们直接从这个入口开始
// org.springframework.beans.factory.support.DefaultListableBeanFactory#doResolveDependency
public Object doResolveDependency(DependencyDescriptor descriptor, @Nullable String beanName,@Nullable Set<String> autowiredBeanNames, @Nullable TypeConverter typeConverter) throws BeansException {InjectionPoint previousInjectionPoint = ConstructorResolver.setCurrentInjectionPoint(descriptor);try {// 针对 @Value 注解的使用场景,例如 @Value("${xxx:defaultValue}")Object value = getAutowireCandidateResolver().getSuggestedValue(descriptor);if (value != null) {if (value instanceof String) {String strVal = resolveEmbeddedValue((String) value);BeanDefinition bd = (beanName != null && containsBean(beanName) ?getMergedBeanDefinition(beanName) : null);value = evaluateBeanDefinitionString(strVal, bd);}TypeConverter converter = (typeConverter != null ? typeConverter : getTypeConverter());try {return converter.convertIfNecessary(value, type, descriptor.getTypeDescriptor());}catch (UnsupportedOperationException ex) {// A custom TypeConverter which does not support TypeDescriptor resolution...return (descriptor.getField() != null ?converter.convertIfNecessary(value, type, descriptor.getField()) :converter.convertIfNecessary(value, type, descriptor.getMethodParameter()));}}// 解析 字段类型为 Array、Collection、Map等的场景Object multipleBeans = resolveMultipleBeans(descriptor, beanName, autowiredBeanNames, typeConverter);if (multipleBeans != null) {return multipleBeans;}// 按照类型从 数据源中进行 查找Map<String, Object> matchingBeans = findAutowireCandidates(beanName, type, descriptor);if (matchingBeans.isEmpty()) {if (isRequired(descriptor)) {raiseNoMatchingBeanFound(type, descriptor.getResolvableType(), descriptor);}return null;}String autowiredBeanName;Object instanceCandidate;// 当有多个 匹配到的 Bean 情况,决定选择哪个作为首选的 Bean 进行注入if (matchingBeans.size() > 1) {autowiredBeanName = determineAutowireCandidate(matchingBeans, descriptor);if (autowiredBeanName == null) {if (isRequired(descriptor) || !indicatesMultipleBeans(type)) {return descriptor.resolveNotUnique(descriptor.getResolvableType(), matchingBeans);}else {// In case of an optional Collection/Map, silently ignore a non-unique case:// possibly it was meant to be an empty collection of multiple regular beans// (before 4.3 in particular when we didn't even look for collection beans).return null;}}instanceCandidate = matchingBeans.get(autowiredBeanName);}else {// We have exactly one match.Map.Entry<String, Object> entry = matchingBeans.entrySet().iterator().next();autowiredBeanName = entry.getKey();instanceCandidate = entry.getValue();}if (autowiredBeanNames != null) {autowiredBeanNames.add(autowiredBeanName);}if (instanceCandidate instanceof Class) {instanceCandidate = descriptor.resolveCandidate(autowiredBeanName, type, this);}Object result = instanceCandidate;if (result instanceof NullBean) {if (isRequired(descriptor)) {raiseNoMatchingBeanFound(type, descriptor.getResolvableType(), descriptor);}result = null;}if (!ClassUtils.isAssignableValue(type, result)) {throw new BeanNotOfRequiredTypeException(autowiredBeanName, type, instanceCandidate.getClass());}return result;}finally {ConstructorResolver.setCurrentInjectionPoint(previousInjectionPoint);}
}
总结一下,这个函数主要做了一下事情:
- 解析字段被 @Value 标注时,做一个解析并返回(解析的过程是,如果有显示的属性配置,则采用配置值,没有配置则采用默认值)
- 解析字段为数组、集合或者Map的场景,从
数据源中按照类型查找出来并设置到当前字段中去 - 解析字段非上述情况时,从
数据源中同样按照类型查找出来,并选择出首选的依赖返回。
上面说的数据源比较神秘,我们就深入到 determineAutowireCandidate 方法来一探究竟,解开其神秘的面纱
protected Map<String, Object> findAutowireCandidates(@Nullable String beanName, Class<?> requiredType, DependencyDescriptor descriptor) {// 按照类型从容器中查找相关的候选 Bean 名称String[] candidateNames = BeanFactoryUtils.beanNamesForTypeIncludingAncestors(this, requiredType, true, descriptor.isEager());Map<String, Object> result = new LinkedHashMap<>(candidateNames.length);// 从 可解析依赖 中 查找是否有该 类型的 依赖,如果有也被考虑进 resultfor (Map.Entry<Class<?>, Object> classObjectEntry : this.resolvableDependencies.entrySet()) {Class<?> autowiringType = classObjectEntry.getKey();if (autowiringType.isAssignableFrom(requiredType)) {Object autowiringValue = classObjectEntry.getValue();autowiringValue = AutowireUtils.resolveAutowiringValue(autowiringValue, requiredType);if (requiredType.isInstance(autowiringValue)) {result.put(ObjectUtils.identityToString(autowiringValue), autowiringValue);break;}}}// 根据候选的 Bean 名称,通过其 BeanDefinition 判断是否可以加入到 resultfor (String candidate : candidateNames) {if (!isSelfReference(beanName, candidate) && isAutowireCandidate(candidate, descriptor)) {addCandidateEntry(result, candidate, descriptor, requiredType);}}// 结果为空if (result.isEmpty()) {// 判断字段不是多 Bean 的场景boolean multiple = indicatesMultipleBeans(requiredType);// Consider fallback matches if the first pass failed to find anything...DependencyDescriptor fallbackDescriptor = descriptor.forFallbackMatch();for (String candidate : candidateNames) {if (!isSelfReference(beanName, candidate) && isAutowireCandidate(candidate, fallbackDescriptor) &&(!multiple || getAutowireCandidateResolver().hasQualifier(descriptor))) {addCandidateEntry(result, candidate, descriptor, requiredType);}}// 还为空 并且 字段不为多 Bean 的场景if (result.isEmpty() && !multiple) {// Consider self references as a final pass...// but in the case of a dependency collection, not the very same bean itself.for (String candidate : candidateNames) {if (isSelfReference(beanName, candidate) &&(!(descriptor instanceof MultiElementDescriptor) || !beanName.equals(candidate)) &&isAutowireCandidate(candidate, fallbackDescriptor)) {addCandidateEntry(result, candidate, descriptor, requiredType);}}}}return result;
}
总结一下,这个函数主要做了以下事情:
- 先从 IoC 容器中查找指定类型的
候选 Bean 集合 - 实例化一个 Map<String,Object> 的集合
result,用来存储该类型对应的候选依赖 - 从
可解析依赖里查找符合条件的候选并添加进 result 中 - 从
候选 Bean 集合中找到 非自引用(候选Bean 指向 当前Bean 或者 候选Bean 的 工厂Bean 执行当前Bean)、并且BeanDefinition#autowire-candidate为true的候选Bean加入到result中 - 结果为空的兜底,经符合一定条件的候选 Bean 加入到 result 中
- 将 result 返回,得到最终的依赖源
综上,我们可以得出一个结论,依赖注入的来源包括两方面,分别如下:
- 依赖查找的来源
- 可解析依赖 resolvableDependencies,源码位于 org.springframework.beans.factory.support.DefaultListableBeanFactory#resolvableDependencies
本文总结
本篇,我们介绍了依赖注入的使用方式和其注入原理,并追根溯源定位的依赖的来源,分析了依赖查找的来源以及依赖注入的来源。大家可以结合本篇文章进入到源码进行研读,印象会更深刻。针对 @Autowired 注解的使用和原理分析我放在了另一篇一文搞懂Spring @Autowired注解的使用及其原理,有兴趣的也可以去了解阅读下。


求解23个基本函数)


)


—— Flume)


GDAL之shp转geojson)


