1、下载models。
https://github.com/tensorflow/models 并文件解压。

2、下载protos文件
https://github.com/protocolbuffers/protobuf/releases?after=v3.9.1
我这里下载的3.7.0版本。注意一定要下载protoc-xxx-win64.zip版本。必须是带有win64的压缩包,否则可能没有需要的bin文件

下载后解压如下:并将bin下的protoc.exe文件复制到C:\Windows\System32文件夹下。

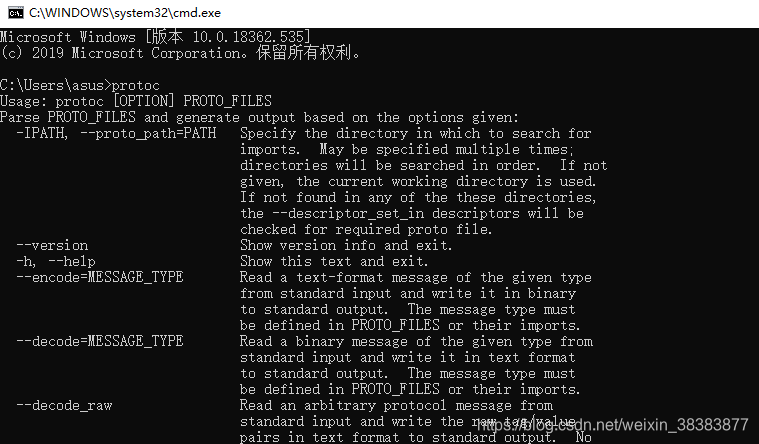
打开cmd输入protoc。如果出现以下界面 则表示配置protoc成功

3、编译proto文件
打开windows PowerShell(注意,这里必须是PowerShell,运行cmd会报错)。cd到research文件目录下
输入:
Get-ChildItem object_detection/protos/*.proto | Resolve-Path -Relative | %{ protoc $_ --python_out=. }

运行成功后:查看research下object_detection文件夹下protos文件,如果每个proto文件都成了对应的以py为后缀的python源码,就说明编译成功了。

4、配置环境变量
在Anaconda\Lib\site-packages新建一个路径文件tensorflow_model.pth,必须以.pth为后缀,写上你要加入的模块文件所在的目录名称,如下图:

5、运行models/research下的setup.py
python setup.py build
python setup.py install
6、测试
在object_detection文件夹下建立object_detection_demo.py 文件
代码如下:这里模型下载链接:链接:https://pan.baidu.com/s/1dxzU4YMpF93qwkXF0x-3JA提取码:uhju
# 一定要保存为UTF8的格式哦
import numpy as np
import os
import six.moves.urllib as urllib
import sys
import tarfile
import tensorflow as tf
import zipfile
import matplotlib
import cv2# Matplotlib chooses Xwindows backend by default.
matplotlib.use('Agg')from collections import defaultdict
from io import StringIO
from matplotlib import pyplot as plt
from PIL import Image
from object_detection.utils import label_map_util
from object_detection.utils import visualization_utils as vis_util##################### Download Model,如果本地已下载也可修改成本地路径
# What model to download.
MODEL_NAME = 'ssd_mobilenet_v1_coco_2017_11_17'
MODEL_FILE = MODEL_NAME + '.tar.gz'
DOWNLOAD_BASE = 'http://download.tensorflow.org/models/object_detection/'# Path to frozen detection graph. This is the actual model that is used for the object detection.
PATH_TO_CKPT = MODEL_NAME + '/frozen_inference_graph.pb'# List of the strings that is used to add correct label for each box.
PATH_TO_LABELS = os.path.join('data', 'mscoco_label_map.pbtxt')NUM_CLASSES = 90# Download model if not already downloaded
if not os.path.exists(PATH_TO_CKPT):print('Downloading model... (This may take over 5 minutes)')opener = urllib.request.URLopener()opener.retrieve(DOWNLOAD_BASE + MODEL_FILE, MODEL_FILE)print('Extracting...')tar_file = tarfile.open(MODEL_FILE)for file in tar_file.getmembers():file_name = os.path.basename(file.name)if 'frozen_inference_graph.pb' in file_name:tar_file.extract(file, os.getcwd())
else:print('Model already downloaded.')##################### Load a (frozen) Tensorflow model into memory.
print('Loading model...')
detection_graph = tf.Graph()with detection_graph.as_default():od_graph_def = tf.GraphDef()with tf.gfile.GFile(PATH_TO_CKPT, 'rb') as fid:serialized_graph = fid.read()od_graph_def.ParseFromString(serialized_graph)tf.import_graph_def(od_graph_def, name='')##################### Loading label map
print('Loading label map...')
label_map = label_map_util.load_labelmap(PATH_TO_LABELS)
categories = label_map_util.convert_label_map_to_categories(label_map, max_num_classes=NUM_CLASSES,use_display_name=True)
category_index = label_map_util.create_category_index(categories)##################### Helper code
def load_image_into_numpy_array(image):(im_width, im_height) = image.sizereturn np.array(image.getdata()).reshape((im_height, im_width, 3)).astype(np.uint8)##################### Detection
# 测试图片的路径,可以根据自己的实际情况修改
TEST_IMAGE_PATH = 'test_images/image1.jpg'# Size, in inches, of the output images.
IMAGE_SIZE = (12, 8)print('Detecting...')
config = tf.ConfigProto()
config.gpu_options.allow_growth = True
with detection_graph.as_default():with tf.Session(graph=detection_graph,config=config) as sess:print(TEST_IMAGE_PATH)image = Image.open(TEST_IMAGE_PATH)image_np = load_image_into_numpy_array(image)image_np_expanded = np.expand_dims(image_np, axis=0)image_tensor = detection_graph.get_tensor_by_name('image_tensor:0')boxes = detection_graph.get_tensor_by_name('detection_boxes:0')scores = detection_graph.get_tensor_by_name('detection_scores:0')classes = detection_graph.get_tensor_by_name('detection_classes:0')num_detections = detection_graph.get_tensor_by_name('num_detections:0')# Actual detection.(boxes, scores, classes, num_detections) = sess.run([boxes, scores, classes, num_detections],feed_dict={image_tensor: image_np_expanded})# Visualization of the results of a detection.vis_util.visualize_boxes_and_labels_on_image_array(image_np,np.squeeze(boxes),np.squeeze(classes).astype(np.int32),np.squeeze(scores),category_index,use_normalized_coordinates=True,line_thickness=8)print(TEST_IMAGE_PATH.split('.')[0] + '_labeled.jpg')plt.figure(figsize=IMAGE_SIZE, dpi=300)# 不知道为什么,在我的机器上没显示出图片,有知道的朋友指点下,谢谢plt.imshow(image_np)# 保存标记图片plt.savefig(TEST_IMAGE_PATH.split('.')[0] + '_labeled.jpg')
运行后:
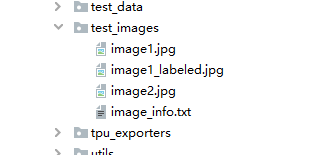
在object_detection文件夹下test_images文件下多了一张image1_labeled.jpg则证明配置成功。


参考自https://blog.csdn.net/zhongxianjin/article/details/103269901
https://blog.csdn.net/qq_28019591/article/details/82023949
试题库.docx)


中国知网等文献检索的一般方法)
之数据探索和分析)
