目录
- 准备条件(基于linux环境)
- 参考文献
- 例子-python Ray集群
-
- 1.部署head节点
- 2.部署worker节点
- 部署Ray集群
- 安装Ray(在所有节点上安装)
- Ray工作原理
- Ray的优势
- Ray简介
准备条件(基于linux环境)
- 这里部署2个节点的集群,准备2个linux环境,ip为
192.168.2.165 worker节点(内存限制,本地安装只有一个CPU)
192.168.2.220 head节点(内存限制,本地安装只有一个CPU)
-
安装 python3:yum install python3
-
Ray学习文档地址:https://ray.readthedocs.io/en/latest/index.html
-
github地址:https://github.com/ray-project/ray
Ray简介
Ray是用于构建和运行分布式应用程序的快速,简单的框架。
Ray与以下库打包在一起,以加快机器学习的工作量:
Tune:可伸缩超参数调整
RLlib:可扩展的强化学习
Distributed Training :分布式培训
Ray的优势
- 更省时,高效
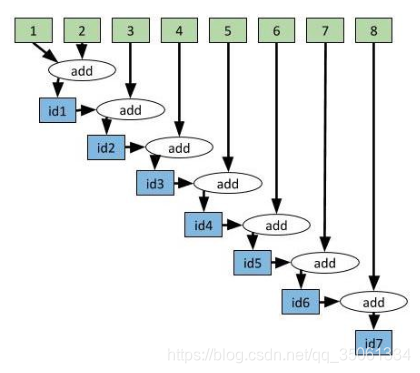
普通的执行方式是这样的:
Ray:
Ray工作原理

该图片引用来自参考文献1:
安装Ray(在所有节点上安装)
pip3 install ray

部署Ray集群
手动在head节点上启动:
firewall-cmd --add-port=6379/tcp
ray start --head --redis-port=6379

在这个节点上启动Ray。您可以通过调用向集群添加其他节点:
(Started Ray on this node. You can add additional nodes to the cluster by calling)
ray start --redis-address 192.168.2.220:6379
您可以通过运行Python将一个驱动程序连接到集群
(from the node you wish to add. You can connect a driver to the cluster from Python by running
)
import ray
ray.init(redis_address="192.168.2.220:6379")
如果从不同的机器连接有问题,请检查防火墙的配置是否正确。如果希望终止已启动的进程,请运行
(If you have trouble connecting from a different machine, check that your firewall is configured properly. If you wish to terminate the processes that have been started, run
)
ray stop
注意:这里的ip 192.168.2.220 是步骤1中head节点的ip
firewall-cmd --add-port=6379/tcp
ray start --redis-address 192.168.2.220:6379

日志存放目录:
/tmp/ray
例子-python Ray集群
# -*- coding: utf-8 -*-
import time
import ray
ray.init(redis_address="192.168.2.220:6379")def  f1():time.sleep(1)@ray.remote
def f2():time.sleep(1)#以下需要十秒。
time1=time.time()
[ f1() for _ in range(50)]
print(time.time()-time1)#以下需要一秒(假设系统至少有10个CPU)。
time2=time.time()
ray.get([ f2.remote() for _ in range(50)])
print(time.time()-time2)
任何程序错误,以及技术疑问或需要解答的,请添加


BackTrack-linux安全***测试系统盘)


)


