作者 | 磊哥
来源 | Java中文社群(ID:javacn666)
转载请联系授权(微信ID:GG_Stone)
在 Nacos 中,服务调用主要是通过 RestTemplate + Ribbon 实现的,RestTemplate 是 Spring 提供的 Restful 请求实现类,而 Ribbon 是客户端负载均衡器,通过 Ribbon 可以获取服务实例的具体信息(IP 和端口号),之后再通过 RestTemplate 加服务实例的具体信息就可以完成一次服务调用了。
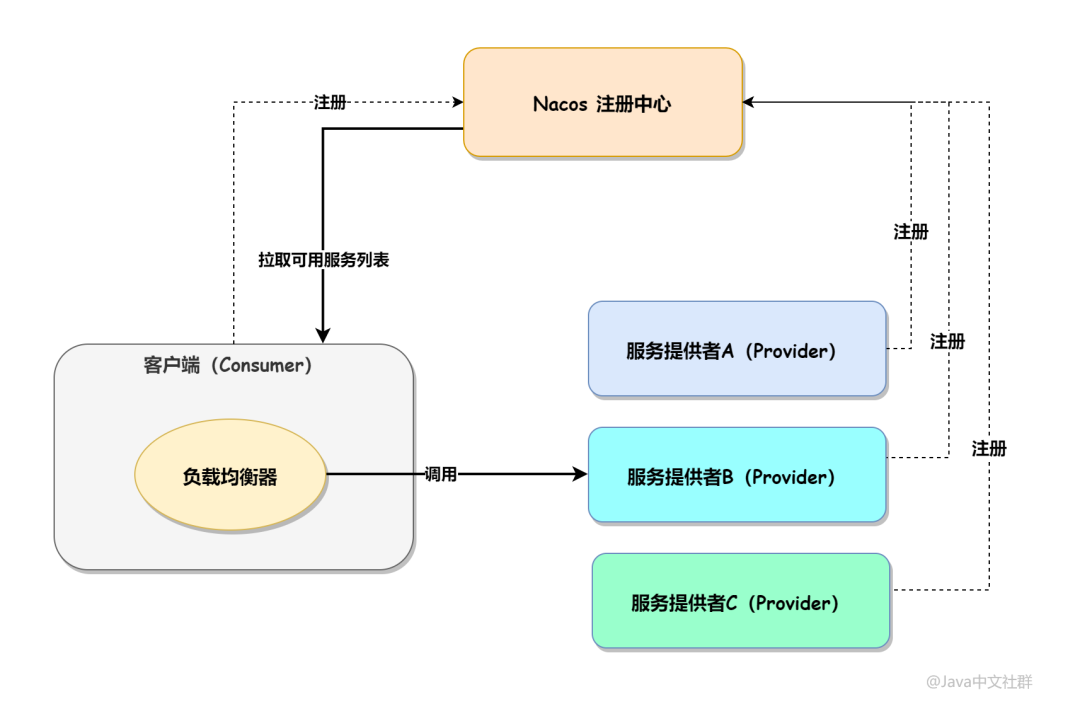
而 RestTemplate + Ribbon 调用服务的实现方式两种:通过代码的方式调用服务和通过注解方式调用服务。但两种实现方式的原理都是一样的:都是通过注册中心,将可用服务列表拉取到本地(客户端),再通过客户端负载均衡器得到某个服务器的具体信息,然后请求此服务器即可,如下图所示:
1.代码方式调用
通过代码的方式调用服务在实际工作中并不常用,主要是写法太麻烦,但了解它对于后面理解注解调用方式有很大的帮助,所以我们这里重点来看一下。服务调用需要有两个角色:一个是服务提供者(Provider),另一个是服务调用者(Consumer),接下来我们来创建一下这两个角色。
1.1 创建服务提供者:Provider
第一步:先创建一个 Spring Boot 项目(Spring Cloud 项目是基于 Spring Boot 创建的),添加 spring-web 和 nacos-discovery 依赖,具体依赖信息如下:
<dependency><groupId>org.springframework.boot</groupId><artifactId>spring-boot-starter-web</artifactId>
</dependency>
<!-- 添加 Nacos 支持 -->
<dependency><groupId>com.alibaba.cloud</groupId><artifactId>spring-cloud-starter-alibaba-nacos-discovery</artifactId>
</dependency>第二步:设置 Nacos 相关配置,在 application.yml 中添加以下配置:
spring:application:name: springcloud-nacos-provider # 项目名称(nacos 注册的服务名)cloud:nacos:discovery:username: nacos # nacos 登录用户名password: nacos666 # nacos 密码server-addr: 127.0.0.1:8848 # nacos 服务端地址
server:port: 8081 # 项目启动端口号第三步:添加服务方法,如下代码所示:
import org.springframework.boot.SpringApplication;
import org.springframework.boot.autoconfigure.SpringBootApplication;
import org.springframework.web.bind.annotation.PathVariable;
import org.springframework.web.bind.annotation.RequestMapping;
import org.springframework.web.bind.annotation.RestController;@SpringBootApplication
@RestController
public class HttpProviderApplication {public static void main(String[] args) {SpringApplication.run(HttpProviderApplication.class, args);}/*** 为客户端提供可调用的接口*/@RequestMapping("/call/{name}")public String call(@PathVariable String name) {return "I'm Provider. Received a message from: " + name;}
}
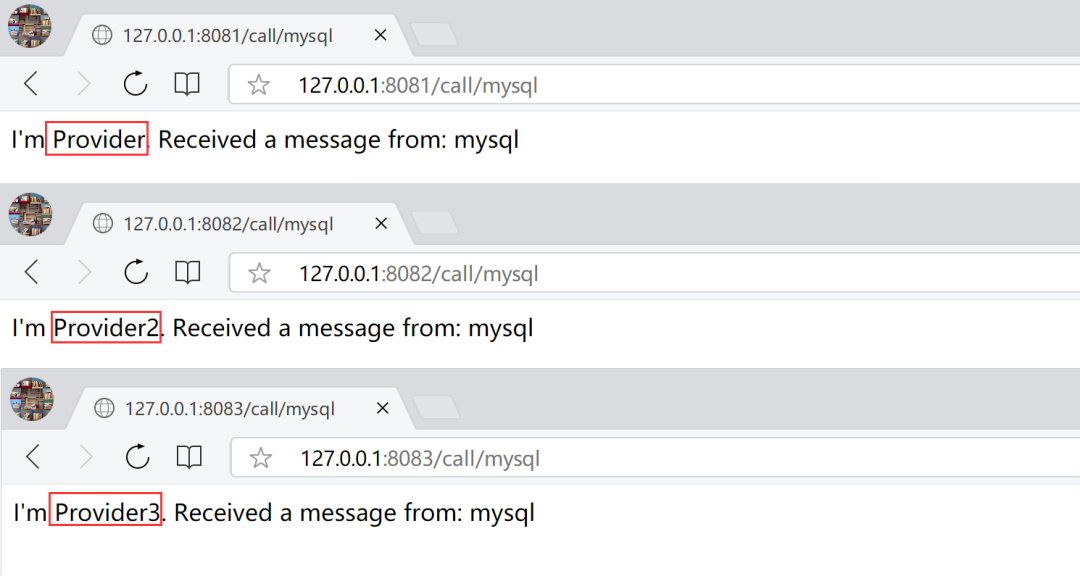
然后使用相同的方法再创建 2 个服务提供者,最终对应的端口号分别为:
127.0.0.1:8081 127.0.0.1:8082 127.0.0.1:8083
这 3 个服务提供者分别打印的内容是“I'm Provider...”、“I'm Provider2...”、“I'm Provider3...”,如下图所示:
1.2 创建服务调用者:Consumer
本文的核心是服务调用者的实现代码,它的创建方式和服务提供者的创建方式类似。第一步:创建一个 Spring Boot 项目,添加 spring-web 和 nacos-discovery 依赖,具体依赖内容如下:
<dependency><groupId>org.springframework.boot</groupId><artifactId>spring-boot-starter-web</artifactId>
</dependency>
<!-- 添加 Nacos 支持 -->
<dependency><groupId>com.alibaba.cloud</groupId><artifactId>spring-cloud-starter-alibaba-nacos-discovery</artifactId>
</dependency>
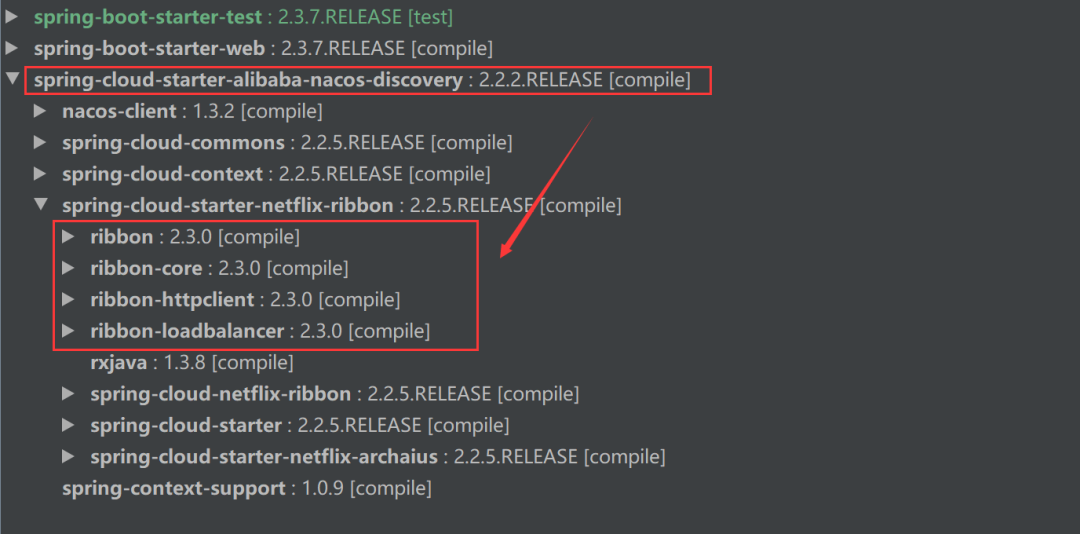
可能有人会有疑问,本文标题是 Spring Cloud Alibaba Nacos + Ribbon,那为什么不添加 Ribbon 的依赖呢?这是因为 Spring Cloud Alibaba Nacos 中已经内置了 Ribbon 框架了,打开项目的依赖树就可以清楚的看到了,如下图所示: 第二步:设置 Nacos 相关配置,在 application.yml 中添加以下配置:
spring:application:name: springcloud-nacos-consumer # 项目名称(nacos 注册的服务名)cloud:nacos:discovery:username: nacos # nacos 登录用户名password: nacos666 # nacos 密码server-addr: 127.0.0.1:8848 # nacos 服务端地址
server:port: 8091 # 项目启动端口号第三步:在项目启动类中,使用 Spring Java Config 的方式声明 RestTemplate 对象,如下代码所示:
import org.springframework.boot.SpringApplication;
import org.springframework.boot.autoconfigure.SpringBootApplication;
import org.springframework.context.annotation.Bean;
import org.springframework.web.client.RestTemplate;@SpringBootApplication
public class RibbonCodeConsumerApplication {public static void main(String[] args) {SpringApplication.run(RibbonCodeConsumerApplication.class, args);}/*** 使用 Spring Java Config 方式声明 RestTemplate*/@BeanRestTemplate restTemplate() {return new RestTemplate();}
}第四步:使用 RestTemplate + Ribbon 的代码方式调用服务,首先使用 Ribbon 提供的 LoadBalancerClient 对象的 choose 方法,根据 Nacos 中的服务 id 获取某个健康的服务实例,服务实例中包含服务的 IP 地址和端口号,然后再使用 RestTemplate 根据获取到的 IP 和 端口号访问服务即可,具体实现代码如下:
import org.springframework.cloud.client.ServiceInstance;
import org.springframework.cloud.client.loadbalancer.LoadBalancerClient;
import org.springframework.web.bind.annotation.GetMapping;
import org.springframework.web.bind.annotation.RequestParam;
import org.springframework.web.bind.annotation.RestController;
import org.springframework.web.client.RestTemplate;
import javax.annotation.Resource;@RestController
public class ConsumerController {// Ribbon 提供的负载均衡对象@Resourceprivate LoadBalancerClient loadBalancerClient;// Spring 提供进行 Restful 请求对象@Resourceprivate RestTemplate restTemplate;@GetMapping("/consumer")public String consumer(@RequestParam String name) {// 根据 Ribbon 提供的对象 + Nacos 的服务 id 获取服务实例ServiceInstance serviceInstance = loadBalancerClient.choose("springcloud-nacos-provider");// 获取服务实例中的 ipString ip = serviceInstance.getHost();// 获取服务实例中的端口号int port = serviceInstance.getPort();// 使用 restTemplate 请求并获取结果String result = restTemplate.getForObject("http://" + ip + ":" + port + "/call/" + name,String.class);return result;}
}
以上程序的执行结果如下图所示:
2.注解方式调用
使用注解方式调用服务就简单多了,服务提供者的创建方法和上面相同,这里就不再赘述了,接下来我们来创建一个注解方式的服务调用者 Consumer。第一步:创建一个 Spring Boot 项目,添加 spring-web 和 nacos-discovery 依赖,具体依赖内容如下:
<dependency><groupId>org.springframework.boot</groupId><artifactId>spring-boot-starter-web</artifactId>
</dependency>
<!-- 添加 Nacos 支持 -->
<dependency><groupId>com.alibaba.cloud</groupId><artifactId>spring-cloud-starter-alibaba-nacos-discovery</artifactId>
</dependency>第二步:设置 Nacos 相关配置,在 application.yml 中添加以下配置:
spring:application:name: springcloud-nacos-consumer # 项目名称(nacos 注册的服务名)cloud:nacos:discovery:username: nacos # nacos 登录用户名password: nacos666 # nacos 密码server-addr: 127.0.0.1:8848 # nacos 服务端地址
server:port: 8092 # 项目启动端口号第三步:在项目启动类中,使用 Spring Java Config 的方式声明 RestTemplate 对象,此步骤中,需要在 RestTemplate 对象上加上 @LoadBalanced 注解,加上此注解之后就可以让 RestTemplate 对象自动支持负载均衡了,如下代码所示:
import org.springframework.boot.SpringApplication;
import org.springframework.boot.autoconfigure.SpringBootApplication;
import org.springframework.cloud.client.loadbalancer.LoadBalanced;
import org.springframework.context.annotation.Bean;
import org.springframework.web.client.RestTemplate;@SpringBootApplication
public class RibbonAnnotationConsumerApplication {public static void main(String[] args) {SpringApplication.run(RibbonAnnotationConsumerApplication.class, args);}@LoadBalanced // 使 RestTemplate 自动支持 Ribbon 负载均衡@Beanpublic RestTemplate restTemplate() {return new RestTemplate();}
}第四步:创建客户端请求方法,具体实现代码如下:
import org.springframework.web.bind.annotation.GetMapping;
import org.springframework.web.bind.annotation.RequestParam;
import org.springframework.web.bind.annotation.RestController;
import org.springframework.web.client.RestTemplate;import javax.annotation.Resource;@RestController
public class ConsumerController {@Resourceprivate RestTemplate restTemplate;@GetMapping("/consumer")public String consumer(@RequestParam String name) {// 请求并获取结果(springcloud-nacos-provider 为 Nacos 服务id)String result = restTemplate.getForObject("http://springcloud-nacos-provider/call/" + name, String.class);return result;}
}
以上程序的执行结果如下图所示:
注解实现原理分析
通过上述代码我们可以看出,Nacos 实现调用服务的关键是通过 @LoadBalanced,它为 RestTemplate 赋予了负载均衡的能力,从而可以正确的调用到服务,那 @LoadBalanced 是如何实现的呢?要知道这个问题的答案,就得阅读 LoadBalancerAutoConfiguration 的源码。LoadBalancerAutoConfiguration 是实现客户端负载均衡器的自动装配类,随着 Spring 的启动而启动,它的源码内容有很多,我们这里截取部分核心的方法来看一下:
@Bean
public SmartInitializingSingleton loadBalancedRestTemplateInitializerDeprecated(final ObjectProvider<List<RestTemplateCustomizer>> restTemplateCustomizers) {return () -> {restTemplateCustomizers.ifAvailable((customizers) -> {Iterator var2 = this.restTemplates.iterator();while(var2.hasNext()) {RestTemplate restTemplate = (RestTemplate)var2.next();Iterator var4 = customizers.iterator();while(var4.hasNext()) {RestTemplateCustomizer customizer = (RestTemplateCustomizer)var4.next();customizer.customize(restTemplate);}}});};
}
这里的 this.restTemplates.iterator() 既所有被 @LoadBalanced 注解修饰的 RestTemplate 对象,所有被 @LoadBalanced 修饰的 RestTemplate 对象会被强转为 RestTemplateCustomizer 对象,而这个对象的实现源码如下:
@Bean
@ConditionalOnMissingBean
public RestTemplateCustomizer restTemplateCustomizer(final LoadBalancerInterceptor loadBalancerInterceptor) {return (restTemplate) -> {List<ClientHttpRequestInterceptor> list = new ArrayList(restTemplate.getInterceptors());list.add(loadBalancerInterceptor);restTemplate.setInterceptors(list);};
}
也就是所有被 @LoadBalanced 注解修饰的 RestTemplate 对象,会为其添加一个 loadBalancerInterceptor 的拦截器,拦截器的实现源码如下:
public class LoadBalancerInterceptor implements ClientHttpRequestInterceptor {private LoadBalancerClient loadBalancer;private LoadBalancerRequestFactory requestFactory;public LoadBalancerInterceptor(LoadBalancerClient loadBalancer, LoadBalancerRequestFactory requestFactory) {this.loadBalancer = loadBalancer;this.requestFactory = requestFactory;}public LoadBalancerInterceptor(LoadBalancerClient loadBalancer) {this(loadBalancer, new LoadBalancerRequestFactory(loadBalancer));}public ClientHttpResponse intercept(final HttpRequest request, final byte[] body, final ClientHttpRequestExecution execution) throws IOException {URI originalUri = request.getURI();String serviceName = originalUri.getHost();Assert.state(serviceName != null, "Request URI does not contain a valid hostname: " + originalUri);return (ClientHttpResponse)this.loadBalancer.execute(serviceName, this.requestFactory.createRequest(request, body, execution));}
}从上述源码可以看出,@LoadBalanced 的执行流程是,被 @LoadBalanced 注解修饰的 RestTemplate 对象,会被 LoadBalancerInterceptor 拦截器所拦截,拦截之后使用 LoadBalancerClient 对象,按照负载均衡的策略获取一个健康的服务实例,然后再通过服务实例的 IP 和端口,调用实例方法,从而完成服务请求。
总结
Nacos 调用 Restful 服务是通过内置的 Ribbon 框架实现的,它有两种调用方法,通过代码的方式或通过注解的方式完成调用。其中注解的方式使用起来比较简单,只需要在 RestTemplate 对象上添加一个 @LoadBalanced 注解,就可以为请求对象赋予负载均衡的能力了。
是非审之于己,毁誉听之于人,得失安之于数。
公众号:Java中文社群
Java面试合集:https://gitee.com/mydb/interview

往期推荐
Spring Cloud Alibaba Nacos 的 2 种健康检查机制!

Nacos服务注册与发现的2种实现方法!

Spring Cloud Alibaba Nacos路由策略之保护阈值!


方法与示例)

方法与示例)


方法与示例)


)


