
【Vue.js实现前后端分离架构中前端页面搭建】
九、Vue的事件处理
Vue的事件都是使用 v-on:事件类型 进行绑定。也可以使用@事件类型进行操作。其中事件类型和之前学习jQuery中事件名称是一样。
示例中都是以点击事件为例。
1. 直接操作属性值
代码示例中通过点击按钮对counter值加一。下面<p>中显示属性值。所以会出现点击按钮后下面数字在变化的效果
<template><div id="app"><button v-on:click="counter += 1">Add 1</button><p>The button above has been clicked {{ counter }} times.</p></div>
</template><script>export default {name: 'App',data() {return {counter: 0}}
}
</script>
也可以把上面的v-on:click换成@click。

2. 事件处理方法
Vue中事件也可以绑定给特定的方法进行处理。
@click取值是方法名称
methods是固定属性。里面定义了多有事件能绑定的方法。
jqk:function(event)中
jqk 是方法名。
event是方法形参,在js中方法形参名称随意。只要@click中使用没有参数的方法时,都会默认传递事件对象。如果方法中不使用事件对象,function里面就不需要写event了,在Vue中变量声明后必须使用。
<template><div id="app"><button @click="jqk">click</button></div>
</template><script>export default {name: 'App',data(){return {field:"值"};},methods:{jqk:function (event) {// this是当前Vue对象alert(this.field);if(event){alert(event.target.tagName)}}}
}
</script>
3. 事件传参
事件传参只需要在调用方法时加上括号和要传递的参数就可以了。
注意:
字符串值必须有单引号。
没有单引号参数(field),调用data()中属性
方法中不需要使用事件对象时就不写$event。但是如果需要使用事件对象,必须手动传递事件对象,且必须叫做$event,$event是全局Vue对象原型(prototype)里面的属性。
<template><div id="app"><button @click="jqk('name',$event)">click</button><button @click="jqk(field,$event)">click</button></div>
</template><script>export default {name: 'App',data(){return {field:"值"};},methods:{jqk:function (name,event) {alert("name:"+name);if(event){alert(event.target.tagName)}}}
}
</script>
十、组件
组件:如果项目中多次用到类似效果,就可以把这个效果进行自定义组件。
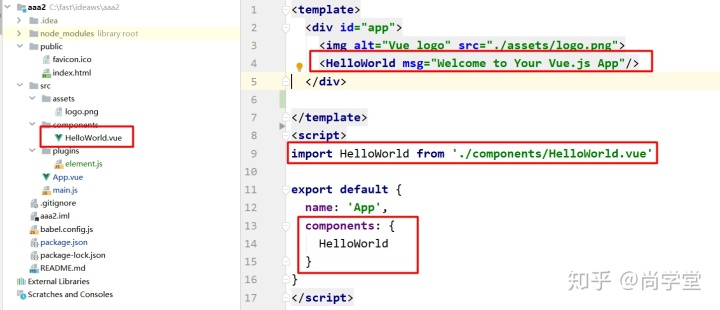
新建项目后默认存在HelloWorld.vue就是一个组件。
import Helloworld .... 组件文件必须导入才能使用。其中Helloworld为自定义名称,通过这个名称就可以调用对应组件。如果import时直接写组件名(大小写相同)IDEA会提升生成组件的路径,所以一般习惯上都是把名称定义为组件文件名。
components: 组件文件只import是不能被使用的。必须在components中注册组件,注册后在<template>中就可以通过组件名直接引用组件了。在<template>中组件以标签形式存在,标签名为组件名。其中msg是在Helloworld中定义的props参数,表示需要传递给组件的数据。
1. 新建vue文件
在Vue中组件就是可复用的页面内容。以.vue文件形式存在。
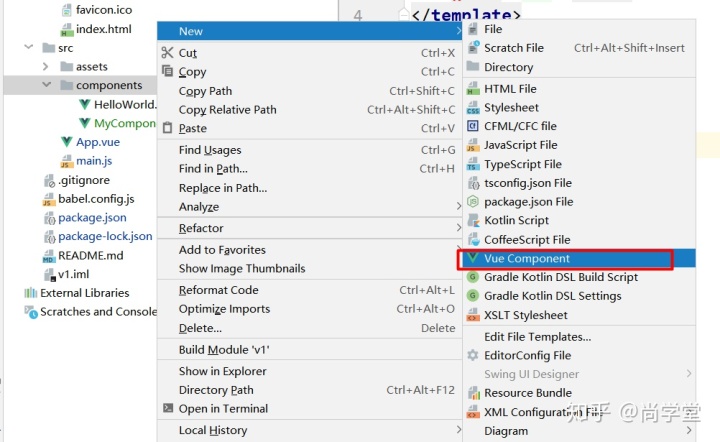
在src/components中新建一个文件。名称任意。示例中叫做MyComponent.vue。
在Vue中组件的文件名多使用大驼峰。
{{jqk}} 获取组件传递参数的值
props:定义组件传递的参数名称和类型
<template><div><div>这是一个组件</div><div>{{jqk}}</div></div>
</template><script>export default {name: "MyComponent",props: {jqk: String}}
</script><style scoped></style>
2. 修改App.vue
<MyComponent>就是下面定义的组件名称。jqk是参数名
import 导入组件并设置名称为MyComponent
components 声明组件
<template><div id="app"><MyComponent jqk="这是传递的内容"/></div>
</template><script>import MyComponent from "@/components/MyComponent";export default {name: 'App',components:{MyComponent}
}
</script>
十一、路由
组件和页面的区别?
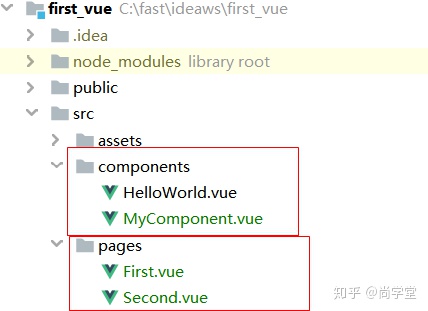
组件和页面文件中内容是完全相同,唯一区别是组件可能被多次使用,import时会给组件定义个名称,而页面文件可能只使用一次,import时就不需要定义名称。在项目中为了区分页面和组件,把组件放在components文件夹而页面放在pages(名称随意,一般多叫pages)文件夹下。
为什么使用路由?
在项目中创建了First.vue和Second.vue。如果按照组件方式进行操作这个两个页面中数据固定显示在App.vue中。但是我们知道正常项目都是通过不同的URL控制显示不同页面。在SPA项目中也是需要通过不同的URL在App.vue中显示不同的数据。
现在缺少一个可以通过URL控制哪个页面显示在App.vue中的功能/组件。路由就是做这件事情的。
什么是路由?
在Vue中路由就是控制显示哪个页面。通过路由显示的页面是显示在App.vue中的,这符合SPA,当更改URL后只改变App.vue页面中路由对应的部分的内容,也就是说通过路由显示时也是属于局部刷新效果。
在App.vue中通过<router-view/>显示路由内容。
简单一句话说明:通过识别URL显示页面的功能。
1. 安装路由依赖
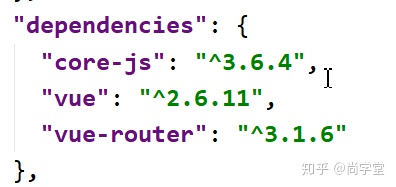
在IDEA中的terminal面板运行命令。--save表示把添加的依赖写入到package.json。如果没有--save效果上也可以,但是加上可以更好的知道项目都使用了哪些组件。

使用terminal时也需要注意下,命令是否在当前项目的根路径下。
运行成功后会在package.json中多了router相关依赖。
2. 新建两个页面
在src下新建了page文件夹。在文件夹下新建了两个.vue的页面
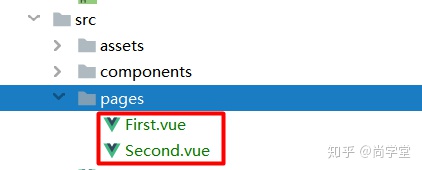
页面内容也只是写了字符串first。另一个页面first换成second,其他都相同。
此时这两个页面是无法访问的。
<template><div>first</div>
</template>
<script>export default {name: "First"}
</script>
<style scoped>
</style>
3. 修改main.js
import Vue from 'vue'
import App from './App.vue'
// 导入路由依赖。安装了vue-router组件后系统带有的依赖。
import VueRouter from 'vue-router'
// 导入两个页面
import First from "@/pages/First";
import Second from "@/pages/Second";Vue.config.productionTip = false;
// 使用路由
Vue.use(VueRouter);
// 创建路由对象。new VueRouter为上面import设置的名称
// 路由对象名称,必须是router。其他命名都无法提供路由表功能,页面抛出异常:
// TypeError: Cannot read property 'matched' of undefined
const router = new VueRouter({// 没有history,访问URL会有#mode:"history",routes:[{path:"/first",component:First},{path:"/second",component:Second}]
});new Vue({// 使用router对象router,render: h => h(App),
}).$mount('#app')
4. 修改App.vue
必须要有<router-view/> 否则无法显示路由控制的页面。
<template><div id="app"><router-view/><MyComponent jqk="这是传递的内容"/></div>
</template>
5 优化结构
把main.js中和路由相关的内容放到一个单独的js文件中。这样维护更好。
5.1 编写index.js文件
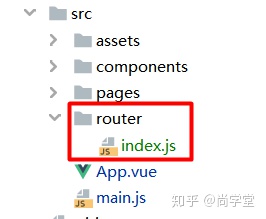
在src下新建router文件夹,在文件夹中新建index.js。
注意文件的第一行和最后一行。
// 必须有这个导入,否则使用路由报错
import Vue from 'vue'
// 导入路由依赖
import VueRouter from 'vue-router'
// 导入两个页面
import First from "@/pages/First";
import Second from "@/pages/Second";// 使用路由
Vue.use(VueRouter);
// 创建路由对象。new VueRouter为上面import设置的名称
const router = new VueRouter({// 没有history,访问URL会有#mode:"history",routes:[{path:"/first",component:First},{path:"/second",component:Second}]
});
// 必须有这个导出,否则main.js无法获取router对象
export default router
5.2 修改main.js
引入router下index.js文件。
import Vue from 'vue'
import App from './App.vue'
// Vue中index.js是默认js文件名。下面引用时省略了index
import router from "@/router";
Vue.config.productionTip = falsenew Vue({router,render: h => h(App),
}).$mount('#app')
十二、发起网络请求和跨域处理
Vue中使用axios进行网络请求。使用起来和jQuery中$.get和$.post功能类似。
给定服务端控制器代码。可以接收name和age参数,设置到Map中并返回。
一定要注意:控制器上有跨域注解。前后端分离都是跨域请求。且端口不能是8080端口。
@RestController
@CrossOrigin
public class DemoController {@RequestMapping("/demo")public Map<String,Object> demo(String name ,Integer age){Map<String,Object> result = new HashMap<>();result.put("name",name);result.put("age",age);return result;}
}
1. 安装依赖

2. get请求
<template><div>发起请求</div>
</template><script>import axios from "axios"export default {name: "axios",
// 页面加载事件。mounted() {axios.get("http://localhost:8081/demo?name=bjsxt&age=12").then(res => {console.log(res.data);}).catch(error => {console.log(error);})}}
</script><style scoped></style>
3. post方式
下面演示了使用POST获取值后把name显示在页面的过程。
注意:
POST也支持URL重写方式传参。通过?和&传参数。
如果使用下面这种方式传参必须要结合querystring使用。
<template><div>发起请求获取到的结果。{{name}}</div>
</template><script>import axios from "axios"import qstring from "querystring"export default {name: "axios",data() {return {name: ""};},mounted() {axios.post("http://localhost:8081/demo", qstring.stringify({name: "张三",age: 12})).then(res => {console.log(res.data.name);this.name = res.data.name;}).catch(error => {console.log(error);})}}
</script><style scoped></style>
4. axios全局设置
如果使用上面的方式,将需要在每个页面中都导入axios。
也可以全局绑定axios。
4.1 修改main.js
Vue.prototype.$jqk=axios 中
Vue 全局Vue对象
prototype 原型。设置全局属性。
$jqk 随意设置的名称。
axios 依赖对象名
import Vue from 'vue'
import App from './App.vue'
// Vue中index.js是默认js文件名。下面引用时省略了index
import router from "@/router";
import axios from "axios"
import qstring from "querystring"Vue.prototype.$axios = axios
Vue.prototype.$qstring=qstring
Vue.config.productionTip = falsenew Vue({router,render: h => h(App),
}).$mount('#app')
4.2 页面中写法
在任何页面中都可以直接使用this.$jqk进行设置。
<template><div>这是首页。所有内容都显示在这个页面中。SPA<br/>姓名:{{name}}, 年龄:{{age}}</div></template><script>export default {data() {return {name:"",age:0};},mounted() {this.$axios.post("http://localhost:8081/demo",this.$qstring.stringify({name:"北京尚学堂",age:15})).then(response => {this.name = response.data.name;this.age = response.data.age}).catch(error => {console.log(error)})}}
</script>
十三、请求代理
在Vue中发起网络请求时URL都使用完整URL,可以把公共URL提出,提出后发起网络请求时URL只写路径部分。省略协议、ip、端口。
如果没有请求代码每次在浏览器开发者工具看见真实请求服务器地址,这样话就把服务器暴露给客户端了。使用代理后只能看见代理前请求,保护真实服务器地址。
在项目根路径(不是src)下新建vue.config.js。名称固定
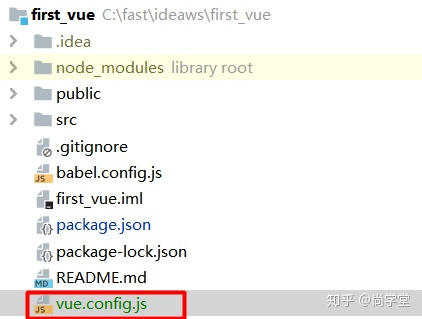
这个配置文件操作完成后必须重启
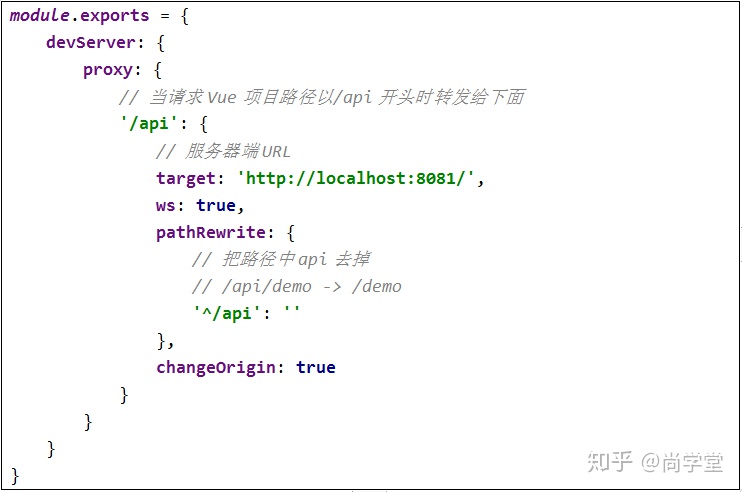
发起请求时可以使用/api/xxx 的形式

在开发者工具看见的请求


)


)


 使用Intellij IDEA打造全栈IDE)


