matplotlib 支持的图形 https://matplotlib.org/stable/gallery/index.html
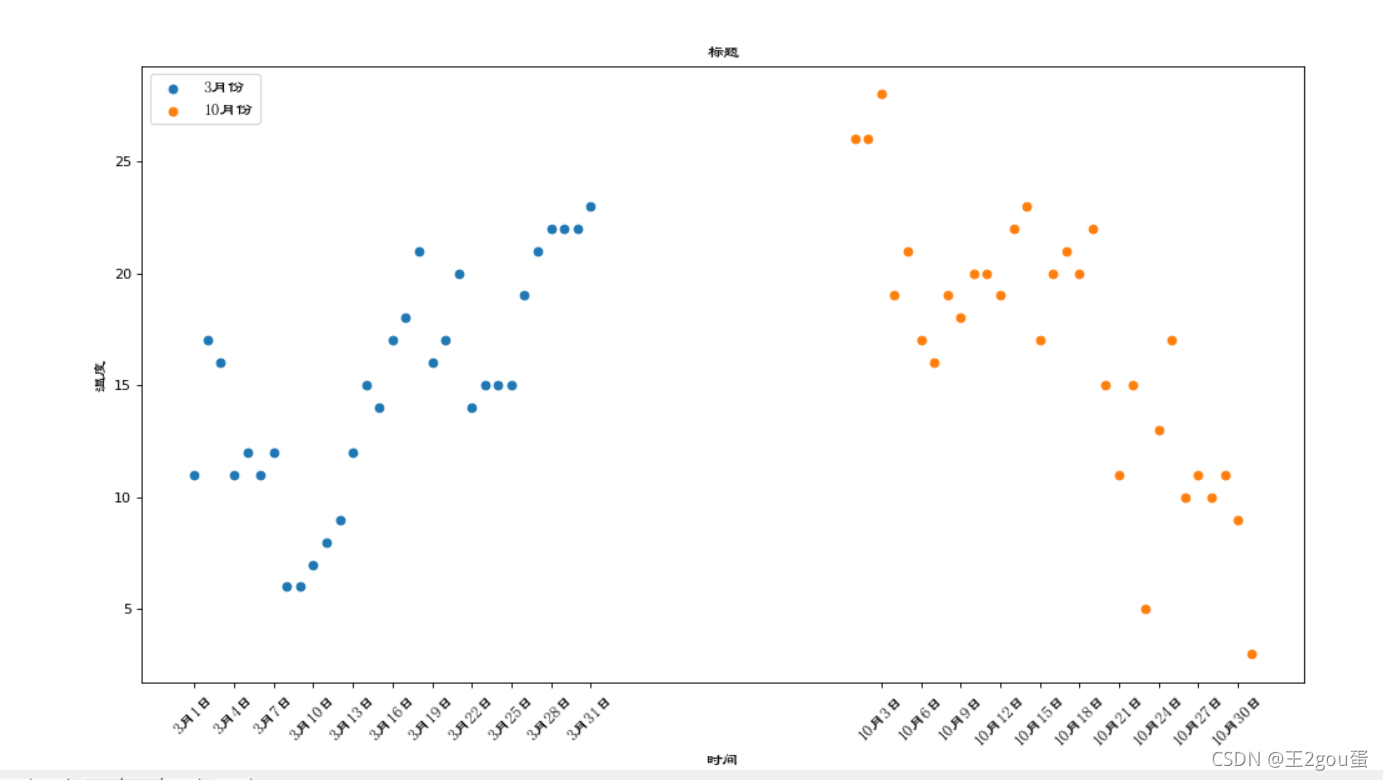
1、绘制散点图
from matplotlib import pyplot as plt
from matplotlib import font_manager# y_3是三月每天的最高温度      y_10 是十月每天的最高温度
y_3 = [11,17,16,11,12,11,12,6,6,7,8,9,12,15,14,17,18,21,16,17,20,14,15,15,15,19,21,22,22,22,23]
y_10 = [26,26,28,19,21,17,16,19,18,20,20,19,22,23,17,20,21,20,22,15,11,15,5,13,17,10,11,10,11,9,3]x_3 = range(1,32)
x_10 = range(51,82)my_font = font_manager.FontProperties(fname=r"C:\Windows\Fonts\SIMLI.TTF", size=12)# 设置图形大小
plt.figure(figsize=(15, 8), dpi=80)# 使用 scatter绘制散点图,和绘制折线图方法唯一区别就是 调用方法不同
plt.scatter(x_3, y_3, label="3月份")
plt.scatter(x_10, y_10, label="10月份")# 调整x轴的刻度
_x = list(x_3) + list(x_10)
xtick_labels = ["3月{}日".format(i) for i in x_3]
xtick_labels += ["10月{}日".format(i-50) for i in x_10]
plt.xticks(_x[::3],xtick_labels[::3],fontproperties=my_font,rotation=45)# 添加图例
plt.legend(loc="upper left",prop=my_font)# 添加描述信息
plt.xlabel("时间",fontproperties=my_font)
plt.ylabel("温度",fontproperties=my_font)
plt.title("标题",fontproperties=my_font)# 展示
plt.show()

2、绘制条形图
绘制竖向条形图
from matplotlib import pyplot as plt
from matplotlib import font_manager# 展示排行前20的电影 名字和票房# 票房
y = [56.01, 26.94, 17.53, 16.49, 15.45, 12.96, 11.8, 11.61, 11.28, 11.12, 10.49, 10.3, 8.75, 7.55, 7.32, 6.99, 6.88, 6.86, 6.58, 6.23]
# 电影
x = ["战狼{}".format(i) for i in range(len(y))]# my_font= font_manager.FontProperties(fname=r"C:\Windows\Fonts\SIMLI.TTF", size=12)
my_font= font_manager.FontProperties(fname=r"C:\Windows\Fonts\simsun.ttc", size=12)# 设置图片大小
plt.figure(figsize=(15, 8), dpi=80)# 生成竖向的条形图 width 是条形图的宽度
plt.bar(range(len(x)),y,width=0.5)plt.xticks(range(len(x)), x, fontproperties=my_font,rotation=45)plt.show()

绘制横向条形图
from matplotlib import pyplot as plt
from matplotlib import font_manager# 展示排行前20的电影 名字和票房# 票房
y = [56.01, 26.94, 17.53, 16.49, 15.45, 12.96, 11.8, 11.61, 11.28, 11.12, 10.49, 10.3, 8.75, 7.55, 7.32, 6.99, 6.88, 6.86, 6.58, 6.23]
# 电影
x = ["战狼{}".format(i) for i in range(len(y))]# my_font= font_manager.FontProperties(fname=r"C:\Windows\Fonts\SIMLI.TTF", size=12)
my_font= font_manager.FontProperties(fname=r"C:\Windows\Fonts\simsun.ttc", size=12)# 设置图片大小
plt.figure(figsize=(15, 8), dpi=80)# 生成横向的条形图 height 是条形图的宽度
plt.barh(range(len(x)),y,height=0.5)plt.yticks(range(len(x)), x, fontproperties=my_font,rotation=45)# 绘制网格
plt.grid(alpha=0.5)
plt.show()

绘制多条条形图
from matplotlib import pyplot as plt
from matplotlib import font_manager# 展示五部电影三天的票房a = ["猩球崛起3:终极之战","郭刻尔克","蜘蛛侠:英雄归来","战狼2"]b_14 = [2358,399,2358,362]
b_15 = [12357,156,2045,168]
b_16 = [15746,312,4497,319]# my_font= font_manager.FontProperties(fname=r"C:\Windows\Fonts\SIMLI.TTF", size=12)
my_font= font_manager.FontProperties(fname=r"C:\Windows\Fonts\simsun.ttc", size=12)bar_width = 0.2x_14 = list(range(len(a)))
x_15 = [i+bar_width for i in x_14]
x_16 = [i+bar_width*2 for i in x_14]# 设置图形大小
plt.figure(figsize=(13,7), dpi=80)plt.bar(range(len(a)),b_14,width=bar_width,label="9月14日")
plt.bar(x_15,b_15,width=bar_width,label="9月15日")
plt.bar(x_16,b_16,width=bar_width,label="9月16日")# 设置图例
plt.legend(prop=my_font)# 设置x轴刻度
plt.xticks(x_15,a,fontproperties=my_font)plt.show()

3、其他
更多 matplotlib 支持图形请参考: https://matplotlib.org/stable/gallery/index.html
前端更多图形,可以参考echarts:
https://echarts.apache.org/examples/zh/index.html
比 matplotlib更牛的可视化神器 Plotly,https://plotly.com/python/
seaborn是类似matplotlib 的工具: https://seaborn.pydata.org/
https://www.bilibili.com/video/BV1hx411d7jb?p=9
https://www.bilibili.com/video/BV1hx411d7jb?p=10
https://www.bilibili.com/video/BV1hx411d7jb?p=11
)


