一.STL(标准模板库)的六大组件:容器,算法,迭代器,仿函数,适配器(配接器),空间配置器
1.容器:各种数据结构,vector,list,deque,unordered_set;
2.算法:各种常用算法,sort,find,copy;
3.迭代器:扮演了容器与算法之间的胶合剂,他两之间的桥梁;
4.仿函数:行为类似函数,可作为算法的某种策略;
5.适配器: 一种用来修饰容器或者仿函数或迭代器接口的东西;
6.空间配置器:负责空间的配置与管理。
1.vector
1.1特点,读取能在常数时间完成,要注意的是动态扩展不是在原空间基础上扩展空间,而是开辟更大的内存空间,然后将数据拷贝到新空间,释放原空间。
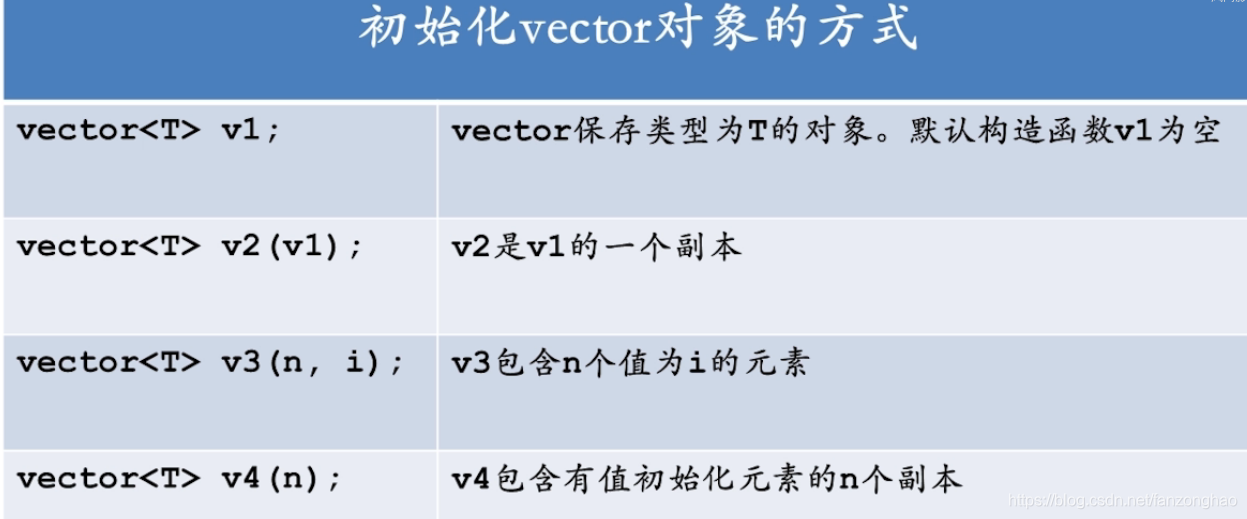
1.2初始化vector的一些方式,其实就是不同的构造函数实现:


1.3 赋值操作

void test06(){vector<int> v(10,1);cout<<"==v[0]:"<<v[0]<<endl;vector<int> v2(v);cout<<"==v2[0]:"<<v2[0]<<endl;vector<int> v3;v3 = v2;cout<<"==v3[0]:"<<v3[0]<<endl;vector<int> v4;v4.assign(v3.begin(), v3.end()-1);cout<<"===v4[0]:==="<<v4[0]<<endl;cout<<"===v4.size():==="<<v4.size()<<endl;vector<int> v5;v5.assign(10, 1);cout<<"===v4[0]:==="<<v5[0]<<endl;cout<<"===v4.size():==="<<v5.size()<<endl;
}
1.4 容量和大小

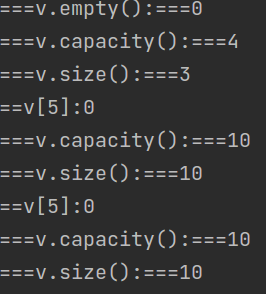
capacity大于等于size,resize默认用0填充,也可以自定义填充元素。
void test06(){vector<int> v;v.push_back(1);v.push_back(2);v.push_back(3);cout<<"===v.empty():==="<<v.empty()<<endl; //0 buweikong 1 weikongcout<<"===v.capacity():==="<<v.capacity()<<endl; //cout<<"===v.size():==="<<v.size()<<endl; // //default use 0 padv.resize(10);cout<<"==v[5]:"<<v[5]<<endl;cout<<"===v.capacity():==="<<v.capacity()<<endl; //cout<<"===v.size():==="<<v.size()<<endl; ////use 100 padv.resize(10, 100);cout<<"==v[5]:"<<v[5]<<endl;cout<<"===v.capacity():==="<<v.capacity()<<endl; //cout<<"===v.size():==="<<v.size()<<endl; //
}
1.5 插入与删除

void printvector(vector<int>& v){for(int i=0; i<v.size(); i++){cout<<v[i]<<" ";}cout<<endl;
}
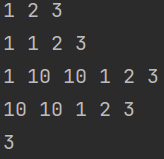
void test06(){vector<int> v;v.push_back(1);v.push_back(2);v.push_back(3);printvector(v);v.insert(v.begin(), 1);printvector(v);v.insert(v.begin()+1, 2,10);printvector(v);v.erase(v.begin());printvector(v);v.erase(v.begin(), v.end()-1);printvector(v);
}
1.6 数据存取

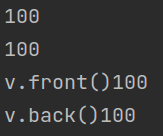
void test06(){vector<int> v(10, 100);cout<<v[0]<<endl;cout<<v.at(0)<<endl;cout<<"v.front()"<<v.front()<<endl;cout<<"v.back()"<<v.back()<<endl;
}
1.7 元素互换
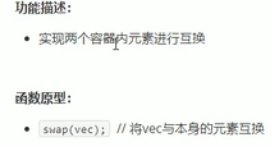
void printvector(vector<int>& v){for(int i=0; i<v.size(); i++){cout<<v[i]<<" ";}cout<<endl;
}
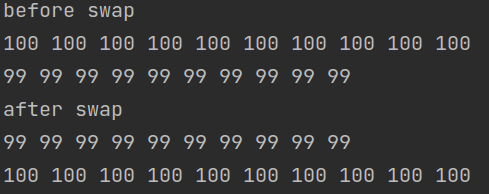
void test06(){vector<int> v1(10, 100);vector<int> v2(10, 99);cout<<"before swap"<<endl;printvector(v1);printvector(v2);v1.swap(v2);cout<<"after swap"<<endl;printvector(v1);printvector(v2);
}
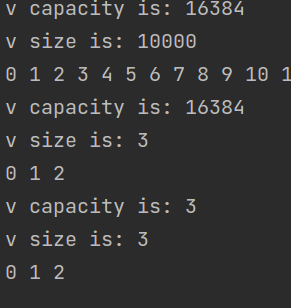
利用swap减少内存
void printvector(vector<int>& v){for(int i=0; i<v.size(); i++){cout<<v[i]<<" ";}cout<<endl;
}
void test06(){vector<int> v;for(int i=0; i<10000; i++){v.push_back(i);}cout<<"v capacity is: "<<v.capacity()<<endl;cout<<"v size is: "<<v.size()<<endl;printvector(v);v.resize(3);cout<<"v capacity is: "<<v.capacity()<<endl;cout<<"v size is: "<<v.size()<<endl;printvector(v);vector<int>(v).swap(v);cout<<"v capacity is: "<<v.capacity()<<endl;cout<<"v size is: "<<v.size()<<endl;printvector(v);
}
1.8 预留空间

利用reserve减少开辟空间次数
void test06(){vector<int> v;int *p;int num = 0;for(int i=0; i<100000; i++){v.push_back(i);if (p != &v[0]){p = &v[0];num++;}}cout<<num<<endl;vector<int> v2;v2.reserve(100000);int *p2;int num2 = 0;for(int i=0; i<100000; i++){v.push_back(i);if (p2 != &v[0]){p2 = &v[0];num2++;}}cout<<num2<<endl;
}![]()
1.9遍历方式:
(1).普通遍历方法;
(2).迭代器遍历方法与示例:


(3)for_each方法:
#include <iostream>
#include <vector>
#include <algorithm>
using namespace std;void myPrint(int val){cout<<val<<endl;
}
int main()
{vector<int> v;v.push_back(10);v.push_back(12);v.push_back(13);for_each(v.begin(), v.end(), myPrint);
}
上述遍历方式的代码:
#include <iostream>
#include <string>
#include <vector>
#include <list>
#include <map>using namespace std;int main()
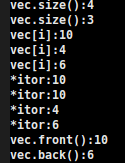
{   vector <int> vec;vec.push_back(10);//尾部插入数据vec.push_back(4);//尾部插入数据vec.push_back(6);//尾部插入数据vec.push_back(3);//尾部插入数据cout<<"vec.size():"<<vec.size()<<endl;//打印长度vec.pop_back();//拿掉尾部数据 cout<<"vec.size():"<<vec.size()<<endl;//打印长度//一般遍历for (int i=0;i<vec.size();i++){cout<<"vec[i]:"<<vec[i]<<endl;}vector <int>::iterator itor = vec.begin();cout<<"*itor:"<<*itor<<endl;for (;itor!=vec.end();itor++){cout<<"*itor:"<<*itor<<endl;}cout<<"vec.front():"<<vec.front()<<endl;cout<<"vec.back():"<<vec.back()<<endl;return 0;
}
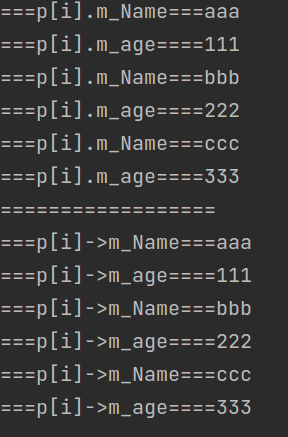
1.10 vector存放自定义数据,一种是存放对象,一种是存放指针
#include <iostream>
#include <vector>
#include <string>
#include <algorithm>
using namespace std;class Person{public:Person(string name, int age){m_Name = name;m_age = age;};string m_Name;int m_age;
};void test_01(){vector<Person> p;Person p1("aaa",111);Person p2("bbb",222);Person p3("ccc",333);p.push_back(p1);p.push_back(p2);p.push_back(p3);for(int i=0; i<p.size(); i++){cout<<"===p[i].m_Name==="<<p[i].m_Name<<endl;cout<<"===p[i].m_age===="<<p[i].m_age<<endl;}
}void test_02(){vector<Person*> p;Person p1("aaa",111);Person p2("bbb",222);Person p3("ccc",333);p.push_back(&p1);p.push_back(&p2);p.push_back(&p3);for(int i=0; i<p.size(); i++){cout<<"===p[i]->m_Name==="<<p[i]->m_Name<<endl;cout<<"===p[i]->m_age===="<<p[i]->m_age<<endl;}
}
int main()
{//test_01();cout<<"=================="<<endl;test_02();
}
1.11 初始化二维vector
vector<vector<int> > dp(n + 1, vector<int>(m + 1, 0));初始化通过另一个vector赋值方式:
vector<int> a(10, 1);vector<int> res(a.begin(), a.begin() + 2);for(int i = 0; i < res.size(); i++){cout<<"==res[i]=="<<res[i]<<endl;}
1.12 vector转mat
(1)一维vectot转cv::mat
std::vector<float> result_feature(10);for(int i=0; i<10;i++){cout<<"==result_feature[i]:"<<result_feature[i]<<endl;}cv::Mat heatmap(result_feature);cout<<"==heatmap:"<<heatmap<<endl;
(2)二维vectot转cv::mat
////#include <pybind11/numpy.h>
//#include <a.h>
//#include <b.h>
#include <iostream>
#include <opencv2/opencv.hpp>
#include <opencv2/core/core.hpp>
#include <opencv2/imgproc/imgproc.hpp>
#include <string>
#include <algorithm>
#include <vector>
#include <memory>typedef cv::Vec<double, 5> Vec5d;
using namespace std;void debug(std::vector<std::vector<float>> angles, std::string name){cv::Mat matAngles(angles.size(), angles.at(0).size(), CV_32FC(1));for(int i=0; i<matAngles.rows; ++i)for(int j=0; j<matAngles.cols; ++j)matAngles.at<float>(i, j) = angles[i][j];std::cout<<name<<matAngles.size<<std::endl;std::cout<<name<<matAngles<<std::endl;}int main(int argc, char** argv)
{vector<vector<float>> angles;for(int i=0; i<10; i++){vector<float> temp;for(int j=0; j<5; j++){temp.push_back(float(i+j));}angles.push_back(temp);}debug(angles, "test_name");  }
cv::Mat debug(std::vector<std::vector<float>> angles, std::string name){cv::Mat matAngles(angles.size(), angles.at(0).size(), CV_32FC(1));for(int i=0; i<matAngles.rows; ++i)for(int j=0; j<matAngles.cols; ++j)matAngles.at<float>(i, j) = angles[i][j];// std::cout<<name<<matAngles.size<<std::endl;return matAngles;}std::vector<std::vector<float>> result_feature2(10, std::vector<float>(10));cv::Mat heatmap2 = debug(result_feature2, "test");cout<<"==heatmap2:"<<heatmap2<<endl;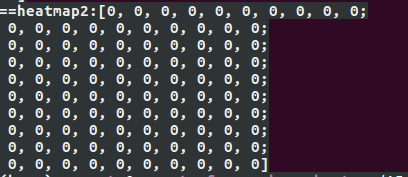
1.13 .data()
在c++11中,vector 增加了data()的用法,它返回内置vecotr所指的数组内存的第一个元素的指针。
std::vector<int> myvector (5,1);int* p = myvector.data();*p = 10;++p;*p = 20;p[2] = 100;cout<<"myvector[1]:"<<myvector[1]<<endl;std::cout << "myvector contains:";for (size_t i=0; i<myvector.size(); ++i){std::cout << ' ' << myvector[i];} int* p1 = myvector.data();std::cout << "\n *p1 contains:";for (size_t i=0; i<myvector.size(); ++i){std::cout << ' ' << *p1;++p1;} std::cout << '\n';
1.14 find
std::find(v.begin(), v.end(), key) != v.end()2.链表
特点 数据插入快
#include <iostream>
#include <string>
#include <vector>
#include <list>
#include <map>using namespace std;int main()
{         list<int>::iterator itor = list1.begin();for(;itor!=list1.end();itor++){cout<<*itor<<endl;}return 0;
}![]()
3.map


特点 key value形式


3.1:用insert插入
#include <iostream>
#include <string>
#include <vector>
#include <list>
#include <map>using namespace std;int main()
{  map<int, string> m;pair<int, string> p1(3,"hello");pair<int, string> p2(6,"world");pair<int, string> p3(8,"beijing");m.insert(p1);m.insert(p2);m.insert(p3);cout<<m[3]<<endl;cout<<m[6]<<endl;map<int,string>::iterator itor = m.begin();for(;itor!=m.end();itor++){cout<<itor->first<<" "<<itor->second<<endl;}return 0;
}
3.2:几种插入方式
#include <map>
int main()
{	map<int, string> mapStudent;// 第一种 用insert函數插入pairmapStudent.insert(pair<int, string>(000, "student_zero"));// 第二种 用insert函数插入value_type数据mapStudent.insert(map<int, string>::value_type(001, "student_one"));// 第三种 用"array"方式插入mapStudent[123] = "student_first";// cout<<mapStudent[123]<<endl;map<int, string > ::iterator it;for(it=mapStudent.begin(); it!=mapStudent.end(); it++)  cout<<it->first<<"    "<<it->second<<endl;  auto start = std::chrono::system_clock::now();//开始时间for (int i=0; i<1e6;i++){}auto end = std::chrono::system_clock::now();//结束时间std::cout << std::chrono::duration_cast<std::chrono::milliseconds>(end - start).count() << "ms" << std::endl;return 0;
}
3.3 拷贝构造函数方式实现 map
void printmap(map<int,int> m){map<int, int>::iterator it;for(it = m.begin();  it != m.end(); it++){cout<<"key="<<it->first<<" value="<<it->second<<endl;}
}
void test06(){map<int,int> m1;m1[0] = 1;//拷贝构造函数方式实现map<int,int> m2(m1);printmap(m1);printmap(m2);
}
int main()
{test06();
}
3.4 map的一些api
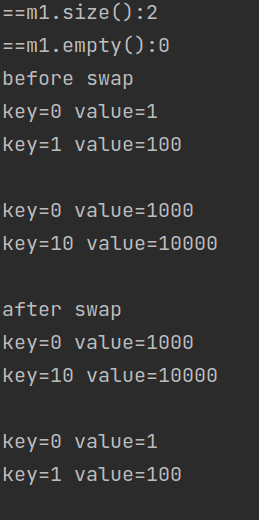
查看size和交换数据等

void printmap(map<int,int> m){map<int, int>::iterator it;for(it = m.begin();  it != m.end(); it++){cout<<"key="<<it->first<<" value="<<it->second<<endl;}cout<<endl;
}
void test06(){map<int,int> m1;m1[0] = 1;m1[1] = 100;cout<<"==m1.size():"<<m1.size()<<endl;cout<<"==m1.empty():"<<m1.empty()<<endl;map<int,int> m2;m2[0] = 1000;m2[10] = 10000;cout<<"before swap"<<endl;printmap(m1);printmap(m2);m2.swap(m1);cout<<"after swap"<<endl;printmap(m1);printmap(m2);}
int main()
{test06();
}
插入与删除

void printmap(map<int,int> m){map<int, int>::iterator it;for(it = m.begin();  it != m.end(); it++){cout<<"key="<<it->first<<" value="<<it->second<<endl;}cout<<endl;
}
void test06(){map<int,int> m1;m1[0] = 1;m1[2] = 200;m1.insert(pair<int, int>(10, 1000));m1.insert(make_pair(1, 100));cout<<"==m1.size():"<<m1.size()<<endl;cout<<"==m1.empty():"<<m1.empty()<<endl;cout<<"==before erase=="<<endl;printmap(m1);m1.erase(m1.begin());m1.erase(10); //按照key 删除cout<<"==after erase1=="<<endl;printmap(m1);m1.clear();//清空m1.erase(m1.begin(), m1.end());cout<<"==after erase2=="<<endl;printmap(m1);}
int main()
{test06();
}
查找与统计

void test06(){map<int,int> m1;m1[0] = 1;m1[2] = 200;m1.insert(pair<int, int>(10, 1000));m1.insert(make_pair(1, 100));cout<<"==m1.size():"<<m1.size()<<endl;cout<<"==m1.empty():"<<m1.empty()<<endl;map<int, int>::iterator pos = m1.find(2);if(pos != m1.end()){cout<<"find key="<<pos->first<<",value="<<pos->second<<endl;}else{cout<<"not find key"<<endl;}int number = m1.count(2);cout<<"==number:"<<number<<endl;
}
map排序

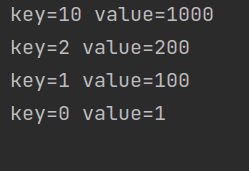
本来 map打印结果是默认key从小到大的,通过仿函数可以修改打印的顺序,比如改为从大到小打印
class MyCompare{
public:bool operator()(int v1, int v2){//jiangxureturn v1 > v2;}
};void printmap(map<int, int, MyCompare> m){map<int, int, MyCompare>::iterator it;for(it = m.begin();  it != m.end(); it++){cout<<"key="<<it->first<<" value="<<it->second<<endl;}cout<<endl;
}void test06(){map<int, int, MyCompare> m1;m1[2] = 200;m1[0] = 1;m1.insert(pair<int, int>(10, 1000));m1.insert(make_pair(1, 100));printmap(m1);
}
int main()
{test06();
}
3.5 c++实现argsort
#include <vector>
#include <iostream>using namespace std;template<typename T>
vector<int>  sort_indexes(const vector<T>  & v, bool reverse=false) {// initialize original index locationsvector<int>  idx(v.size());for (int i = 0; i != idx.size(); ++i) idx[i] = i;// sort indexes based on comparing values in vif(reverse){sort(idx.begin(), idx.end(),[& v](int i1, int i2) {return v[i1] > v[i2];});}else{sort(idx.begin(), idx.end(),[& v](int i1, int i2) {return v[i1] <  v[i2];});}return idx;
}int main()
{int arr[] = {2,3,4,5,63,4,32,3};vector<int> l(arr, arr+8);// for(int i= 0; i < l.size(); i++)// {//     cout << l[i] << " ";// }vector<int> sorted_indx;sorted_indx = sort_indexes(l);cout << "ascending sorted: ";for(int i= 0; i < sorted_indx.size(); i++){cout << sorted_indx[i] << " ";}cout << endl;sorted_indx = sort_indexes(l, true);cout << "descending sorted: ";for(int i= 0; i < sorted_indx.size(); i++){cout << sorted_indx[i] << " ";}cout << endl;return 0;
}
![]()
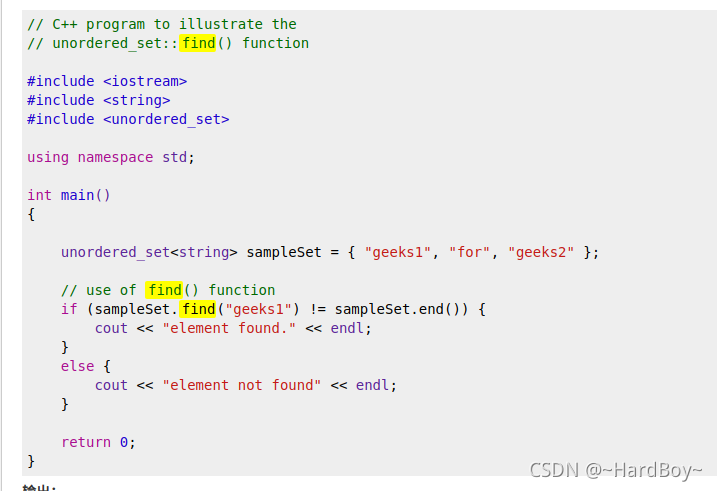
4.unordered_set
类似python set
#include <unordered_set>
using namespace std;
int main(){ std::unordered_set<int> uset;uset.insert(1);uset.insert(1);uset.insert(2);for(int u_:uset){cout<<u_<<endl;}return 0;
}
find
5.std::partial_sort与std::partial_sort_copy
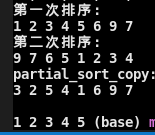
这两都是取topk进行排序,区别在于前者直接修改,后者开出一个新区域.
//
// Created by fzh on 2021/6/22.
////#include <pybind11/numpy.h>
//#include <a.h>
//#include <b.h>
#include <iostream>
#include <opencv2/opencv.hpp>
#include <opencv2/core/core.hpp>
#include <opencv2/imgproc/imgproc.hpp>
#include <string>
#include <algorithm>
#include <vector>
#include <memory>typedef cv::Vec<double, 5> Vec5d;
using namespace std;//以函数对象的方式自定义排序规则
class mycomp2 {
public:bool operator() (int i, int j) {return (i > j);}
};int main(int argc, char** argv)
{std::vector<int> myvector1{ 3,2,5,4,1,6,9,7};//以默认的升序排序作为排序规则,将 myvector 中最小的 4 个元素移动到开头位置并排好序std::partial_sort(myvector1.begin(), myvector1.begin() + 4, myvector1.end());cout << "第一次排序:\n";// for (std::vector<int>::iterator it = myvector.begin(); it != myvector.end(); ++it)//     std::cout << *it << ' ';for(int i = 0; i<myvector1.size(); i++){std::cout << myvector1[i] << ' ';}cout << "\n第二次排序:\n";// 以指定的 mycomp2 作为排序规则,将 myvector 中最大的 4 个元素移动到开头位置并排好序std::partial_sort(myvector1.begin(), myvector1.begin() + 4, myvector1.end(), mycomp2());// for (std::vector<int>::iterator it = myvector.begin(); it != myvector.end(); ++it)//     std::cout << *it << ' ';for(int i = 0; i<myvector1.size(); i++){std::cout << myvector1[i] << ' ';}std::vector<int> myvector2{ 3,2,5,4,1,6,9,7};cout << "\npartial_sort_copy:\n";std::vector<int> myvector3(5, 0);    std::partial_sort_copy(myvector2.begin(), myvector2.end(), myvector3.begin(), myvector3.begin()+5);for(int i = 0; i<myvector2.size(); i++){std::cout << myvector2[i] << ' ';}cout << "\n"<<endl;for(int i = 0; i<myvector3.size(); i++){std::cout << myvector3[i] << ' ';}return 0;  }
二.string的一些基础知识
1.string的本质是一个类,所有封装了不少成员函数,而char* 是指针
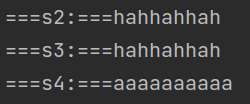
string的构造函数如下:


代码示例:
void test_03(){string s1;const char* c = "hahhahhah";string s2(c);cout<<"===s2:==="<<s2<<endl;string s3(s2);cout<<"===s3:==="<<s3<<endl;string s4(10,'a');cout<<"===s4:==="<<s4<<endl;
}
2.string赋值的一些操作:

//string赋值操作
void test_01(){string str1;str1 = "hello";cout<<"===str1===:"<<str1<<endl;string str2;str2 = str1;cout<<"===str2===:"<<str2<<endl;string str3;str3 = 'a';cout<<"===str3===:"<<str3<<endl;string str4;str4.assign("hello c++"); //赋值全部字符串cout<<"===str4===:"<<str4<<endl;string str5;str5.assign("hello c++", 5); //赋值5个字符cout<<"===str5===:"<<str5<<endl;string str6;str6.assign(str5); //赋值5个字符cout<<"===str6===:"<<str6<<endl;string str7;str7.assign(10,'h'); //赋值5个字符cout<<"===str7===:"<<str7<<endl;
}
int main() {test_01();
}

3.string 字符串拼接

void test_02(){string str1 = "hello";string str2 = "  c++";string str3;str3 = str1 + str2;cout<<"===str3===:"<<str3<<endl;str3 += " again";cout<<"===str3===:"<<str3<<endl;str3.append(str1);cout<<"===str3===:"<<str3<<endl;str3.append(str1, 1, 2);cout<<"===str3===:"<<str3<<endl;
}
int main() {
//    test_01();test_02();
}
4.字符串查找与替换

find从左往右找,rfind从右往左找
void test_03(){string str1 = "abcdebfg";int pos = str1.find("b"); //从左往右找cout<<"===pos===:"<<pos<<endl;int rpos = str1.rfind("b"); //从右往左找cout<<"===rpos===:"<<rpos<<endl;
}
int main() {
//    test_01();
//    test_02();test_03();
}
void test_03(){string str1 = "abcdebfg";str1.replace(1, 3, "1111"); //将bcd替换为1111cout<<"===str1===:"<<str1<<endl;
}![]()
5.字符串比较

void test_03(){string str1 = "abcdebfg";string str2 = "abcd";const char *p = "abcd";int res1 = str1.compare(p);cout<<"===res1===:"<<res1<<endl;int res2 = str1.compare(str2);cout<<"===res2===:"<<res2<<endl;
}![]()
6.字符存取
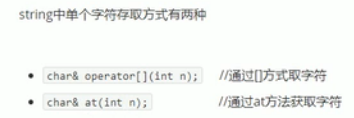
void test04(){string str1 = "hello";cout<<"str1[0]:"<<str1[0]<<endl;cout<<"str1.at(0):"<<str1.at(0)<<endl;str1[0] = 'A';cout<<"===str1:==="<<str1<<endl;
}
7.字符串的插入与删除

void test05(){string str1 = "hello";str1.insert(0,"111");cout<<"===str1:==="<<str1<<endl;//deletestr1.erase(0,3);cout<<"===str1:==="<<str1<<endl;
}
8.子串获取

void test06(){string str1 = "hello";string substr = str1.substr(0, 3);cout<<"===str1:==="<<str1<<endl;cout<<"===substr:==="<<substr<<endl;
}
void test06(){string email = "hello@qq.com";int pos = email.find("@");cout<<"===pos:==="<<pos<<endl;string name = email.substr(0,pos);cout<<"===name:==="<<name<<endl;
}




)


