本节所讲内容:
Linux终端介绍
Shell提示符
Bash Shell基本语法
基本命令的使用:ls、pwd、cd
查看系统和BIOS硬件时间
Linux如何获得帮助
Linux关机命令:shutdow、init等
Linux 7个启动级别
创建一个方便快捷实验环境快照
设置服务器在来电后自动开机
Linux终端介绍
tty控制台终端 pts虚拟终端
tty1-tty6
如是一开始进入的是图形图面:tty1 就是图形界面。
图形界面切换到字符界面终端: Ctrl+(Shift)+Alt+F2-6
Fn
Alt+F1
pts虚拟终端
ctrl+shift+T
Alt + 数字键
放大:ctrl+shift+ +
缩小:ctrl+ -
[root@localhost ~]# ps -aux | grep pts
Warning: bad syntax, perhaps a bogus '-'? See /usr/share/doc/procps-3.2.8/FAQ
root      2919  0.0  0.1 108300  1884 pts/0    Ss   10:27   0:00 /bin/bash
root      2948  0.0  0.1 110228  1184 pts/0    R+   10:29   0:00 ps -aux
root      2949  0.0  0.0 103240   864 pts/0    S+   10:29   0:00 grep pts
pts(pseudo-terminalslave) 伪终端 :通过ssh相关工具连接上后,显示出来终端为:pts
Shell提示符:
[root@localhost ~]#
[用户@主机名 当前目录名称 ] 提示符 root为# 普通用户为:$
Bash Shell基本语法
总结Linux命令输入规律:
如何输入命令:
命令 [选项]([参数]) [选项的值]([参数的值])
空格作为分割
Ls-l/root
基本命令:
ls 命令
作用:查看当前目录下有哪些文件
语法:ls 目录 ,如果不加目录查看当前目录
参数:
-l 显示详细信息 系统里面的快捷方式#ll=ls -l
-a显示隐藏文件
-d 查看目录(不查看里面的内容)
-h 增强可读性
[root@localhost ~]# ls -l  /root
[root@localhost ~]# ll  -h /etc/passwd
-rw-r--r-- 1 root root 1.6K Aug 25 21:27 /etc/passwd
linux系统中不同的颜色代表了不同的文件类型
蓝色 目录/etc
黑色 文件/etc/passwd
浅蓝色 链接/etc/grub2.cfg
红色 压缩包boot.tar.gz
绿色 可执行文件/etc/init.d/network
黑底黄字设备文件/dev/sda
pwd
作用:查看当前目录
语法:pwd 没有参数
cd
作用:切换目录
语法:cd 目录名
例:
#cd 回到用户自己的主目录
#cd ~ 回到用户自己的主目录
#cd - 回到上一个目录
查看系统和BIOS硬件时间: 指的是bios时间 (格里尼兹天文台)
[root@localhost sysconfig]# hwclock
Tue 25 Aug 2015 10:06:06 PM CST  -0.204632 seconds
Linux如何获得帮助
方法1:加参数-h 或--help
[root@localhost ~]# shutdown –-help
[root@localhost ~]# fdisk  -h
Man
[root@localhost ~]# man find
help 查看内部命令帮助信息
--help 查看外部命令帮助信息
关机命令:
shutdown、 init 、reboot poweroff
shutdown
作用:关机,重启,定时关机
语法:shutdown [选项]
有如下选项:
-r => 重新启动计算机
-h => 关机
-h 时间 =>定时关机
-c => 取消之前的定时关机 或ctrl+c
[root@localhost ~]# shutdown -h +10
10分钟之后关机
[root@localhost ~]# shutdown -h 23:00
指定具体的时间点进行关机
[root@localhost ~]# shutdown -h now
立即关机
shutdown -r now  立即重启
shutdown -r +10    #10 分钟以后重启
shutdown -r  22:22     # 22:22 以后重启
init 命令
作用:切换系统运行级别
语法:init 0-6
例:
init 0命令用于立即将系统运行级别切换为0,即关机;
init 6命令用于将系统运行级别切换为6,即重新启动。
Linux 7个启动级别:
0 系统停机模式,系统默认运行级别不能设置为0,否则不能正常启动,机器关闭。
1 单用户模式,root权限,用于系统维护,禁止远程登陆,就像Windows下的安全模式登录。
2 多用户模式,没有NFS网络支持。
3 完整的多用户文本模式,有NFS,登陆后进入控制台命令行模式。
4 系统未使用,保留一般不用,在一些特殊情况下可以用它来做一些事情。例如在笔记本电脑的电池用尽时,可以切换到这个模式来做一些设置。
5 图形化模式,登陆后进入图形GUI模式,X Window系统。
6 重启模式,默认运行级别不能设为6,否则不能正常启动。运行init 6机器就会重启。
启动级别配置
RHEL7不再使用/etc/inittab文件进行默认的启动级别配置
systemd使用比sysvinit的运行级更为自由的target替代。第3运行级用multi-user.target替代。第5运行级用graphical.target替代。runlevel3.target和runlevel5.target分别是指向 multi-user.target和graphical.target的符号链接。
切换运行级别
切换到第3运行级
[root@localhost ~]# systemctl isolate multi-user.target
或
[root@localhost ~]# systemctl isolate runlevel3.target
切换到第5运行级
[root@localhost ~]# systemctl isolate graphical.target
或
[root@localhost ~]# systemctl isolate runlevel5.target
设置默认的运行界别
systemd使用链接来指向默认的运行级别。在创建新的链接前,可以通过下面命令删除存在的链接:
rm /etc/systemd/system/default.target
默认启动级别3
[root@localhost ~]# ln -sf /lib/systemd/system/multi-user.target /etc/systemd/system/default.target
或
[root@localhost ~]# systemctl -f enable multi-user.target
默认启动级别5
[root@localhost ~]# ln -sf /lib/systemd/system/graphical.target /etc/systemd/system/default.target
或
[root@localhost ~]# systemctl -f enable graphical.target
查看当前的运行级别
runlevel
[root@localhost ~]# runlevel
N 5

创建一个方便快捷实验环境快照
配置好静态IP地址,关闭iptables防火墙,关闭selinux,,光盘自动挂载,配置好yum仓库
1)配置IP地址
RHEL7中弱化了setup的功能,对于网络管理来说,network服务的功能弱化,主要通过NetworkManage对网络进行管理
RHEL7通过nmtui修改网络配置(RHEL7默认安装,前提是需要开启NetworkManager.service 才可以使用)
首先,确认NetworkManager服务器正常运行
[root@localhost ~]# systemctl status NetworkManager
NetworkManager.service - Network ManagerLoaded: loaded (/usr/lib/systemd/system/NetworkManager.service; enabled)Active: active (running) since Wed 2015-11-25 19:02:52 CST; 3min 10s ago
1、修改配置:
[root@localhost ~]# nmtui-edit eno16777736
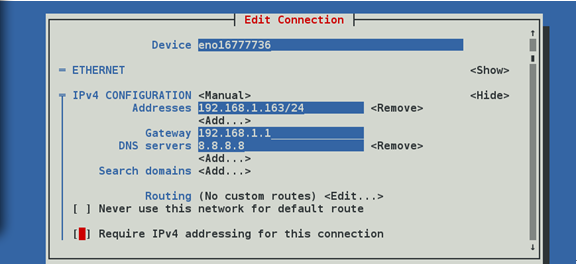
2、激活网络配置
[root@localhost ~]# nmtui
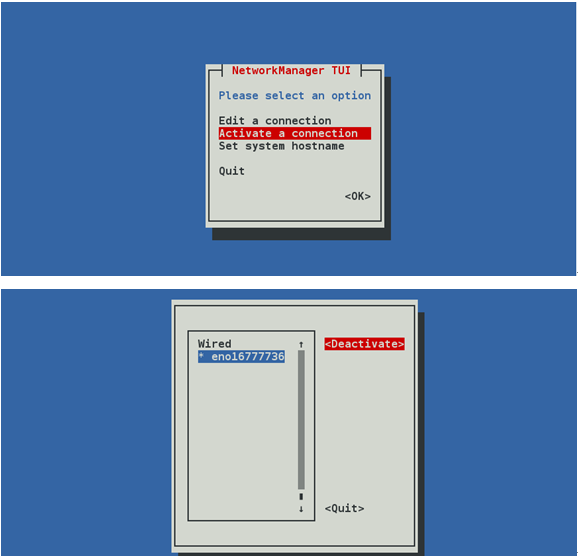
或者
[root@localhost ~]# systemctl restart network
2)关闭防火墙并设置为开机自动关闭
[root@localhost ~]# systemctl stop firewalld
[root@localhost ~]# systemctl disable firewalld
3)关闭selinux
查看selinux服务开启状态
[root@localhost ~]# getenforce
Disabled
[root@localhost ~]# vim /etc/selinux/config
# This file controls the state of SELinux on the system.
# SELINUX= can take one of these three values:
#     enforcing - SELinux security policy is enforced.
#     permissive - SELinux prints warnings instead of enforcing.
#     disabled - No SELinux policy is loaded.
SELINUX=disabled
# SELINUXTYPE= can take one of these two values:
#     targeted - Targeted processes are protected,
#     mls - Multi Level Security protection.
SELINUXTYPE=targeted
临时强制关闭selinux
[root@localhost ~]
# setenforce 0
没基础的同学,仅供了解
光盘自动挂载
[root@localhost ~]# vim /etc/fstab
/dev/sr0                /mnt                    iso9660       defaults        0   0
配置好yum仓库
[root@localhost ~]# cd /etc/yum.repos.d/
[root@ localhost yum.repos.d]# vim rhel-source.repo
[rhel-yum]
name=Red Hat Enterprise Linux $releasever - $basearch - Source
baseurl=file:///mnt/
enabled=1
gpgcheck=0
开机按首先按Del F2进入BIOS
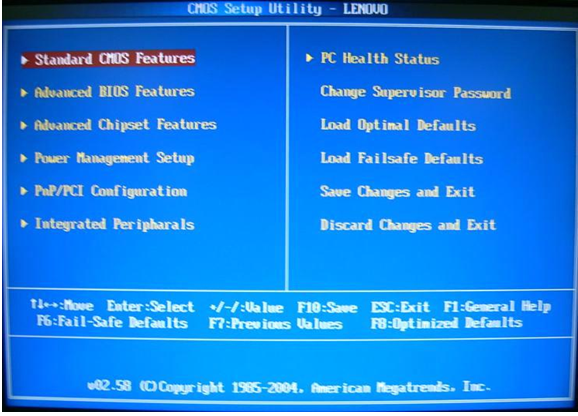
选择Integrated Peripharals中的SuperIO Device
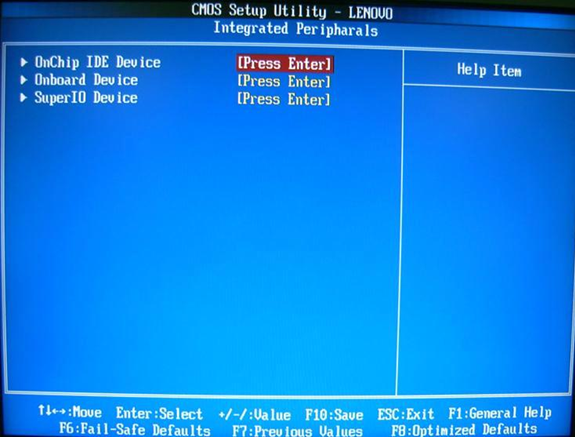
将其中的Restore On AC Power Loss选项修改:Power On
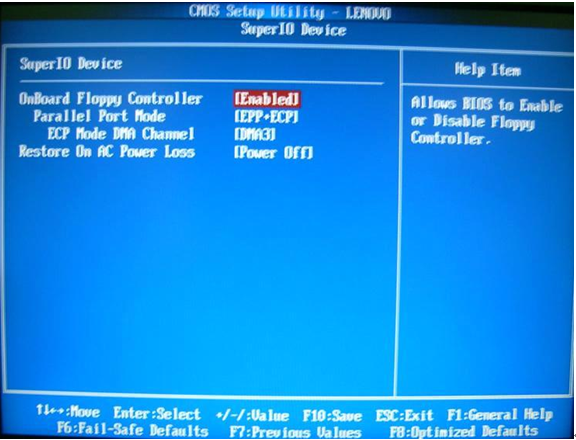
(若要加电不开机选择Power Off,若要加电之前断电状态选择Last State)
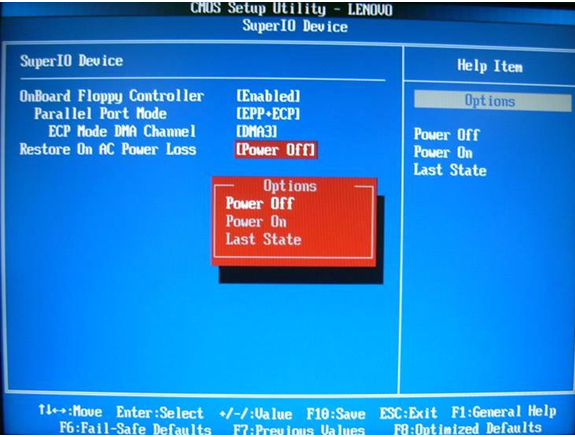
最后按F10保存退出即可
学习过程中如果问题,请留言。更多内容请加:
学神IT-linux讲师-RM老师QQ:2805537762
学神IT-戚老师QQ:3341251313
学神IT-旭斌QQ:372469347
学神IT教育RHEL7交流群:468845589
转载于:https://blog.51cto.com/xuegodlinux/1716975


