概述
Butterknife是供职于Square公司的JakeWharton大神开发的开源库,使用这个库,在AS中搭配Android ButterKnife Zelezny插件,可以大大提高开发的效率,从此摆脱繁琐的findViewById(int id),也不用自己手动@bind(int id) , 直接用插件生成即可。本篇博客将对Butterknife进行深入解析。
项目地址: JakeWharton/butterknife
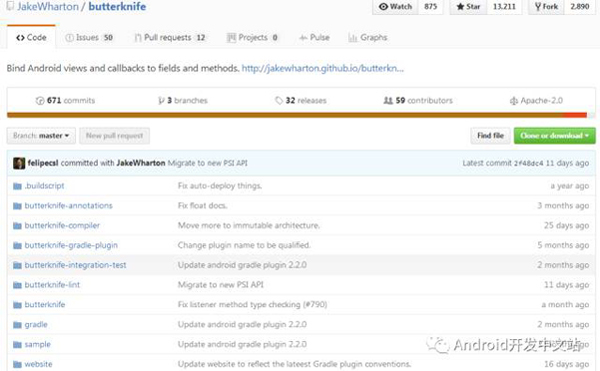
ButterKnife有以下优点:
1、强大的View绑定和Click事件处理功能,简化代码,提升开发效率
2、方便的处理Adapter里的ViewHolder绑定问题
3、运行时不会影响APP效率,使用配置方便
4、代码清晰,可读性强
如何导入ButterKnife
在项目的build.grade文件中进行如下配置:
- buildscript {
- repositories {
- jcenter()
- mavenCentral()
- maven {
- url "https://plugins.gradle.org/m2/"
- }
- }
- dependencies {
- classpath 'com.android.tools.build:gradle:2.2.0'
- //这里配置 apt 供butterknife使用
- classpath 'com.neenbedankt.gradle.plugins:android-apt:1.8'
- }
- }
例如:
- buildscript {
- repositories {
- jcenter()
- mavenCentral()
- maven {
- url "https://plugins.gradle.org/m2/"
- }
- }
- dependencies {
- classpath 'com.android.tools.build:gradle:2.2.2'
- classpath 'com.neenbedankt.gradle.plugins:android-apt:1.8'
- }
- }
- allprojects {
- repositories {
- jcenter()
- }
- }
- task clean(type: Delete) {
- delete rootProject.buildDir
- }
在app的build.grade文件中进行如下配置:
- apply plugin: 'com.android.application'
- apply plugin: 'com.neenbedankt.android-apt'
- android{...}
- dependencies {
- //视图绑定 butterknife
- compile 'com.jakewharton:butterknife:8.4.0'
- apt 'com.jakewharton:butterknife-compiler:8.4.0'
- }
例如:
- apply plugin: 'com.android.application'
- apply plugin: 'android-apt'
- android {
- compileSdkVersion 24
- buildToolsVersion "24.0.3"
- defaultConfig {
- minSdkVersion 14
- targetSdkVersion 24
- versionCode 1
- versionName "1.0"
- }
- buildTypes {
- release {
- minifyEnabled false
- proguardFiles getDefaultProguardFile('proguard-android.txt'), 'proguard-rules.pro'
- }
- }
- }
- dependencies {
- compile fileTree(dir: 'libs', include: ['*.jar'])
- compile 'com.jakewharton:butterknife:8.4.0'
- apt 'com.jakewharton:butterknife-compiler:8.4.0'
- }
如何使用ButterKnife
1) 由于每次都要在Activity中的onCreate绑定Activity,所以个人建议写一个BaseActivity完成绑定,子类继承即可
注:ButterKnife.bind(this);绑定Activity 必须在setContentView之后:
实现如下(FragmentActivity 实现一样):
- public abstract class BaseActivity extends Activity {
- public abstract int getContentViewId();
- @Override
- protected void onCreate(Bundle savedInstanceState) {
- super.onCreate(savedInstanceState);
- setContentView(getContentViewId());
- ButterKnife.bind(this);
- initAllMembersView(savedInstanceState);
- }
- protected abstract void initAllMembersView(Bundle savedInstanceState);
- @Override
- protected void onDestroy() {
- super.onDestroy();
- ButterKnife.unbind(this);//解除绑定,官方文档只对fragment做了解绑
- }
- }
2) 绑定fragment
- public abstract class BaseFragment extends Fragment {
- public abstract int getContentViewId();
- protected Context context;
- protected View mRootView;
- @Nullable
- @Override
- public View onCreateView(LayoutInflater inflater, @Nullable ViewGroup container, @Nullable Bundle savedInstanceState) {
- mRootView =inflater.inflate(getContentViewId(),container,false);
- ButterKnife.bind(this,mRootView);//绑定framgent
- this.context = getActivity();
- initAllMembersView(savedInstanceState);
- return mRootView;
- }
- protected abstract void initAllMembersView(Bundle savedInstanceState);
- @Override
- public void onDestroyView() {
- super.onDestroyView();
- ButterKnife.unbind(this);//解绑
- }
- }
3) 控件id 注解: @BindView()
- package com.myl.test;
- import android.support.v7.app.AppCompatActivity;
- import android.os.Bundle;
- import android.widget.Button;
- import butterknife.BindView;
- import butterknife.ButterKnife;
- public class ButterknifeActivity extends AppCompatActivity {
- @BindView( R.id.button1 )
- public Button button1 ;
- // 注意:button 的修饰类型不能是:private 或者 static 。 否则会报错:错误: @BindView fields must not be private or static. (com.myl.test.ButterknifeActivity.button1)
- @Override
- protected void onCreate(Bundle savedInstanceState) {
- super.onCreate(savedInstanceState);
- setContentView(R.layout.activity_butterknife);
- //绑定activity
- ButterKnife.bind( this ) ;
- button1.setText( "I am a button ");
- }
- }
4) 多个控件id 注解: @BindViews()
- package com.myl.test;
- import android.support.v7.app.AppCompatActivity;
- import android.os.Bundle;
- import android.widget.Button;
- import java.util.List;
- import butterknife.BindViews;
- import butterknife.ButterKnife;
- public class Main2Activity extends AppCompatActivity {
- @BindViews({ R.id.button1 , R.id.button2 , R.id.button3 })
- public List<Button> buttonList ;
- @Override
- protected void onCreate(Bundle savedInstanceState) {
- super.onCreate(savedInstanceState);
- setContentView(R.layout.activity_main2);
- ButterKnife.bind(this);
- buttonList.get( 0 ).setText( "hello 1 ");
- buttonList.get( 1 ).setText( "hello 2 ");
- buttonList.get( 2 ).setText( "hello 3 ");
- }
- }
5) @BindString() :绑定string 字符串
- package com.myl.test;
- import android.os.Bundle;
- import android.support.v7.app.AppCompatActivity;
- import android.widget.Button;
- import butterknife.BindString;
- import butterknife.BindView;
- import butterknife.ButterKnife;
- public class ButterknifeActivity extends AppCompatActivity {
- @BindView( R.id.button1 ) //绑定button 控件
- public Button button1 ;
- @BindString( R.string.app_name ) //绑定string 字符串
- String meg;
- @Override
- protected void onCreate(Bundle savedInstanceState) {
- super.onCreate(savedInstanceState);
- setContentView(R.layout.activity_butterknife);
- //绑定activity
- ButterKnife.bind( this ) ;
- button1.setText( meg );
- }
- }
6) @BindArray() : 绑定string里面array数组
- <resources>
- <string name="app_name">校园助手</string>
- <string-array name="city">
- <item>东莞市</item>
- <item>广州市</item>
- <item>珠海市</item>
- <item>肇庆市</item>
- <item>深圳市</item>
- </string-array>
- </resources>
- -----------------------------------------------------------------
- package com.myl.test;
- import android.os.Bundle;
- import android.support.v7.app.AppCompatActivity;
- import android.widget.Button;
- import butterknife.BindArray;
- import butterknife.BindView;
- import butterknife.ButterKnife;
- public class ButterknifeActivity extends AppCompatActivity {
- @BindView( R.id.button1 ) //绑定button 控件
- public Button button1 ;
- @BindArray(R.array.city ) //绑定string里面array数组
- String [] citys ;
- @Override
- protected void onCreate(Bundle savedInstanceState) {
- super.onCreate(savedInstanceState);
- setContentView(R.layout.activity_butterknife);
- //绑定activity
- ButterKnife.bind( this ) ;
- button1.setText( citys[0] );
- }
- }
7) @BindBitmap( ) : 绑定Bitmap 资源
- package com.myl.test;
- import android.graphics.Bitmap;
- import android.os.Bundle;
- import android.support.v7.app.AppCompatActivity;
- import android.widget.ImageView;
- import butterknife.BindBitmap;
- import butterknife.BindView;
- import butterknife.ButterKnife;
- public class ButterknifeActivity extends AppCompatActivity {
- @BindView( R.id.imageView ) //绑定ImageView 控件
- public ImageView imageView ;
- @BindBitmap( R.mipmap.wifi ) //绑定Bitmap 资源
- public Bitmap wifi_bitmap ;
- @Override
- protected void onCreate(Bundle savedInstanceState) {
- super.onCreate(savedInstanceState);
- setContentView(R.layout.activity_butterknife);
- //绑定activity
- ButterKnife.bind( this ) ;
- imageView.setImageBitmap( wifi_bitmap );
- }
- }
8) @BindColor( ) : 绑定一个颜色值
- package com.myl.test;
- import android.os.Bundle;
- import android.support.v7.app.AppCompatActivity;
- import android.widget.Button;
- import butterknife.BindColor;
- import butterknife.BindView;
- import butterknife.ButterKnife;
- public class ButterknifeActivity extends AppCompatActivity {
- @BindView( R.id.button1 ) //绑定一个控件
- public Button button1 ;
- @BindColor( R.color.colorAccent ) int black ; //绑定一个颜色值
- @Override
- protected void onCreate(Bundle savedInstanceState) {
- super.onCreate(savedInstanceState);
- setContentView(R.layout.activity_butterknife);
- //绑定activity
- ButterKnife.bind( this ) ;
- button1.setTextColor( black );
- }
- }
9) Adapter ViewHolder 绑定
- public class TestAdapter extends BaseAdapter {
- private List<String> list;
- private Context context;
- public TestAdapter(Context context, List<String> list) {
- this.list = list;
- this.context = context;
- }
- @Override
- public int getCount() {
- return list==null ? 0 : list.size();
- }
- @Override
- public Object getItem(int position) {
- return list.get(position);
- }
- @Override
- public long getItemId(int position) {
- return position;
- }
- @Override
- public View getView(int position, View convertView, ViewGroup parent) {
- ViewHolder holder;
- if (convertView == null) {
- convertView = LayoutInflater.from(context).inflate(R.layout.layout_list_item, null);
- holder = new ViewHolder(convertView);
- convertView.setTag(holder);
- } else {
- holder = (ViewHolder) convertView.getTag();
- }
- holder.textview.setText("item=====" + position);
- return convertView;
- }
- static class ViewHolder {
- @Bind(R.id.hello_world)
- TextView textview;
- public ViewHolder(View view) {
- ButterKnife.bind(this, view);
- }
- }
- }
10) 点击事件的绑定:不用声明view,不用setOnClickLisener()就可以绑定点击事件
a. 直接绑定一个方法
- @OnClick(R.id.submit)
- public void submit(View view) {
- // TODO submit data to server...
- }
b. 所有监听方法的参数是可选的
- @OnClick(R.id.submit)
- public void submit() {
- // TODO submit data to server...
- }
c. 定义一个特定类型,它将自动被转换
- @OnClick(R.id.submit)
- public void sayHi(Button button) {
- button.setText("Hello!");
- }
d. 多个view统一处理同一个点击事件,很方便,避免抽方法重复调用的麻烦
- @OnClick(R.id.submit)
- public void sayHi(Button button) {
- button.setText("Hello!");
- }
e. 自定义view可以绑定自己的监听,不指定id
- public class FancyButton extends Button {
- @OnClick
- public void onClick() {
- // TODO do something!
- }
- }
f. 给EditText加addTextChangedListener(即添加多回调方法的监听的使用方法),利用指定回调,实现想回调的方法即可,哪个注解不会用点进去看下源码上的注释
- @OnTextChanged(value = R.id.mobileEditText, callback = OnTextChanged.Callback.BEFORE_TEXT_CHANGED)
- void beforeTextChanged(CharSequence s, int start, int count, int after) {
- }
- @OnTextChanged(value = R.id.mobileEditText, callback = OnTextChanged.Callback.TEXT_CHANGED)
- void onTextChanged(CharSequence s, int start, int before, int count) {
- }
- @OnTextChanged(value = R.id.mobileEditText, callback = OnTextChanged.Callback.AFTER_TEXT_CHANGED)
- void afterTextChanged(Editable s) {
- }
代码混淆
- -keep class butterknife.** { *; }
- -dontwarn butterknife.internal.**
- -keep class **$$ViewBinder { *; }
- -keepclasseswithmembernames class * {
- @butterknife.* <fields>;
- }
- -keepclasseswithmembernames class * {
- @butterknife.* <methods>;
- }
Zelezny插件的使用
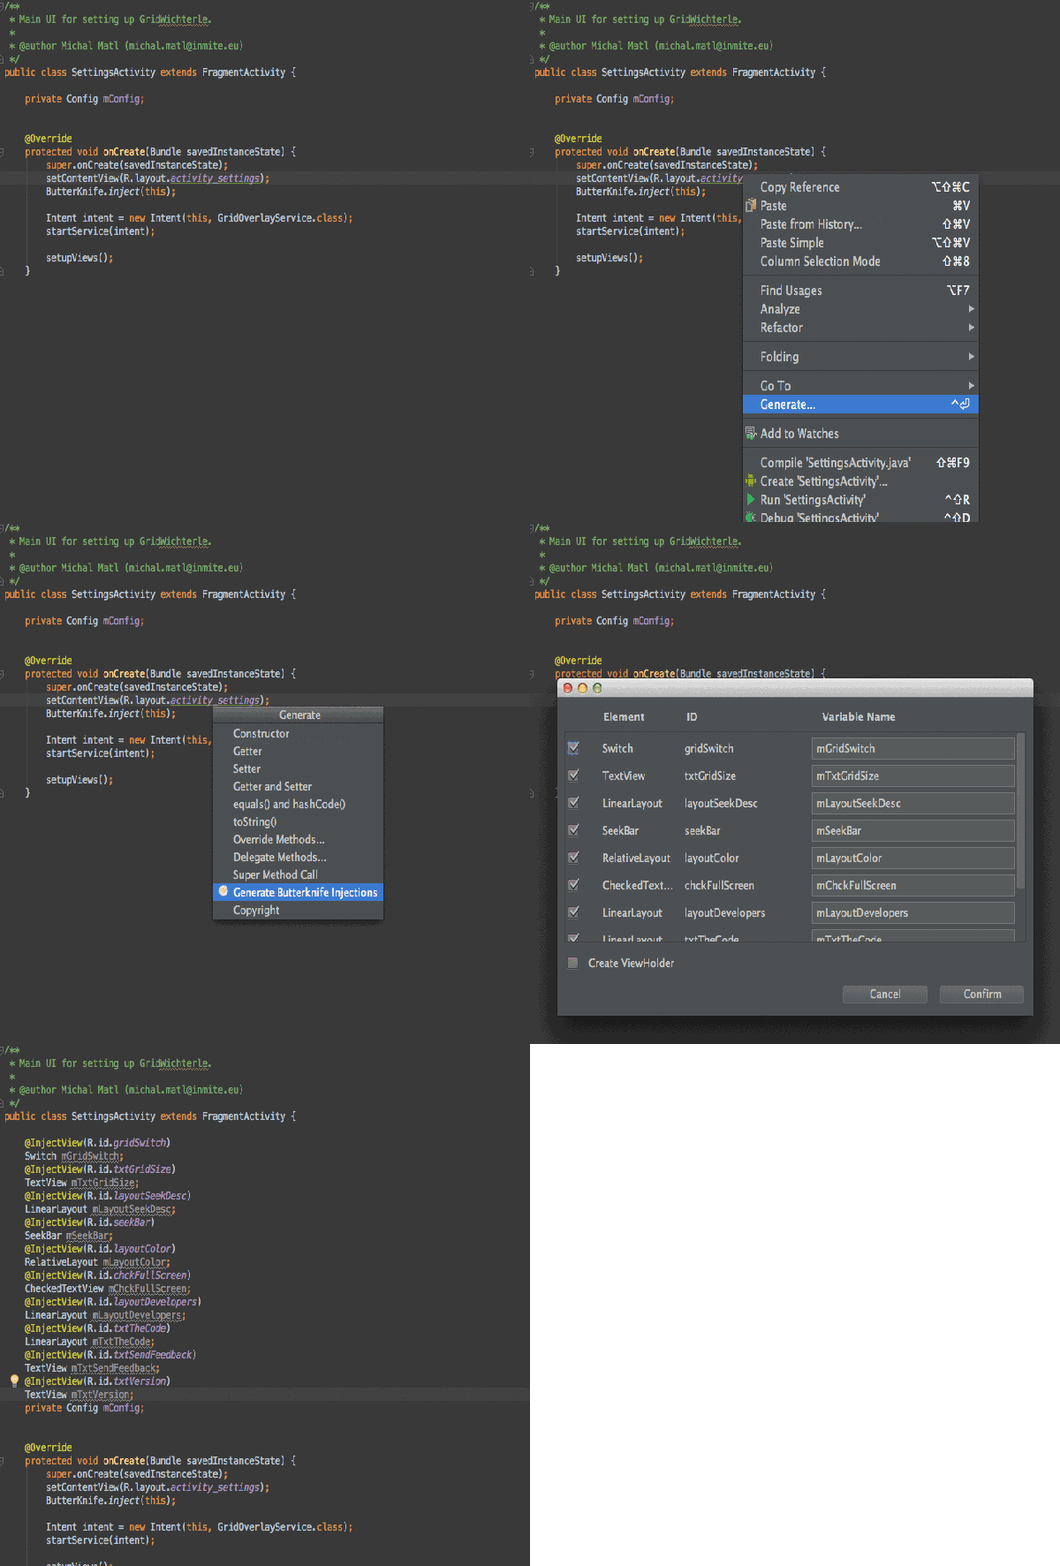
在AndroidStudio->File->Settings->Plugins->搜索Zelezny下载添加就行 ,可以快速生成对应组件的实例对象,不用手动写。使用时,在要导入注解的Activity 或 Fragment 或 ViewHolder的layout资源代码上,右键——>Generate——Generate ButterKnife Injections,然后就出现如图的选择框。
ButterKnife实现原理
对ButterKnife有过了解人 , 注入字段的方式是使用注解@BindView(R.id.tv_account_name),但首先我们需要在Activity声明注入ButterKnife.bind(Activity activity) 。我们知道,注解分为好几类, 有在源码生效的注解,有在类文件生成时生效的注解,有在运行时生效的注解。分别为RetentionPolicy.SOURCE,RetentionPolicy.CLASS,RetentionPolicy.RUNTIME ,其中以RetentionPolicy.RUNTIME最为消耗性能。而ButterKnife使用的则是编译器时期注入,在使用的时候,需要配置classpath ‘com.neenbedankt.gradle.plugins:android-apt:1.8’ , 这个配置说明,在编译的时候,进行注解处理。要对注解进行处理,则需要继承AbstractProcessor , 在boolean process(Set
ButterKnife实现方式
知晓了注解可以在编译的时候进行处理,那么,我们就可以得到注解的字段属性与所在类 , 进而生成注入文件,生成一个注入类的内部类,再进行字段处理 , 编译之后就会合并到注入类中,达到植入新代码段的目的。例如:我们注入@VInjector(R.id.tv_show) TextView tvShow;我们就可以得到tvShow这个变量与R.id.tv_show这个id的值,然后进行模式化处理injectObject.tvShow = injectObject.findViewById(R.id.tv_show); ,再将代码以内部类的心事加入到组件所在的类中 , 完成一次DI(注入) 。
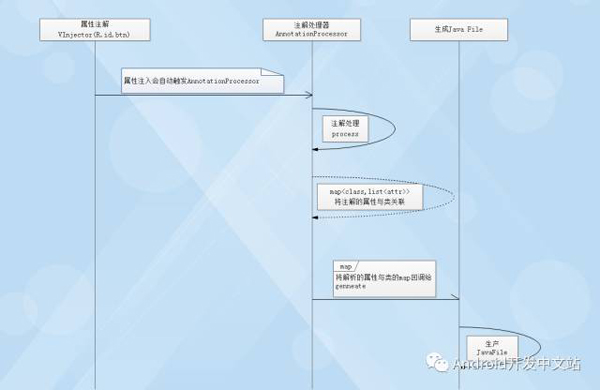
a) 首先创建一个视图注解
b) 创建一个注解处理器,用来得到注解的属性与所属类
c) 解析注解,分离组合Class与属性
d) 组合Class与属性,生成新的Java File
APT生成的Java File , 以及模式代码
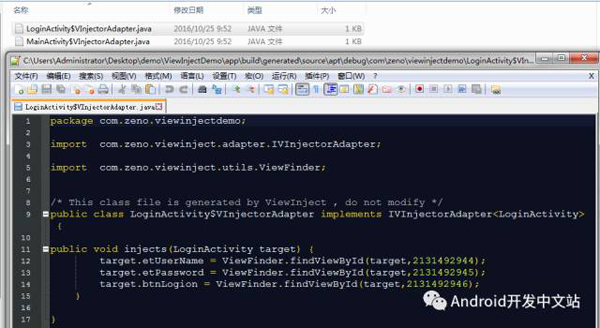
使用Javac , 编译时期生成注入类的子类
项目UML图
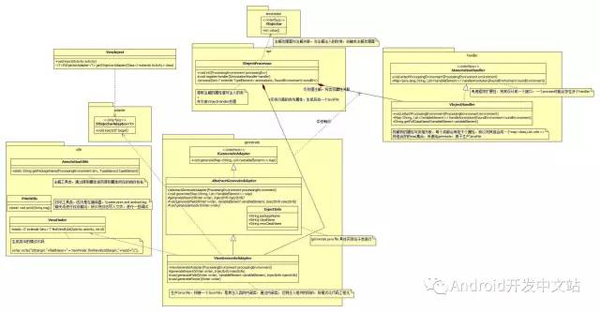
简要说明:
主要类:
VInjectProcessor —-> 注解处理器 , 需要配置注解处理器
- resources
- - META-INF
- - services
- - javax.annotation.processing.Processor
Processor内容:
- com.myl.viewinject.apt.VInjectProcessor # 指定处理器全类名
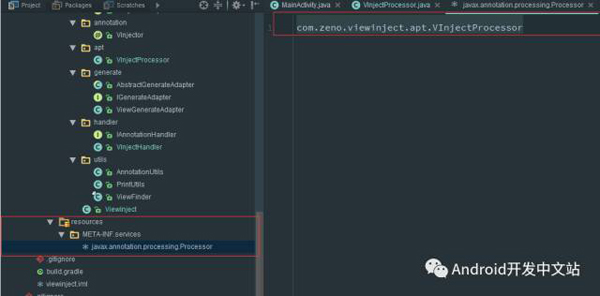
VInjectHandler —-> 注解处理类 , 主要进行注入类与注解字段进行解析与封装,将同类的字段使用map集合进行映射。exp: Map
自定义ButterKnife具体实现
因微信字数限制,请点击左下角原文链接查看!~


)


)


