文章目录
- 一.需求分析
- 二.课程管理导航页面
- 1.定义course_manage.vue为课程管理页面
- 2.创建各个信息管理页面
- 3.创建路由
- 三.服务端
- 1.Api接口
- 1)根据课程ID查询课程信息
- 2)修改课程信息
- 2.Dao
- 3.Service
- 4.Controller
- 四.前端
- 1. 完成course_baseinfo.vue页面
- 2.API方法
- 3.course_baseinfo.vue中mounted钩子方法
- 4.课程修改提交
一.需求分析
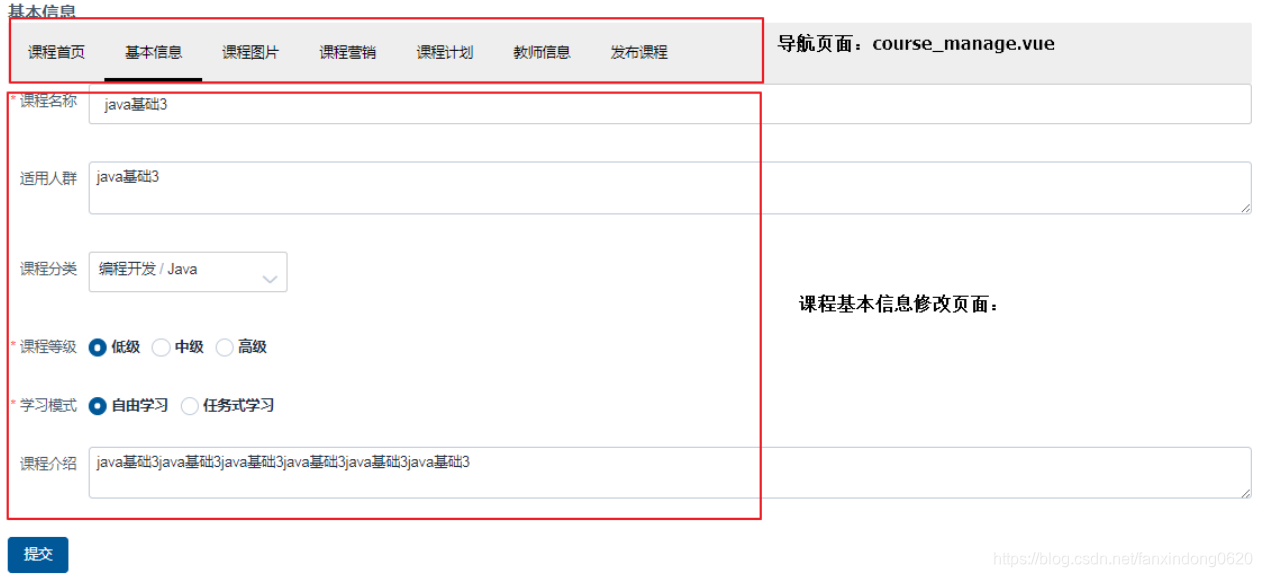
课程添加成功进入课程管理页面,通过课程管理页面修改课程的基本信息、编辑课程图片、编辑课程营销信息等。本小节实现修改课程。
课程管理页面的结构如下:

二.课程管理导航页面
1.定义course_manage.vue为课程管理页面
导航效果使用Element-UI的NavMenu组件实现
文件位置:xc-ui-pc-teach\src\module\course\page\course_manage.vue

<template><div><el-menu:default-active="activeIndex"class="el-menu-demo"mode="horizontal"background-color="#eee"text-color="#000"active-text-color="#000"><router-link class="mui-tab-item" :to="{path:'/course/manage/summary/'+this.courseid}"><el-menu-item index="1">课程首页</el-menu-item></router-link><router-link class="mui-tab-item" :to="{path:'/course/manage/baseinfo/'+this.courseid}"><el-menu-item index="2">基本信息</el-menu-item></router-link><router-link class="mui-tab-item" :to="{path:'/course/manage/picture/'+this.courseid}"><el-menu-item index="3">课程图片</el-menu-item></router-link><router-link class="mui-tab-item" :to="{path:'/course/manage/marketinfo/'+this.courseid}"><el-menu-item index="4">课程营销</el-menu-item></router-link><router-link class="mui-tab-item" :to="{path:'/course/manage/plan/'+this.courseid}"><el-menu-item index="5">课程计划</el-menu-item></router-link><router-link class="mui-tab-item" :to="{path:'/course/manage/teacher/'+this.courseid}"><el-menu-item index="6">教师信息</el-menu-item></router-link><router-link class="mui-tab-item" :to="{path:'/course/manage/pub/'+this.courseid}"><el-menu-item index="7">发布课程</el-menu-item></router-link></el-menu><router-view class="main"></router-view></div>
</template>
<script>import * as courseApi from '../api/course';import utilApi from '../../../common/utils';export default {data() {return {activeIndex:'2',courseid:''}},methods: {},mounted(){//课程idthis.courseid = this.$route.params.courseidconsole.log("courseid=" + this.courseid)//跳转到课程基本信息this.$router.push({ path: '/course/manage/baseinfo/'+this.courseid})}}
</script>
<style scoped></style>
2.创建各个信息管理页面
通过管理页面的导航可以进入各各信息管理页面,这里先创建各各信息管理页面,页面内容暂时为空,待开发时再完善,在本模块的page目录下创建course_manage目录,此目录存放各各信息管理页面,页面明细如下:
课程管理首页:course_summary.vue
基本信息修改页面:course_baseinfo.vue
图片管理页面:course_picture.vue
营销信息页面:course_marketinfo.vue
老师信息页面:course_teacher.vue
课程计划页面:course_plan.vue
课程发布页面:course_pub.vue
3.创建路由
文件位置:xc-ui-pc-teach\src\module\course\router\index.js
import Home from '@/module/home/page/home.vue';
import course_list from '@/module/course/page/course_list.vue';
import course_add from '@/module/course/page/course_add.vue';import course_manage from '@/module/course/page/course_manage.vue';
import course_summary from '@/module/course/page/course_manage/course_summary.vue';
import course_picture from '@/module/course/page/course_manage/course_picture.vue';
import course_baseinfo from '@/module/course/page/course_manage/course_baseinfo.vue';
import course_marketinfo from '@/module/course/page/course_manage/course_marketinfo.vue';
import course_teacher from '@/module/course/page/course_manage/course_teacher.vue';
import course_plan from '@/module/course/page/course_manage/course_plan.vue';
import course_pub from '@/module/course/page/course_manage/course_pub.vue';
export default [{path: '/course',component: Home,name: '课程管理',hidden: false,iconCls: 'el-icon-document',children: [{ path: '/course/list', name: '我的课程',component: course_list,hidden: false },{ path: '/course/add/base', name: '新增课程',component: course_add,hidden: true },{ path: '/course/manager/:courseid', name: '管理课程',component: course_manage,hidden: true ,children: [{ path: '/course/manage/plan/:courseid', name: '课程计划',component: course_plan,hidden: false },{ path: '/course/manage/baseinfo/:courseid', name: '基本信息',component: course_baseinfo,hidden: false },{ path: '/course/manage/picture/:courseid', name: '课程图片',component: course_picture,hidden: false },{ path: '/course/manage/marketinfo/:courseid', name: '营销信息',component: course_marketinfo,hidden: false },{ path: '/course/manage/teacher/:courseid', name: '教师信息',component: course_teacher,hidden: false},{ path: '/course/manage/pub/:courseid', name: '发布课程',component: course_pub,hidden: false},{ path: '/course/manage/summary/:courseid', name: '课程首页',component: course_summary,hidden: false }]}]}
]
三.服务端
1.Api接口
修改课程需要如下接口:
1、根据id查询课程信息;
2、修改课程并提交。
文件位置:
1)根据课程ID查询课程信息
@ApiOperation("获取课程基础信息")
public CourseBase getCourseBaseById(String courseId) throws RuntimeException;
2)修改课程信息
@ApiOperation("更新课程基础信息")
public ResponseResult updateCourseBase(String id,CourseBase courseBase);
2.Dao
Dao即为学成在线–20.新增课程(最后完善)中Dao层中定义的接口。
文件位置:xcEduService01\xc-service-manage-course\src\main\java\com\xuecheng\manage_course\dao\CourseBaseRepository.java
public interface CourseBaseRepository extends JpaRepository<CourseBase, String> {
}
3.Service
文件位置:xcEduService01\xc-service-manage-course\src\main\java\com\xuecheng\manage_course\service\CourseService.java
public CourseBase getCoursebaseById(String courseid) {Optional<CourseBase> optional = courseBaseRepository.findById(courseId);if(optional.isPresent()){return optional.get();} return null;
} @Transactional
public ResponseResult updateCoursebase(String id, CourseBase courseBase) {CourseBase one = this.getCoursebaseById(id);if(one == null){//抛出异常..} //修改课程信息one.setName(courseBase.getName());one.setMt(courseBase.getMt());one.setSt(courseBase.getSt());one.setGrade(courseBase.getGrade());one.setStudymodel(courseBase.getStudymodel());one.setUsers(courseBase.getUsers());one.setDescription(courseBase.getDescription());CourseBase save = courseBaseRepository.save(one);return new ResponseResult(CommonCode.SUCCESS);
}
4.Controller
文件位置:xcEduService01\xc-service-manage-course\src\main\java\com\xuecheng\manage_course\controller\CourseController.java
@Override
@GetMapping("/coursebase/get/{courseId}")
public CourseBase getCourseBaseById(@PathVariable("courseId") String courseId) throws RuntimeException {return courseService.getCoursebaseById(courseId);
}@Override
@PutMapping("/coursebase/update/{id}")
public ResponseResult updateCourseBase(@PathVariable("id") String id, @RequestBody CourseBase courseBase) {return courseService.updateCoursebase(id,courseBase);
}
四.前端

1. 完成course_baseinfo.vue页面
在course模块下的course_manage目录下创建course_baseinfo.vue页面,本页面实现课程修改。
文件位置:xc-ui-pc-teach\src\module\course\page\course_manage\course_baseinfo.vue
<template><div><el-form :model="courseForm" label-width="80px" :rules="courseRules" ref="courseForm"><el-form-item label="课程名称" prop="name"><el-input v-model="courseForm.name" auto-complete="off" ></el-input></el-form-item><el-form-item label="适用人群" prop="users"><el-input type="textarea" v-model="courseForm.users" auto-complete="off" ></el-input></el-form-item><el-form-item label="课程分类" prop="categoryActive"><el-cascaderexpand-trigger="hover":options="categoryList"v-model="categoryActive":props="props"></el-cascader></el-form-item><el-form-item label="课程等级" prop="grade"><b v-for="grade in gradeList"><el-radio v-model="courseForm.grade" :label="grade.sdId" >{{grade.sdName}}</el-radio> </b></el-form-item><el-form-item label="学习模式" prop="studymodel"><b v-for="studymodel_v in studymodelList"><el-radio v-model="courseForm.studymodel" :label="studymodel_v.sdId" >{{studymodel_v.sdName}}</el-radio> </b></el-form-item><el-form-item label="课程介绍" prop="description"><el-input type="textarea" v-model="courseForm.description" ></el-input></el-form-item></el-form><div slot="footer" class="dialog-footer"><el-button type="primary" @click.native="save" :loading="editLoading">提交</el-button></div></div>
</template>
<script>import * as courseApi from '../../api/course';import utilApi from '../../../../common/utils';import * as systemApi from '../../../../base/api/system';export default {data() {return {dotype:'',courseid:'',studymodelList:[],gradeList:[],editLoading: false,props: {value: 'id',label:'label',children:'children'},categoryList: [],categoryActive:[],courseForm: {id:'',name: '',users: '',grade:'',studymodel:'',mt:'',st:'',description: ''},courseRules: {name: [{required: true, message: '请输入课程名称', trigger: 'blur'}],category: [{required: true, message: '请选择课程分类', trigger: 'blur'}],grade: [{required: true, message: '请选择课程等级', trigger: 'blur'}],studymodel: [{required: true, message: '请选择学习模式', trigger: 'blur'}]}}},methods: {save () {//修改课程this.$refs.courseForm.validate((valid) => {if (valid) {this.$confirm('确认提交吗?', '提示', {}).then(() => {this.editLoading = true;let mt = this.categoryActive[0];let st = this.categoryActive[1];this.courseForm.mt = mt;this.courseForm.st = st;let id = this.courseForm.idcourseApi.updateCoursebase(id,this.courseForm).then((res) => {this.editLoading = false;if(res.success){this.$message({message: '提交成功',type: 'success'});}else{if(res.message){this.$message.error(res.message);}else{this.$message.error('提交失败');}}});});}});}},created(){},mounted(){//查询数据字典字典systemApi.sys_getDictionary('201').then((res) => {
// console.log(res);this.studymodelList = res.dvalue;});systemApi.sys_getDictionary('200').then((res) => {this.gradeList = res.dvalue;});//取课程分类courseApi.category_findlist({}).then((res) => {this.categoryList = res.children;});//查询课程信息//课程idthis.courseid = this.$route.params.courseid;courseApi.getCoursebaseById(this.courseid).then((res) => {
// console.log(res);this.courseForm = res;//课程分类显示,需要两级分类this.categoryActive.push(this.courseForm.mt);this.categoryActive.push(this.courseForm.st);});}}
</script>
<style scoped></style>2.API方法
文件位置:xc-ui-pc-teach\src\module\course\api\course.js
//获取课程基本信息
export const getCoursebaseById = id => {
return http.requestQuickGet(apiUrl+'/course/coursebase/get/'+id)
}//更新课程基本信息
export const updateCoursebase= (id,course) => {
return http.requestPut(apiUrl+'/course/coursebase/update/'+id,course)
}
3.course_baseinfo.vue中mounted钩子方法
在mounted钩子方法中查询课程信息及数据字典:
文件位置:xc-ui-pc-teach\src\module\course\page\course_manage\course_baseinfo.vue
    mounted(){//查询数据字典字典systemApi.sys_getDictionary('201').then((res) => {
//        console.log(res);this.studymodelList = res.dvalue;});systemApi.sys_getDictionary('200').then((res) => {this.gradeList = res.dvalue;});//取课程分类courseApi.category_findlist({}).then((res) => {this.categoryList = res.children;});//查询课程信息//课程idthis.courseid = this.$route.params.courseid;courseApi.getCoursebaseById(this.courseid).then((res) => {
//          console.log(res);this.courseForm = res;//课程分类显示,需要两级分类this.categoryActive.push(this.courseForm.mt);this.categoryActive.push(this.courseForm.st);});}
4.课程修改提交
文件位置:xc-ui-pc-teach\src\module\course\page\course_manage\course_baseinfo.vue
编辑课程提交方法:
methods: {save () {//修改课程this.$refs.courseForm.validate((valid) => {if (valid) {this.$confirm('确认提交吗?', '提示', {}).then(() => {this.editLoading = true;let mt = this.categoryActive[0];let st = this.categoryActive[1];this.courseForm.mt = mt;this.courseForm.st = st;let id = this.courseForm.idcourseApi.updateCoursebase(id,this.courseForm).then((res) => {this.editLoading = false;if(res.success){this.$message({message: '提交成功',type: 'success'});}else{if(res.message){this.$message.error(res.message);}else{this.$message.error('提交失败');}}});});}});}},

)

)


 方法用法解说)


)