这篇博客将介绍在WPF项目中引入PRISM框架进行开发的一些基础知识。目前最新的PRISM的版本是Prism 6.1.0,可以在Github上获取PRISM的源码。这个系列的博客将选择PRISM 4.1版本来讲解。可以从微软官网上下载到PRISM 4.1相关内容。将下载下来的文件解压开:

新建一个WPF解决方案如下:

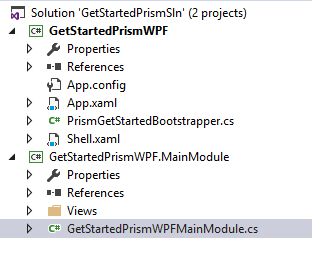
解决方案中包含两个工程,GetStartedPrismWPF是一个WPF项目,GetStartedPrismWPF.MainModule是一个类库项目。这两个项目中都同时添加下面Prism相关的Dll,

在GetStartedPrismWPF.MainModule类库中需要额外引用PresentationCore,PresentationFramework,ReachFramework,System.Xaml这4个WPF相关的类库。
GetStartedPrismWPF工程中删除MainWindow.xaml文件,新建一个Shell.xaml窗体文件,XAML代码如下:

<Window x:Class="GetStartedPrismWPF.Shell"xmlns="http://schemas.microsoft.com/winfx/2006/xaml/presentation"xmlns:x="http://schemas.microsoft.com/winfx/2006/xaml"xmlns:d="http://schemas.microsoft.com/expression/blend/2008"xmlns:mc="http://schemas.openxmlformats.org/markup-compatibility/2006"xmlns:prism="http://www.codeplex.com/prism"xmlns:local="clr-namespace:GetStartedPrismWPF"mc:Ignorable="d"Title="GetStarted Prism for WPF" Height="300" Width="300"><Grid><ContentControl prism:RegionManager.RegionName="MainRegion"/></Grid>
</Window>
添加一个PrismGetStartedBootstrapper类,代码如下:

using Microsoft.Practices.Prism.Modularity;
using Microsoft.Practices.Prism.UnityExtensions;
using System.Windows;namespace GetStartedPrismWPF
{public class PrismGetStartedBootstrapper : UnityBootstrapper{protected override DependencyObject CreateShell(){return this.Container.TryResolve<Shell>();}protected override void InitializeShell(){base.InitializeShell();Application.Current.MainWindow = (Window)this.Shell;Application.Current.MainWindow.Show();}protected override void ConfigureModuleCatalog(){base.ConfigureModuleCatalog();ModuleCatalog moduleCatalog = (ModuleCatalog)this.ModuleCatalog;moduleCatalog.AddModule(typeof(MainModule.GetStartedPrismWPFMainModule));}}
}
打开App.xaml文件,删除StartupUri的代码,在后台代码中添加:

protected override void OnStartup(StartupEventArgs e){base.OnStartup(e);PrismGetStartedBootstrapper bootstrapper = new PrismGetStartedBootstrapper();bootstrapper.Run();}
上面两段代码的意思是将主窗体设置为Shell窗体。
下面看GetStartedPrismWPF.MainModule中的代码,新建一个UserControl,命名为GetStartedPrismView,XAML代码如下:

<UserControl x:Class="GetStartedPrismWPF.MainModule.Views.GetStartedPrismView"xmlns="http://schemas.microsoft.com/winfx/2006/xaml/presentation"xmlns:x="http://schemas.microsoft.com/winfx/2006/xaml"xmlns:mc="http://schemas.openxmlformats.org/markup-compatibility/2006" xmlns:d="http://schemas.microsoft.com/expression/blend/2008" xmlns:local="clr-namespace:GetStartedPrismWPF.MainModule.Views"mc:Ignorable="d" d:DesignHeight="300" d:DesignWidth="300"><Grid><TextBlock Text="Prism for WPF Getstarted" FontSize="16" /></Grid>
</UserControl>
很简单,就一句话显示一段文字。新建一个GetStartedPrismWPFMainModule,集成自IModule,

public class GetStartedPrismWPFMainModule : IModule{private readonly IRegionViewRegistry regionViewRegistry;public GetStartedPrismWPFMainModule(IRegionViewRegistry registry){this.regionViewRegistry = registry;}public void Initialize(){regionViewRegistry.RegisterViewWithRegion("MainRegion", typeof(Views.GetStartedPrismView));}}
这里会把GetStartedPrismView这个UserControl注册到MainRegion这样一个占位符上,而这个占位符在WPF工程中Shell窗体XAML代码中出现过,在Shell中,我们先定义好这样一个占位符,后续可以对他填充Module。
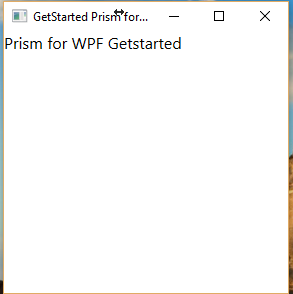
此时运行这个项目,运行效果如下:

这个时候我们来对PRISM的基础架构做一个简单的描述。
Shell: 顶级窗口,就像一个空荡荡的舞台,Shell本身不包含内容,他的功能都是通过Module来实现的;
Bootstrapper: 应用程序的入口点,就像一个工厂的调度,需要完成很多协调事情;
Region: 内容区域,类似于一个占位符,先把坑占了,至于上面的蹲坑的人是可以换的;
Module: 真正实现业务功能的东西,是View,数据,模型组成的集合,一个应用程序中可以根据复杂程度分很多Module;
用一个电影院来举例子:Shell就是一个剧院,里面空空荡荡的演出厅就是Region,Bootstrapper就是剧场运营部门,安排演出单位的引入和演出安排及演出厅之间的资源协调;Module就是各个演出剧。
感谢您的阅读!代码点击这里下载。
本文版权归作者和博客园共有,欢迎转载,但未经作者同意必须保留此段声明,且在文章页面明显位置给出原文连接,否则保留追究法律责任的权利。
https://www.cnblogs.com/yang-fei/p/5193886.html?spm=a2c6h.12873639.0.0.75796827p2wRvf


的用法)


