目录
- GPIO
- python3
- python-periphery
- python2
- RPi
- C语言
- SysFs方式
- 编写
- gpiolib.c
- gpiolib.h
- main.c
- 编译
- 测试
- wiringPi
- bash
平台:华硕 Thinker Edge R 瑞芯微 RK3399Pro
固件版本:Tinker_Edge_R-Debian-Stretch-V1.0.4-20200615
GPIO
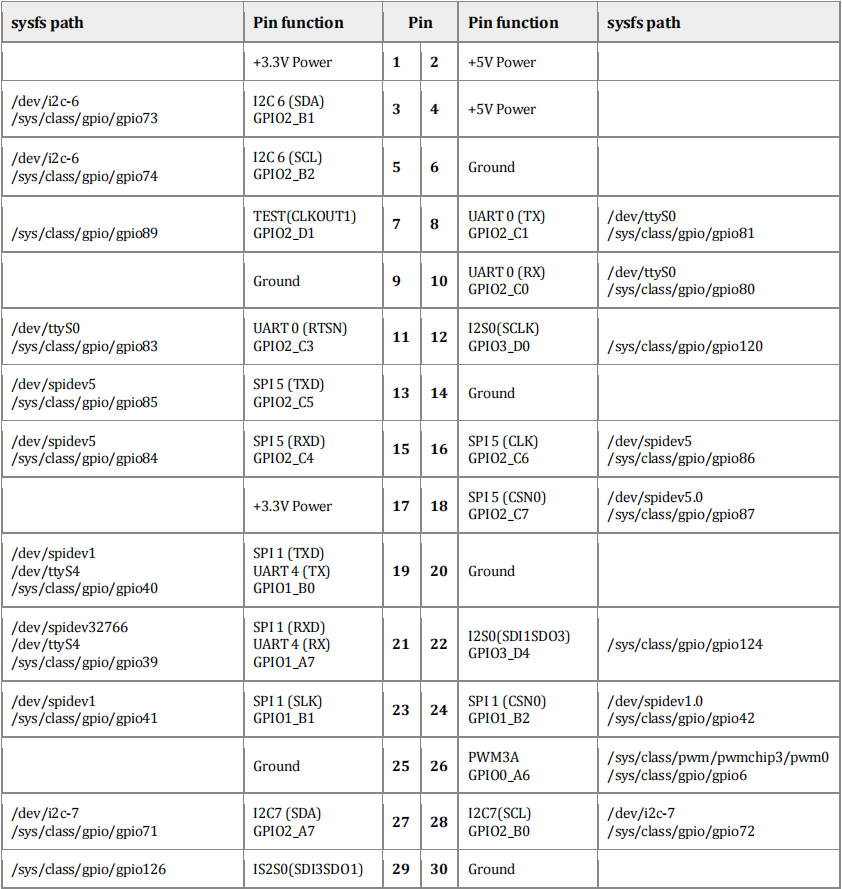
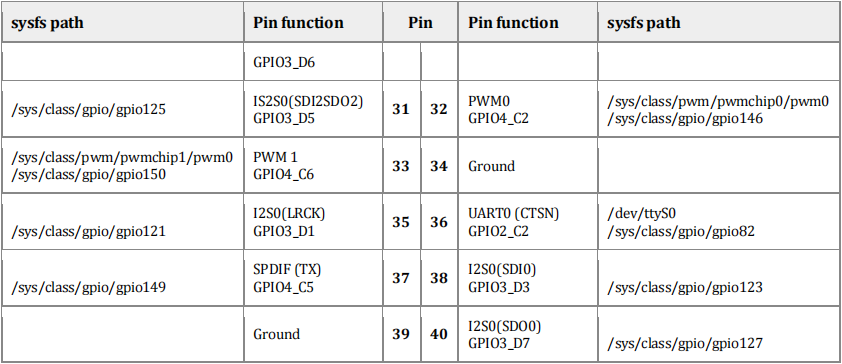
(机翻)下表显示了座子的引脚,包括每个端口的sysfs路径,这通常是使用外围库时需要的名称。你也可以通过在命令行中输入pinout来查看座子的引脚。
备注:
I. 第32、33、37号I/O引脚为+3.0V电平,它有61K欧姆的内部下拉电阻,3mA驱动电流容量。
II. 除了32、33、37号引脚外,所有的I/O引脚都是+3.0V电平。32、33、37号引脚,其他引脚都是+3.3V电平,有5K~10K欧姆的内部上拉电阻,50mA的驱动电流容量。

 驱动库函数:
在/usr/local/share有如下文件:
 说明已预装wiringPi和RPi库
使用gpio readall命令查看引脚对应情况:

python3
python-periphery
参考资料:《Tinker_Edge_R_Getting_Started》
python-periphery API手册
sudo apt-get update
sudo apt-get install python3-pip
sudo pip3 install python-periphery
(官方例程)在合适的地方编写代码
其使用CPU编号
from periphery import GPIO
import timeLED_Pin = 73 #Physical Pin-3 is GPIO 73
# Open GPIO /sys/class/gpio/gpio73 with output direction
LED_GPIO = GPIO(LED_Pin, "out")while True:try: #Blink the LEDLED_GPIO.write(True)# Send HIGH to switch on LEDprint("LED ON!")time.sleep(0.5)LED_GPIO.write(False)# Send LOW to switch off LEDprint("LED OFF!")time.sleep(0.5)except KeyboardInterrupt:# Turn LED off before stoppingLED_GPIO.write(False)breakexcept IOError:print ("Error")LED_GPIO.close()
运行
sudo python3 blink.py
可见LED灯闪烁

python2
RPi
在合适的地方编写代码:
nano blink.py
#!/usr/bin/env python2.7  # import ASUS.GPIO as GPIO
import RPi.GPIO as GPIO  # 两种均可from time import sleep     # this lets us have a time delay LED_PIN = 3
LED_PIN_BCM = 2 GPIO.setmode(GPIO.BOARD)    # BOARD 对应 physical numbers
GPIO.setup(LED_PIN, GPIO.OUT, initial=GPIO.HIGH)
for _ in range(10):GPIO.output(LED_PIN, GPIO.HIGH)sleep(0.5)GPIO.output(LED_PIN, GPIO.LOW)sleep(0.5)
GPIO.output(LED_PIN, GPIO.HIGH)
GPIO.cleanup()GPIO.setmode(GPIO.BCM)          # BCM 对应 GPIO numbers
GPIO.setup(LED_PIN_BCM, GPIO.OUT, initial=GPIO.HIGH)
for _ in range(10):GPIO.output(LED_PIN_BCM, GPIO.HIGH)sleep(0.25)GPIO.output(LED_PIN_BCM, GPIO.LOW)sleep(0.25)
GPIO.output(LED_PIN_BCM, GPIO.HIGH)
GPIO.cleanup()
BCM —— GPIO numbers

(运行前记得把脚本中的中文删去)
sudo python2 ./blink.py可见LED灯闪烁
C语言
SysFs方式
本代码来自SysFs方式下C语言控制GPIO(RK3399)—— 姚家湾
编写
在合适的地方编写代码:
gpiolib.c
nano gpiolib.c
#include <stdio.h>
#include <stdlib.h>
#include <string.h>
#include <fcntl.h>
#include <unistd.h>
#include <sys/select.h>
#include <sys/stat.h>
#include "gpiolib.h"int gpio_direction(int gpio, int dir)
{int ret = 0;char buf[50];sprintf(buf, "/sys/class/gpio/gpio%d/direction", gpio);int gpiofd = open(buf, O_WRONLY);if (gpiofd < 0){perror("Couldn't open IRQ file");ret = -1;}if (dir == 2 && gpiofd){if (3 != write(gpiofd, "high", 3)){perror("Couldn't set GPIO direction to out");ret = -2;}}if (dir == 1 && gpiofd){if (3 != write(gpiofd, "out", 3)){perror("Couldn't set GPIO direction to out");ret = -3;}}else if (gpiofd){if (2 != write(gpiofd, "in", 2)){perror("Couldn't set GPIO directio to in");ret = -4;}}close(gpiofd);return ret;
}int gpio_setedge(int gpio, int rising, int falling)
{int ret = 0;char buf[50];sprintf(buf, "/sys/class/gpio/gpio%d/edge", gpio);int gpiofd = open(buf, O_WRONLY);if (gpiofd < 0){perror("Couldn't open IRQ file");ret = -1;}if (gpiofd && rising && falling){if (4 != write(gpiofd, "both", 4)){perror("Failed to set IRQ to both falling & rising");ret = -2;}}else{if (rising && gpiofd){if (6 != write(gpiofd, "rising", 6)){perror("Failed to set IRQ to rising");ret = -2;}}else if (falling && gpiofd){if (7 != write(gpiofd, "falling", 7)){perror("Failed to set IRQ to falling");ret = -3;}}}close(gpiofd);return ret;
}int gpio_export(int gpio)
{int efd;char buf[50];int gpiofd, ret;/* Quick test if it has already been exported */sprintf(buf, "/sys/class/gpio/gpio%d/value", gpio);efd = open(buf, O_WRONLY);if (efd != -1){close(efd);return 0;}efd = open("/sys/class/gpio/export", O_WRONLY);if (efd != -1){sprintf(buf, "%d", gpio);ret = write(efd, buf, strlen(buf));if (ret < 0){perror("Export failed");return -2;}close(efd);}else{// If we can't open the export file, we probably// dont have any gpio permissionsreturn -1;}return 0;
}void gpio_unexport(int gpio)
{int gpiofd, ret;char buf[50];gpiofd = open("/sys/class/gpio/unexport", O_WRONLY);sprintf(buf, "%d", gpio);ret = write(gpiofd, buf, strlen(buf));close(gpiofd);
}int gpio_getfd(int gpio)
{char in[3] = {0, 0, 0};char buf[50];int gpiofd;sprintf(buf, "/sys/class/gpio/gpio%d/value", gpio);gpiofd = open(buf, O_RDWR);if (gpiofd < 0){fprintf(stderr, "Failed to open gpio %d value\n", gpio);perror("gpio failed");}return gpiofd;
}int gpio_read(int gpio)
{char in[3] = {0, 0, 0};char buf[50];int nread, gpiofd;sprintf(buf, "/sys/class/gpio/gpio%d/value", gpio);gpiofd = open(buf, O_RDWR);if (gpiofd < 0){fprintf(stderr, "Failed to open gpio %d value\n", gpio);perror("gpio failed");}do{nread = read(gpiofd, in, 1);} while (nread == 0);if (nread == -1){perror("GPIO Read failed");return -1;}close(gpiofd);return atoi(in);
}int gpio_write(int gpio, int val)
{char buf[50];int nread, ret, gpiofd;sprintf(buf, "/sys/class/gpio/gpio%d/value", gpio);gpiofd = open(buf, O_RDWR);if (gpiofd > 0){snprintf(buf, 2, "%d", val);ret = write(gpiofd, buf, 2);if (ret < 0){perror("failed to set gpio");return 1;}close(gpiofd);if (ret == 2)return 0;}return 1;
}int gpio_select(int gpio)
{char gpio_irq[64];int ret = 0, buf, irqfd;fd_set fds;FD_ZERO(&fds);snprintf(gpio_irq, sizeof(gpio_irq), "/sys/class/gpio/gpio%d/value", gpio);irqfd = open(gpio_irq, O_RDONLY, S_IREAD);if (irqfd < 1){perror("Couldn't open the value file");return -13;}// Read first since there is always an initial statusret = read(irqfd, &buf, sizeof(buf));while (1){FD_SET(irqfd, &fds);ret = select(irqfd + 1, NULL, NULL, &fds, NULL);if (FD_ISSET(irqfd, &fds)){FD_CLR(irqfd, &fds); // Remove the filedes from set// Clear the junk data in the IRQ fileret = read(irqfd, &buf, sizeof(buf));return 1;}}
}
gpiolib.h
nano gpiolib.h
#ifndef _GPIOLIB_H_
#define _GPIOLIB_H_
/* returns -1 or the file descriptor of the gpio value file */
int gpio_export(int gpio);
/* Set direction to 2 = high output, 1 low output, 0 input */
int gpio_direction(int gpio, int dir);
/* Release the GPIO to be claimed by other processes or a kernel driver */
void gpio_unexport(int gpio);
/* Single GPIO read */
int gpio_read(int gpio);
/* Set GPIO to val (1 = high) */
int gpio_write(int gpio, int val);
/* Set which edge(s) causes the value select to return */
int gpio_setedge(int gpio, int rising, int falling);
/* Blocks on select until GPIO toggles on edge */
int gpio_select(int gpio);/* Return the GPIO file descriptor */
int gpio_getfd(int gpio);#endif //_GPIOLIB_H_
main.c
nano main.c
其使用CPU编号
#include <stdlib.h>
#include <stdio.h>
#include <unistd.h>
#include "gpiolib.h"int main(int argc, char **argv)
{int gpio_pin;if (argc != 2){printf("Too few parameters in call!\r\n");return -1;}gpio_pin = atoi(argv[1]);gpio_export(gpio_pin);gpio_direction(gpio_pin, 1);for (int i = 0; i < 5; i++){printf(">> GPIO %d Low\n", gpio_pin);gpio_write(gpio_pin, 0);sleep(1);printf(">> GPIO %d High\n", gpio_pin);gpio_write(gpio_pin, 1);sleep(1);}gpio_unexport(gpio_pin);return 0;
}
编译
编写Makefile文件
nano Makefile
main: main.o gpiolib.occ -o main main.o gpiolib.o
main.o: main.c gpiolib.hcc -c main.c gpiolib.h
gpiolib.o: gpiolib.c gpiolib.hcc -c gpiolib.c
.PHONY:clear
clear:rm *.orm main
编译
make
测试
可见LED灯闪烁
chmod +x ./main
sudo ./main 73
wiringPi
编写
在合适的地方编写代码:
其使用wiringPi编号
nano main.c
#include <wiringPi.h>int main(int argc, char * argv[])
{ char i;wiringPiSetup();pinMode(8, OUTPUT);for(i = 0; i < 10; ++i){digitalWrite(8, HIGH);delay(500);digitalWrite(8, LOW);delay(500);}digitalWrite(8, HIGH);return 0;
}
编译
gcc -o main.o main.c -lwiringPi
运行目标文件
sudo ./main.o
可见LED灯闪烁
bash
在合适的地方编写代码:
其使用wiringPi编号
nano blink.sh
# !/bin/bashPIN=8gpio mode $PIN outwhile true; dogpio write $PIN 1sleep 0.5gpio write $PIN 0sleep 0.5
done
运行:
sh blink.sh
可见LED灯闪烁


)
![[原]关于在 iOS 中支持 DLNA](http://pic.xiahunao.cn/[原]关于在 iOS 中支持 DLNA)


之EditText重写)


)