使用SystemC进行硬件仿真
环境
- linux-x86-64
- bash
- g++
下载解压SystemC
SystemC下载地址
解压下载的包
tar zxvf systemc-2.3.3.tar.gz
进入解压出来的目录,准备编译安装
cd systemc-2.3.3
编译安装
打开安装说明文件INSTALL
vim INSTALL
按照步骤安装
Create a temporary directory
mkdir objdir
Change to the temporary directory
cd objdir
Choose your compiler by setting the CXX environment variable(我的shell是bash)
export CXX=g++
Configure the package for your system
../configure --prefix=/usr/local/systemc-2.3.2
Compile the package(这里使用make命令)
make
Verify the compiled package
make check
Install the package(root用户)
make install
安装好的目录
配置安装的库路径
添加软链接(使用root用户/sudo执行)
ln -s /usr/local/systemc-2.3.2/lib-linux64/libsystemc-2.3.2.so /usr/lib/libsystemc-2.3.2.so
修复动态链接库问题
将安装路径添加都/etc/ld.so.conf.d/目录下(使用root用户/sudo执行)
使用超级用户的方式:
https://jingyan.baidu.com/article/fd8044fa1e74035031137ae0.html
退出超级用户:
exit
echo "/usr/local/systemc-2.3.2/lib-linux64/" > /etc/ld.so.conf.d/systemc.conf
sudo ldconfig
以上为完整的安装步骤,可以通过以下范例hello程序测试
hello.h
#ifndef _HELLO_H
#define _HELLO_H
#include "systemc.h"
SC_MODULE(hello){
SC_CTOR(hello){
cout<<"Hello, SystemC!"<<endl;
}
};
#endif
main.cpp
#include "hello.h"
int sc_main(int i, char* a[]){
hello h("hello");
return 0;
}
通过运行命令
g++ main.cpp -I /usr/local/systemc-2.3.2/include -L /usr/local/systemc-2.3.2/lib-linux64 -o hello -lsystemc
生成可执行文件“hello”
通过运行
./hello得到运行结果

运行官方案例pipe
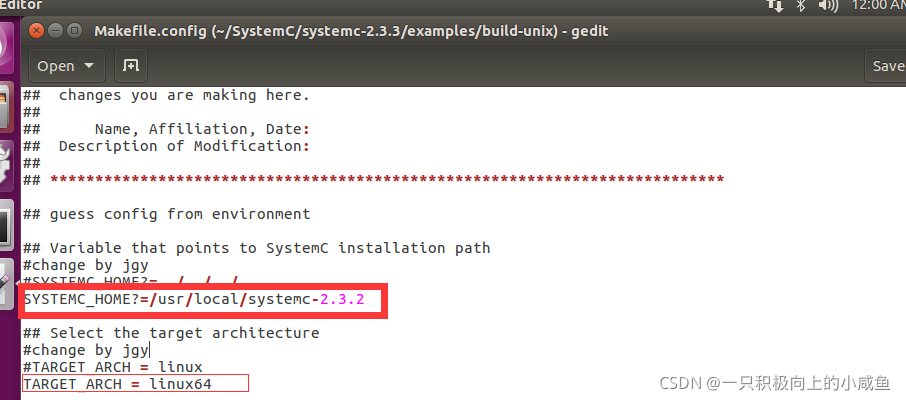
需要提前修改的Makefile.config,如命所示,这个文件是Makefile的配置文件。该文件原始文件标注为默认位置,需要用户根据自己的实际安装位置进行修改
位置有两处,一处为SystemC的安装位置。根据上面的步骤可知,systemC安装在/usr/local/systemc-2.3.2
另外一处是linux的版本号,通过查看文件名,进行修改

修改完毕后进入systemc-2.3.3/examples/sysc/pipe文件夹,执行make。
当时出现
anonymous variadic macros were introduced in C++11
......
cc1plus: all warnings being treated as errors错误。通过修改MakeFile.config(和之前修改的文件相同)

后,执行make,产生输出文件

执行./pipe.x, 得到一系列输出

参考链接:
使用SystemC进行硬件仿真 - 乔_木 - 博客园
systemC的安装_Alex_rz的技术博客_51CTO博客
SystemC在ubuntu上的安装_Haifeng的博客-CSDN博客
gcc cc1: all warnings being treated as errors - 一沙世界 - 博客园


)

)

)


)


)


)


