文章目录
- 前言
- 一、整合日志功能
- 二、@Nullable注解
- 三、函数式风格编程
- 四、JUnit5单元测试框架
- 总结
前言
整合日志、Nullable注解、函数式风格编程、整合JUnit5、Webflux
一、整合日志功能
Spring5移除了Log4jConfigListener,官方建议使用Log4j2.
依赖:
        <dependency><groupId>org.apache.logging.log4j</groupId><artifactId>log4j-api</artifactId><version>2.17.1</version></dependency><dependency><groupId>org.apache.logging.log4j</groupId><artifactId>log4j-core</artifactId><version>2.17.1</version></dependency><dependency><groupId>org.apache.logging.log4j</groupId><artifactId>log4j-slf4j-impl</artifactId><version>2.17.1</version>
<!--            <scope>test</scope>--></dependency><dependency><groupId>org.slf4j</groupId><artifactId>slf4j-api</artifactId><version>1.7.30</version></dependency>
log4j2.xml文件:
<?xml version="1.0" encoding="UTF-8"?>
<!--日志级别以及优先级排序: OFF > FATAL > ERROR > WARN > INFO > DEBUG > TRACE > ALL -->
<!--Configuration后面的status,这个用于设置log4j2自身内部的信息输出,可以不设置,当设置成trace时,你会看到log4j2内部各种详细输出-->
<configuration status="DEBUG"><!--先定义所有的appender--><appenders><!--这个输出控制台的配置--><console name="Console" target="SYSTEM_OUT"><!--输出日志的格式--><PatternLayout pattern="%d{yyyy-MM-dd HH:mm:ss.SSS} 【%t】 %-5level %logger{36} - %msg%n"/></console></appenders><!--然后定义logger,只有定义了logger并引入的appender,appender才会生效--><!--root:用于指定项目的根日志,如果没有单独指定Logger,则会使用root作为默认的日志输出--><loggers><root level="info"><appender-ref ref="Console"/></root></loggers>
</configuration>
然后写一个主函数运行,就发现日志输出变了,就会按照上面输出日志格式的设定。< configuration > 标签内的属性status="DEBUG",属性值可以改成OFF > FATAL > ERROR > WARN > INFO > DEBUG > TRACE > ALL(任意一个,这里是优先级顺序)。
二、@Nullable注解
@Nullable注解可以使用在方法上面,属性上面,参数上面,表示方法可以返回为空,属性值可以为空,参数值可以为空。
(1)注解使用在方法上面,方法返回值可以为空。
@Nullable
String getId();
(2)注解使用在方法参数里,方法参数可以为空。
public <T> void select(@Nullable String name,int id){........return <T>;
}
(3)注解使用在属性上面,属性值可以为空
@Nullabele
private String bookName;
三、函数式风格编程
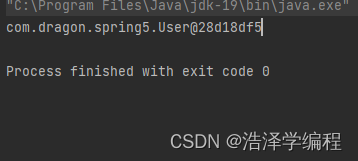
函数式创建对象,交给Spring管理
代码:
package com.dragon.xintexing;import com.dragon.spring5.User;
import org.springframework.context.support.GenericApplicationContext;public class test1 {public static void main(String[] args) {//创建GenericApplicationContext对象GenericApplicationContext context=new GenericApplicationContext();//调用context的方法对象注册context.refresh();context.registerBean(User.class,()->new User());//获取在Spring注册的对象User user=(User) context.getBean("com.dragon.spring5.User");System.out.println(user);}
}
四、JUnit5单元测试框架
JUnit5的代码:
package com.dragon.xintexing;import com.dragon.shiwu.service.UserService;
import org.junit.jupiter.api.extension.ExtendWith;
import org.springframework.beans.factory.annotation.Autowired;
import org.springframework.test.context.ContextConfiguration;
import org.springframework.test.context.junit.jupiter.SpringExtension;
import org.junit.jupiter.api.Test;
import org.springframework.test.context.junit.jupiter.SpringJUnitConfig;@ExtendWith(SpringExtension.class) //单元测试框架
@ContextConfiguration("classpath:bean8.xml")//加载配置文件
//@SpringJUnitConfig(locations = "classpath:bean8.xml")
public class J5test {@Autowiredprivate UserService userService;@Testpublic void test1(){userService.accountMoney();}
}上面的注释掉的@SpringJUnitConfig注解可以替代它上面的两个注解使用,是复合注解。
JUnit4的代码:
package com.dragon.xintexing;import com.dragon.shiwu.service.UserService;
import org.junit.Test;
import org.junit.runner.RunWith;
import org.springframework.beans.factory.annotation.Autowired;
import org.springframework.test.context.ContextConfiguration;
import org.springframework.test.context.junit4.SpringJUnit4ClassRunner;
@RunWith(SpringJUnit4ClassRunner.class)//单元测试框架
@ContextConfiguration("classpath:bean8.xml")//加载配置文件
public class Jtest {@Autowiredprivate UserService userService;@Testpublic void test1(){userService.accountMoney();}
}
大家可以自行对比一下
这里再补充一下bean8.xml代码:
大家不需要太注意我的配置文件,主要给你们模拟测试参考用的。
<?xml version="1.0" encoding="UTF-8"?>
<beans xmlns="http://www.springframework.org/schema/beans"xmlns:xsi="http://www.w3.org/2001/XMLSchema-instance"xmlns:context="http://www.springframework.org/schema/context"xmlns:tx="http://www.springframework.org/schema/tx"xsi:schemaLocation="http://www.springframework.org/schema/beans http://www.springframework.org/schema/beans/spring-beans.xsdhttp://www.springframework.org/schema/context http://www.springframework.org/schema/context/spring-context.xsdhttp://www.springframework.org/schema/tx http://www.springframework.org/schema/tx/spring-tx.xsd"><context:property-placeholder location="classpath:jdbc.properties"/><bean id="dataSource" class="com.alibaba.druid.pool.DruidDataSource"><property name="driverClassName" value="${pro.driverClass}"></property><property name="url" value="${pro.url}"></property><property name="username" value="${pro.username}"></property><property name="password" value="${pro.password}"></property></bean><bean id="jdbcTemplate" class="org.springframework.jdbc.core.JdbcTemplate"><property name="dataSource" ref="dataSource"></property></bean><context:component-scan base-package="com.dragon.shiwu"></context:component-scan><bean id="transactionManager" class="org.springframework.jdbc.datasource.DataSourceTransactionManager"><property name="dataSource" ref="dataSource"></property></bean><!--        开启事务注解--><tx:annotation-driven transaction-manager="transactionManager"></tx:annotation-driven>
</beans>
总结
以上就是Spring5新功能的讲解,Webflu还未讲解,后面我会出一篇文章专门讲诉。

)


十五)


![[管理与领导-10]:IT基层管理者 - 目标、责任、落实 - 如何把管理者的高高在上的目标,落地、落实到团队实施](http://pic.xiahunao.cn/[管理与领导-10]:IT基层管理者 - 目标、责任、落实 - 如何把管理者的高高在上的目标,落地、落实到团队实施)
)


)