0x01 前言
前面一篇,Xamarin.Android和UWP之MVVM的简单使用(一),主要讲了MvvmLight的简单使用
这篇主要讲讲MvvmCross的简单使用,例子的话,还是和上篇的一样。直接进正题吧,不废话了。
0x02 简单的MVVM(mvvmcross) Demo
新建一个类库项目:Catcher.MVVMDemo.Day01CrossCore
添加一个ViewModels文件夹,同时添加一个MainViewModel
 1 using MvvmCross.Core.ViewModels;
 2 namespace Catcher.MVVMDemo.Day01CrossCore.ViewModels
 3 {
 4     public class MainViewModel : MvxViewModel
 5     {
 6         public MainViewModel() { }
 7         private string _input;
 8         public string Input
 9         {
10             get
11             {
12                 return _input;
13             }
14             set
15             {
16                 _input = value;
17                 RaisePropertyChanged(() => Input);
18             }
19         }
20     }
21 }
这里的ViewModel继承的是MvxViewModel。
在项目根路径添加一个App.cs
 1 using Catcher.MVVMDemo.Day01CrossCore.ViewModels;
 2 using MvvmCross.Core.ViewModels;
 3 namespace Catcher.MVVMDemo.Day01CrossCore
 4 {
 5     public class App : MvxApplication
 6     {
 7         public override void Initialize()
 8         {
 9             RegisterAppStart<MainViewModel>();
10         }
11     }
12 }
注册MainViewModel为启动的第一个视图模型
到这里,Xamarin.Android和UWP的公共部分已经完成了。
第一个例子(Xamarin.Android):
新建一个Android项目:Catcher.MVVMDemo.Day01DroidByMvvmCross
在根目录添加一个Setup.cs
 1 using Android.Content;
 2 using MvvmCross.Core.ViewModels;
 3 using MvvmCross.Droid.Platform;
 4 using Catcher.MVVMDemo.Day01CrossCore;
 5 namespace Catcher.MVVMDemo.Day01DroidByMvvmCross
 6 {
 7     public class Setup : MvxAndroidSetup
 8     {
 9         public Setup(Context applicationContext)
10             : base(applicationContext)
11         {
12         }
13         protected override IMvxApplication CreateApp()
14         {
15             return new App();
16         }
17     }
18 }
在Setup中,主要是返回了我们在Core里面编写的App.cs
然后修改我们的Main.axml
 1 <?xml version="1.0" encoding="utf-8"?>
 2 <LinearLayout xmlns:android="http://schemas.android.com/apk/res/android"
 3     xmlns:local="http://schemas.android.com/apk/res-auto"
 4     android:orientation="vertical"
 5     android:layout_width="match_parent"
 6     android:layout_height="match_parent">
 7     <EditText
 8         android:layout_width="match_parent"
 9         android:layout_height="wrap_content"
10         local:MvxBind="Text Input" />
11     <TextView
12         android:layout_width="match_parent"
13         android:layout_height="wrap_content"
14         local:MvxBind="Text Input" />
15 </LinearLayout>
通过local:MvxBind来实现绑定。
新建一个文件夹Activities,同时添加一个MainActivity
 1 using Android.App;
 2 using MvvmCross.Droid.Views;
 3 namespace Catcher.MVVMDemo.Day01DroidByMvvmCross.Activities
 4 {
 5     [Activity(Label = "MvvmCross", MainLauncher = true)]
 6     public class MainActivity : MvxActivity
 7     {
 8         protected override void OnViewModelSet()
 9         {
10             SetContentView(Resource.Layout.Main);
11         }
12     }
13 }
Activity的代码很简单,就是指定视图。
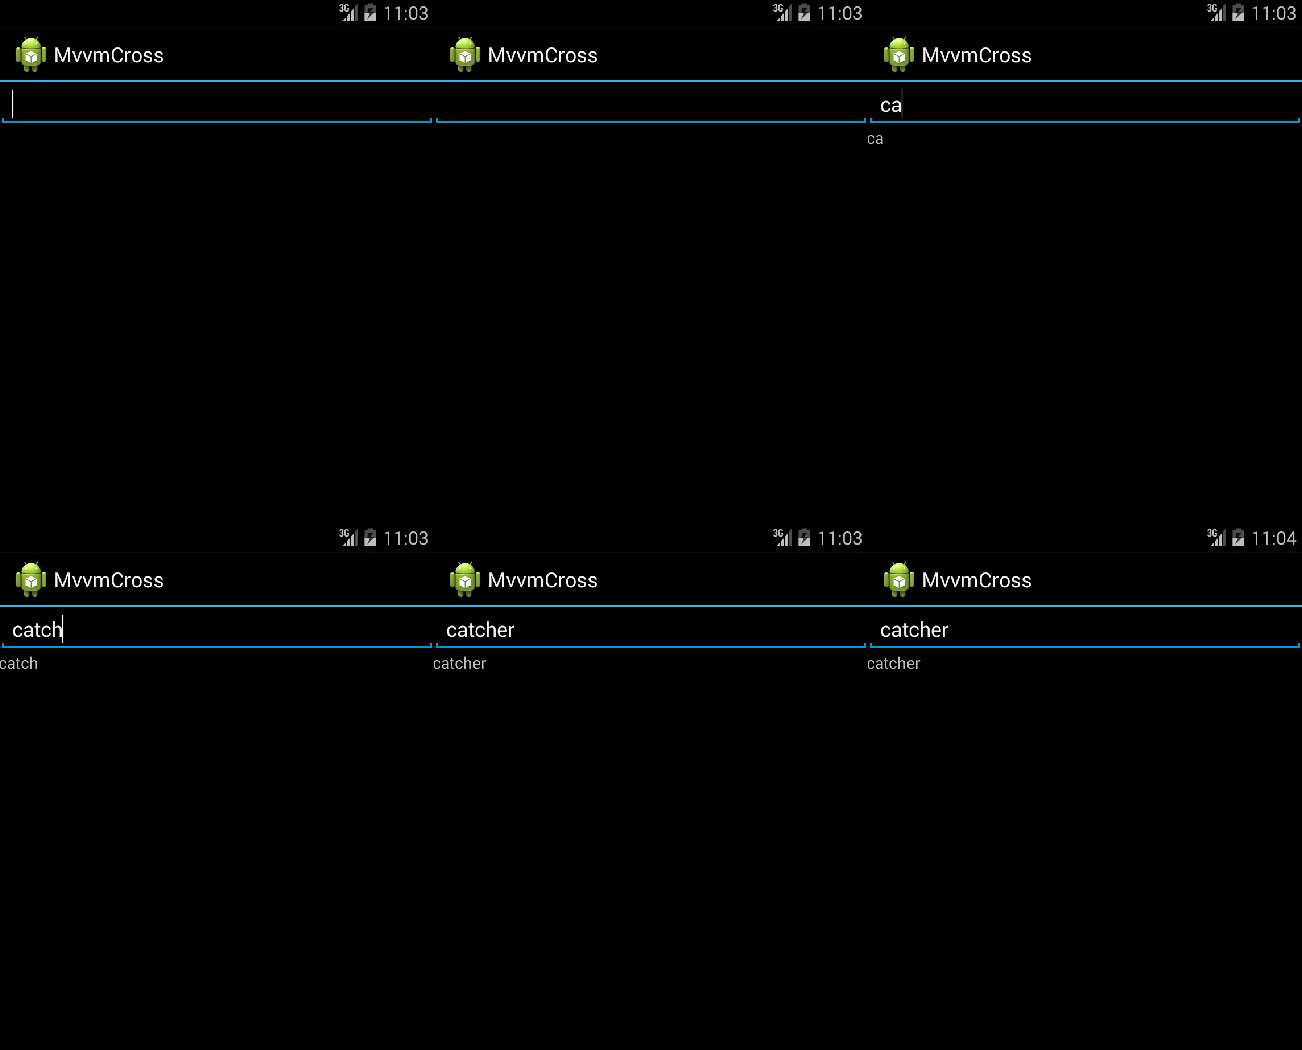
到这里已经可以成功运行了,效果如下:

第二个例子(UWP):
步骤基本与Xamarin.Android一致!
新建一个UWP项目:Catcher.MVVMDemo.Day01UWPByMvvmCross
添加一个Setup.cs
 1 using MvvmCross.Core.ViewModels;
 2 using MvvmCross.WindowsUWP.Platform;
 3 using Windows.UI.Xaml.Controls;
 4 namespace Catcher.MVVMDemo.Day01UWPByMvvmCross
 5 {
 6     public class Setup : MvxWindowsSetup
 7     {
 8         public Setup(Frame rootFrame) : base(rootFrame)
 9         {
10         }
11         protected override IMvxApplication CreateApp()
12         {
13             return new Day01CrossCore.App();
14         }
15     }
16 }
注意与Android的区别!!
修改App.xaml.cs,将设置启动页注释掉,换成我们刚才的Setup.cs,具体如下:
 1           if (e.PrelaunchActivated == false)
 2             {
 3                 if (rootFrame.Content == null)
 4                 {
 5
 6                     //rootFrame.Navigate(typeof(MainPage), e.Arguments);
 7                     var setup = new Setup(rootFrame);
 8                     setup.Initialize();
 9                     var start = Mvx.Resolve<IMvxAppStart>();
10                     start.Start();
11                 }
12                 Window.Current.Activate();
13             }
把新建项目生成的MainPage干掉,同时在根目录添加一个Views文件夹,用来存放我们的Page
新建一个MainPage.xaml,修改布局如下:
 1 <views:MvxWindowsPage
 2     x:Class="Catcher.MVVMDemo.Day01UWPByMvvmCross.Views.MainPage"
 3     xmlns="http://schemas.microsoft.com/winfx/2006/xaml/presentation"
 4     xmlns:x="http://schemas.microsoft.com/winfx/2006/xaml"
 5     xmlns:local="using:Catcher.MVVMDemo.Day01UWPByMvvmCross.Views"
 6     xmlns:d="http://schemas.microsoft.com/expression/blend/2008"
 7     xmlns:mc="http://schemas.openxmlformats.org/markup-compatibility/2006"
 8         xmlns:views="using:MvvmCross.WindowsUWP.Views"
 9     mc:Ignorable="d">
10     <Grid Background="{ThemeResource ApplicationPageBackgroundThemeBrush}">
11         <StackPanel Margin="20">
12             <TextBlock FontSize="14" HorizontalAlignment="Center" Text="MvvmCross UWP Demo" />
13             <TextBox
14                 x:Name="txtInput"
15                 />
16             <TextBlock Text="{Binding ElementName=txtInput,Path=Text}" />
17         </StackPanel>
18     </Grid>
19 </views:MvxWindowsPage>
要注意的是,用的是MvvmCross的布局MvxWindosPage
并且,MainPage.xaml.cs也要修改!!
 1 using MvvmCross.WindowsUWP.Views;
 2 namespace Catcher.MVVMDemo.Day01UWPByMvvmCross.Views
 3 {
 4     public sealed partial class MainPage : MvxWindowsPage
 5     {
 6         public MainPage()
 7         {
 8             this.InitializeComponent();
 9         }
10     }
11 }
都是用MvvmCross自己的东西!如果忘记修改,运行效果是一片黑。
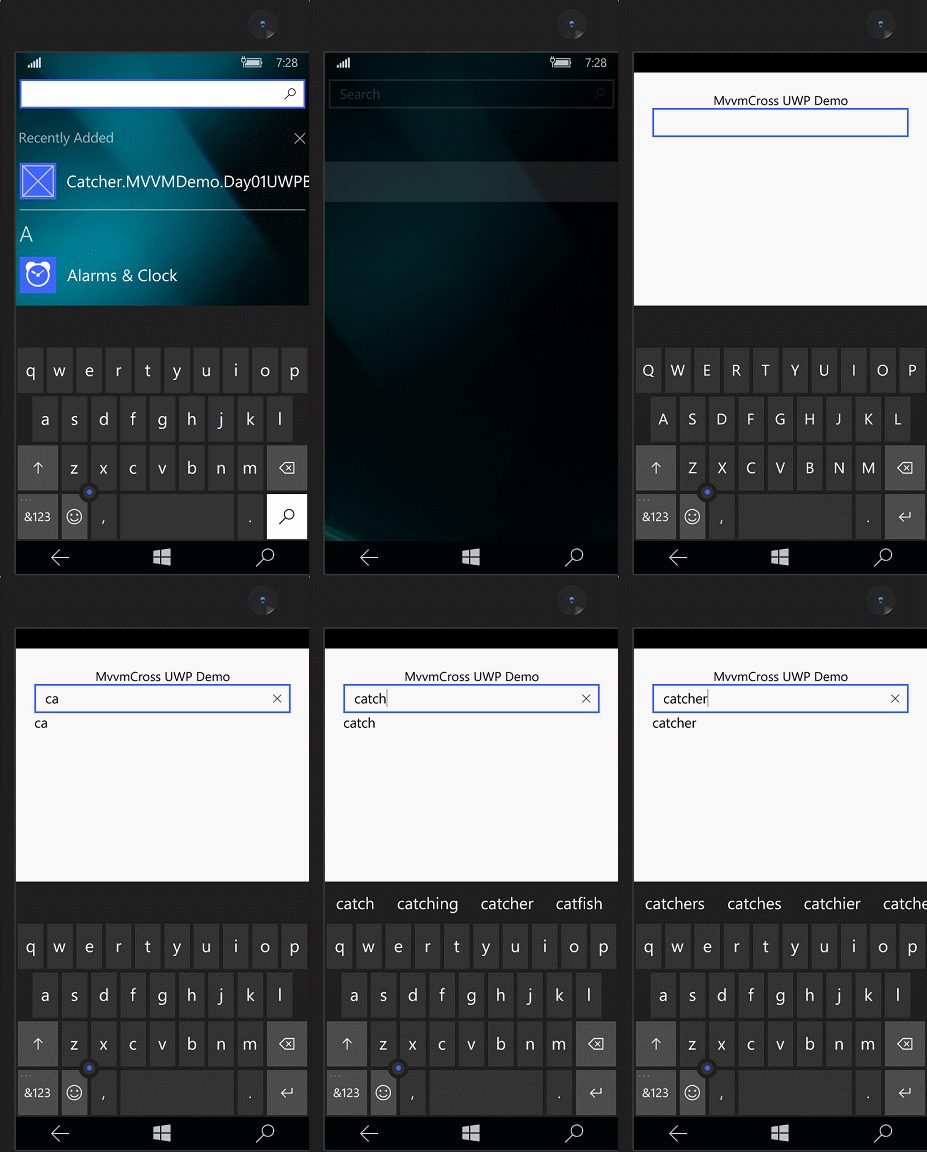
到这里已经OK了,效果如下

0x03 MVVM(mvvmcross) 登陆Demo
登陆失败时要有个对话框提示,我们要先新建一个IDialogService
1 namespace Catcher.MVVMDemo.Day01CrossCore
2 {
3     public interface IDialogService
4     {
5         void Alert(string message, string title, string okbtnText);
6     }
7 }
在刚才的类库项目中添加一个LoginViewModel
 1 using MvvmCross.Core.ViewModels;
 2 namespace Catcher.MVVMDemo.Day01CrossCore.ViewModels
 3 {
 4     public class LoginViewModel : MvxViewModel
 5     {
 6         private readonly IDialogService _dialogService;
 7         public LoginViewModel(IDialogService dialogService)
 8         {
 9             _dialogService = dialogService;
10         }
11         private string _Name;
12         public string Name
13         {
14             get
15             {
16                 return _Name;
17             }
18             set
19             {
20                 _Name = value;
21                 RaisePropertyChanged(()=>Name);
22             }
23         }
24         private string _password;
25         public string Password
26         {
27             get
28             {
29                 return _password;
30             }
31             set
32             {
33                 _password = value;
34                 RaisePropertyChanged(()=>Password);
35             }
36         }
37         private IMvxCommand _loginCommand;
38         public virtual IMvxCommand LoginCommand
39         {
40             get
41             {
42                 _loginCommand = _loginCommand ?? new MvxCommand(Login);
43                 return _loginCommand;
44             }
45         }
46         private void Login()
47         {
48             if (Name=="catcher"&&Password=="123")
49             {
50                 ShowViewModel<MainViewModel>();
51             }
52             else
53             {
54                 _dialogService.Alert("check your name and password", "Infomation", "OK");
55             }
56         }
57     }
58 }
登陆的逻辑处理还是和上一篇一样。
修改我们的App.cs
 1 using Catcher.MVVMDemo.Day01CrossCore.ViewModels;
 2 using MvvmCross.Core.ViewModels;
 3 using MvvmCross.Platform;
 4 using MvvmCross.Platform.IoC;
 5 namespace Catcher.MVVMDemo.Day01CrossCore
 6 {
 7     public class App : MvxApplication
 8     {
 9         public override void Initialize()
10         {
11             CreatableTypes()
12             .EndingWith("Service")
13             .AsInterfaces()
14             .RegisterAsLazySingleton();
15
16             RegisterAppStart<LoginViewModel>();
17             //demo 1
18             //RegisterAppStart<MainViewModel>();
19         }
20     }
21 }
第三个例子(Xamarin.Android):
在Catcher.MVVMDemo.Day01DroidByMvvmCross中添加一个Services文件夹
同时添加一个DialogService去实现我们刚才定义的IDialogService接口。
 1 using Android.App;
 2 using MvvmCross.Platform;
 3 using Catcher.MVVMDemo.Day01CrossCore;
 4 using MvvmCross.Platform.Droid.Platform;
 5 namespace Catcher.MVVMDemo.Day01DroidByMvvmCross.Services
 6 {
 7     public class DialogService : IDialogService
 8     {
 9         /// <summary>
10         /// show the alert dialog
11         /// </summary>
12         /// <param name="message">the message of the dialog</param>
13         /// <param name="title">the title of the dialog</param>
14         /// <param name="okbtnText">the text of the button</param>
15         public void Alert(string message, string title, string okbtnText)
16         {
17             //activity
18             var topActivity = Mvx.Resolve<IMvxAndroidCurrentTopActivity>();
19             var context = topActivity.Activity;
20             //alert dialog
21             var adb = new AlertDialog.Builder(context);
22             adb.SetTitle(title);
23             adb.SetMessage(message);
24             adb.SetPositiveButton(okbtnText, (sender, args) => { });
25             adb.Create().Show();
26         }
27     }
28 }
这里用到了AlertDialog。
在Setup.cs中注册一下这个Service,重写InitializeFirstChance 方法
1       protected override void InitializeFirstChance()
2         {
3             base.InitializeFirstChance();
4             Mvx.RegisterSingleton<IDialogService>(() => new DialogService());
5         }
添加一个login.axml
 1 <?xml version="1.0" encoding="utf-8"?>
 2 <LinearLayout xmlns:android="http://schemas.android.com/apk/res/android"
 3     xmlns:local="http://schemas.android.com/apk/res-auto"
 4     android:orientation="vertical"
 5     android:layout_width="match_parent"
 6     android:layout_height="match_parent">
 7     <EditText
 8         android:layout_width="match_parent"
 9         android:layout_height="wrap_content"
10         android:hint="enter your name"
11         local:MvxBind="Text Name" />
12     <EditText
13         android:layout_width="match_parent"
14         android:layout_height="wrap_content"
15         android:inputType="textPassword"
16         android:hint="enter your password"
17         local:MvxBind="Text Password" />
18     <Button
19         android:layout_width="match_parent"
20         android:layout_height="wrap_content"
21         android:text="Login"
22         local:MvxBind="Click LoginCommand" />
23 </LinearLayout>
在Activities文件夹添加一个LoginActivity
 1 using Android.App;
 2 using MvvmCross.Droid.Views;
 3 namespace Catcher.MVVMDemo.Day01DroidByMvvmCross.Activities
 4 {
 5     [Activity(Label = "MvvmCross", MainLauncher = true)]
 6     public class LoginActivity : MvxActivity
 7     {
 8         protected override void OnViewModelSet()
 9         {
10             SetContentView(Resource.Layout.login);
11         }
12     }
13 }
去掉,MainActivity中的Mainlauncher=true
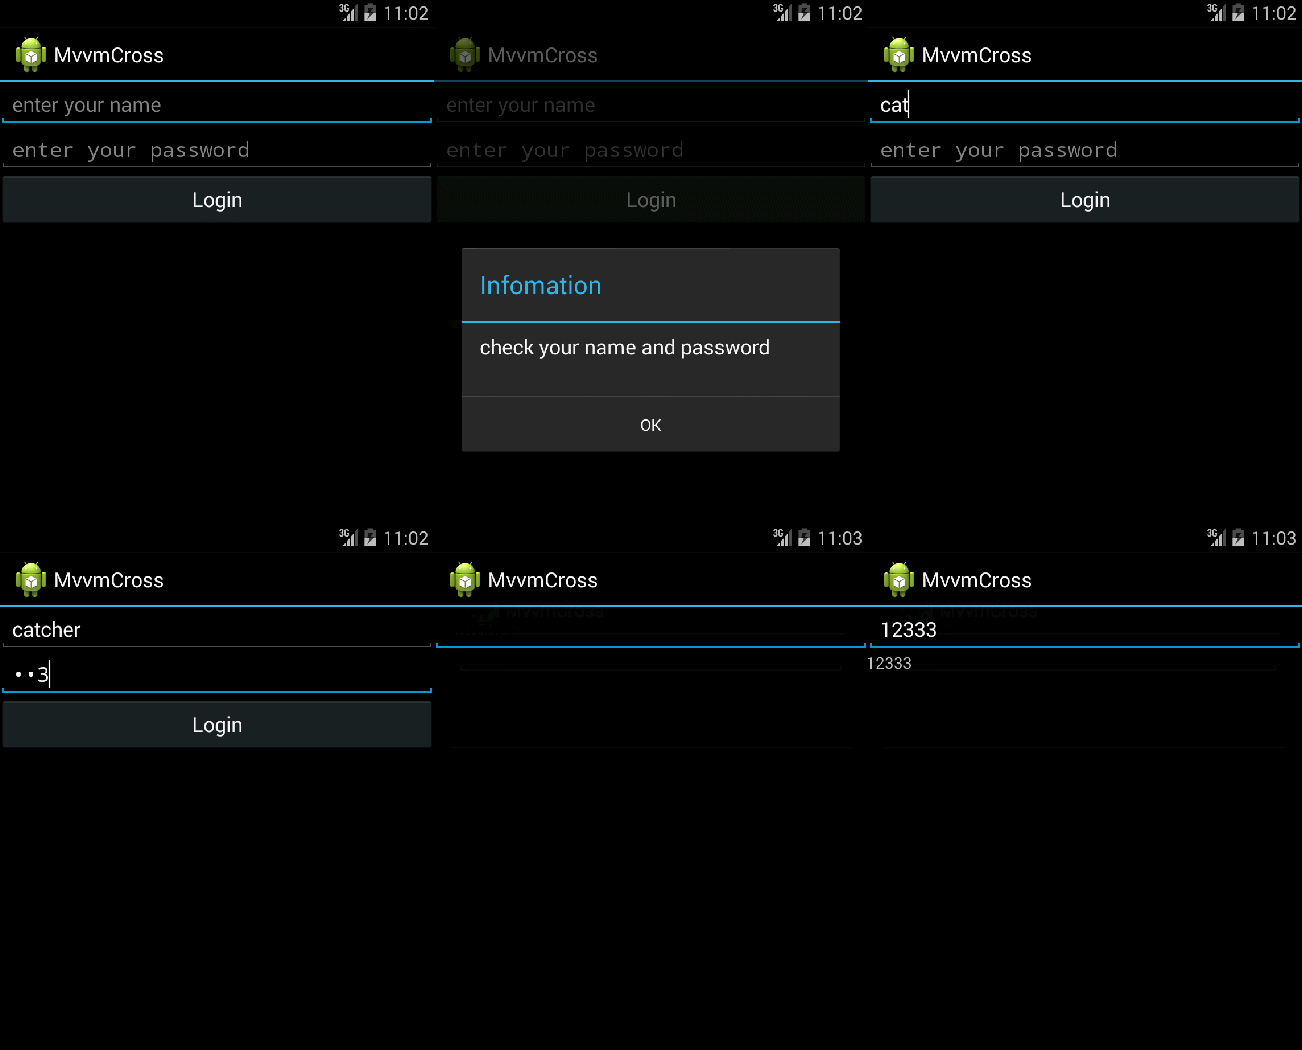
OK,效果如下:

第四个例子(UWP):
在Catcher.MVVMDemo.Day01UWPByMvvmCross中添加一个Services文件夹
同时添加一个DialogService去实现我们刚才定义的IDialogService接口。
 1 using Catcher.MVVMDemo.Day01CrossCore;
 2 using System;
 3 using Windows.UI.Xaml.Controls;
 4 namespace Catcher.MVVMDemo.Day01UWPByMvvmCross.Services
 5 {
 6     public class DialogService : IDialogService
 7     {
 8         public async void Alert(string message, string title, string okbtnText)
 9         {
10             var dialog = new ContentDialog()
11             {
12                 Content = message,
13                 Title= title,
14                 PrimaryButtonText = okbtnText
15             };
16             dialog.PrimaryButtonClick += (s, e) => { };
17             await dialog.ShowAsync();
18         }
19     }
20 }
这里用ContentDialog去实现这个提示。
在Setup.cs中注册一下这个Service,重写InitializeFirstChance 方法
1       protected override void InitializeFirstChance()
2         {
3             base.InitializeFirstChance();
4             Mvx.RegisterSingleton<IDialogService>(() => new DialogService());
5         }
在Views文件夹添加一个LoginPage.xaml
 1 <views:MvxWindowsPage
 2     x:Class="Catcher.MVVMDemo.Day01UWPByMvvmCross.Views.LoginPage"
 3     xmlns="http://schemas.microsoft.com/winfx/2006/xaml/presentation"
 4     xmlns:x="http://schemas.microsoft.com/winfx/2006/xaml"
 5     xmlns:local="using:Catcher.MVVMDemo.Day01UWPByMvvmCross.Views"
 6     xmlns:d="http://schemas.microsoft.com/expression/blend/2008"
 7     xmlns:mc="http://schemas.openxmlformats.org/markup-compatibility/2006"
 8     xmlns:views="using:MvvmCross.WindowsUWP.Views"
 9     mc:Ignorable="d">
10     <Grid Background="{ThemeResource ApplicationPageBackgroundThemeBrush}">
11         <Grid.RowDefinitions>
12             <RowDefinition Height="*"></RowDefinition>
13             <RowDefinition Height="*"></RowDefinition>
14             <RowDefinition Height="*"></RowDefinition>
15             <RowDefinition Height="*"></RowDefinition>
16             <RowDefinition Height="5*"></RowDefinition>
17         </Grid.RowDefinitions>
18         <TextBox Grid.Row="1" Margin="15" Height="20" Text="{Binding Name,Mode=TwoWay}" PlaceholderText="enter you name" />
19         <PasswordBox Grid.Row="2" Margin="15" Height="20" Password="{Binding Password,Mode=TwoWay}" PasswordChar="*" PlaceholderText="enter your password" />
20         <Button Grid.Row="3" Margin="15,10" Content="Login" Command="{Binding LoginCommand}" HorizontalAlignment="Stretch" VerticalAlignment="Stretch"   />
21     </Grid>
22 </views:MvxWindowsPage>
LoginPage.xaml.cs
 1 using Catcher.MVVMDemo.Day01CrossCore.ViewModels;
 2 using MvvmCross.WindowsUWP.Views;
 3 namespace Catcher.MVVMDemo.Day01UWPByMvvmCross.Views
 4 {
 5     public sealed partial class LoginPage :MvxWindowsPage
 6     {
 7         public new LoginViewModel ViewModel
 8         {
 9             get { return (LoginViewModel)base.ViewModel; }
10             set { base.ViewModel = value; }
11         }
12         public LoginPage()
13         {
14             this.InitializeComponent();
15         }
16     }
17 }
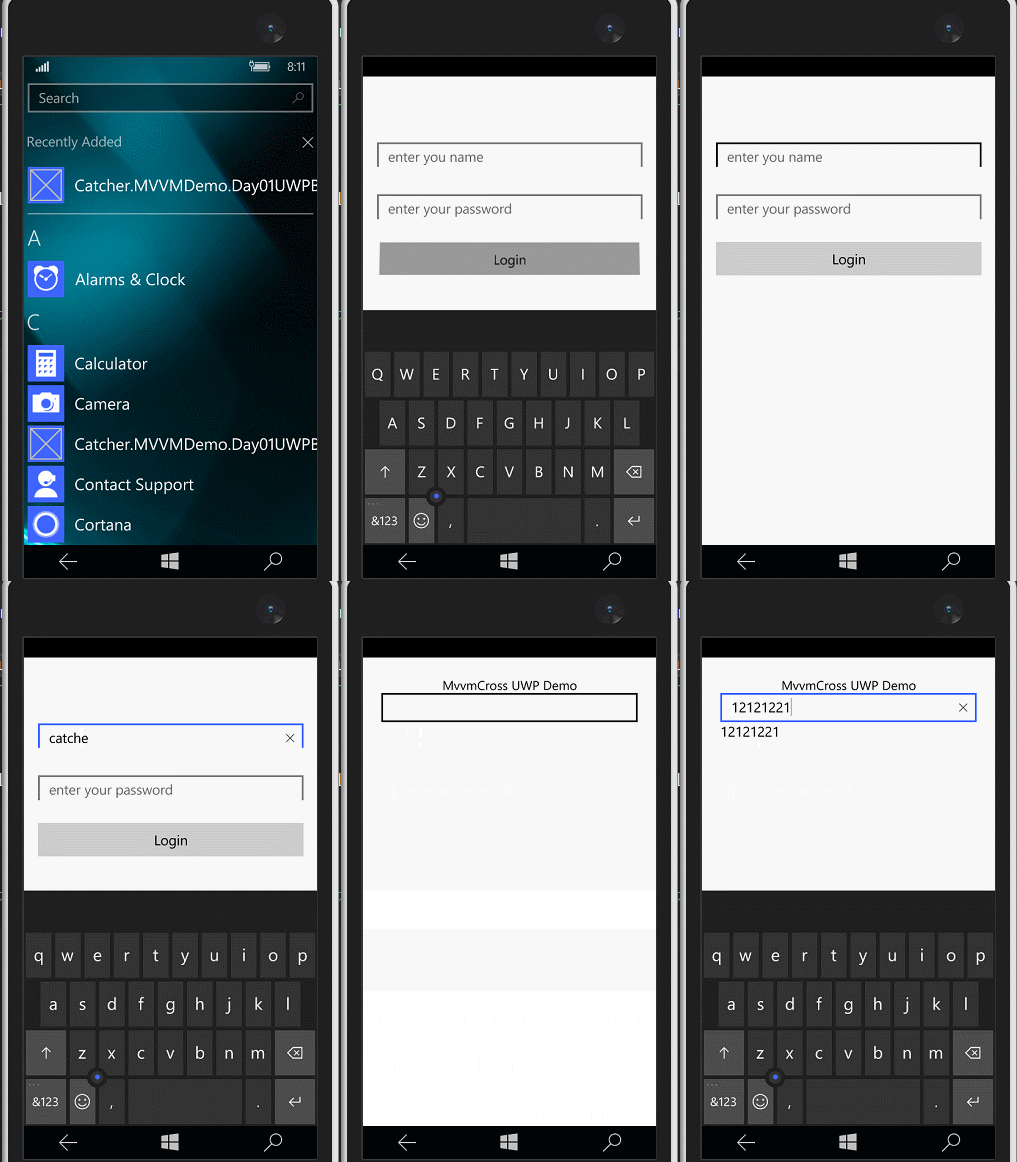
OK,效果如下 :

0x04 简单总结
MvvmCross用起来跟MvvmLight基本是一样
ViewModel这一块与MvvmLight的ViewModel基本没有太大的差别
其他方面,复杂一点的时候,工作量基本差不多,各有各的好,使用的话,都是看个人的兴趣爱好。
MvvmCross也在不断更新,昨天是4.1.5版本,今天就4.1.6了。
官网:https://mvvmcross.com/
Github:https://github.com/MvvmCross


:Response)


)


+1=0?)


)
