Hbase
Hbase是一种NoSql模式的数据库,采用了列式存储。而采用了列存储天然具备以下优势:
可只查涉及的列,且列可作为索引,相对高效
针对某一列的聚合及其方便
同一列的数据类型一致,方便压缩
同时由于列式存储将不同列分开存储,也造成了读取多列效率不高的问题
LSM Tree
说到HBase,我们不得不说其采用的LSM Tree。我们都知道关系数据库中常用的B+Tree,叶子节点有序,但写入时可能存在大量随机写入,因此形成了其读快写慢的特点。
而HBase采用了LSM Tree,在读写之间寻找了平衡,损失了部分读取的性能,实现了快速的写入。LSM具体实现如下:
写入WAL日志中(防止数据丢失),同时数据写入内存中,内存中构建一个有顺序的树,HBase采用跳表结构。
随着内存中数据逐渐增大,内存中flush到磁盘,形成一个个小树。
磁盘中的小树存在数据冗余,且查询时遍历多个小树效率低,LSM定期合并,实现数据合并,而合并的时候,会对数据重新排序,优化读取性能。

HBase架构
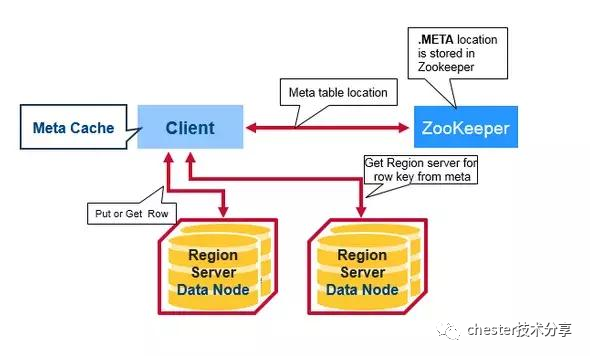
HBase中三个核心的Server形成其分布式存储架构。
RegionServer:负责客户端读写请求,客户端直接与其通信
HBaseMaser:负责维护RegionServer;表结构的维护
Zookeeper:维护集群状态

HBase读写操作步骤
客户端从zookeeper获取哪台RegionServer存储MetaTable(一张特殊表,存储了所有region信息)。
客户端查询MetaTable所在的RegionServer,获取哪台RegionServer应负责此次操作的rowKey
客户端访问对应的RegionServer实现数据读取

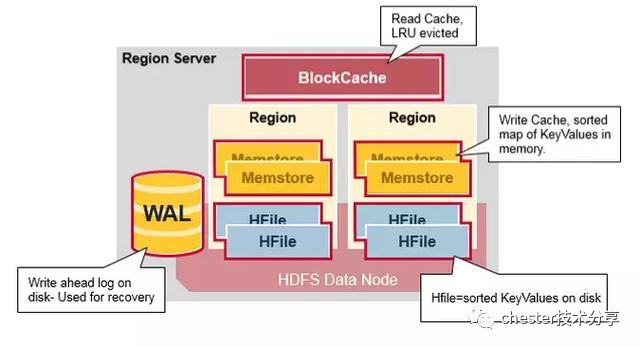
RegionServer的组成
WAL:Write Ahead Log,用于存储写操作的日志,用于故障恢复
BlockCache:读缓存,用于缓存最常访问数据
MemStore:写缓存,会定期flush到磁盘
HFile:在HDFS上存储数据,以有序keyvalue形式存储

HBase存储机制
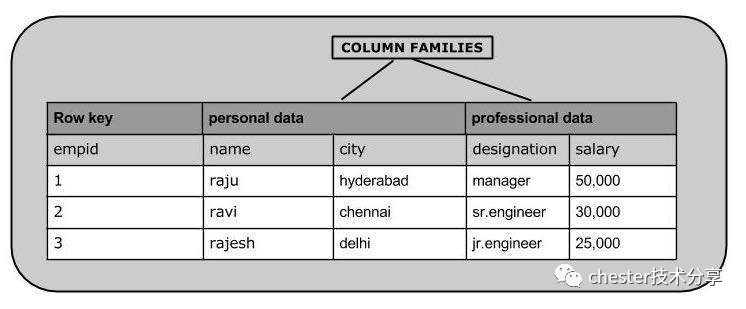
表是行的集合。
行是列家族的集合。
列家族是列的集合。
列是键值对的集合。

HBase安装
1.下载Hbase2.4.11
https://hbase.apache.org/downloads.html
2.解压
tar -zxvf hbase-2.4.11-bin.tar.gz3.修改环境变量
cat conf/hbase-env.sh
export JAVA_HOME=/usr/local/java18/jdk1.8.0_331/
4.修改hbase存储位置
cat conf/hbase-site.xml<property><name>hbase.cluster.distributed</name><value>true</value></property>
<property><name>hbase.rootdir</name><value>hdfs://localhost:9000/hbase</value>
</property>
5.启动Hbase
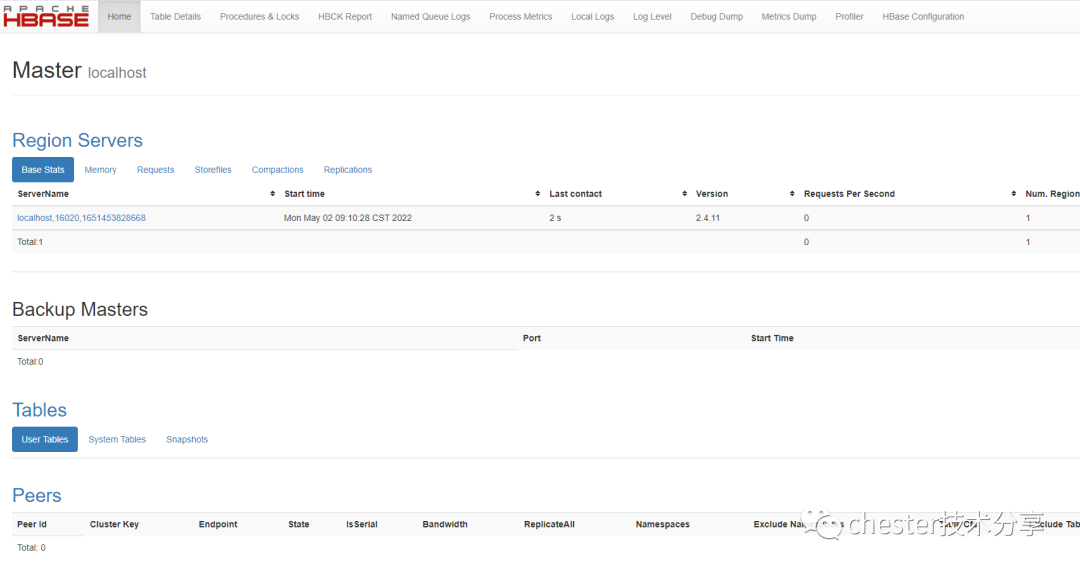
./bin/start-hbase.sh6.验证Hbase
http://192.168.43.50:16010/master-status
7.停止Hbase
./bin/stop-hbase.shHBase Shell访问HBase
官方文档:https://hbase.apache.org/book.html#shell
1.进入shell
./bin/hbase shell2.查看表
hbase:001:0> list3.创建表
#create ‘<table name>’,’<column family>’hbase:001:0> create 'emp', 'personal data', 'professional data'
Created table emp
Took 3.4810 seconds
=> Hbase::Table - emp
4.创建/更新数据
#put ‘table name’,’row ’,'Column family:column name',’new value’hbase:001:0> put 'emp','1','personal data:name','raju'
Took 1.1807 seconds
5.查看数据
hbase:001:0> scan 'emp'
ROW                                                    COLUMN+CELL1                                                     column=personal data:name, timestamp=2022-05-02T09:55:38.861, value=raju
1 row(s)
Took 1.1758 seconds
#get ’<table name>’,’row1’
hbase:002:0> get 'emp', '1'
COLUMN CELLpersonal data:name timestamp=2022-05-02T09:55:38.861, value=raju
1 row(s)
Took 1.3090 seconds6.删除数据
#delete ‘<table name>’, ‘<row>’, ‘<column name >’, ‘<time stamp>’hbase:001:0> deleteall 'emp','1'
Took 0.9424 seconds
C#访问Hbase
C#访问Hbase可以根据thrift文件自己生成响应rpc client代码,通过rpc方式访问。
https://github.com/apache/hbase/tree/master/hbase-thrift/src/main/resources/org/apache/hadoop/hbase
也可以启动rest server通过微软的Microsoft.Hbase.Client访问,我们这次使用rest方式访问。
1.启动与关闭rest server
./bin/hbase-daemon.sh start rest
./bin/hbase-daemon.sh stop rest
可通过访问http://192.168.43.50:8080/version/cluster验证rest是否启动成功

2.新增console项目,引入Microsoft.Hbase.Client包
https://github.com/hdinsight/hbase-sdk-for-net
3.编写测试demo
using Microsoft.HBase.Client;
using Microsoft.HBase.Client.LoadBalancing;
using org.apache.hadoop.hbase.rest.protobuf.generated;var scanOptions = RequestOptions.GetDefaultOptions();
scanOptions.Port = 8080;
scanOptions.AlternativeEndpoint = "/";
var nodeIPs = new List<string>();
nodeIPs.Add("192.168.43.50");
var client = new HBaseClient(null, scanOptions, new LoadBalancerRoundRobin(nodeIPs));
var version = client.GetVersionAsync().Result;
Console.WriteLine(version);var testTableSchema = new TableSchema();
testTableSchema.name = "mytablename";
testTableSchema.columns.Add(new ColumnSchema() { name = "d" });
testTableSchema.columns.Add(new ColumnSchema() { name = "f" });
client.CreateTableAsync(testTableSchema).Wait();
通过hbase shell验证表是mytablename否创建成功
hbase:001:0> list
TABLE
emp
mytablename
关注我获取技术分享


,生成Shapefile点数据图层)


拦截js、css,图片资源)
)


)


