一.consul的介绍
1.1consul是什么?
Consul是HashiCorp公司推出的开源工具,用于实现分布式系统的服务发现与配置。 Consul是分布式的、高可用的、可横向扩展的。它具备以下特性 :
service discovery:consul通过DNS或者HTTP接口使服务注册和服务发现变的很容易,一些外部服务,例如saas提供的也可以一样注册。
health checking:健康检测使consul可以快速的告警在集群中的操作。和服务发现的集成,可以防止服务转发到故障的服务上面。
key/value storage:一个用来存储动态配置的系统。提供简单的HTTP接口,可以在任何地方操作。
multi-datacenter:无需复杂的配置,即可支持任意数量的区域。
2.2使用consul服务场景
因为一套微服务架构中有很多个服务需要管理,也就是说会有很多对grpc。如果一一对应的进行管理会很繁琐所以我们需要有一个管理发现的机制。
二.部署集群
2.1部署环境
| 服务器 | 服务 | 操作系统 |
|---|---|---|
| 192.168.106.90 | Docker-ce、Compose 3、Consul、Consul-template | centos7 |
| 192.168.106.91 | Docker-ce、registrator | centos7 |
2.2搭建Consul
##上传解压到指定文件夹中
[root@server1 ~]# mkdir /root/consul
[root@server1 ~]# cp consul_0.9.2_linux_amd64.zip /root/consul
[root@server1 ~]# cd /root/consul/
[root@server1 consul]# unzip consul_0.9.2_linux_amd64.zip
Archive:  consul_0.9.2_linux_amd64.zipinflating: consul
[root@server1 consul]# ls
consul  consul_0.9.2_linux_amd64.zip
[root@server1 consul]# mv consul /usr/bin/ #导入系统环境方便系统识别[root@server1 consul]# consul agent \ ##agent代理
-server \  ##提供server功能
-bootstrap \
-ui \ #提供web访问界面
-data-dir=/var/lib/consul-data \##参数地址
-bind=192.168.106.90 \ ##监听地址
-client=0.0.0.0 \ ##服务地址
-node=consul-server01 &> /var/log/consul.log &
##指定本地节点名称 产生日志混合输出到 后台运行
[1] 129523[root@server1 consul]# consul members
Node             Address              Status  Type    Build  Protocol  DC
consul-server01  192.168.106.90:8301  alive   server  0.9.2  2         dc1[root@server1 consul]# consul info | grep leaderleader = trueleader_addr = 192.168.106.90:8300[root@server1 consul]# jobs
[1]+  运行中               consul agent -server -bootstrap -ui -data-dir=/var/lib/consul-data -bind=192.168.106.90 -client=0.0.0.0 -node=consul-server01 &>/var/log/consul.log &
查看集群信息
[root@server1 ~]# consul members
Node             Address              Status  Type    Build  Protocol  DC
consul-server01  192.168.106.90:8301  alive   server  0.9.2  2         dc1[root@server1 ~]# consul info | grep leaderleader = trueleader_addr = 192.168.106.90:8300
通过httpd api 获取集群信息
[root@server1 ~]# curl 127.0.0.1:8500/v1/status/peers  ##查看集群server成员
[root@server1 ~]# curl 127.0.0.1:8500/v1/status/leader  ##集群Raf leader
[root@server1 ~]# curl 127.0.0.1:8500/v1/catalog/services ##注册的所有服务
[root@server1 ~]# curl 127.0.0.1:8500/v1/catalog/nginx ##查看nginx服务信息
[root@server1 ~]# curl 127.0.0.1:8500/v1/catalog/nodes  ##集群节点详细信息
新启一个服务器
安装Gliderlabs/Registrator Gliderlabs/Registrator
可检查容器运行状态自动注册,还可注销docker容器的服务到服务配置中心。
在192.168.106.91节点,执行以下操作:
[root@server1 ~]# docker run -d \
--name=registrator \  ##名称
--net=host \  ##指定网络
-v /var/run/docker.sock:/tmp/docker.sock
--restart=always \
gliderlabs/registrator:latest \
-ip=192.168.106.91 \
consul://192.168.106.90:8500  ##consul服务器ip
测试服务发现功能是否正常
新建2个nginx服务容器
新建2个apache服务容器
[root@server1 ~]# docker run -itd -p 83:80 --name test-01 -h test01 nginx
[root@server1 ~]# docker run -itd -p 84:80 --name test-02 -h test02 nginx
[root@server1 ~]# docker run -itd -p 88:80 --name test-03 -h test03 httpd
[root@server1 ~]# docker run -itd -p 89:80 --name test-04 -h test04 httpd
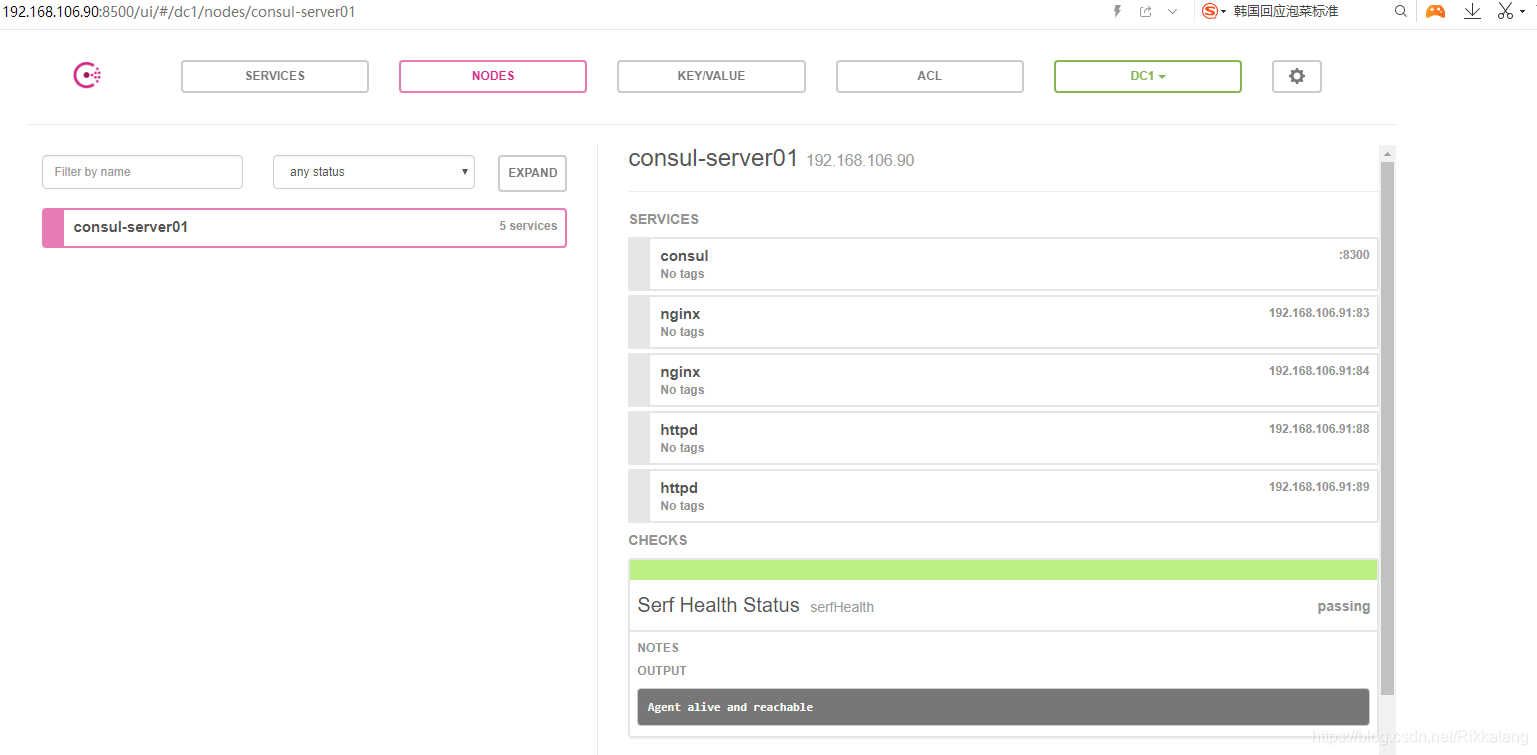
网页验证http和nginx服务是否注册到 consul
浏览器输入 http://192.168.106.90:8500, “单击 NODES”,然后单击“consurl-server01

2.3验证
在容器中关闭一台nginx服务容器,网页查看状态
[root@server1 ~]# docker ps -a
CONTAINER ID        IMAGE                           COMMAND                  CREATED             STATUS              PORTS                NAMES
2cc76ac54834        httpd                           "httpd-foreground"       5 hours ago         Up 5 hours          0.0.0.0:88->80/tcp   test-03
95b5dc7ab301        httpd                           "httpd-foreground"       5 hours ago         Up 5 hours          0.0.0.0:89->80/tcp   test-04
7cb476ca85f5        gliderlabs/registrator:latest   "/bin/registrator -i…"   5 hours ago         Up 5 hours                               registrator
db10b647c5e6        nginx                           "/docker-entrypoint.…"   5 hours ago         Up 5 hours          0.0.0.0:84->80/tcp   test-02
8f03002bbcda        nginx                           "/docker-entrypoint.…"   5 hours ago         Up 5 hours          0.0.0.0:83->80/tcp   test-01
[root@server1 ~]# docker stop db10b647c5e6
db10b647c5e6
网页显示少一台nginx容器

三.consul-template
Consul-template 是一个守护进程,用于实时查询consul集群信息,并更新文件系统上任意数量的指定模板,生成配置文件。更新完成以后,可以选择运行shell命令执行更新操作,重新加载Nginx。Consul-Template可以查询Consul中的服务目录、Key、Key-values等。
这种强大的抽象功能和查询语言模板可以是Consul-Template 特别适合动态的创建配置文件。
例如:创建 Apache/Nginx Proxy Balancers、Haproxy Backends
3.1配置nginx模板文件
[root@server1 consul]# cd
[root@server1 ~]# cd /root/consul/
[root@server1 consul]# vim nginx.ctmplupstream http_backend {     ##基于四层转发{{range service "nginx"}}   ##遍历nginx服务server{{.Address}}:{{.Port}}; ##地址 端口{{end}}  ##结束符
}
server {listen 83;server_name localhost 192.168.106.90;access_log /var/log/nginx/tat-access.log;index inde.html index.php;location / {proxy_set_header HOST $host; proxy_set_header X-Real-IP $remote_addr; ##真实地址proxy_set_header Client-IP $remote_addr; ##客户端地址proxy_set_header X-Forwarded-For $proxy_add_x_forwarded_for; ##支持转发proxy_pass http://http_backend;##调用地址池}
}
3.2编译安装nginx
[root@server1 consul]# yum -y install gcc- gcc-c++ pcre-devel zlib-devel  ##依赖环境
##上传文件 解压到opt目录下
[root@server1 ~]# tar zxvf nginx-1.6.0.tar.gz -C /opt/
##安装
[root@server1 ~]# cd /opt/nginx-1.6.0/
[root@server1 nginx-1.6.0]# ./configure --prefix=/usr/local/nginx
[root@server1 nginx-1.6.0]# make && make install
##更改配置文件
[root@server1 nginx-1.6.0]# vim /usr/local/nginx/conf/nginx.conf
http {include       mime.types;include       vhost/*.conf; ##添加这一行,子配置文件default_type  application/octet-stream;
[root@server1 nginx-1.6.0]# cd /usr/local/nginx/conf/
[root@server1 conf]# mkdir vhost  ##新建虚拟主机文件
[root@server1 conf]# mkdir /var/log/nginx ##新建日志文件目录
[root@server1 conf]# cd vhost
3.3配置并启动 template
##上传consul-template_0.19.3_linux_amd64.zip到/root 解压到/usr/bin/供系统识别
[root@server1 vhost]# cd
[root@server1 ~]# unzip consul-template_0.19.3_linux_amd64.zip
[root@server1 ~]# mv consul-template /usr/bin/
[root@server1 ~]# consul-template -consul-addr 192.168.106.90:8500 -template "/root/consul/nginx.ctmpl:/usr/local/nginx/conf/vhost/tat.conf:/usr/local/nginx/sbin/nginx -s reload" --log-level=info  ##指定地址 指定template到子配置文件vhost虚拟主机中 重载
验证:停止和重新开启一个容器
测试服务发现及配置更新功能
##节点端
[root@server1 ~]# docker start 40cd85d93795
40cd85d93795
[root@server1 ~]# docker stop 40cd85d93795
40cd85d93795
##consul服务端
2020/12/01 10:43:47.919942 [INFO] (runner) initiating run
2020/12/01 10:43:47.920786 [INFO] (runner) rendered "/root/consul/nginx.ctmpl" => "/usr/local/nginx/conf/vhost/tat.conf"
2020/12/01 10:43:47.920808 [INFO] (runner) executing command "/usr/local/nginx/sbin/nginx -s reload" from "/root/consul/nginx.ctmpl" => "/usr/local/nginx/conf/vhost/tat.conf"
2020/12/01 10:43:47.920846 [INFO] (child) spawning: /usr/local/nginx/sbin/nginx -s reload
2020/12/01 10:43:58.353307 [INFO] (runner) initiating run
2020/12/01 10:43:58.354554 [INFO] (runner) rendered "/root/consul/nginx.ctmpl" => "/usr/local/nginx/conf/vhost/tat.conf"
2020/12/01 10:43:58.354588 [INFO] (runner) executing command "/usr/local/nginx/sbin/nginx -s reload" from "/root/consul/nginx.ctmpl" => "/usr/local/nginx/conf/vhost/tat.conf"
2020/12/01 10:43:58.354639 [INFO] (child) spawning: /usr/local/nginx/sbin/nginx -s reload
查看虚拟vhost配置
[root@server1 vhost]# cat /usr/local/nginx/conf/vhost/tat.conf
upstream http_backend {server 192.168.106.91:83;server 192.168.106.91:84;}
server {listen 83;server_name localhost 192.168.106.90;access_log /var/log/nginx/tat-access.log;index inde.html index.php;location / {proxy_set_header HOST $host;proxy_set_header X-Real-IP $remote_addr;proxy_set_header Client-IP $remote_addr;proxy_set_header X-Forwarded-For $proxy_add_x_forwarded_for;proxy_pass http://http_backend;}
}
查看日志
[root@server1 ~]# docker logs -f test-01
[root@server1 ~]# docker logs -f test-02
[root@server1 ~]# docker logs -f test-05
四.consul多节点
提前安装好docker
在192.168.106.90 把consul文件传到192.168.106.100的/usr/local/bin
[root@server1 bin]# scp /usr/bin/consul root@192.168.106.100:/usr/local/bin/
配置多节点
[root@server1 ~]# consul agent -server \
-bootstrap \
-ui \
-data-dir=/var/lib/consul-data \
-bind=192.168.106.100 \
-client=0.0.0.0 \
-node=consul-server02 \ 节点名称##
-enable-script-checks=true \ ##设置检查服务为可用
-datacenter=dc1 \ ##数据中心名称
-join 192.168.106.90 &> /var/log/consul.log & ##加入到已有的集群中
查看集群节点状态
[root@server1 ~]# curl 127.0.0.1:8500/v1/catalog/nodes
[{"ID":"ea5109c6-e3c9-b310-5fd5-500f5ee08347","Node":"consul-server01","Address":"192.168.106.90","Datacenter":"dc1","TaggedAddresses":null,"Meta":null,"CreateIndex":6,"ModifyIndex":6},{"ID":"d24113ce-f452-93cf-ef9d-1b79b46c4553","Node":"consul-server02","Address":"192.168.106.100","Datacenter":"dc1","TaggedAddresses":{"lan":"192.168.106.100","wan":"192.168.106.100"},"Meta":{},"CreateIndex":5,"ModifyIndex":7}]
edAddresses":null,“Meta”:null,“CreateIndex”:6,“ModifyIndex”:6},{“ID”:“d24113ce-f452-93cf-ef9d-1b79b46c4553”,“Node”:“consul-server02”,“Address”:“192.168.106.100”,“Datacenter”:“dc1”,“TaggedAddresses”:{“lan”:“192.168.106.100”,“wan”:“192.168.106.100”},“Meta”:{},“CreateIndex”:5,“ModifyIndex”:7}]
---------------------
作者:Rikkatang
来源:CSDN
原文:https://blog.csdn.net/rikkatang/article/details/110449434
版权声明:本文为作者原创文章,转载请附上博文链接!
内容解析By:CSDN,CNBLOG博客文章一键转载插件


)
案例详解)
)


)
![BZOJ 1370: [Baltic2003]Gang团伙 [并查集 拆点 | 种类并查集WA]](http://pic.xiahunao.cn/BZOJ 1370: [Baltic2003]Gang团伙 [并查集 拆点 | 种类并查集WA])


.Start导致高并发CPU 100%的问题)