1、Redis简介
Redis是一个开放源代码(BSD许可证)的代理,其在内存中存储数据,可以代理数据库、缓存和消息。它支持字符串、散列、列表、集合和位图等数据结构。Redis 是一个高性能的key-value数据库, 它在很大程度改进了memcached这类key/value存储的不足。Redis提供了Java,C/C++,C#,PHP,JavaScript,Perl,Object-C,Python,Ruby和Erlang等语言的客户端。
Redis支持master/slave结构,数据可以从master向任意数量的slave上进行同步。Redis 与其它 key – value 缓存产品相比,具有以下三个方面特点:
- 支持内存的持久化:可以将内存中的数据保存在磁盘中,重启的时候可以再次加载进行使用;
- 支持多种数据结构:Redis不仅仅只是支持key-value类型的数据,还能够支持字符串、散列和列表等数据结构;
- 支持主从结构:Redis支持主从结构,保证系统的高可用。
2、基于Sentinel模式的高可用方案
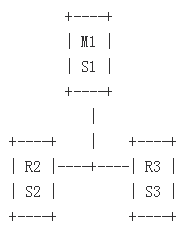
本文中的Redis高可用方案采用Sentinel(哨兵)模式,在集群出现故障的时候自动进行故障转移,保证集群的可用性。Redis Sentinel 为Redis提供了高可用性,这意味着通过使用Sentinel 可以创建一个Redis部署,在没有人为干预的情况下能够抵抗某些类型的失败。Sentiel的完整功能列表如下所示:
- 监控:不间断的检查master/slave实例否是安装预期正常工作;
- 通知:当 Redis 实例出现错误的时候,会使用程序(通过 API 接口)通知管理员;
- 自动故障转移:在master发生故障时,哨兵会开启故障转移处理,将一台slave提升为master,其它的slave被重新配置使用新的master,当应用程序连接时使用新的地址配置;
- 配置信息:Sentinel作为服务发现的权威来源,客户端连接到Sentinel去获取当前Redis master的地址,如果发生故障转移,Sentinel将会汇报新的服务器地址。
Sentinel本身是一套分布式系统,它被设计成能够进行多个进程间协同工作的模式,这样的好处如下:
- 多个Sentinel一致明确给定的主机不再可用时,才会执行故障检测,这能够有效错报的概率。
- 即使只有一个Sentinel在正常运行,Redis也是可用的,从而保证系统具有较高的健壮性。
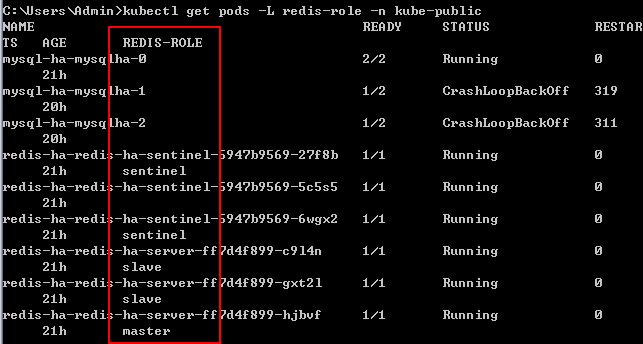
Sentinel,Redis实例(master和slave)和连接到Sentinel和Redis的客户端的数量,也是一个具有特定属性的更大的分布式系统。在本文中,定制的Redis服务器镜像会确定执行它的Pod是redis的Sentinel、master还是slave,并启动适当的服务。这个Helm chart指示Sentinel状态与环境变量。如果没有设置,新启动的Pod将查询Kunbernetes的活动master。如果不存在,则它使用一种确定的方法来检测它是否应该作为master启动,然后将“master”或“slave”写入到称为redis-role的标签中。
redis-role=master Pod是集群启动的关键。在它们完成启动,sentinel将处于等待整体。所有其他的Pod等待sentinel识别主节点。运行Pod并设置标签podIP和runID。runID是每个redis服务器生成的唯一run_ID值的前几个字符。
在正常操作中,应该只有一个redis=master Pod。如果失败,Sentinel将提名一个新的master,并适当地改变所有的redis-role的值。
通过执行如下命令可以查看Pod所承担的角色:
$ kubectl get pods -L redis-role -namespace=kube-public

3、安装部署
2.1 环境要求
- 已有Kubernetes 1.6+环境;
- 已部署helm客户端和tiller服务端(请参考:https://docs.helm.sh/using_helm/#installing-helm):
- 在Kubernetes中创建了具备足够权限访问权限的service account;
- 并通过此service account在Kubernetes部署了tiller服务端(请参考:https://docs.helm.sh/using_helm/#role-based-access-control)。
- 在Kubernetes中提供了容量大于10g的持久化存储卷。
2.2 Helm char配置
下表列示了Redis chart的配置参数和默认值:
| 参数 | 描述 | 默认值 |
|---|---|---|
redis_image | Redis镜像 | quay.io/smile/redis:4.0.6r2 |
resources.master | Redis主节点CPU/内存的资源请求/限制 | Memory: 200Mi, CPU: 100m |
resources.slave | Redis从节点CPU/内存的资源请求/限制 | Memory: 200Mi, CPU: 100m |
resources.sentinel | 哨兵节点CPU/内存的资源请求/限制 | Memory: 200Mi, CPU: 100m |
replicas.servers | redis master/slave pods的副本数量 | 3 |
replicas.sentinels | sentinel pods的副本数量 | 3 |
nodeSelector | 为Pod指派的Node标签 | {} |
tolerations | 为Pod指派的可容忍标签 | [] |
servers.serviceType | 设置”LoadBalancer”能够通过VPC进行访问 | ClusterIP |
servers.annotations | 参考应用模式 | “ |
rbac.create | 是否应该创建RBAC资源 | true |
serviceAccount.create | 是否创建代理所使用的service account名称 | true |
serviceAccount.name | 被使用的service account。如果未进行设置,同时如果serviceAccount.create被设置为true,则Kubernetes会在后台以模板的全名创建一个service account。 | “ |
在helm install中使用–set key=value 格式设置上述的参数值,例如:
$ helm install \--set redis_image=quay.io/smile/redis:4.0.6r2 \stable/redis-ha2.3 持久化
redis将持久化数据保存在容器的/redis-master-datal路径下,安装时会创建一个PersistentVolumeClaim ,并将其挂接到容器内的目录。因此,需要在Kubernetes中提前提供一个PersistentVolume。
2.4 通过Chart安装Redis
通过执行如下的命令,在Kubernetes中部署Redis:
$ helm install stable/redis-ha --name=redis-ha --namespace=kube-public通过上述命令,将以默认的配置在Kubernetes中部署Redis。默认情况下,chart会安装部署3个Sentinel Pod,1个master Pod和2个slave Pod。

3、Helm Chart分析
MySQL Chart的目录如下,其中,values为默认的配置文件,用于为部署提供默认值。templates目录下的YAML文件是在Kubernetes进行部署的配置文件。
redis-ha
--templates # 模板目录,当与values.yaml组合时,将生成有效的Kubernetes清单文件。 ----NOTES.txt
----_helpers.tpl
----redis-auth-secret.yaml
----redis-master-service.yalm
----redis-role.yaml
----redis-rolebinding.yaml
----redis-sentinel-deployment.yaml
----redis-sentinel-service.yaml
----redis-server-deployment.yaml
----redis-serviceaccount.yaml
----redis-slave-service.yaml
--Chart.yaml # 描述chart的信息 --README.md # 可读的chart介绍文件 --values.yaml # 默认配置文件
3.1 values.yaml
在values.yaml配置文件中设置了通过helm进行部署时的默认值。在values.yaml中,首先,定义了主Pod和哨兵Pod的请求和限制资源的要求;接着,通过nodeSelector和容忍度为Pod定义调度到哪个Node上;以及,指定容器所使用的镜像和其它的相关信息。
## Configure resource requests and limits ## ref: http://kubernetes.io/docs/user-guide/compute-resources/ ##
resources:server:requests:memory: 200Micpu: 100mlimits:memory: 700Misentinel:requests:memory: 200Micpu: 100mlimits:memory: 200Mi ## Node labels and tolerations for pod assignment ## ref: https://kubernetes.io/docs/concepts/configuration/assign-pod-node/#nodeselector  ## ref: https://kubernetes.io/docs/concepts/configuration/assign-pod-node/#taints-and-tolerations-beta-featurenodeSelector: {}tolerations: [] ## Redis image version
redis_image: quay.io/smile/redis:4.0.8r0 ## replicas number for each component
replicas:servers: 3sentinels: 3
servers:serviceType: ClusterIP # [ClusterIP|LoadBalancer]annotations: {}rbac: # Specifies whether RBAC resources should be createdcreate: trueserviceAccount: # Specifies whether a ServiceAccount should be createdcreate: true # The name of the ServiceAccount to use. # If not set and create is true, a name is generated using the fullname templatename: ## Configures redis with AUTH (requirepass & masterauth conf params)
auth: false ## Redis password ## Defaults to a random 10-character alphanumeric string if not set and auth is true ## ref: https://github.com/kubernetes/charts/blob/master/stable/redis-ha/templates/redis-auth-secret.yaml ## ## redisPassword:
3.2 redis-server-deployment.yaml
此YAML配置文件用于定义Redis master/slave的部署。
apiVersion: extensions/v1beta1
kind: Deployment
metadata: # Pay attention to the redis-role label at runtime. The self-determination logic in the image sets  # this value accordingly.name: {{ template "redis-ha.fullname" . }}-serverlabels:name: {{ template "redis-ha.fullname" . }}-serverredis-node: "true" {{ include "labels.standard" . | indent 4 }}
spec:replicas: {{ .Values.replicas.servers }} template:metadata:labels:app: {{ template "redis-ha.name" . }}release: {{ .Release.Name }}component: servername: {{ template "redis-ha.fullname" . }}-serverredis-node: "true"spec:serviceAccountName: {{ template "redis-ha.serviceAccountName" . }} {{- if .Values.nodeSelector }}nodeSelector: {{ toYaml .Values.nodeSelector | indent 8 }} {{- end }} {{- if .Values.tolerations }}tolerations: {{ toYaml .Values.tolerations | indent 8 }} {{- end }}containers: - name: redisimage: {{ .Values.redis_image }}resources: {{ toYaml .Values.resources.server | indent 10 }}env: - name: REDIS_SENTINEL_SERVICE_HOSTvalue: "redis-sentinel" - name: REDIS_CHART_PREFIXvalue: {{ template "redis-ha.fullname" . }}- {{- if .Values.auth }} - name: REDIS_PASSvalueFrom:secretKeyRef:name: {{ template "redis-ha.fullname" . }}key: auth
{{- end }}ports: - containerPort: 6379volumeMounts: - mountPath: /redis-master-dataname: datavolumes: - name: data
3.3 redis-master-service.yaml
此YAML配置文件为定义了redis master的服务,此服务暴露6379端口,以供在集群中使用。
apiVersion: v1
kind: Service
metadata:name: {{ template "redis-ha.fullname" . }}-master-svclabels: {{ include "labels.standard" . | indent 4 }}annotations: {{ toYaml .Values.servers.annotations | indent 4 }}
spec:ports: - port: 6379protocol: TCPtargetPort: 6379selector:app: {{ template "redis-ha.name" . }}release: "{{ .Release.Name }}"redis-node: "true"redis-role: "master"type: "{{ .Values.servers.serviceType }}"
3.4 redis-slave-service.yaml
此YAML配置文件为定义了redis slave的服务,此服务暴露6379端口,以供在集群中使用。
apiVersion: v1
kind: Service
metadata:name: {{ template "redis-ha.fullname" . }}-slave-svclabels:role: service
{{ include "labels.standard" . | indent 4 }}annotations: {{ toYaml .Values.servers.annotations | indent 4 }}
spec:ports: - port: 6379protocol: TCPtargetPort: 6379selector:app: {{ template "redis-ha.name" . }}release: "{{ .Release.Name }}"redis-node: "true"redis-role: "slave"type: "{{ .Values.servers.serviceType }}"
3.5 redis-sentinel-deployment.yaml
此YAML文件定义Sentinel部署,Sentinel用于监控和管理对于Redis的访问。
apiVersion: extensions/v1beta1
kind: Deployment
metadata:name: {{ template "redis-ha.fullname" . }}-sentinellabels: {{ include "labels.standard" . | indent 4 }}
spec:replicas: {{ .Values.replicas.sentinels }} template:metadata:labels:app: {{ template "redis-ha.name" . }}release: {{ .Release.Name }}component: sentinelname: {{ template "redis-ha.fullname" . }}-sentinelspec:serviceAccountName: {{ template "redis-ha.serviceAccountName" . }} {{- if .Values.nodeSelector }}nodeSelector: {{ toYaml .Values.nodeSelector | indent 8 }} {{- end }} {{- if .Values.tolerations }}tolerations: {{ toYaml .Values.tolerations | indent 8 }} {{- end }}containers: - name: sentinelimage: {{ .Values.redis_image }}resources: {{ toYaml .Values.resources.sentinel | indent 10 }}env: - name: SENTINELvalue: "true" - name: REDIS_CHART_PREFIXvalue: {{ template "redis-ha.fullname" . }}- {{- if .Values.auth }} - name: REDIS_PASSvalueFrom:secretKeyRef:name: {{ template "redis-ha.fullname" . }}key: auth
{{- end }}ports: - containerPort: 26379
3.6 redis-sentinel-service.yaml
此YAML文件用于在集群内容暴露Sentinel部署,以供其它应用访问和调用。
apiVersion: v1
kind: Service
metadata:name: {{ template "redis-ha.fullname" . }}-sentinellabels:name: {{ template "redis-ha.name" . }}-sentinel-svcrole: service
{{ include "labels.standard" . | indent 4 }}
spec:ports: - port: 26379targetPort: 26379selector:app: {{ template "redis-ha.name" . }}release: "{{ .Release.Name }}"redis-role: "sentinel"
3.7 redis-serviceaccount.yaml
如果rbac.create的值为true,此YAML文件将创建一个名为{{template “redis-ha.serviceAccountName”.}}的service account。
{{- if .Values.serviceAccount.create -}}
apiVersion: v1
kind: ServiceAccount
metadata:name: {{ template "redis-ha.serviceAccountName" . }}labels:app: "redis-ha"chart: {{ .Chart.Name }}-{{ .Chart.Version }}heritage: {{ .Release.Service }}release: {{ .Release.Name }} {{- end -}}
3.8 redis-role.yaml
如果rbac.create的值为true,则此YAML文件将会定义名为{{template “redis-ha.fullname” .}}一个角色,此角色拥有获取、列示和修改pods的权限。
{{- if .Values.rbac.create -}}
apiVersion: rbac.authorization.k8s.io/v1beta1
kind: Role
metadata:name: {{ template "redis-ha.fullname" . }}labels: {{ include "labels.standard" . | indent 4 }}
rules: - apiGroups: - ""resources: - podsverbs: - get - list- patch
{{- end -}}
3.9 redis-rolebinding.yaml
如果rbac.create的值为true,将上述创建的service account和角色进行绑定。
{{- if .Values.rbac.create -}}
apiVersion: rbac.authorization.k8s.io/v1beta1
kind: RoleBinding
metadata:name: {{ template "redis-ha.fullname" . }}labels: {{ include "labels.standard" . | indent 4 }}
roleRef:apiGroup: rbac.authorization.k8s.iokind: Rolename: {{ template "redis-ha.fullname" . }}
subjects: - kind: ServiceAccountname: {{ template "redis-ha.serviceAccountName" . }} {{- end -}}
3.10 redis-auth-secret.yaml
如果auth的值为true,则会创建一个保密字典。
{{- if .Values.auth -}}
apiVersion: v1
kind: Secret
metadata:name: {{ template "redis-ha.fullname" . }}labels: {{ include "labels.standard" . | indent 4 }}
type: Opaque
data: {{- if .Values.redisPassword }}auth: {{ .Values.redisPassword | b64enc | quote }} {{- else }}auth: {{ randAlphaNum 10 | b64enc | quote }} {{- end }} {{- end -}}
4、Redis部署环境验证
在Kubernetes集群中,可以通过DNS名称{{ template “redis-ha.fullname” . }}.{{ .Release.Namespace }}.svc.cluster.local和端口6379访问redis集群。
如果设置了认证的话,通过下面的步骤连接Redis:
1)获取随机创建的redis密码:
echo $(kubectl get secret {{ template “redis-ha.fullname” . }} -o “jsonpath={.data[‘auth’]}” | base64 -D)
2)使用客户端连接Redis master Pod:
kubectl exec -it $(kubectl get pod -o jsonpath='{range .items[*]}{.metadata.name} {.status.containerStatuses[0].state}{“\n”}{end}’ -l redis-role=master | grep running | awk ‘{print $1}’) bash
3)在容器内使用Redis CLI连接:
redis-cli -a <REDIS-PASS-FROM-SECRET>
如果未设置认证的话,通过下面的步骤连接Redis:
1)可以通过下面的命令运行Redis Pod,作为客户端:
获取当前系统中的Pods:
$ kubectl get pods -L redis-role --namespace=kube-public

以名称为redis-ha-redis-ha-server-79659c558f-lgrtg的Pod作为客户端:
$ kubectl exec -it redis-ha-redis-ha-server-79659c558f-lgrtg --namespace=kube-public bash
2)使用Redis CLI:
获取Redis的master服务名称:
$ kubectl get svc --namespace=kube-public

$ redis-cli -h redis-ha-redis-ha-master-svc.kube-public -p 6379本文转自kubernetes中文社区-Kubernetes-基于Helm安装部署高可用的Redis


)

:Realm授权)

![[LeetCode][Java] Unique Paths II](http://pic.xiahunao.cn/[LeetCode][Java] Unique Paths II)


的用法)


![[译]关于NODE_ENV,哪些你应该了解](http://pic.xiahunao.cn/[译]关于NODE_ENV,哪些你应该了解)
