
word多级列表创建目录

Microsoft Word lets you easily create and format multilevel lists in your documents. You can choose from a variety of formatting options, including bulleted, numbered, or alphabetized lists. Let’s take a look.
Microsoft Word使您可以轻松地在文档中创建多级列表并设置其格式。 您可以从各种格式选项中进行选择,包括项目符号,编号或字母顺序的列表。 让我们来看看。
如何在Microsoft Word中创建多级列表 (How to Create a Multilevel List in Microsoft Word)
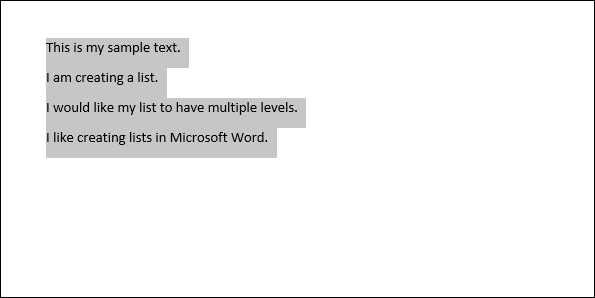
Creating a multilevel list in Word is dead simple. Start by typing out one or more lines of your list, with each item of your list on a different line. Then, select those lines.
在Word中创建多级列表非常简单。 首先输入列表中的一行或多行,然后将列表中的每一项都放在不同的行上。 然后,选择那些行。
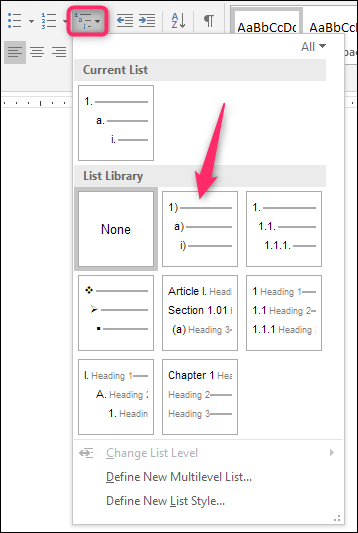
On the “Home” tab of the Ribbon, click the “Multilevel Lists” button, and then click one of the built-in lists types shown on the dropdown menu.
在功能区的“主页”选项卡上,单击“多级列表”按钮,然后单击下拉菜单上显示的内置列表类型之一。
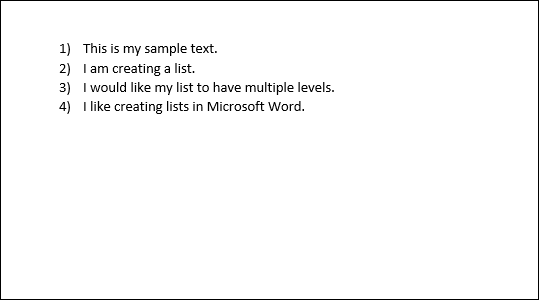
Your list will now be formatted in the style you chose.
现在,您的列表将以您选择的样式进行格式化。
And yes, right now, it’s a single-level list. The truth is that technically, single- and multi-level lists are not much different in Word. It’s not until you start promoting and demoting list items that it turns into a multilevel list.
是的,现在,这是一个单层列表。 事实是,从技术上讲,单级和多级列表在Word中没有太大区别。 直到您开始升级和降级列表项后,它才变成多级列表。
降级和提升多级列表上的行 (Demoting and Promoting Lines On Your Multilevel List)
Demoting a line in your list indents the line and bumps it to a lower list level. Promoting a line does just the opposite.
降级列表中的一行会使该行缩进,并将其凸显到较低的列表级别。 推广一条路线恰恰相反。
通过按Tab或Shift-Tab降级或提升列表项 (Demote or Promote a List Item By Pressing Tab or Shift-Tab)
Start by placing your cursor at the beginning of the line you want to demote or promote.
首先将光标放在要降级或升级的行的开头。
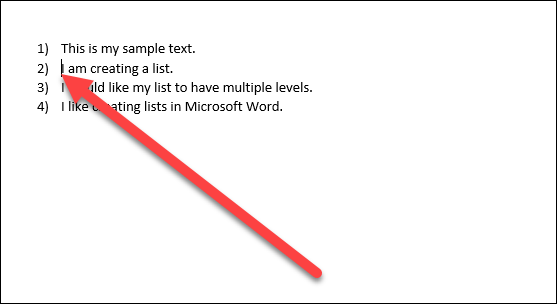
To demote that line to a lower list level, just hit your Tab key.
要将该行降级为较低的列表级别,只需按Tab键即可。
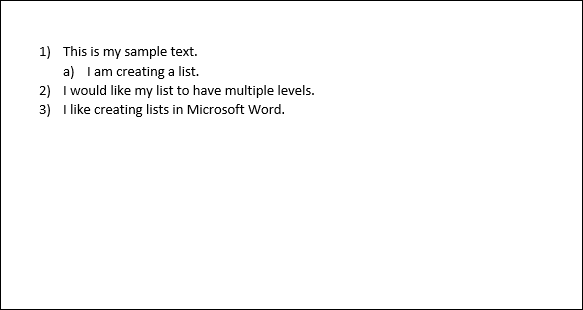
You can also demote a line more than once by just pressing Tab however many times you need. Here, we’ve demoted the third line in our list twice.
您也可以通过多次按Tab键降级一行。 在这里,我们两次将列表中的第三行降级。
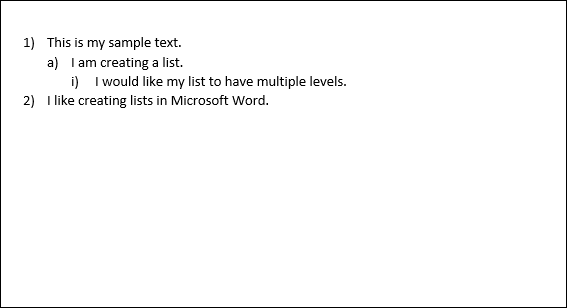
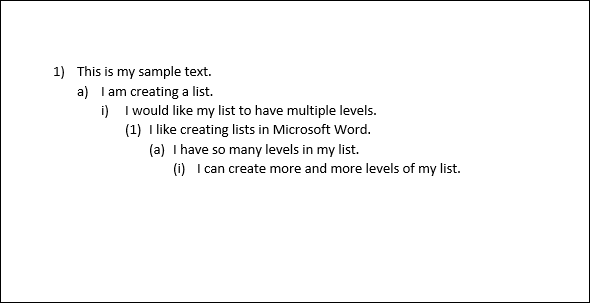
Repeat these steps if you would like to add four, five, or even more levels to your multilevel list.
如果要向多级列表中添加四个,五个甚至更多个级别,请重复这些步骤。
You can also promote a line (move it back a level) by placing your cursor at the beginning of the line…
您还可以通过将光标置于行的开头来提升一行(将其移回一个级别)…
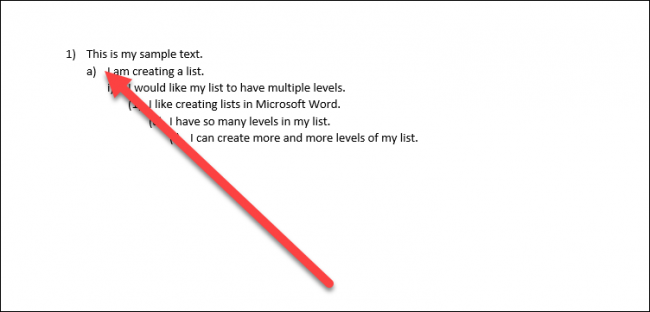
And then hitting Shift+Tab.
然后按Shift + Tab。
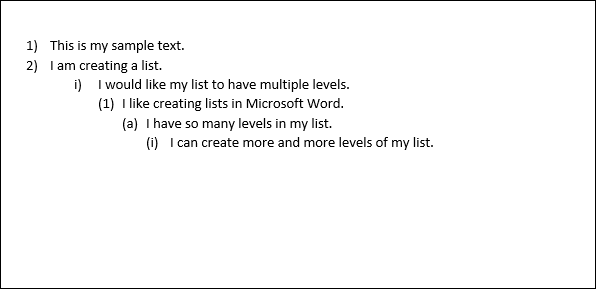
You can also demote or promote multiple lines at a time by selecting them…
您还可以通过选择多个行同时降级或升级它们。

and then hitting the Tab or Shift+Tab keys.
然后按Tab键或Shift + Tab键。

选择行的特定列表级别 (Pick a Specific List Level for a Line)
While just using the Tab and Shift+Tab key combos is probably the easiest way to promote or demote lines on your list, Word does have a menu option for choosing a specific level.
虽然仅使用Tab和Shift + Tab键组合是升级或降级列表中行的最简单方法,但Word确实具有用于选择特定级别的菜单选项。
Place your cursor anywhere in the line you want to change (or select multiple lines if you want to change more than one).
将光标放在要更改的行中的任何位置(如果要更改多个,请选择多行)。

Click the “Multilevel List” button on the Home tab of the Ribbon, point to the “Change List Level” option on the dropdown, and then select the level you want.
单击功能区“主页”选项卡上的“多级列表”按钮,指向下拉菜单中的“更改列表级别”选项,然后选择所需的级别。
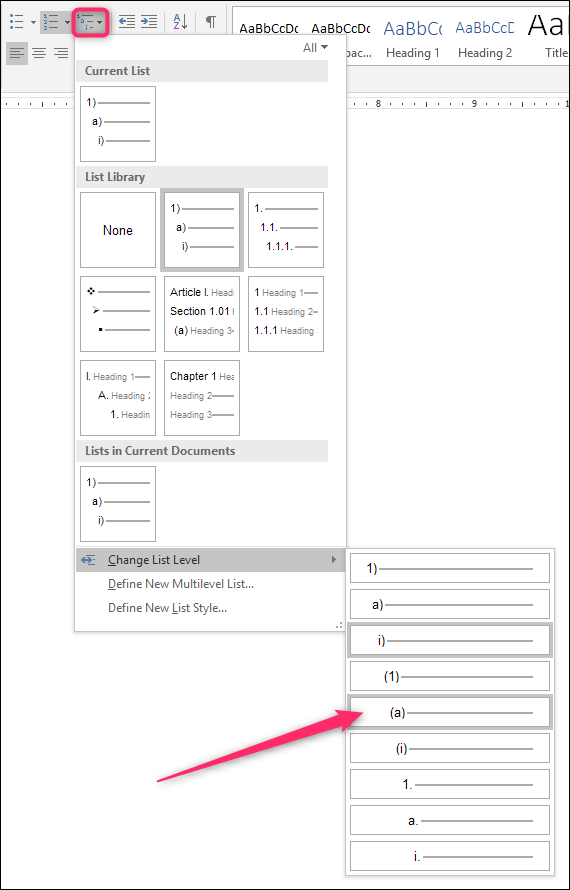
And the line (or lines) you selected get changed to that level.
然后,您选择的一条或多条线将更改为该级别。

如何快速更改多级列表的类型 (How to Quickly Change the Type of Your Multilevel List)
Sometimes, you may decide that you want to change the basic type of multilevel list you’re using. Perhaps you originally went with numbers, but now want to use bullet points. Or maybe you just want a different numbering scheme. Whatever the case, you can easily make that change.
有时,您可能会决定要更改所使用的多级列表的基本类型。 也许您最初使用数字,但现在想使用项目符号。 或者,也许您只是想要一个不同的编号方案。 无论如何,您都可以轻松进行更改。
Place your cursor anywhere on any line of your list. It really doesn’t matter where, because this is going to change the whole list.
将光标放在列表的任何行上的任何位置。 确实无关紧要,因为这将更改整个列表。
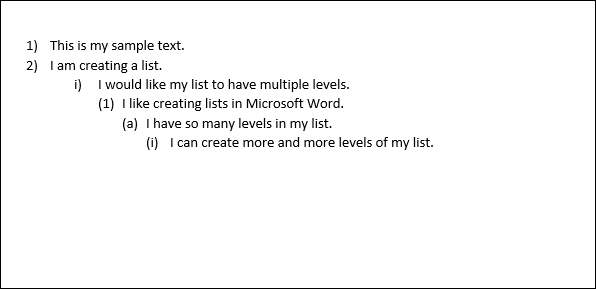
Open that “Multilevel Lists” dropdown menu again, and this time, just click any of the other default list types on the menu.
再次打开该“多级列表”下拉菜单,这一次,只需单击菜单上的任何其他默认列表类型即可。
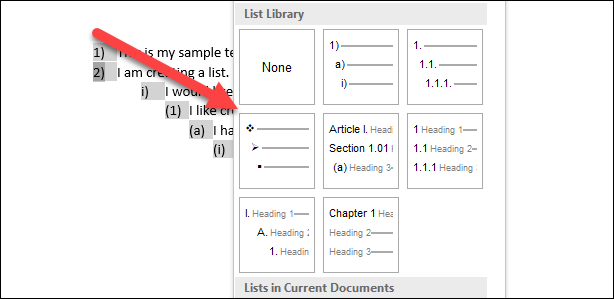
Your whole list changes to that new type.
您的整个列表将更改为该新类型。
如何自定义多级列表 (How to Customize Your Multilevel List)
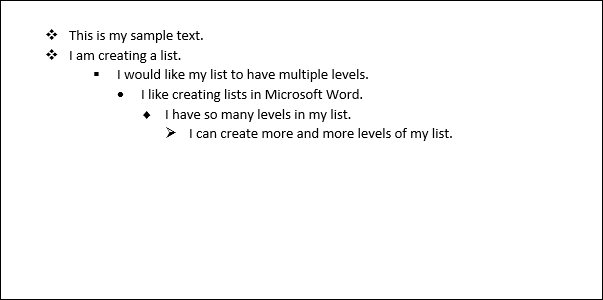
So, what if you want to change something about your list like the way just one line level is numbered or how the levels are aligned. Well, you can do that, too. Multilevel lists in Word are pretty customizable, letting you make changes to just about every aspect.
因此,如果您想更改列表的内容,例如仅对一个行级别进行编号的方式或如何对齐级别,该怎么办? 好吧,您也可以这样做。 Word中的多级列表是非常可定制的,使您几乎可以对每个方面进行更改。
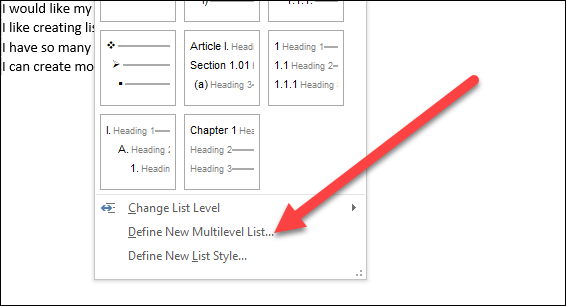
Start by placing your cursor anywhere on any line of your list. Open the “Multilevel List” dropdown, and then choose the “Define New Multilevel List” command.
首先将光标放在列表中任何一行的任意位置。 打开“多级列表”下拉列表,然后选择“定义新的多级列表”命令。
The Define New Multilevel List window pops up, showing you a number of basic options for customizing how the lines in your list appear. However, there’s more here than meets the eye, so go ahead and click that “More” button down in the bottom left corner.
弹出“定义新的多层列表”窗口,为您显示许多用于自定义列表中各行显示方式的基本选项。 但是,这里的内容不仅仅吸引眼球,因此请继续并单击左下角的“更多”按钮。

Now, your window should look like this, with a bunch of extra options off to the right.
现在,您的窗口应该看起来像这样,右侧有许多其他选项。
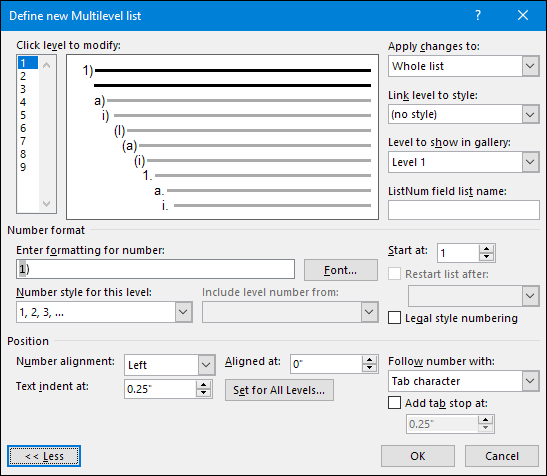
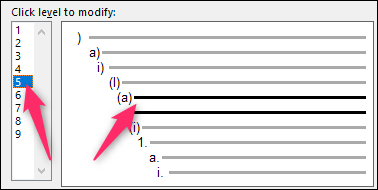
So, here’s the rundown. First, select the level of the list that you want to modify. You can click either in the simple numbered list to the left, or on a line in the center window that shows how the list actually looks.
所以,这是总结。 首先,选择要修改的列表级别。 您可以单击左侧的简单编号列表,也可以单击中心窗口中显示列表实际外观的一行。
Below that, you’ll find a bunch of options for changing the number format and positioning for the selected level appears.
在其下,您将找到许多用于更改数字格式和所选级别的位置的选项。
Here’s what you can do there (and note that this list includes the extra stuff revealed by that “More” button):
这是您可以在其中执行的操作(请注意,此列表包括该“更多”按钮显示的其他内容):
Enter formatting for number: You can type the text for the line number as you want it to appear in this box. Click the “Font” button to its right to change the font used for the level.
输入数字格式:您可以键入要显示在该框中的行号文本。 单击右侧的“字体”按钮以更改用于该级别的字体。
Number style for this level: Use this dropdown to change the style of the selected number level. You can change it to pretty much any number or bullet style you want. You can even mix bullet points into a numbered list this way (or vice versa).
此级别的数字样式:使用此下拉列表可以更改所选数字级别的样式。 您可以将其更改为几乎所需的任何数字或项目符号样式。 您甚至可以通过这种方式将项目符号点混合到编号列表中(反之亦然)。
Include level number from: Use this dropdown to include the number from a previous level. This lets you create line numbers like 1.1; 1.1.1; and so on.
包括来自以下级别的编号:使用此下拉列表可以包括上一个级别的编号。 这样就可以创建行号,例如1.1; 1.1.1; 等等。
Start at: Choose the number or letter where you want to start the numbering.
开始于:选择要在其上开始编号的数字或字母。
Restart list after: Have the list restart after it reaches a certain number or letter.
重新启动列表:在达到某个数字或字母后重新启动列表。
Position: Use the controls in the “Position” section to change how the selected number level is aligned and indented. You can also click the “Set For All Levels” button to control alignment and indents for your whole list. You can also choose whether the line number is followed by a tab character (the default), a space, or no character at all.
位置:使用“位置”部分中的控件来更改对齐和缩进所选数字级别的方式。 您也可以单击“为所有级别设置”按钮来控制整个列表的对齐方式和缩进量。 您还可以选择行号后跟制表符(默认),空格还是根本没有字符。
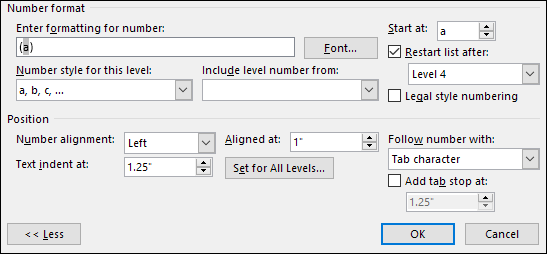
And at the top right of the window, you’ll find a few extra options, including:
在窗口的右上方,您会发现一些其他选项,包括:
Apply changes to: Choose whether you want to apply changes to the whole list, from the point where your cursor is placed in the list, or only levels you’ve selected.
将更改应用于:选择是将更改应用于整个列表,还是将光标置于列表中,或者仅将所选级别应用于整个列表。
Link level to style: You can use this dropdown to link your selected level to a style, whether a built-in Word style or one you’ve created. This can be particularly handy for linking levels to heading styles.
将级别链接到样式:可以使用此下拉列表将所选级别链接到一种样式,无论是内置Word样式还是您创建的样式。 这对于将级别链接到标题样式特别方便。
Level to show in gallery: This dropdown lets you choose the level of the list that’s shown in the gallery on Word’s Home tab. Honestly, its not a very useful option, and it’s usually best to leave it set to its default—Level 1.
在图库中显示的级别:通过此下拉列表,您可以选择Word的“主页”选项卡上的图库中显示的列表级别。 老实说,它不是一个非常有用的选项,通常最好将其设置为默认值-1级。
ListNum field list name: Use this field to associate the level with a name that you can then use along with Word’s LISTNUM function. This is useful if you’re creating functions to generate lists.
ListNum字段列表名称:使用此字段将级别与一个名称关联,然后可以将其与Word的LISTNUM函数一起使用。 如果要创建用于生成列表的函数,这将很有用。
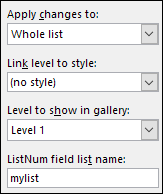
After making changes to a particular level, you’ll need to repeat the process for each additional level of the list you want to modify. So, select a level, make your changes, select the next level, make those changes, and so on.
对特定级别进行更改后,您需要为要修改的列表的每个其他级别重复该过程。 因此,选择一个级别,进行更改,选择下一个级别,进行那些更改,依此类推。
When you have finished changing all the levels you want, click the “OK” button, and your multilevel list will now show your changes.
完成所需的所有级别的更改后,单击“确定”按钮,您的多级列表现在将显示您的更改。

如何将多级列表转换为新样式 (How to Turn Your Multilevel List into a New Style)
After customizing you multilevel list just the way you want it, you may find yourself wanting to use that same formatting for other lists—even lists in other documents. You can do this by turning the list into a style.
在按照自己的方式自定义多级列表之后,您可能会发现自己想要对其他列表(甚至其他文档中的列表)使用相同的格式。 您可以通过将列表变成样式来实现。
Place your cursor anywhere on any line of your list, open the “Multilevel List” dropdown menu again, and this time, choose the “Define New List Style” option.
将光标放在列表的任何行上的任意位置,再次打开“多级列表”下拉菜单,然后选择“定义新列表样式”选项。
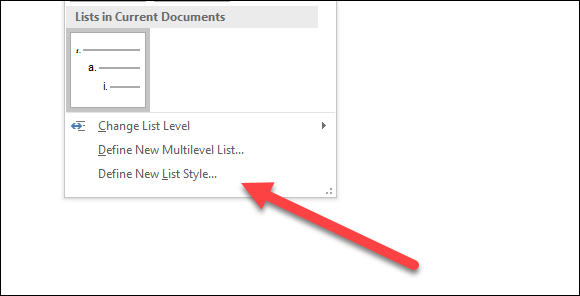
In the Define New List Style window, start by giving your new style a name.
在“定义新列表样式”窗口中,首先为您的新样式命名。
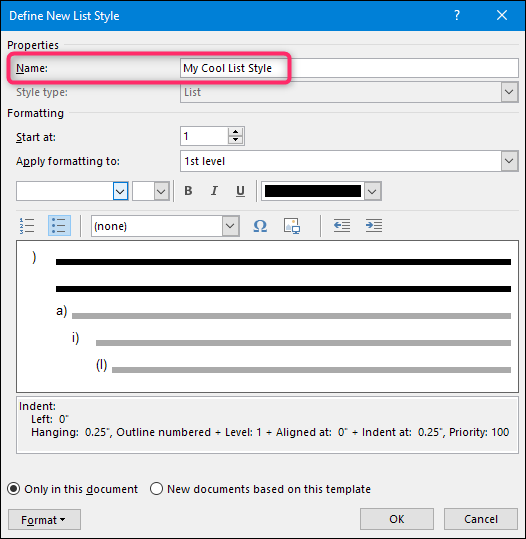
Now, there are a number of formatting options available in this window. You can change the font, character formatting, type (number or bullet), and several other things that you were also able to change when customizing your list.
现在,此窗口中有许多可用的格式设置选项。 您可以更改字体,字符格式,类型(数字或项目符号)以及自定义列表时也可以更改的其他几项。
While these options can be useful if you want to create a quick new multilist style from scratch (i.e., when you have not already created and customized a list you want to turn into a style), we highly recommend that you don’t bother with them. Instead, it’s much more effective to create your list, customize using the more powerful tools we talked about in the previous section, and then creating your style. The new style will include all those customizations you’ve already made to the list.
尽管如果您想从头开始创建快速的新多列表样式(例如,当您尚未创建和自定义要转换为样式的列表时),这些选项很有用,但我们强烈建议您不要打扰他们。 取而代之的是,创建列表,使用我们在上一节中讨论的功能更强大的工具进行自定义,然后创建样式的效果要好得多。 新样式将包括您已经对列表进行的所有自定义。
One option you will want to pay attention to is whether you want the style to be available only in the current document, or in new documents based on the template attached to the document. You’ll want to choose the latter if you need to access the style when you create other documents.
您将要注意的一个选项是您希望样式仅在当前文档中还是在基于文档所附模板的新文档中可用。 如果在创建其他文档时需要访问样式,则需要选择后者。
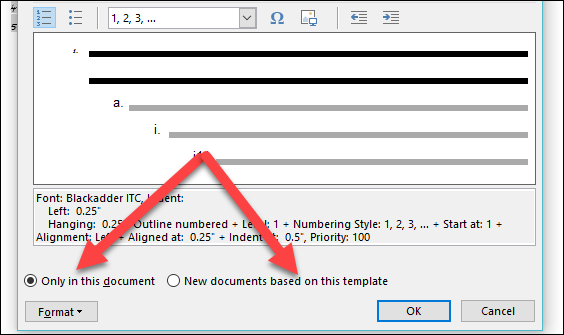
Choose what you want, and then click “OK” to save your new style.
选择所需的内容,然后单击“确定”以保存新样式。
Now, you’ll be able to choose that style (or any other list styles you’ve created) from the “Multilevel List” dropdown menu any time you want to create another multilevel list.
现在,您随时可以在要创建另一个多级列表时从“多级列表”下拉菜单中选择该样式(或您创建的任何其他列表样式)。

And now you know more than you ever wanted to know about creating multilevel lists in Word.
现在,您比在Word中创建多级列表要了解的知识更多。
翻译自: https://www.howtogeek.com/355561/how-to-create-and-work-with-multilevel-lists-in-microsoft-word/
word多级列表创建目录

的实现原理分析(3)...)

)


部署指南)


