参考:如何建立利用根证书(凭证)签发建立中继证书(凭证)详解
地址:https://qingmu.blog.csdn.net/article/details/108221568?spm=1001.2014.3001.5502
目录
- 在建立中继之前需要自建根证书
- 建立根证书的具体步骤
- 1、建立一个目录存放所有中继资料
- 2、进入中继目录,建立相关的文件夹
- 2.1、进入中继目录,建立相关的文件夹
- 2.2、更改private文件夹得权限
- 2.3、建立index.txt文件
- 2.4、建立serial
- 3、填写 OpenSSL 需要的配置文件
- 4、在中继凭证得目录中产生中继凭证得私钥
- 5、在中继凭证目录产生中继凭证的凭证签发申请
- 6、使用根凭证去签发中继凭证的凭证签发申请档, 产生中继凭证的凭证
- 6.1、签发凭证签发申请档, 有效期限是 3650 天.
- 6.2、变更签发的凭证的存取权限.
- 7、检查签发的中继凭证是否无误.
- 8、确认中继凭证是由根凭证所签发.
- 9、产生中继凭证的凭证串链
- 9.1、回到中继凭证目录来
- 10、中继凭证建立完成
在建立中继之前需要自建根证书
自建根证书详解,参照之前的博文
需要安装openssl库
sudo apt-get install openssl
我们在建立根证书的前提下来建立中继
建立根证书的具体步骤
1、建立一个目录存放所有中继资料

2、进入中继目录,建立相关的文件夹
2.1、进入中继目录,建立相关的文件夹
cd intermediate
mkdir private csr cert chain signed_certs

这些文件夹得作用:
| 文件 | 作用 |
|---|---|
| private | 存放中继凭证的私钥. |
| csr | 存放中继凭证的凭证签发申请档. |
| cert | 存放中继凭证的凭证串链 |
| chain | 存放中继凭证的凭证. |
| signed_certs | 存放中继凭证签发过的凭证的副本. |
2.2、更改private文件夹得权限
chmod 700 private2.3、建立index.txt文件
建立 index.txt, 此档案会用来纪录中继凭证签发过的凭证的纪录, 每次中继凭证签发凭证OpenSSL 会自动更新此档案.(具体没什么用但必须要有)
touch index.txt2.4、建立serial
建立 serial, 并在档案中填入 0001, 被签发的凭证都会有序号的栏位, 纪录此凭证在上一层签发单位所签发的凭证的序号, 此档案会用来纪录中继凭证签发的凭证的序号, 每次中继凭证签发凭证 OpenSSL 会自动更新此档案(具体没什么用但必须要有)
echo 0001 > serial3、填写 OpenSSL 需要的配置文件
文件名:openssl_intermediate_ca.cnf
位置:intermediate目录下
用vim打开,然后复制下面得内容进去,注意路径要修改
[ ca ]
default_ca = CA_default[ CA_default ]
# # 放置相关的文件和目录.
dir           = /home/qingmu/works/ca/intermediate
certs         = $dir/cert
new_certs_dir = $dir/signed_certs
database      = $dir/index.txt
serial        = $dir/serial
RANDFILE      = $dir/private/.rand# 放置私钥和证书的路径.
private_key   = $dir/private/intermediate_ca.key.pem
certificate   = $dir/cert/intermediate_ca.cert.pemdefault_md    = sha256name_opt      = ca_default
cert_opt      = ca_default
default_days  = 365
preserve      = no
policy        = policy_defualt[ policy_defualt ]
countryName            = optional
stateOrProvinceName    = optional
organizationName       = optional
organizationalUnitName = optional
commonName             = supplied
emailAddress           = optional[ req ]
# req 工具需要的參数.
default_bits       = 2048
distinguished_name = req_distinguished_name
string_mask        = utf8only
default_md         = sha256[ req_distinguished_name ]
# 产生凭证时要输入的资料的说明
countryName            = Country Name (2 letter code)
stateOrProvinceName    = State or Province Name
localityName           = Locality Name
0.organizationName     = Organization Name
organizationalUnitName = Organizational Unit Name
commonName             = Common Name
emailAddress           = Email Address[ server_cert ]
# 签发服务器凭证时使用
basicConstraints = CA:FALSE
nsCertType = server
nsComment = "OpenSSL Generated Server Certificate"
subjectKeyIdentifier = hash
authorityKeyIdentifier = keyid,issuer:always
keyUsage = critical, digitalSignature, keyEncipherment
extendedKeyUsage = serverAuth[ client_cert ]
# 签发客户端凭证时使用
basicConstraints = CA:FALSE
nsCertType = client, email
nsComment = "OpenSSL Generated Client Certificate"
subjectKeyIdentifier = hash
authorityKeyIdentifier = keyid,issuer
keyUsage = critical, nonRepudiation, digitalSignature, keyEncipherment
extendedKeyUsage = clientAuth, emailProtection
4、在中继凭证得目录中产生中继凭证得私钥
文件名:intermediate_ca.key.pem
位置:ca/intermediate/private
使用命令:
openssl genrsa -aes256 -out private/intermediate_ca.key.pem 4096
会提示输入密码,也就是:bob123  (信息可以自己随意输入)
Enter pass phrase for private/intermediate_ca.key.pem:bob123
再次确认密码:
Verifying - Enter pass phrase for private/intermediate_ca.key.pem:bob123

更改私钥的权限,使其只读
chmod 400 private/intermediate_ca.key.pem5、在中继凭证目录产生中继凭证的凭证签发申请
输入命令:
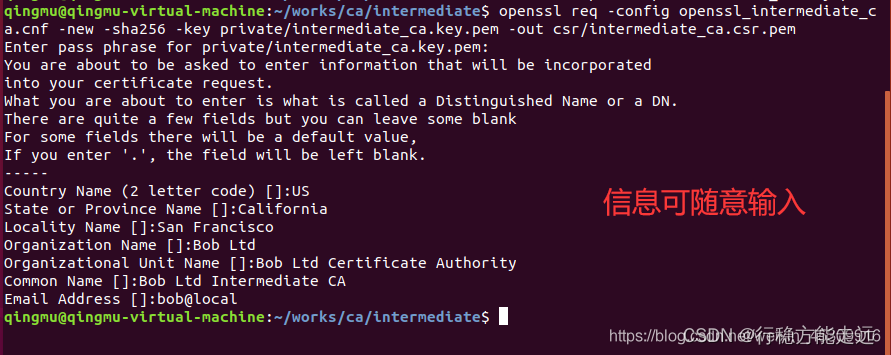
openssl req -config openssl_intermediate_ca.cnf -new -sha256 -key private/intermediate_ca.key.pem -out csr/intermediate_ca.csr.pem
 会提示输入私钥密码, 也就是 bob123
Enter pass phrase for private/intermediate_ca.key.pem:bob123接著需要输入凭证拥有者的信息:
You are about to be asked to enter information that will be incorporated into your certificate request.
What you are about to enter is what is called a Distinguished Name or a DN.
There are quite a few fields but you can leave some blank For some fields there will be a default value,
If you enter '.', the field will be left blank.所在国家的缩写, 2 个字母, 例如
Country Name (2 letter code) []:US
所在的州或省.
State or Province Name []:California
所在的城市.
Locality Name []:San Francisco
所在的公司.
Organization Name []:Bob Ltd
所在的公司的单位.
Organizational Unit Name []:Bob Ltd Certificate Authority
证书名称
Common Name []:Bob Ltd Intermediate CA
邮箱.
Email Address []:bob@local

6、使用根凭证去签发中继凭证的凭证签发申请档, 产生中继凭证的凭证
文件名:intermediate_ca.cert.pem
注意:回到root目录下来操作

6.1、签发凭证签发申请档, 有效期限是 3650 天.
输入命令:
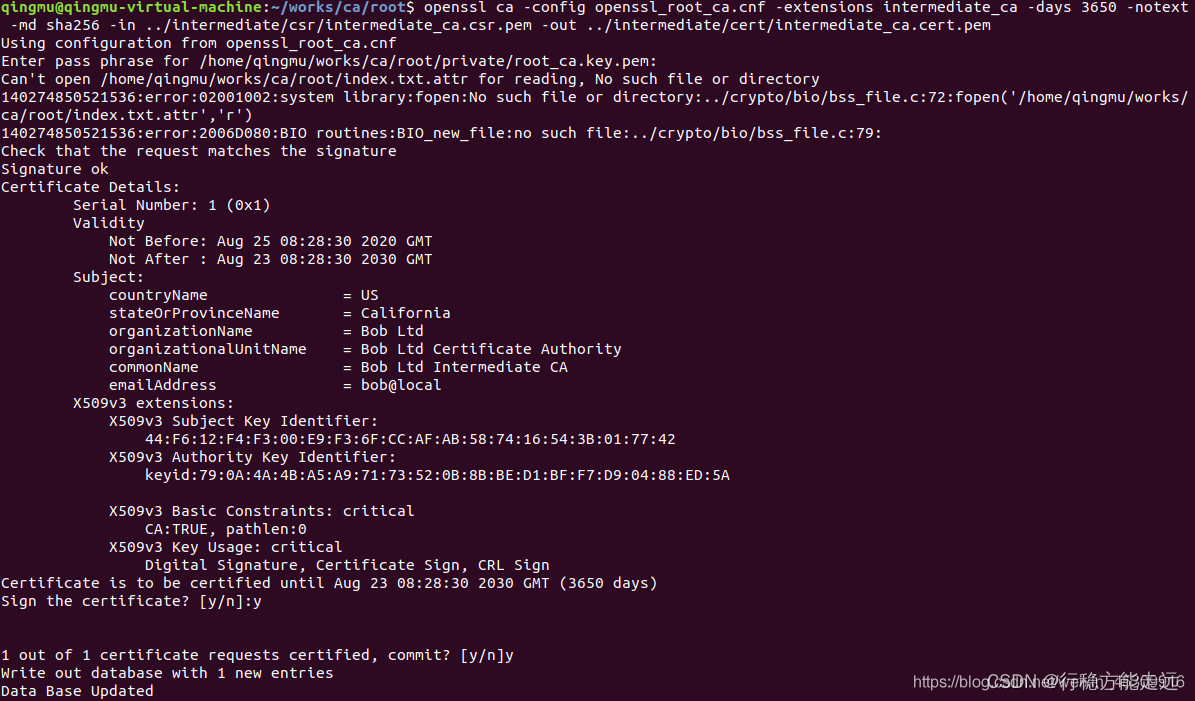
openssl ca -config openssl_root_ca.cnf -extensions intermediate_ca -days 3650 -notext -md sha256 -in ../intermediate/csr/intermediate_ca.csr.pem -out ../intermediate/cert/intermediate_ca.cert.pem
# 会提示需要输入根凭证的私钥密码, 也就是 alice123
Enter pass phrase for /ca/root/private/root_ca.key.pem:alice123# 接著会显示要签发的凭证签发申请档的内容.
Check that the request matches the signature
Signature ok
Certificate Details:
...
# 并询问是否签发, 输入 y
Sign the certificate? [y/n]:y
# 以及询问是否纪录签发的凭证到资料库 (index.txt, serial), 输入 y
1 out of 1 certificate requests certified, commit? [y/n]y

6.2、变更签发的凭证的存取权限.
chmod 444 ../intermediate/cert/intermediate_ca.cert.pem

7、检查签发的中继凭证是否无误.
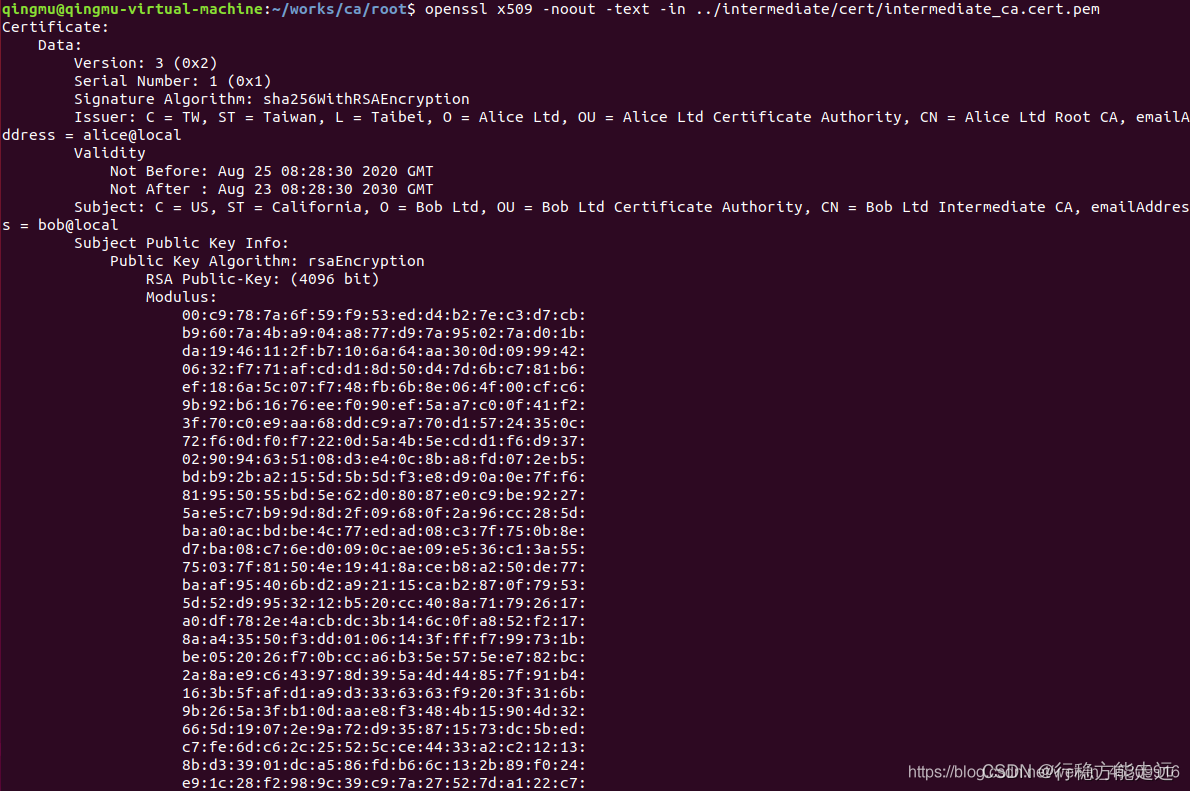
输入命令:
openssl x509 -noout -text -in ../intermediate/cert/intermediate_ca.cert.pem
# 使用的算法
Signature Algorithm: sha256WithRSAEncryption# 公钥的长度
Subject Public Key Info:Public-Key: (4096 bit)# 有效日期.
Validity:Not Before: Aug  4 23:56:43 2017 GMTNot After : Aug  4 23:56:43 2027 GMT# 主旨 (Bob 的资料).
Subject: C=US, ST=Unit State, O=Bob Ltd, OU=Bob Ltd Certificate Authority, CN=Bob Ltd Intermediate CA/emailAddress=bob@local# 签发者 (Alice 的资料).
Issuer: C=TW, ST=Taiwan, L=Taipei, O=Alice Ltd, OU=Alice Ltd Certificate Authority, CN=Alice Ltd Root CA/emailAddress=alice@local

8、确认中继凭证是由根凭证所签发.
输入命令:
openssl verify -CAfile cert/root_ca.cert.pem ../intermediate/cert/intermediate_ca.cert.pem
显示 OK 表示正确.
../intermediate/cert/intermediate_ca.cert.pem: OK

9、产生中继凭证的凭证串链
文件名:chain_ca.cert.pem
浏览器在验证网站传来的凭证是否可信任时, 需要验证从 根凭证 -> 中继凭证-1 -> … -> 中继凭证-N -> 终端凭证 整个串链, 所以网站在传送凭证时是传送整个串链的凭证给浏览器.
因此凭证中心除了签发凭证给对方之外, 还必须将上层凭证中心给的凭证串链加上自己的凭证产生新的凭证串链, 再将新的凭证串链给对方.
凭证串链的格式是:
-----BEGIN CERTIFICATE-----
凭证 1 内容.:
-----END CERTIFICATE-----
-----BEGIN CERTIFICATE-----
凭证 2 内容:
-----END CERTIFICATE-----
...
-----BEGIN CERTIFICATE-----
凭证 N 內容:
-----END CERTIFICATE-----凭证串链内凭证的顺序是自己的凭证在最前面, 所以就是.
-----BEGIN CERTIFICATE-----
中继凭证-N.
-----END CERTIFICATE-----
...
-----BEGIN CERTIFICATE-----
中继凭证-1.
-----END CERTIFICATE-----
-----BEGIN CERTIFICATE-----
根凭证
-----END CERTIFICATE-----应用程式必须自己拥有对方的凭证的根凭证, 表示信任此根凭证所签发的凭证, 才有办法验证对方传来的凭证串链, 所以实际使用时凭证串链可以不包含根凭证部分.
9.1、回到中继凭证目录来
cd ../intermediate
产生凭证串链 (包含根凭证)
cat cert/intermediate_ca.cert.pem ../root/cert/root_ca.cert.pem > chain/chain.cert.pem
变更凭证串链的存取权限
chmod 444 chain/chain.cert.pem

建立服务器证书)


)

建立客户端证书)


)


