说明:本文也是参考互联网上的文章写的,感谢相关作者的贡献。
操作系统
64位CentOS Linux release 7.2.1511 (Core)
配置好IP:192.168.1.160
修改yum源
目的是提升对docker的下载速度。
1.备份你的原镜像文件,以免出错后可以恢复。
[root@localhost ~]# mv /etc/yum.repos.d/CentOS-Base.repo /etc/yum.repos.d/CentOS-Base.repo.backup 2.下载新的CentOS-Base.repo 到/etc/yum.repos.d/
[root@localhost ~]# wget -O /etc/yum.repos.d/CentOS-Base.repo http://mirrors.aliyun.com/repo/Centos-7.repo 3.运行yum makecache生成缓存
[root@localhost ~]# yum clean all
[root@localhost ~]# yum makecache
安装Docker
[root@localhost ~]# yum -y install docker-io 要稍等几分钟才能安装好。网速快的话几十秒吧。
启动Docker
[root@localhost ~]# systemctl start docker
发现会报错:
Job for docker.service failed because the control process exited with error code. See "systemctl status docker.service" and "journalctl -xe" for details.
按照提示执行:
[root@localhost ~]# systemctl status docker.service
会有提示信息如下:
● docker.service - Docker Application Container EngineLoaded: loaded (/usr/lib/systemd/system/docker.service; disabled; vendor preset: disabled)Active: failed (Result: exit-code) since 三 2018-05-02 23:34:46 CST; 52s agoDocs: http://docs.docker.comProcess: 14416 ExecStart=/usr/bin/dockerd-current --add-runtime docker-runc=/usr/libexec/docker/docker-runc-current --default-runtime=docker-runc --exec-opt native.cgroupdriver=systemd --userland-proxy-path=/usr/libexec/docker/docker-proxy-current --seccomp-profile=/etc/docker/seccomp.json $OPTIONS $DOCKER_STORAGE_OPTIONS $DOCKER_NETWORK_OPTIONS $ADD_REGISTRY $BLOCK_REGISTRY $INSECURE_REGISTRY $REGISTRIES (code=exited, status=1/FAILURE)Main PID: 14416 (code=exited, status=1/FAILURE)5月 02 23:34:45 localhost.localdomain systemd[1]: Starting Docker Application Container Engine...
5月 02 23:34:45 localhost.localdomain dockerd-current[14416]: time="2018-05-02T23:34:45.527821208+08:00" level=warning msg="could not change group /var/run/...t found"
5月 02 23:34:45 localhost.localdomain dockerd-current[14416]: time="2018-05-02T23:34:45.532650572+08:00" level=info msg="libcontainerd: new containerd proce...: 14421"
5月 02 23:34:46 localhost.localdomain dockerd-current[14416]: time="2018-05-02T23:34:46.539484373+08:00" level=warning msg="overlay2: the backing xfs filesystem is ...
5月 02 23:34:46 localhost.localdomain dockerd-current[14416]: Error starting daemon: SELinux is not supported with the overlay2 graph driver on this kernel....d=false)
5月 02 23:34:46 localhost.localdomain systemd[1]: docker.service: main process exited, code=exited, status=1/FAILURE
5月 02 23:34:46 localhost.localdomain systemd[1]: Failed to start Docker Application Container Engine.
5月 02 23:34:46 localhost.localdomain systemd[1]: Unit docker.service entered failed state.
5月 02 23:34:46 localhost.localdomain systemd[1]: docker.service failed.
Hint: Some lines were ellipsized, use -l to show in full.
红色部分告诉我们此linux的内核中的SELinux不支持 overlay2 graph driver,解决方法有两个,要么启动一个新内核,要么就在docker里禁用selinux,设置--selinux-enabled=false。我们采用第二种方式。
[root@localhost ~]# vi /etc/sysconfig/docker 然后将--selinux-enabled设置成false,保存并退出。
# /etc/sysconfig/docker# Modify these options if you want to change the way the docker daemon runs
OPTIONS='--selinux-enabled=false --log-driver=journald --signature-verification=false'
if [ -z "${DOCKER_CERT_PATH}" ]; thenDOCKER_CERT_PATH=/etc/docker
fi
# ......省略N行
重新启动
[root@localhost ~]# systemctl start docker
查看版本号
[root@localhost ~]# docker -v
Docker version 1.13.1, build 774336d/1.13.1
至此docker启动成功
修改Docker镜像加速器
因为国外的docker镜像访问太慢,所以我们需要修改成阿里云的docker镜像。这样从国内镜像拉取速度会快点。
1.打开阿里云docker仓库地址https://dev.aliyun.com/search.html
2.淘宝账号即可登录,登录后点击自己的管理中心。
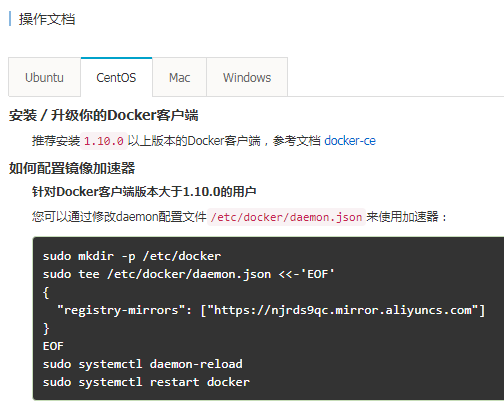
3.点击管理中心左侧菜单栏的“镜像加速器”,右边面板会有你的加速地址,面板下面有详细设置步骤。如下图:

[root@localhost ~]# vi /etc/docker/daemon.json 将下面整行字符拷贝进去,保存并退出。
"registry-mirrors": ["https://njrds9qc.mirror.aliyuncs.com"]
刷新daemon
[root@localhost ~]# systemctl daemon-reload
重启docker
[root@localhost ~]# systemctl restart docker
拉取镜像
以hello-world为例
[root@localhost tmp]# docker pull hello-world
Using default tag: latest
Trying to pull repository docker.io/library/hello-world ...
latest: Pulling from docker.io/library/hello-world
9bb5a5d4561a: Pull complete
Digest: sha256:f5233545e43561214ca4891fd1157e1c3c563316ed8e237750d59bde73361e77
Status: Downloaded newer image for docker.io/hello-world:latest
表示成功拉取
运行镜像
[root@localhost tmp]# docker run hello-worldHello from Docker!
This message shows that your installation appears to be working correctly.To generate this message, Docker took the following steps:1. The Docker client contacted the Docker daemon.2. The Docker daemon pulled the "hello-world" image from the Docker Hub.(amd64)3. The Docker daemon created a new container from that image which runs theexecutable that produces the output you are currently reading.4. The Docker daemon streamed that output to the Docker client, which sent itto your terminal.To try something more ambitious, you can run an Ubuntu container with:$ docker run -it ubuntu bashShare images, automate workflows, and more with a free Docker ID:https://hub.docker.com/

For more examples and ideas, visit:https://docs.docker.com/engine/userguide/
成功运行。
简单操作命令
镜像
docker pull 镜像名称[:版本]
拉取镜像,如果版本为空,则拉取最新的版本
docker run 镜像名称或ID
运行镜像,创建容器
docker run -it 镜像名称或ID
运行镜像,创建容器,并进入该容器。
-i表示以交互模式运行容器,通常与 -t 同时使用;
-t表示为容器重新分配一个伪输入终端,通常与 -i 同时使用;
另外还有很多参数,可参考http://www.runoob.com/docker/docker-run-command.html
docker rmi 镜像名称或ID
根据名称或ID删除镜像
容器
docker ps
列出容器
-a显示所有的容器,包括未运行的
-q 静默模式,只显示容器编号,通常和-a一起使用,docker ps -aq
docker rm 容器名称或ID
根据名称或者ID删除容器,如果带上参数-f,表示强制删除正在运行的容器
docker rm $(docker ps -aq)
表示删除所有容器
docker start 容器名称或ID
根据名称或者ID启动容器
docker stop 容器名称或ID
根据名称或者ID停止容器
docker attach id
进入某个容器(使用exit退出后容器也跟着停止运行)
docker exec -ti id
启动一个伪终端以交互式的方式进入某个容器(使用exit退出后容器不停止运行)


![[转] SQL2000 关于 Java JDBC 驱动的安装和设定](http://pic.xiahunao.cn/[转] SQL2000 关于 Java JDBC 驱动的安装和设定)

——set查找)


)


![[Swift]LeetCode556. 下一个更大元素 III | Next Greater Element III](http://pic.xiahunao.cn/[Swift]LeetCode556. 下一个更大元素 III | Next Greater Element III)

![html中name和id的区别 [ZT]](http://pic.xiahunao.cn/html中name和id的区别 [ZT])


)

