【C++】郭老二博文之:C++目录
1、XML测试文件(laoer.xml)
<?xml version="1.0" standalone="no" ?>
<!-- Hello World !-->
<root><child name="childName" id="1"><c_child name="c_child1Name" id="1">Text</c_child><c_child name="c_child2Name" id="2">Text</c_child><c_child name="c_child3Name" id="3">Text</c_child></child><child name="childName" id="2">Text</child><child name="childName" id="3"><c_child name="c_child1Name" id="1">Text</c_child><c_child name="c_child2Name" id="2">Text</c_child><c_child name="c_child3Name" id="3">Text</c_child><c_child name="c_child4Name" id="4">Text</c_child><c_child name="c_child5Name" id="5">Text</c_child><c_child name="c_child6Name" id="6">Text</c_child></child><child1 name="child1Name" id="4">Text</child1><child2 name="child1Name" id="5">Text</child1><child3 name="child1Name" id="6">Text</child1>
</root>
2、读取文件并打印
加载xml文件:TiXmlDocument::LoadFile()
获取错误信息:TiXmlDocument::ErrorDesc()
打印XML内容:TiXmlDocument::Print( stdout )
#include <iostream>
#include <sstream>#include "tinyxml.h"using namespace std;int main()
{TiXmlDocument doc( "laoer.xml" );bool loadOkay = doc.LoadFile();if ( !loadOkay ){printf( "Could not load file 'gw.xml'. Error='%s'. Exiting.\n", doc.ErrorDesc() );exit( 1 );}doc.Print( stdout );
}
4、属性相关接口
4.1 获取属性
获取属性有四类接口
- Attribute :获取属性,如果返回空,则表示不存在
- QueryStringAttribute:获取属性,返回值“错误检查”值
- C++ STL(使用std::string)
- C++模版接口
1)Attribute 原型如:
const char* Attribute( const char* name ) const;
const char* Attribute( const char* name, int* i ) const;
const char* Attribute( const char* name, double* d ) const;
……
2)QueryStringAttribute 原型如:
int QueryIntAttribute( const char* name, int* _value ) const;
int QueryDoubleAttribute( const char* name, double* _value ) const;
……
3)C++ STL(使用std::string) 原型如:
const std::string* Attribute( const std::string& name ) const;
const std::string* Attribute( const std::string& name, int* i ) const;
const std::string* Attribute( const std::string& name, double* d ) const;int QueryIntAttribute( const std::string& name, int* _value ) const;
int QueryDoubleAttribute( const std::string& name, double* _value ) const;
……
4)C++模版接口 原型如:
template< typename T > int QueryValueAttribute( const std::string& name, T* outValue ) const
4.2 设置属性
1)SetAttribute 原型如:
void SetAttribute( const char* name, const char * _value );
void SetAttribute( const char * name, int value );
2)SetDoubleAttribute 原型如:
void SetDoubleAttribute( const char * name, double value );
3)C++STL(使用std::string) 原型如:
void SetAttribute( const std::string& name, const std::string& _value );
void SetAttribute( const std::string& name, int _value );
void SetDoubleAttribute( const std::string& name, double value );
void printNameID(const TiXmlElement * const element)
{std::string name;if (element->QueryStringAttribute( "name", &name ) != TIXML_SUCCESS){std::cout << "[ERR] QueryStringAttribute " << std::endl;}int id = -1;if (!element->Attribute("id", (int*)&id)){std::cout << "[ERR] Attribute(id " << std::endl;}std::cout << "name = " << name <<"; id = " <<id << std::endl;
}
4.3 删除属性
void RemoveAttribute( const char * name );
void RemoveAttribute( const std::string& name )
5、遍历子元素
1)返回第一个子元素:TiXmlElement* TiXmlNode::FirstChildElement()
2)返回第一个匹配“value”的子元素:TiXmlElement* TiXmlElement* FirstChildElement( const std::string& _value )
3)返回下一个兄弟元素:TiXmlElement* NextSiblingElement()
4)返回下一个匹配“value”的兄弟元素:TiXmlElement* NextSiblingElement( const std::string& _value)
#include <iostream>
#include <sstream>#include "tinyxml.h"using namespace std;int main()
{TiXmlDocument doc( "laoer.xml" );TiXmlNode* rootNode = 0;TiXmlElement* rootElement = 0;rootNode = doc.FirstChild( "root" );rootElement = rootNode->ToElement();for( childElement = rootElement->FirstChildElement("child");childElement;childElement = childElement->NextSiblingElement("child") ){printNameID(childElement);}
}
6、TiXmlHandle 类
6.1 检查空指针
TiXmlHandle主要用来检测空节点指针(null)的类。
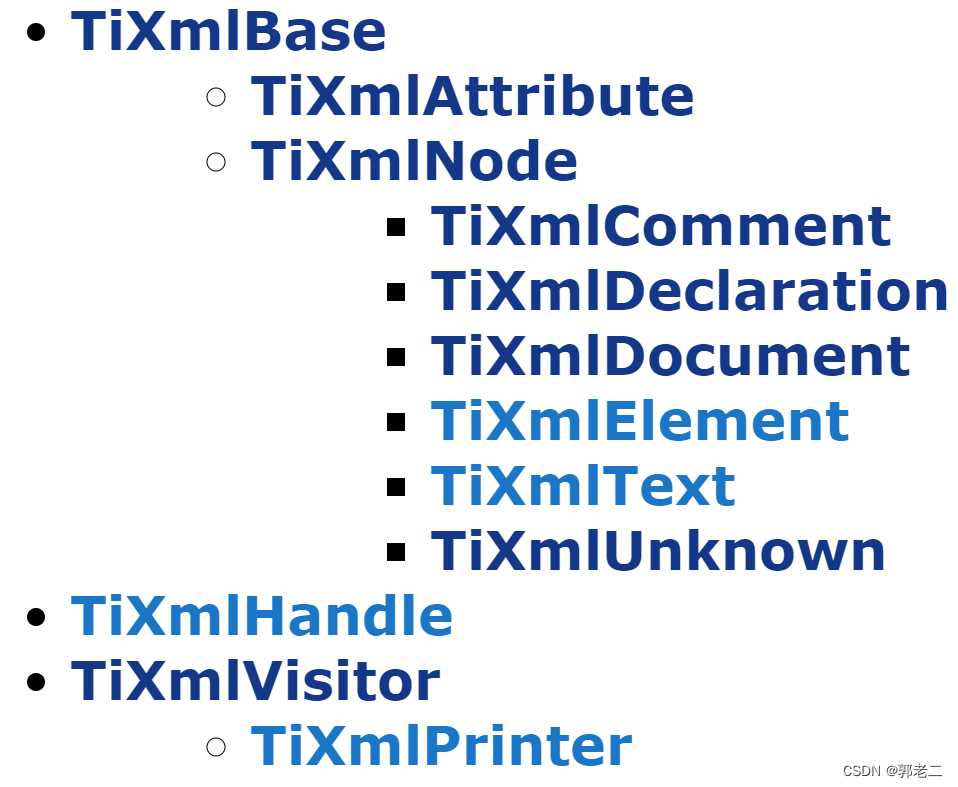
注意:TiXmlHandle 不是DOM 元素树的一部分,类关系如下

例如,遍历如下XML文档:
<Document><Element attributeA = "valueA"><Child attributeB = "value1" /><Child attributeB = "value2" /></Element>
<Document>
TiXmlElement每次获取子元素后,都需要检查是否为NULL,否则操作NULL空指针将会报错
TiXmlElement* root = document.FirstChildElement( "Document" );
if ( root )
{TiXmlElement* element = root->FirstChildElement( "Element" );if ( element ){TiXmlElement* child = element->FirstChildElement( "Child" );if ( child ){TiXmlElement* child2 = child->NextSiblingElement( "Child" );if ( child2 ){// Finally do something useful.
使用 TiXmlHandle 可以简化上面的操作
TiXmlHandle docHandle( &document );
TiXmlElement* child2 = docHandle.FirstChild( "Document" ).FirstChild( "Element" ).Child( "Child", 1 ).ToElement();
if ( child2 )
{// do something useful
6.2 遍历元素
下面使用while循环遍历元素,看上去很合理,其实Child方法内部是一个线性遍历来查找元素,即下面的示例是两个嵌入的while循环
int i=0;
while ( true ){TiXmlElement* child = docHandle.FirstChild( "Document" ).FirstChild( "Element" ).Child( "Child", i ).ToElement();if ( !child )break;// do something++i;}
代替方法:
TiXmlElement* child = docHandle.FirstChild( "Document" ).FirstChild( "Element" ).FirstChild( "Child" ).ToElement();for( child; child; child=child->NextSiblingElement("Child") )
{// do something
}
注意上面 NextSiblingElement(“Child”) 和 NextSiblingElement()的区别
6.3 常用接口
TiXmlHandle FirstChild() const;//返回第一个子节点的句柄:
TiXmlHandle FirstChild( const std::string& _value ) const; //返回给定名称的第一个子节点的句柄。
TiXmlHandle FirstChildElement() const;//返回第一个子元素的句柄。
TiXmlHandle FirstChildElement( const std::string& _value ) const;//返回给定名称的第一个子元素的句柄。
TiXmlHandle Child( int index ) const;//返回指定索引“index”子节点的句柄。
TiXmlHandle Child( const std::string& _value, int index ) const;//返回给定名称、指定索引“index”子节点的句柄。
TiXmlHandle ChildElement( int index ) const;//返回指定索引“index”子元素的句柄。
TiXmlHandle ChildElement( const std::string& _value, int index ) const//返回给定名称、指定索引“index”子元素的句柄。
获取节点、元素、文本、未知元素的接口
TiXmlNode* ToNode() const
TiXmlElement* ToElement() const
TiXmlText* ToText() const
TiXmlUnknown* ToUnknown() const
7、创建XML
1)TiXmlNode* InsertEndChild( const TiXmlNode& addThis );
在“最后子节点”后添加新节点。如果发生错误则返回NULL。(addThis)是const引用,在内部会被复制addThis.Clone()
2)TiXmlNode* LinkEndChild( TiXmlNode* addThis );
在“最后子节点”后添加新节点,这里addThis 是指针,将被作为链表的一个项,插入到链表中,因此它内存管理将有父节点TiXmlNode接管。
3)TiXmlNode* InsertBeforeChild( TiXmlNode* beforeThis, const TiXmlNode& addThis );
在指定子节点之前添加子节点。
4)TiXmlNode* InsertAfterChild( TiXmlNode* afterThis, const TiXmlNode& addThis );
在指定的子元素之后添加子元素。
5)TiXmlNode* ReplaceChild( TiXmlNode* replaceThis, const TiXmlNode& withThis );
替换指定的节点
6)bool RemoveChild( TiXmlNode* removeThis );
删除指定的节点
#include <iostream>
#include <sstream>#include "tinyxml.h"using namespace std;int main()
{TiXmlDocument doc( "laoer.xml" );TiXmlNode* rootNode = 0;TiXmlElement* rootElement = 0;// 创建新节点 "child3"TiXmlElement child( "child3" );child.SetAttribute( "name", "child3" );child.SetAttribute( "id", "8" );// 创建节点文本TiXmlText text( "text" );// 创建孙子节点1TiXmlElement c_child1( "c_child" );c_child1.SetAttribute( "name", "c_child1" );c_child1.SetAttribute( "id", "1" );// 创建孙子节点2TiXmlElement c_child2( "c_child" );c_child2.SetAttribute( "name", "c_child2" );c_child2.SetAttribute( "id", "2" );// 组装子节点child.InsertEndChild( text );child.InsertEndChild( c_child1 );child.InsertEndChild( c_child2 );// 获取插入点位置,将新节点插入到指定位置childElement = rootElement->FirstChildElement("child2");rootElement->InsertAfterChild( childElement, child );doc.Print( stdout );doc.SaveFile();
}
修改后的XML如下,请自行和博文开头的做对比
<?xml version="1.0" standalone="no" ?>
<!-- Hello World !-->
<root><child name="childName" id="1"><c_child name="c_child1Name" id="1">Text</c_child><c_child name="c_child2Name" id="2">Text</c_child><c_child name="c_child3Name" id="3">Text</c_child></child><child name="childName" id="2">Text</child><child name="childName" id="3"><c_child name="c_child1Name" id="1">Text</c_child><c_child name="c_child2Name" id="2">Text</c_child><c_child name="c_child3Name" id="3">Text</c_child><c_child name="c_child4Name" id="4">Text</c_child><c_child name="c_child5Name" id="5">Text</c_child><c_child name="c_child6Name" id="6">Text</c_child></child><child1 name="child1Name" id="4">Text</child1><child2 name="child1Name" id="5">Text</child2><child3 name="child3" id="8">text<c_child name="c_child1" id="1" /><c_child name="c_child2" id="2" /></child3><child3 name="child1Name" id="6">Text</child3>
</root>


—— 算例制作:开闸式异重流(lock-exchange flow))


移植tiny4412_backlight驱动的过程及问题解决)

