目录
- 一、项目准备
- spring项目
- 数据库
- 二、传统锁
- 演示超卖现象
- 使用JVM锁解决超卖
- 解决方案
- JVM失效场景
- 使用一个SQL解决超卖
- 使用mysql悲观锁解决超卖
- 使用mysql乐观锁解决超卖
- 四种锁比较
- Redis乐观锁
- 集成Redis
- 超卖现象
- redis乐观锁解决超卖
- 三、分布式锁概述
- 四、Redis分布式锁
- 实现方案
- 分布式锁实现
- 循环重试
- 防止死锁
- 防误删
- Lua脚本解决删除锁一致性
- 实现可重入
- lua脚本
- 加锁流程
- 解锁流程
- 代码编写
- 分布式锁使用
- 可重入性
- 自动续期
- RedLock算法
- 五、Redisson分布式锁
- Redisson介绍
- Redisson简单使用
- Redisson常用配置
- 通用配置
- 单机版
- 集群版
- Redisson原理
- 建立连接
- 加锁原理
- 自动续期
- 解锁原理
- 公平锁
- 读写锁
- 信号量
- 闭锁
- Redisson分布式锁考虑问题
- **1.续期问题**
- **2.可用性**
- **3.可重入性**
- **4.死锁检测与恢复**
- 六、ZooKeeper分布式锁
- ZooKeeper概述
- ZooKeeper原理
- Java使用ZooKeeper
- ZooKeeper实现分布式锁
- 基本实现
- 优化:阻塞锁
- 优化:可重入
- Zookeeper分布式锁总结
- Curator中的分布式锁
- Curator概述
- 引入依赖
- 使用InterProcessMutex分布式锁
- Curator中其他锁
- 七、MySQL分布式锁
- 思路
- 代码实现
- 分析
- 八、分布式锁总结
一、项目准备
spring项目
创建一个spring项目,名称为distributed-lock,并创建对应的controller、service、mapper等包及文件,整体结构如下:
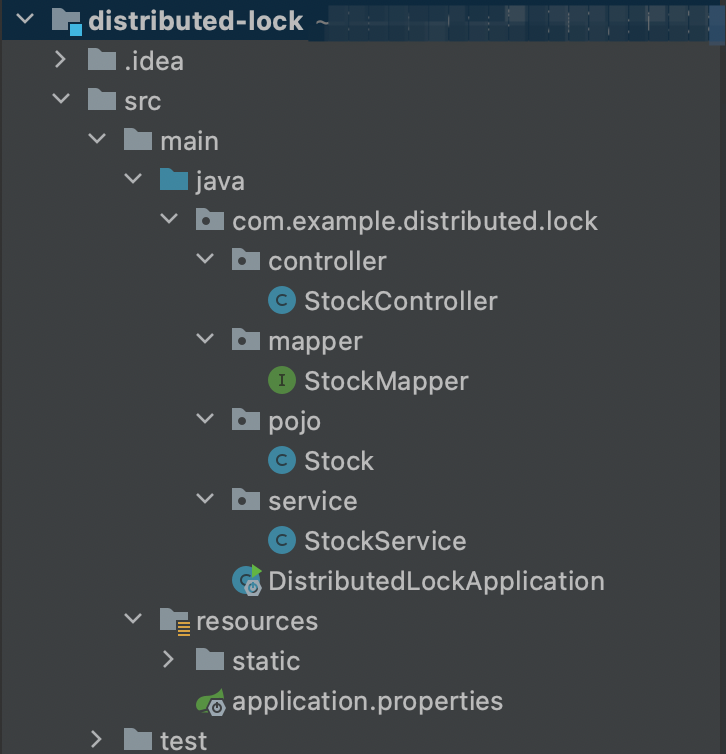
pom文件引入如下配置:
<?xml version="1.0" encoding="UTF-8"?>
<project xmlns="http://maven.apache.org/POM/4.0.0" xmlns:xsi="http://www.w3.org/2001/XMLSchema-instance"xsi:schemaLocation="http://maven.apache.org/POM/4.0.0 https://maven.apache.org/xsd/maven-4.0.0.xsd"><modelVersion>4.0.0</modelVersion><groupId>com.example</groupId><artifactId>distributed-lock</artifactId><version>0.0.1-SNAPSHOT</version><name>distributed-lock</name><description>Demo project for Spring Boot</description><properties><java.version>1.8</java.version><project.build.sourceEncoding>UTF-8</project.build.sourceEncoding><project.reporting.outputEncoding>UTF-8</project.reporting.outputEncoding><spring-boot.version>2.6.13</spring-boot.version></properties><dependencies><dependency><groupId>org.springframework.boot</groupId><artifactId>spring-boot-starter-web</artifactId></dependency><dependency><groupId>org.springframework.boot</groupId><artifactId>spring-boot-starter-test</artifactId><scope>test</scope></dependency><dependency><groupId>org.projectlombok</groupId><artifactId>lombok</artifactId></dependency><dependency><groupId>com.baomidou</groupId><artifactId>mybatis-plus-boot-starter</artifactId><version>3.4.2</version></dependency><dependency><groupId>mysql</groupId><artifactId>mysql-connector-java</artifactId></dependency></dependencies><dependencyManagement><dependencies><dependency><groupId>org.springframework.boot</groupId><artifactId>spring-boot-dependencies</artifactId><version>${spring-boot.version}</version><type>pom</type><scope>import</scope></dependency></dependencies></dependencyManagement><build><plugins><plugin><groupId>org.apache.maven.plugins</groupId><artifactId>maven-compiler-plugin</artifactId><version>3.8.1</version><configuration><source>1.8</source><target>1.8</target><encoding>UTF-8</encoding></configuration></plugin><plugin><groupId>org.springframework.boot</groupId><artifactId>spring-boot-maven-plugin</artifactId><version>${spring-boot.version}</version><configuration><mainClass>com.example.distributed.lock.DistributedLockApplication</mainClass><skip>true</skip></configuration><executions><execution><id>repackage</id><goals><goal>repackage</goal></goals></execution></executions></plugin></plugins></build></project>
配置文件 application.properties如下:
# 应用服务 WEB 访问端口
server.port=10010spring.datasource.driver-class-name=com.mysql.jdbc.Driver
spring.datasource.url=jdbc:mysql://127.0.0.1:3306/distributed_lock
spring.datasource.username=root
spring.datasource.password=123456
StockMapper.java文件如下:
package com.example.distributed.lock.mapper;import com.baomidou.mybatisplus.core.mapper.BaseMapper;
import com.example.distributed.lock.pojo.Stock;public interface StockMapper extends BaseMapper<Stock> {
}
实体类Stock如下:
package com.example.distributed.lock.pojo;import com.baomidou.mybatisplus.annotation.TableName;
import lombok.Data;@Data
@TableName("stock")
public class Stock {private Long id ;private String productCode;private String warehouse;private Integer count;}
StockService如下:
package com.example.distributed.lock.service;import com.baomidou.mybatisplus.core.conditions.query.QueryWrapper;
import com.example.distributed.lock.mapper.StockMapper;
import com.example.distributed.lock.pojo.Stock;
import lombok.extern.slf4j.Slf4j;
import org.springframework.beans.factory.annotation.Autowired;
import org.springframework.stereotype.Service;import javax.annotation.Resource;
import java.util.concurrent.locks.ReentrantLock;@Service
@Slf4j
public class StockService {private Stock stock = new Stock();/*** 减库存,不加锁*/public void deduct() {stock.setStock(stock.getStock() - 1);log.info("剩余库存:{}" , stock.getStock());}}
StockController代码如下:
package com.example.distributed.lock.controller;import com.example.distributed.lock.service.StockService;
import org.springframework.beans.factory.annotation.Autowired;
import org.springframework.stereotype.Controller;
import org.springframework.web.bind.annotation.GetMapping;
import org.springframework.web.bind.annotation.RestController;@RestController
public class StockController {@Autowiredprivate StockService stockService;@GetMapping("stock/deduct")public String deduct() {stockService.deduct();return "stock deduct success!";}}
数据库
数据库设计如下:
-- distributed_lock.stock definitionCREATE TABLE `stock` (`id` bigint NOT NULL AUTO_INCREMENT,`product_code` varchar(100) NOT NULL,`warehouse` varchar(100) CHARACTER SET utf8mb4 COLLATE utf8mb4_0900_ai_ci NOT NULL,`count` int NOT NULL,PRIMARY KEY (`id`)
) ENGINE=InnoDB AUTO_INCREMENT=2 DEFAULT CHARSET=utf8mb4 COLLATE=utf8mb4_0900_ai_ci;
上面实体类和表并不对应,后面会修改实体类。
二、传统锁
演示超卖现象
超卖是指在电商系统中,物品实际卖出的数量超过了库存数量。
使用jmeter模拟高并发场景。
创建一个线程组,如下:
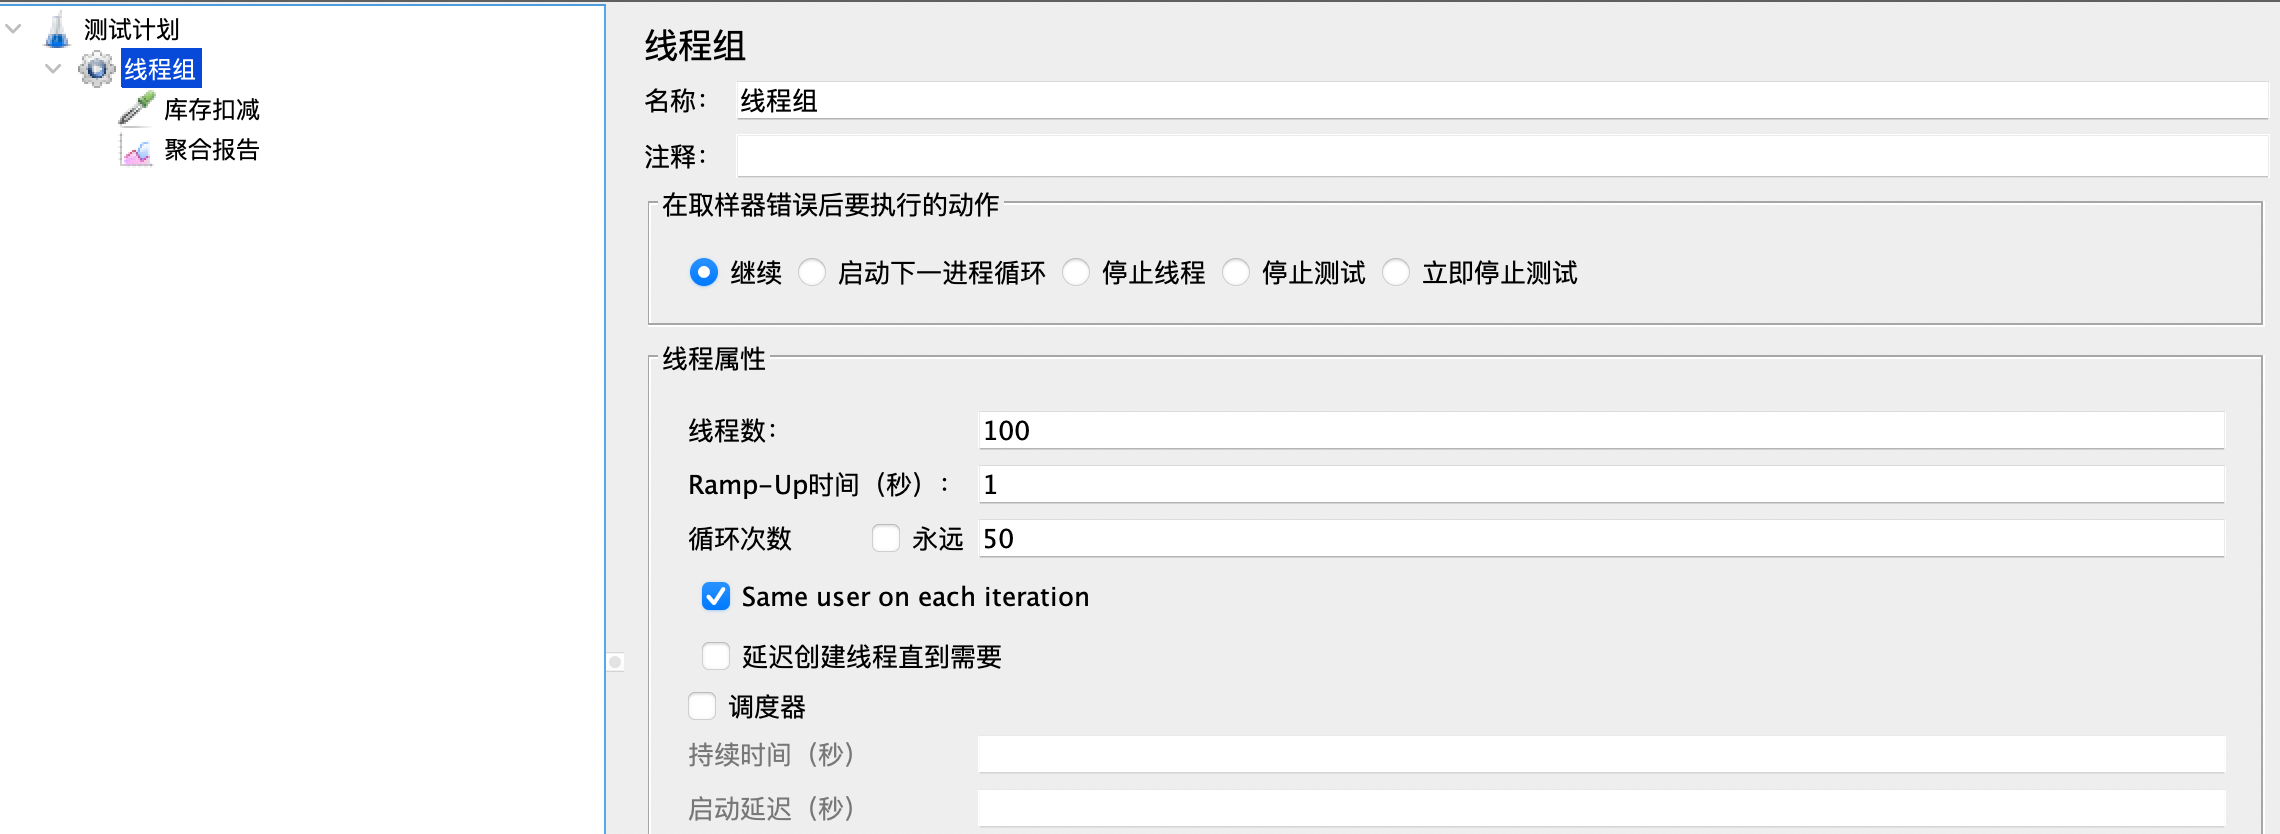
线程数100,运行是按1s,循环次数50,也就是每秒有100个请求同时发出,共发了50次。
创建一个http请求,如下:

启动distributed-lock项目,然后启动jmeter测试,可以看到日志打出的剩余库存并没有减到0,这就是由于多线程资源竞争导致的。
由于库存没有减到0,也就是可以继续售卖,实际售卖的数量就会超过5000,这就是超卖现象。
使用JVM锁解决超卖
解决方案
数据库表Stock加一条数据:
INSERT INTO distributed_lock.stock (id, product_code, warehouse, count) VALUES(1, '1001', '上海仓', 4999);
修改实体类Stock如下:
package com.example.distributed.lock.pojo;import com.baomidou.mybatisplus.annotation.TableName;
import lombok.Data;@Data
@TableName("stock")
public class Stock {private Long id ;private String productCode;private String warehouse;private Integer count;}
修改StockService如下:
package com.example.distributed.lock.service;import com.baomidou.mybatisplus.core.conditions.query.QueryWrapper;
import com.example.distributed.lock.mapper.StockMapper;
import com.example.distributed.lock.pojo.Stock;
import lombok.extern.slf4j.Slf4j;
import org.springframework.beans.factory.annotation.Autowired;
import org.springframework.stereotype.Service;import javax.annotation.Resource;
import java.util.concurrent.locks.ReentrantLock;@Service
@Slf4j
public class StockService {@Resourceprivate StockMapper stockMapper;/*** 库存扣减,数据库*/public void deduct() {Stock stock = stockMapper.selectOne(new QueryWrapper<Stock>().eq("product_code", "1001"));if (stock != null && stock.getCount() > 0) {stock.setCount(stock.getCount() - 1);stockMapper.updateById(stock);log.info("剩余库存:{}" , stock.getCount());}}
}
上面没有加锁,也会出现超卖现象。
要解决,也可以使用ReentrantLock进行加锁,如下:
package com.example.distributed.lock.service;import com.baomidou.mybatisplus.core.conditions.query.QueryWrapper;
import com.example.distributed.lock.mapper.StockMapper;
import com.example.distributed.lock.pojo.Stock;
import lombok.extern.slf4j.Slf4j;
import org.springframework.beans.factory.annotation.Autowired;
import org.springframework.stereotype.Service;import javax.annotation.Resource;
import java.util.concurrent.locks.ReentrantLock;@Service
@Slf4j
public class StockService {@Resourceprivate StockMapper stockMapper;private ReentrantLock lock = new ReentrantLock();/*** 库存扣减,数据库,加锁版*/public void deduct() {lock.lock();try {Stock stock = stockMapper.selectOne(new QueryWrapper<Stock>().eq("product_code", "1001"));if (stock != null && stock.getCount() > 0) {stock.setCount(stock.getCount() - 1);stockMapper.updateById(stock);log.info("剩余库存:{}" , stock.getCount());}} finally {lock.unlock();}}}
JVM失效场景
1. Spring多例模式
在Spring中,我们的StockService默认是单例的,但是如果是多例的,并且指定代理模式为如下,改成多例:
package com.example.distributed.lock.service;import com.baomidou.mybatisplus.core.conditions.query.QueryWrapper;
import com.example.distributed.lock.mapper.StockMapper;
import com.example.distributed.lock.pojo.Stock;
import lombok.extern.slf4j.Slf4j;
import org.springframework.beans.factory.annotation.Autowired;
import org.springframework.stereotype.Service;import javax.annotation.Resource;
import java.util.concurrent.locks.ReentrantLock;@Service
@Slf4j
// @Scope("singleton")
@Scope(value = "prototype", proxyMode = ScopedProxyMode.TARGET_CLASS)
public class StockService {@Resourceprivate StockMapper stockMapper;private ReentrantLock lock = new ReentrantLock();/*** 库存扣减,数据库,加锁版*/public void deduct() {lock.lock();try {Stock stock = stockMapper.selectOne(new QueryWrapper<Stock>().eq("product_code", "1001"));if (stock != null && stock.getCount() > 0) {stock.setCount(stock.getCount() - 1);stockMapper.updateById(stock);log.info("剩余库存:{}" , stock.getCount());}} finally {lock.unlock();}}}
那么本地锁ReentrantLock就会失效。因为ReentrantLock是对象锁,如果是多例,那么StockService的实例化对象就不是同一个对象了。
2. 事务
如果在减库存方法上加上事务,那么就可能导致锁失效,如下:
package com.example.distributed.lock.service;import com.baomidou.mybatisplus.core.conditions.query.QueryWrapper;
import com.example.distributed.lock.mapper.StockMapper;
import com.example.distributed.lock.pojo.Stock;
import lombok.extern.slf4j.Slf4j;
import org.springframework.beans.factory.annotation.Autowired;
import org.springframework.context.annotation.Scope;
import org.springframework.context.annotation.ScopedProxyMode;
import org.springframework.stereotype.Service;
import org.springframework.transaction.annotation.Transactional;import javax.annotation.Resource;
import java.util.concurrent.locks.ReentrantLock;@Service
@Slf4j
// @Scope("singleton")
// @Scope(value = "prototype", proxyMode = ScopedProxyMode.TARGET_CLASS)
public class StockService {@Resourceprivate StockMapper stockMapper;private ReentrantLock lock = new ReentrantLock();@Transactionalpublic void deduct() {lock.lock();try {Stock stock = stockMapper.selectOne(new QueryWrapper<Stock>().eq("product_code", "1001"));if (stock != null && stock.getCount() > 0) {stock.setCount(stock.getCount() - 1);stockMapper.updateById(stock);log.info("剩余库存:{}" , stock.getCount());}} finally {lock.unlock();}}}
假如有两个请求同时执行deduct方法,如下图:
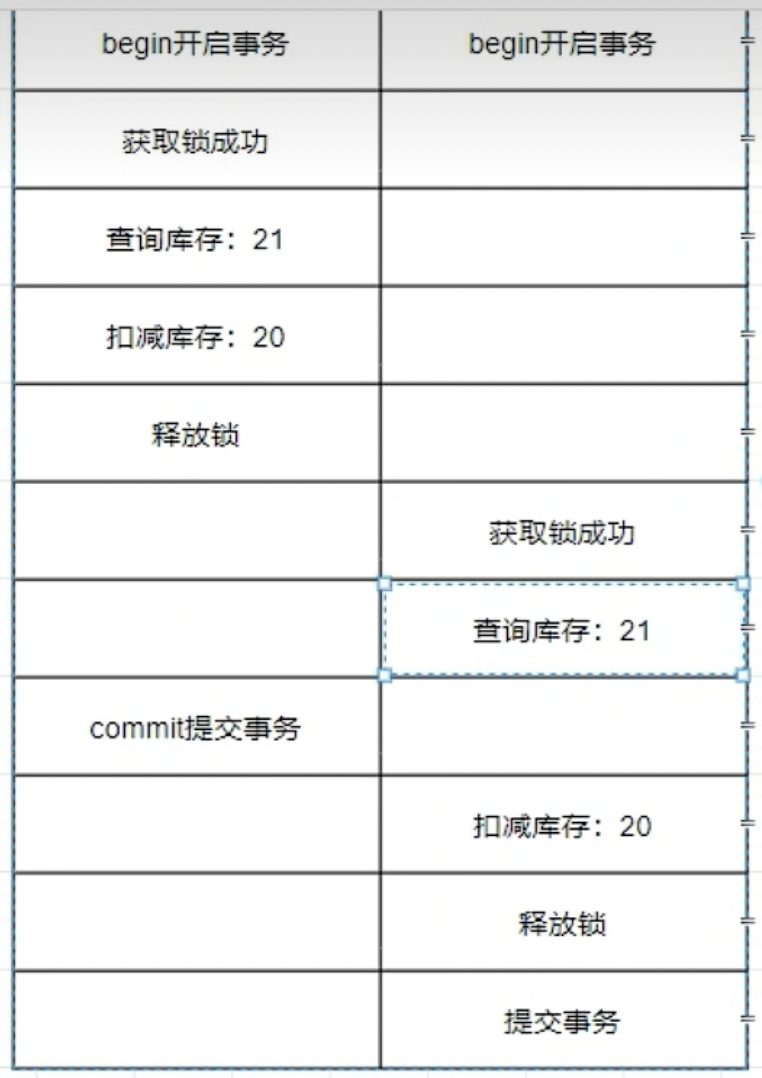
- 左边请求和右边请求同时进来时,开启事务,假如这时库存都是21
- 左边请求获取到锁,右边请求获取锁失败,阻塞
- 左边请求查询库存(21)并减去库存,把库存减到20
- 左边请求释放锁(注意还未提交事务)
- 右边请求成功获取锁
- 右边请求查询库存(还是21,因为左边的还未提交事务)并减去库存,把库存减到20
- 左边请求提交事务
- 右边请求减去库存,把库存减到20
- 右边请求释放锁,提交事务
从上面步骤可以看出,由于事务和锁同时存在,是有可能导致超卖现象的。
上面的现象是基于事务的隔离级别。Transactional默认采用mysql的隔离级别。
MySQL默认的事务隔离级别是"可重复读"(Repeatable Read)。这意味着在一个事务中,读取的数据会在事务执行过程中保持一致,即使其他事务对这些数据进行了修改也不会被读取到。在该隔离级别下,读取的数据会锁定直到事务结束,这可以防止其他事务修改这些数据。
如果我们把事务的隔离级别改为读未提交,如下:
@Transactional(isolation = Isolation.READ_UNCOMMITTED)
这样就可以解决超卖现象。
但是,在实际使用中,并不能设为读未提交,否则会出现其他数据问题。
3. 集群部署
因为集群部署的话,并不在一个服务器内,所以也相当于有多个StockService实例了。
使用一个SQL解决超卖
前面都是利用JVM提供的锁,也可以利用Mysql关系型数据库本身的锁机制,可以解决上面讲的三种JVM锁失效的问题。
在mysql中,当使用update、insert、delete这些写操作时,本身mysql就会自己加锁。
首先,在StockMapper里增加如下方法:
package com.example.distributed.lock.mapper;import com.baomidou.mybatisplus.core.mapper.BaseMapper;
import com.example.distributed.lock.pojo.Stock;
import org.apache.ibatis.annotations.Param;
import org.apache.ibatis.annotations.Update;public interface StockMapper extends BaseMapper<Stock> {@Update("update stock set count=count-#{count} where product_code = #{productCode} and count >= #{count}}")int updateStock(@Param("productCode") String productCode, @Param("count") Integer count);
}
然后修改StockService,如下:
package com.example.distributed.lock.service;import com.baomidou.mybatisplus.core.conditions.query.QueryWrapper;
import com.example.distributed.lock.mapper.StockMapper;
import com.example.distributed.lock.pojo.Stock;
import lombok.extern.slf4j.Slf4j;
import org.springframework.beans.factory.annotation.Autowired;
import org.springframework.context.annotation.Scope;
import org.springframework.context.annotation.ScopedProxyMode;
import org.springframework.stereotype.Service;
import org.springframework.transaction.annotation.Isolation;
import org.springframework.transaction.annotation.Transactional;import javax.annotation.Resource;
import java.util.concurrent.locks.ReentrantLock;@Service
@Slf4j
//@Scope("singleton")
@Scope(value = "prototype", proxyMode = ScopedProxyMode.TARGET_CLASS)
public class StockService {@Resourceprivate StockMapper stockMapper;/*** 使用mysql自带的锁*/public void deduct() {int stock = stockMapper.updateStock("1001", 1);}}
上面就是使用一句SQL,使用mysql自带的锁,即使使用集群部署,也是可以防止超卖的,且并发量也比较高。
但是使用一句SQL有很大的局限性,它只适用于比较简单的场景,当场景复杂,比如,我先查询库存,库存不足要报错,就没法使用一句SQL了。再比如,加入有两个仓库都有商品1001,如果还用上面的sql语句,就会把两个仓库的商品都减1了。
同时还需要注意mysql自己的锁范围。
mysql锁范围,即mysql自己加的锁是行锁还是表锁:
- 一般情况,是表级锁;
- 当锁的查询或更新条件是索引字段,则是行级锁。比如上面的例子增加product_code索引;
- 锁的查询或更新条件必须是具体值,比如=,in等操作,也就是能走索引,则是行级锁。
使用mysql悲观锁解决超卖
悲观锁,就是对于数据的处理持悲观态度,总认为会发生并发冲突,获取和修改数据时,别人会修改数据。所以在整个数据处理过程中,需要将数据锁定。
上面说到一个SQL在场景复杂时不能满足业务需求,这是可以使用数据库的悲观锁解决。悲观锁可以在查询时锁住记录,如下:
select * from ... for update
改造我们上面的代码。
首先在mapper增加查询接口
package com.example.distributed.lock.mapper;import com.baomidou.mybatisplus.core.mapper.BaseMapper;
import com.example.distributed.lock.pojo.Stock;
import org.apache.ibatis.annotations.Param;
import org.apache.ibatis.annotations.Select;
import org.apache.ibatis.annotations.Update;import java.util.List;public interface StockMapper extends BaseMapper<Stock> {@Update("update stock set count=count-#{count} where product_code = #{productCode} and count >= #{count}}")int updateStock(@Param("productCode") String productCode, @Param("count") Integer count);@Select("select * from stock where product_code=#{productCode} for update")List<Stock> queryStock(String productCode);
}
然后修改StockService:
package com.example.distributed.lock.service;import com.baomidou.mybatisplus.core.conditions.query.QueryWrapper;
import com.example.distributed.lock.mapper.StockMapper;
import com.example.distributed.lock.pojo.Stock;
import lombok.extern.slf4j.Slf4j;
import org.springframework.beans.factory.annotation.Autowired;
import org.springframework.context.annotation.Scope;
import org.springframework.context.annotation.ScopedProxyMode;
import org.springframework.stereotype.Service;
import org.springframework.transaction.annotation.Isolation;
import org.springframework.transaction.annotation.Transactional;import javax.annotation.Resource;
import java.util.List;
import java.util.concurrent.locks.ReentrantLock;@Service
@Slf4j
//@Scope("singleton")
@Scope(value = "prototype", proxyMode = ScopedProxyMode.TARGET_CLASS)
public class StockService {@Resourceprivate StockMapper stockMapper;/*** 使用mysql悲观锁*/@Transactionalpublic void deduct() {// 1.查询库存信息并锁定List<Stock> stocks = stockMapper.queryStock("1001");// 取第一个仓库Stock stock = stocks.get(0);// 2.判断是否充足if (stock != null && stock.getCount() > 0) {// 3. 扣减库存stock.setCount(stock.getCount() -1);stockMapper.updateById(stock);}}}
这样就完成了使用mysql悲观锁。但是这样的吞吐量会比一个SQL有所下降。但可能比JVM本地锁高一点。
mysql悲观锁的问题:
- 性能较低(与一条SQL相比)
- 死锁问题:对弈多条数据加锁时,加锁顺序不一致导致死锁
- 库存操作要统一:一个使用select … fro update,另一个使用普通的select,就无法锁住,需要所有查询都要使用for update
使用mysql乐观锁解决超卖
乐观锁,就是对数据的处理持乐观态度,乐观的认为数据一般情况下不会发生冲突,只有提交数据更新时,才会对数据是否冲突进行检测。
乐观锁需要借助时间戳(version版本号)实现,依赖CAS机制。
首先修改Stock实体类,增加Version字段:
package com.example.distributed.lock.pojo;import com.baomidou.mybatisplus.annotation.TableName;
import lombok.Data;@Data
@TableName("stock")
public class Stock {private Long id ;private String productCode;private String warehouse;private Integer count;private Integer version;}
修改Service如下:
package com.example.distributed.lock.service;import com.baomidou.mybatisplus.core.conditions.query.QueryWrapper;
import com.baomidou.mybatisplus.core.conditions.update.UpdateWrapper;
import com.example.distributed.lock.mapper.StockMapper;
import com.example.distributed.lock.pojo.Stock;
import lombok.extern.slf4j.Slf4j;
import org.springframework.beans.factory.annotation.Autowired;
import org.springframework.context.annotation.Scope;
import org.springframework.context.annotation.ScopedProxyMode;
import org.springframework.stereotype.Service;
import org.springframework.transaction.annotation.Isolation;
import org.springframework.transaction.annotation.Transactional;import javax.annotation.Resource;
import java.util.List;
import java.util.concurrent.locks.ReentrantLock;@Service
@Slf4j
//@Scope("singleton")
@Scope(value = "prototype", proxyMode = ScopedProxyMode.TARGET_CLASS)
public class StockService {@Resourceprivate StockMapper stockMapper;/*** 使用mysql乐观锁*/// @Transactional 不要事务注解,因为下面的update没有注解的时候会立即释放锁,不会阻塞后续请求,否则可能出现连接超时public void deduct() {// 1.查询库存信息并锁定List<Stock> stocks = stockMapper.selectList(new QueryWrapper<Stock>().eq("product_code", "1001"));// 取第一个仓库Stock stock = stocks.get(0);// 2.判断是否充足if (stock != null && stock.getCount() > 0) {// 3. 扣减库存stock.setCount(stock.getCount() -1);// 老的版本Integer oldVersion = stock.getVersion();// 更新版本stock.setVersion(oldVersion + 1);// 尝试更新并比较版本if (stockMapper.update(stock, new UpdateWrapper<Stock>().eq("id", stock.getId()).eq("version", oldVersion)) == 0) {// 如果更新失败,进行重试// 睡一会避免递归调用栈内存溢出try {Thread.sleep(20);} catch (InterruptedException e) {e.printStackTrace();}this.deduct();}}}}
上面就完成了使用乐观锁解决超卖。
乐观锁问题:
- 高并发下,性能下降明显(重试次数多,浪费cup资源)
- CAS的ABA问题
- 主从模式时,乐观锁不准确
四种锁比较
性能:一个SQL > 悲观锁 > JVM锁 > 乐观锁
如果追求极致姓名、业务场景简单并且不需要记录数据前后变化,优先使用一个SQL;
如果并发量较低(多读),争抢资源不是很激烈的情况下优先选择乐观锁;
如果并发量较高,一般会经常冲突,此时选择乐观锁的话,会导致业务不间断充实,优先选择悲观锁;
不推荐使用JVM本地锁。
Redis乐观锁
集成Redis
增加依赖,pom里添加:
<dependency><groupId>org.springframework.boot</groupId><artifactId>spring-boot-starter-data-redis</artifactId>
</dependency>
配置文件:
# redis
spring.redis.host=127.0.0.1
spring.redis.database=0
spring.redis.port=6379
spring.redis.password=123456
使用redis客户端设置库存:
127.0.0.1:6379> set stock 500
OK
超卖现象
修改StockService如下:
package com.example.distributed.lock.service;import com.baomidou.mybatisplus.core.conditions.query.QueryWrapper;
import com.baomidou.mybatisplus.core.conditions.update.UpdateWrapper;
import com.example.distributed.lock.mapper.StockMapper;
import com.example.distributed.lock.pojo.Stock;
import lombok.extern.slf4j.Slf4j;
import org.springframework.beans.factory.annotation.Autowired;
import org.springframework.context.annotation.Scope;
import org.springframework.context.annotation.ScopedProxyMode;
import org.springframework.data.redis.core.RedisTemplate;
import org.springframework.data.redis.core.StringRedisTemplate;
import org.springframework.stereotype.Service;
import org.springframework.transaction.annotation.Isolation;
import org.springframework.transaction.annotation.Transactional;import javax.annotation.Resource;
import java.util.List;
import java.util.concurrent.locks.ReentrantLock;@Service
@Slf4j
//@Scope("singleton")
@Scope(value = "prototype", proxyMode = ScopedProxyMode.TARGET_CLASS)
public class StockService {@Resourceprivate StockMapper stockMapper;@Autowiredprivate StringRedisTemplate redisTemplate;/*** redis 超卖*/public void deduct() {// 查询库存信息String stock = redisTemplate.opsForValue().get("stock");// 判断库存是否充足if (stock != null && stock.length() != 0) {Integer st = Integer.valueOf(stock);if (st > 0) {// 扣减库存redisTemplate.opsForValue().set("stock", String.valueOf(--st));}}}}
上面的代码在高并发量下会出现超卖现象。
redis乐观锁解决超卖
使用redis提供的一套指令可以实现乐观锁:
watch:监听一个或多个key的值,如果在事务(exec)执行之前,如果key的值发生变化,则取消事务执行multi:开启事务exec:提交事务
修改StockService如下:
package com.example.distributed.lock.service;import com.baomidou.mybatisplus.core.conditions.query.QueryWrapper;
import com.baomidou.mybatisplus.core.conditions.update.UpdateWrapper;
import com.example.distributed.lock.mapper.StockMapper;
import com.example.distributed.lock.pojo.Stock;
import lombok.extern.slf4j.Slf4j;
import org.springframework.beans.factory.annotation.Autowired;
import org.springframework.context.annotation.Scope;
import org.springframework.context.annotation.ScopedProxyMode;
import org.springframework.dao.DataAccessException;
import org.springframework.data.redis.core.RedisOperations;
import org.springframework.data.redis.core.RedisTemplate;
import org.springframework.data.redis.core.SessionCallback;
import org.springframework.data.redis.core.StringRedisTemplate;
import org.springframework.stereotype.Service;
import org.springframework.transaction.annotation.Isolation;
import org.springframework.transaction.annotation.Transactional;import javax.annotation.Resource;
import java.util.List;
import java.util.concurrent.locks.ReentrantLock;@Service
@Slf4j
public class StockService {@Resourceprivate StockMapper stockMapper;@Autowiredprivate StringRedisTemplate redisTemplate;/*** redis 乐观锁解决超卖*/public void deduct() {// 创建session对象使用事务redisTemplate.execute(new SessionCallback<Object>() {@Overridepublic Object execute(RedisOperations operations) throws DataAccessException {// watchoperations.watch("stock");// 查询库存信息String stock = operations.opsForValue().get("stock").toString();// 判断库存是否充足if (stock != null && stock.length() != 0) {Integer st = Integer.valueOf(stock);if (st > 0) {// multioperations.multi();// 扣减库存operations.opsForValue().set("stock", String.valueOf(--st));// execList<Object> exec = operations.exec();if (exec == null || exec.size() == 0) {// 执行失败,重试try {Thread.sleep(40);} catch (InterruptedException e) {e.printStackTrace();}deduct();}return exec;}}return null;}});}}
上面就完成了redis乐观锁。
但是redis乐观锁也有问题,大大降低了redis的并发量。
后面会使用redis分布式锁。
三、分布式锁概述
前面我们了解到,要保证共享资源的线程安全,可以在应用程序级别使用JVM本地锁以及共享资源的位置(mysql还是redis)选择不同的锁类型。比如在redis中的资源,使用JVM本地锁,只能在单机情况下使用,使用redis乐观锁,性能又会大幅降低。
这时候可以引用分布式锁解决。
分布式锁是针对JVM本地锁来说的。分布式锁可以跨进程、跨服务、跨服务器使用。
使用场景:
- 超卖现象
- 缓存击穿
超卖现象前面已经讲过。那么为什么缓存击穿需要分布式锁呢?
所谓缓存击穿是指当缓存中某个热点数据过期了,在该热点数据重新载入缓存之前,有大量的查询请求穿过缓存,直接查询数据库。这种情况会导致数据库压力瞬间骤增,造成大量请求阻塞,甚至直接挂掉。
为了防止这种情况,可以在使用分布式锁。也就是当某个热点数据过期了,先让请求获取锁,获取到锁的才去请求数据库,拿到数据后再缓存到redis中,其他请求后续就可以在缓存中拿到数据了。这样就减小了数据库的压力。
分布式锁的实现方式主要有如下几种:
- redis实现分布式锁
- zookeeper实现分布式锁
- mysql实现分布式锁
四、Redis分布式锁
本节图片主要参考:https://mp.weixin.qq.com/s/Uv8c9s_sBjAXOqZXgkn-BA
实现方案
Redis实现分布式锁主要使用setnx和del命令。
setnx:用来加锁。setnx与set类似,但是不同的是,set设置key的值时,如果key存在会覆盖原来的值,而setnx会失败。两个客户端同时向redis写入try_lock,客户端1写入成功,即获取分布式锁成功。客户端2写入失败,则获取分布式锁失败。
del:用来解锁。使用del删除key后,setnx原来的key才可以成功。
实现步骤:
- setnx加锁
- del解锁
- 递归重试
分布式锁实现
简单的实现过程如下:
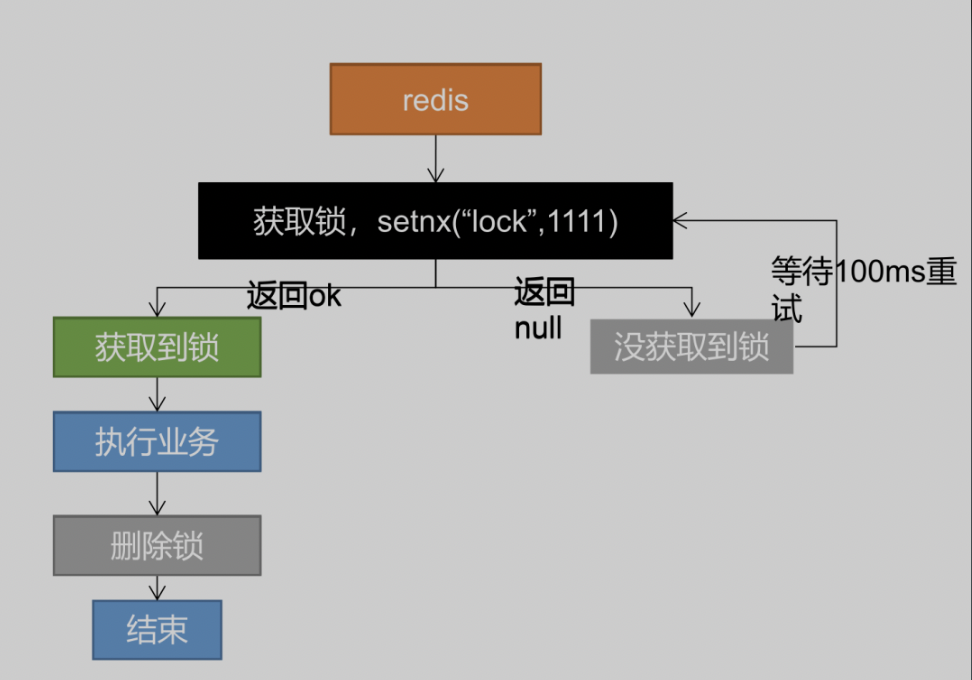
下面就看下代码如何实现分布式锁解决超卖问题:
package com.example.distributed.lock.service;import com.example.distributed.lock.mapper.StockMapper;
import lombok.extern.slf4j.Slf4j;
import org.springframework.beans.factory.annotation.Autowired;
import org.springframework.context.annotation.Scope;
import org.springframework.context.annotation.ScopedProxyMode;
import org.springframework.dao.DataAccessException;
import org.springframework.data.redis.core.RedisOperations;
import org.springframework.data.redis.core.SessionCallback;
import org.springframework.data.redis.core.StringRedisTemplate;
import org.springframework.stereotype.Service;import javax.annotation.Resource;
import java.util.List;@Service
@Slf4j
public class StockService2 {@Autowiredprivate StringRedisTemplate redisTemplate;/*** redis 分布式锁解决超卖*/public void deduct() {// 尝试获取锁Boolean lock = redisTemplate.opsForValue().setIfAbsent("lock", "111");// 获取锁失败,递归重试if (!lock) {try {Thread.sleep(50);this.deduct();} catch (InterruptedException e) {e.printStackTrace();}} else {// 获取锁成功,则执行业务逻辑// 注意执行业务逻辑一定要放在else里,否则在重试的时候,多次调用了deduct方法,可能出现多次扣减库存try {// 1.获取当前库存信息String stock = redisTemplate.opsForValue().get("stock").toString();// 2.判断库存是否充足if (stock != null && stock.length()!=0) {Integer st = Integer.valueOf(stock);if (st > 0) {// 3.扣减库存redisTemplate.opsForValue().set("stock", String.valueOf(--st));}}} finally {// 解锁redisTemplate.delete("stock");}}}}
循环重试
上面的代码中,当获取锁失败时,会执行递归进行重试,这样是安全的,当重试次数过多,是有可能出现栈内存溢出的。
下面改为循环调用,代码如下:
package com.example.distributed.lock.service;import com.example.distributed.lock.mapper.StockMapper;
import lombok.extern.slf4j.Slf4j;
import org.springframework.beans.factory.annotation.Autowired;
import org.springframework.context.annotation.Scope;
import org.springframework.context.annotation.ScopedProxyMode;
import org.springframework.dao.DataAccessException;
import org.springframework.data.redis.core.RedisOperations;
import org.springframework.data.redis.core.SessionCallback;
import org.springframework.data.redis.core.StringRedisTemplate;
import org.springframework.stereotype.Service;import javax.annotation.Resource;
import java.util.List;@Service
@Slf4j
public class StockService2 {@Autowiredprivate StringRedisTemplate redisTemplate;/*** redis 分布式锁,递归改为循环*/public void deduct() {// 尝试获取锁失败,重试while (!redisTemplate.opsForValue().setIfAbsent("lock", "111")) {try {// 睡眠时间不用去掉,防止锁的竞争过大Thread.sleep(50);this.deduct();} catch (InterruptedException e) {e.printStackTrace();}}// 获取锁成功,则执行业务逻辑// 注意执行业务逻辑一定要放在else里,否则在重试的时候,多次调用了deduct方法,可能出现多次扣减库存try {// 1.获取当前库存信息String stock = redisTemplate.opsForValue().get("stock").toString();// 2.判断库存是否充足if (stock != null && stock.length()!=0) {Integer st = Integer.valueOf(stock);if (st > 0) {// 3.扣减库存redisTemplate.opsForValue().set("stock", String.valueOf(--st));}}} finally {// 解锁redisTemplate.delete("stock");}}}
防止死锁
上面的代码存在一个问题:当一个客户端获取了锁后,还没来得及执行业务代码获取还没来级的释放锁,程序宕机了。没有执行删除锁逻辑,这就造成了死锁。
解决: 设置锁的自动过期,即使没有删除,会自动删除。要注意设置过期时间要和设置锁具有原子性。redis支持使用setnx ex命令。
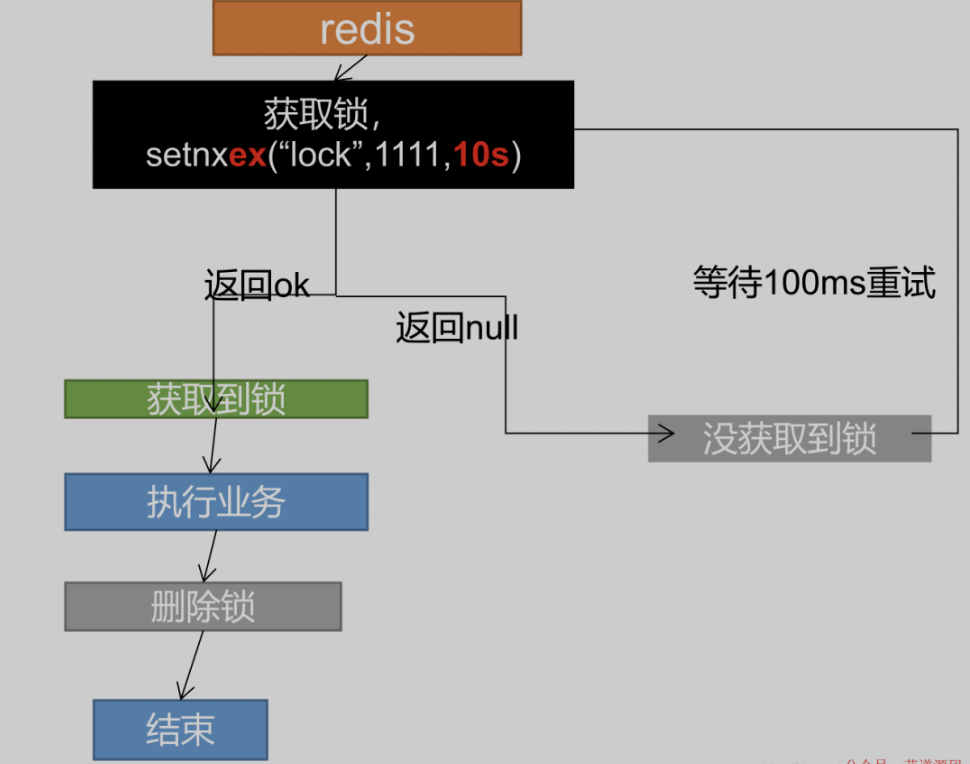
修改代码如下:
package com.example.distributed.lock.service;import com.example.distributed.lock.mapper.StockMapper;
import lombok.extern.slf4j.Slf4j;
import org.springframework.beans.factory.annotation.Autowired;
import org.springframework.context.annotation.Scope;
import org.springframework.context.annotation.ScopedProxyMode;
import org.springframework.dao.DataAccessException;
import org.springframework.data.redis.core.RedisOperations;
import org.springframework.data.redis.core.SessionCallback;
import org.springframework.data.redis.core.StringRedisTemplate;
import org.springframework.stereotype.Service;import javax.annotation.Resource;
import java.util.List;
import java.util.concurrent.TimeUnit;@Service
@Slf4j
public class StockService2 {@Autowiredprivate StringRedisTemplate redisTemplate;/*** redis 分布式锁,防死锁,设置过期时间*/public void deduct() {// 尝试获取锁失败,重试// 设置锁时设置过期时间while (!redisTemplate.opsForValue().setIfAbsent("lock", "111", 3, TimeUnit.SECONDS)) {try {// 睡眠时间不用去掉,防止锁的竞争过大Thread.sleep(50);this.deduct();} catch (InterruptedException e) {e.printStackTrace();}}// 获取锁成功,则执行业务逻辑// 注意执行业务逻辑一定要放在else里,否则在重试的时候,多次调用了deduct方法,可能出现多次扣减库存try {// 1.获取当前库存信息String stock = redisTemplate.opsForValue().get("stock").toString();// 2.判断库存是否充足if (stock != null && stock.length()!=0) {Integer st = Integer.valueOf(stock);if (st > 0) {// 3.扣减库存redisTemplate.opsForValue().set("stock", String.valueOf(--st));}}} finally {// 解锁redisTemplate.delete("stock");}}
}
问题:如果锁过期时间设置的太小,有可能出现业务还没处理完,锁就过期了。需要一个守护线程检测,过期后自动续期。这个程序较为复杂,后面会通过Redisson的看门狗机制解决。
防误删
上面方案还有问题:如果由于业务时间很长,锁自己过期了,直接删除,有可能把别人正在持有的锁删除了。
解决: 设置的时候,值指定为uuid,删除锁时匹配是自己的锁才删除。
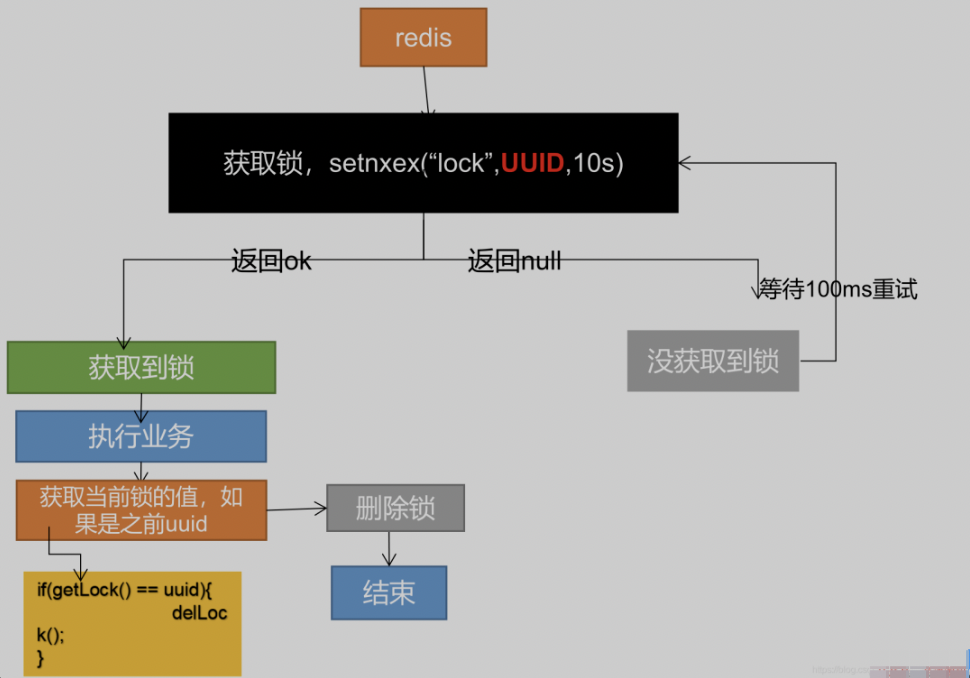
修改代码如下:
package com.example.distributed.lock.service;import com.example.distributed.lock.mapper.StockMapper;
import lombok.extern.slf4j.Slf4j;
import org.apache.commons.lang.StringUtils;
import org.springframework.beans.factory.annotation.Autowired;
import org.springframework.context.annotation.Scope;
import org.springframework.context.annotation.ScopedProxyMode;
import org.springframework.dao.DataAccessException;
import org.springframework.data.redis.core.RedisOperations;
import org.springframework.data.redis.core.SessionCallback;
import org.springframework.data.redis.core.StringRedisTemplate;
import org.springframework.stereotype.Service;import javax.annotation.Resource;
import java.util.List;
import java.util.UUID;
import java.util.concurrent.TimeUnit;@Service
@Slf4j
public class StockService2 {@Autowiredprivate StringRedisTemplate redisTemplate;/*** redis 分布式锁,防误删,uuid*/public void deduct() {// 设置锁的value为uuidString uuid = UUID.randomUUID().toString();// 尝试获取锁失败,重试// 设置锁时设置过期时间while (!redisTemplate.opsForValue().setIfAbsent("lock", uuid, 3, TimeUnit.SECONDS)) {try {// 睡眠时间不用去掉,防止锁的竞争过大Thread.sleep(50);this.deduct();} catch (InterruptedException e) {e.printStackTrace();}}// 获取锁成功,则执行业务逻辑// 注意执行业务逻辑一定要放在else里,否则在重试的时候,多次调用了deduct方法,可能出现多次扣减库存try {// 1.获取当前库存信息String stock = redisTemplate.opsForValue().get("stock").toString();// 2.判断库存是否充足if (stock != null && stock.length()!=0) {Integer st = Integer.valueOf(stock);if (st > 0) {// 3.扣减库存redisTemplate.opsForValue().set("stock", String.valueOf(--st));}}} finally {// 解锁时判断是否自己的锁if (StringUtils.equals(redisTemplate.opsForValue().get("stock"), uuid)) {redisTemplate.delete("stock");}}}}
Lua脚本解决删除锁一致性
上面的代码中还有一个问题:在finally里释放锁的时候,先判断了锁是否是自己的锁,然后再删除锁,这是完全独立的两个步骤。如果第一步判断是自己的锁后,这时候还没来得及删,锁就过期了,再执行删除可能就删除了别人的锁。
解决:使用Lua脚本保证redis操作的原子性。
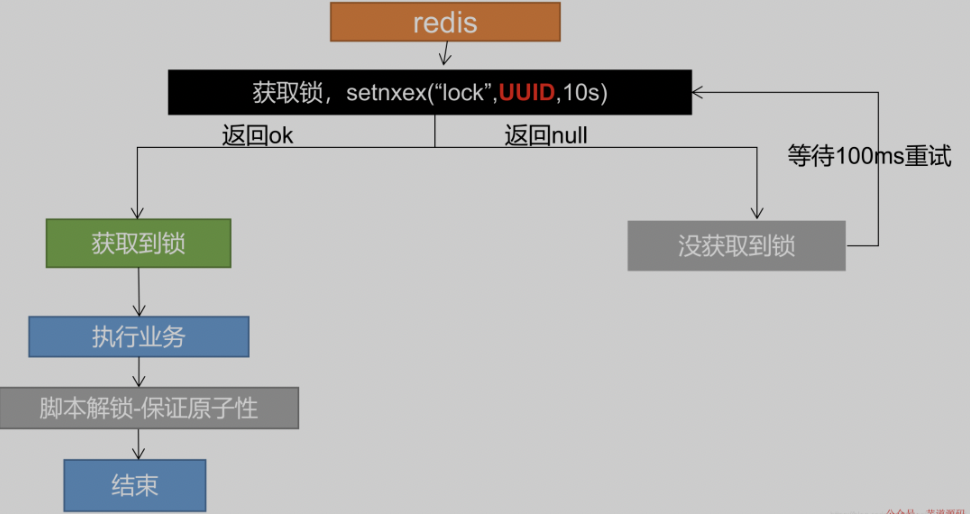
为什么Lua脚本可以保证操作原子性?因为Lua脚本把几个Redis命令合并了给Redis一起执行。Redis是单线程执行的,执行指令遵守one-by-one。
Lua语言的语法不在这里介绍了。
Redis是支持执行Lua脚本的,使用EVAL命令即可,格式如下:
EVAL script numkeys key [key ...] arg [arg ...]
# script:Lua脚本字符串
# 脚本后面跟的都是参数,有两部分组成,一个是key,一个arg,两个都是数组
# numkeys:代表参数里前几个是属于参数key的,剩下的属于参数arg
# key和arg参数数组可通过下标获取,如key[1]和ARGV[1]
修改代码如下,只有删除锁的部分修改了:
package com.example.distributed.lock.service;import com.example.distributed.lock.mapper.StockMapper;
import lombok.extern.slf4j.Slf4j;
import org.apache.commons.lang.StringUtils;
import org.springframework.beans.factory.annotation.Autowired;
import org.springframework.context.annotation.Scope;
import org.springframework.context.annotation.ScopedProxyMode;
import org.springframework.dao.DataAccessException;
import org.springframework.data.redis.core.RedisOperations;
import org.springframework.data.redis.core.SessionCallback;
import org.springframework.data.redis.core.StringRedisTemplate;
import org.springframework.data.redis.core.script.DefaultRedisScript;
import org.springframework.stereotype.Service;import javax.annotation.Resource;
import java.util.Arrays;
import java.util.List;
import java.util.UUID;
import java.util.concurrent.TimeUnit;@Service
@Slf4j
public class StockService2 {@Autowiredprivate StringRedisTemplate redisTemplate;/*** redis 分布式锁,Lua脚本保证删除原子性*/public void deduct() {// 设置锁的value为uuidString uuid = UUID.randomUUID().toString();// 尝试获取锁失败,重试// 设置锁时设置过期时间while (!redisTemplate.opsForValue().setIfAbsent("lock", uuid, 3, TimeUnit.SECONDS)) {try {// 睡眠时间不用去掉,防止锁的竞争过大Thread.sleep(50);this.deduct();} catch (InterruptedException e) {e.printStackTrace();}}// 获取锁成功,则执行业务逻辑// 注意执行业务逻辑一定要放在else里,否则在重试的时候,多次调用了deduct方法,可能出现多次扣减库存try {// 1.获取当前库存信息String stock = redisTemplate.opsForValue().get("stock").toString();// 2.判断库存是否充足if (stock != null && stock.length()!=0) {Integer st = Integer.valueOf(stock);if (st > 0) {// 3.扣减库存redisTemplate.opsForValue().set("stock", String.valueOf(--st));}}} finally {//使用Lua脚本删除锁String script = "if redis.call(\"get\",KEYS[1]) == ARGV[1] then\n" +"    return redis.call(\"del\",KEYS[1])\n" +"else\n" +"    return 0\n" +"end";// 使用execute方法,使用DefaultRedisScript创建执行脚本,// 后面传递参数,Arrays.asList("lock")是参数key,uuid是ARGV参数redisTemplate.execute(new DefaultRedisScript<>(script), Arrays.asList("lock"), uuid);}}
}
实现可重入
可参考ReentrantLock的重入原理来实现可重入。
ReentrantLock的重入原理:内部维护了一个state记录状态。使用CAS尝试获取锁时,如果获取成功(state为0),则把当前所的所有者设为当前线程,并把state + 1,如果获取失败(state大于0),看是否是当前线程持有了锁,如果是当前线程持有了锁,则state + 1,如果不是,则获取锁失败,进入队列等待。
在redis中可使用hash数据结构和Lua脚本来实现。
hash数据结构可使用hset指令来操作,Lua脚本为了保证多个操作的原子性。
hset命令格式为
hset key field value,key为键,field为字段名,value为值。例如有个User对象,有字段名name,那么User就是key,name位field,name的值为vlaue。
lua脚本
加锁流程
- 判断锁是否存在(使用redis中的exists),不存在则直接获取锁(使用hset命令)
- 如果锁存在则判断是否是自己的锁(使用redis中的hexists),如果是则进行重入(使用hincrby key field increment)
- 如果不是自己的锁,则重试
对应的Lua脚本如下:
if redis.call('exists', 'lock') == 0
then redis.call('hset', 'lock', uuid, 1)redis.call('expire', 'lock', 30)
elseif redis.call('hexists', 'lock', uuid, 1) == 1
thenredis.call('hincrby', 'lock', uuid, 1)redis.call('expire', 'lock', 30)return 1
else return 0
end
可以合并条件和参数,key不存在时也可以使用hincrby代替hset,把值直接设为1,修改代码如下:
if redis.call('exists', 'lock') == 0 or redis.call('hexists', 'lock', uuid, 1) == 1
then redis.call('hincrby', 'lock', uuid, 1)redis.call('expire', 'lock', 30)
else return 0
end
再把lock和uuid和过期时间使用参数代替,可以灵活使用我们的脚本。参数key第一个为lock参数(KEYS[1]),参数arg第一个为uuid(ARGV[1]),第二个为过期时间(ARGV[2]),修改如下:
if redis.call('exists', KEYS[1]) == 0 or redis.call('hexists', KEYS[1], ARGV[1], 1) == 1
then redis.call('hincrby', KEYS[1], ARGV[1], 1)redis.call('expire', KEYS[1], ARGV[2])
else return 0
end
解锁流程
- 判断自己的锁是否存在(hexists),不存在(则是咋已释放别人的锁)则返回nil
- 如果自己的锁存在,则减1(hincrby -1)
- 判断减1后的值是否为0,为0则释放锁并返回1,释放锁成功
- 不为0,则还在继续持有锁,返回0
对应的Lua脚本如下:
if redis.call('hexists', 'lock', uuid) == 0
then return nil
elseif redis.call('hincrby', 'lock', uuid, -1) == 0
then return redis.call('del', 'lock')
else return 0
end
改为带参数的如下:
if redis.call('hexists', KEYS[1], ARGV[1]) == 0
then return nil
elseif redis.call('hincrby', KEYS[1], ARGV[1], -1) == 0
then return redis.call('del', KEYS[1])
else return 0
end
代码编写
分布式锁使用
新加一个工具类来具体实现加锁和解锁流程,代码如下:
package com.example.distributed.lock.utils.lock;import org.springframework.beans.factory.annotation.Autowired;
import org.springframework.data.redis.core.StringRedisTemplate;
import org.springframework.data.redis.core.script.DefaultRedisScript;
import org.springframework.stereotype.Component;import java.util.Arrays;
import java.util.UUID;
import java.util.concurrent.TimeUnit;
import java.util.concurrent.locks.Condition;
import java.util.concurrent.locks.Lock;public class DistributedRedisLock implements Lock {private StringRedisTemplate redisTemplate;private String lockName;/*** uuid每次重新获取分布式锁时,重新生成即可*/private String uuid;/*** 过期时间默认为30*/private Long expire = 30L;/*** 有参构造方法,把使用redisTemplate和锁名称lockName都交给客户端来决定* @param redisTemplate* @param lockName*/public DistributedRedisLock(StringRedisTemplate redisTemplate, String lockName) {this.redisTemplate = redisTemplate;this.lockName = lockName;this.uuid = UUID.randomUUID().toString();}@Overridepublic void lock() {tryLock();}@Overridepublic void lockInterruptibly() throws InterruptedException {}@Overridepublic boolean tryLock() {// 调用有参的加锁方法即可,过期时间默认给个-1try {return tryLock(-1L, TimeUnit.SECONDS);} catch (InterruptedException e) {e.printStackTrace();}return false;}/*** 加锁方法** @param time* @param unit* @return* @throws InterruptedException*/@Overridepublic boolean tryLock(long time, TimeUnit unit) throws InterruptedException {if (time != -1) {this.expire = unit.toSeconds(time);}String script = "if redis.call('exists', KEYS[1]) == 0 or redis.call('hexists', KEYS[1], ARGV[1], 1) == 1\n" +"then \n" +"  \tredis.call('hincrby', KEYS[1], ARGV[1], 1)\n" +"  \tredis.call('expire', KEYS[1], ARGV[2])\n" +"else \n" +"  \treturn 0\n" +"end";// 如果获取锁失败,则循环重试while (!this.redisTemplate.execute(new DefaultRedisScript<>(script, Boolean.class), Arrays.asList(lockName), uuid, String.valueOf(expire))) {Thread.sleep(50);}return true;}/*** 解锁方法*/@Overridepublic void unlock() {String script = "if redis.call('hexists', KEYS[1], ARGV[1]) == 0\n" +"then \n" +"  \treturn nil\n" +"elseif redis.call('hincrby', KEYS[1], ARGV[1], -1) == 0\n" +"then \n" +"  \treturn redis.call('del', KEYS[1])\n" +"else \n" +"  \treturn 0\n" +"end";// 使用Long接受,当脚本返回nil,则结果为null,脚本返回1则结果1,脚本返回0则结果为0Long flag = this.redisTemplate.execute(new DefaultRedisScript<>(script, Long.class), Arrays.asList(lockName), uuid);// 如果脚本返回nil,则释放的不是自己的锁,抛出异常if (flag == null) {throw new IllegalMonitorStateException("this lock doesn't belong to you!");}// 另外两种情况暂不需要,等后面自动续期用}@Overridepublic Condition newCondition() {return null;}
}
在使用时,因为还有其他的分布式锁,如MySQL分布式锁,ZooKeeper分布式锁,所以可使用工厂方法来让使用者自己决定使用哪种锁。
创建一个工厂方法,如下:
package com.example.distributed.lock.utils.lock;import org.springframework.beans.factory.annotation.Autowired;
import org.springframework.data.redis.core.StringRedisTemplate;
import org.springframework.stereotype.Component;@Component
public class DistributedLockClient {@Autowiredprivate StringRedisTemplate redisTemplate;public DistributedRedisLock getRedisLock(String lockName) {return new DistributedRedisLock(redisTemplate, lockName);}
}
然后在我们的service层使用工厂方法即可,修改StockService2如下:
package com.example.distributed.lock.service;import com.example.distributed.lock.mapper.StockMapper;
import com.example.distributed.lock.utils.lock.DistributedLockClient;
import com.example.distributed.lock.utils.lock.DistributedRedisLock;
import lombok.extern.slf4j.Slf4j;
import org.apache.commons.lang.StringUtils;
import org.springframework.beans.factory.annotation.Autowired;
import org.springframework.context.annotation.Scope;
import org.springframework.context.annotation.ScopedProxyMode;
import org.springframework.dao.DataAccessException;
import org.springframework.data.redis.core.RedisOperations;
import org.springframework.data.redis.core.SessionCallback;
import org.springframework.data.redis.core.StringRedisTemplate;
import org.springframework.data.redis.core.script.DefaultRedisScript;
import org.springframework.stereotype.Service;import javax.annotation.Resource;
import java.util.Arrays;
import java.util.List;
import java.util.UUID;
import java.util.concurrent.TimeUnit;@Service
@Slf4j
public class StockService2 {@Autowiredprivate StringRedisTemplate redisTemplate;@Autowiredprivate DistributedLockClient distributedLockClient;/*** redis 分布式锁,实现可重入*/public void deduct() {// 使用工厂方法获取锁,传入锁的名称DistributedRedisLock lock = distributedLockClient.getRedisLock("lock");lock.lock();try {// 1.获取当前库存信息String stock = redisTemplate.opsForValue().get("stock").toString();// 2.判断库存是否充足if (stock != null && stock.length()!=0) {Integer st = Integer.valueOf(stock);if (st > 0) {// 3.扣减库存redisTemplate.opsForValue().set("stock", String.valueOf(--st));}}} finally {lock.unlock();}}
}
可重入性
修改我们的StockService2,让其多次获取锁,其代码如下:
package com.example.distributed.lock.service;import com.example.distributed.lock.mapper.StockMapper;
import com.example.distributed.lock.utils.lock.DistributedLockClient;
import com.example.distributed.lock.utils.lock.DistributedRedisLock;
import lombok.extern.slf4j.Slf4j;
import org.apache.commons.lang.StringUtils;
import org.springframework.beans.factory.annotation.Autowired;
import org.springframework.context.annotation.Scope;
import org.springframework.context.annotation.ScopedProxyMode;
import org.springframework.dao.DataAccessException;
import org.springframework.data.redis.core.RedisOperations;
import org.springframework.data.redis.core.SessionCallback;
import org.springframework.data.redis.core.StringRedisTemplate;
import org.springframework.data.redis.core.script.DefaultRedisScript;
import org.springframework.stereotype.Service;import javax.annotation.Resource;
import java.util.Arrays;
import java.util.List;
import java.util.UUID;
import java.util.concurrent.TimeUnit;@Service
@Slf4j
public class StockService2 {@Autowiredprivate StringRedisTemplate redisTemplate;@Autowiredprivate DistributedLockClient distributedLockClient;/*** redis 分布式锁,实现可重入*/public void deduct() {// 使用工厂方法获取锁,传入锁的名称DistributedRedisLock lock = distributedLockClient.getRedisLock("lock");lock.lock();try {// 1.获取当前库存信息String stock = redisTemplate.opsForValue().get("stock").toString();// 2.判断库存是否充足if (stock != null && stock.length()!=0) {Integer st = Integer.valueOf(stock);if (st > 0) {// 3.扣减库存redisTemplate.opsForValue().set("stock", String.valueOf(--st));}}// 测试可重入性test();} finally {lock.unlock();}}/*** 测试可重入性*/public void test() {DistributedRedisLock lock = distributedLockClient.getRedisLock("lock");lock.lock();System.out.println("测试可重入性");lock.unlock();}}
但是上面这种写法是有问题的,因为在test方法中再次获取锁时,getRedisLock里获取锁时是多例的,又重新生成了锁的uuid,两个锁的uuid就不一样了。
解决:把uuid交给工厂方法DistributedLockClient,因为他交给了IOC,是单例的,可以保证唯一性。
修改工厂方法如下:
package com.example.distributed.lock.utils.lock;import org.springframework.beans.factory.annotation.Autowired;
import org.springframework.data.redis.core.StringRedisTemplate;
import org.springframework.stereotype.Component;import java.util.UUID;@Component
public class DistributedLockClient {@Autowiredprivate StringRedisTemplate redisTemplate;private String uuid;public DistributedLockClient() {this.uuid = UUID.randomUUID().toString();}public DistributedRedisLock getRedisLock(String lockName) {return new DistributedRedisLock(redisTemplate, lockName, uuid);}
}
修改工厂方法,把uuid都改为从一个方法里获取,加上了线程id,使每个线程可以单独使用一把锁,如下:
package com.example.distributed.lock.utils.lock;import org.springframework.beans.factory.annotation.Autowired;
import org.springframework.data.redis.core.StringRedisTemplate;
import org.springframework.data.redis.core.script.DefaultRedisScript;
import org.springframework.stereotype.Component;import java.util.Arrays;
import java.util.UUID;
import java.util.concurrent.TimeUnit;
import java.util.concurrent.locks.Condition;
import java.util.concurrent.locks.Lock;public class DistributedRedisLock implements Lock {private StringRedisTemplate redisTemplate;private String lockName;/*** uuid每次重新获取分布式锁时,重新生成即可*/private String uuid;/*** 过期时间默认为30*/private Long expire = 30L;/*** 有参构造方法,把使用redisTemplate和锁名称lockName都交给客户端来决定* @param redisTemplate* @param lockName*/public DistributedRedisLock(StringRedisTemplate redisTemplate, String lockName, String uuid) {this.redisTemplate = redisTemplate;this.lockName = lockName;this.uuid = uuid;}@Overridepublic void lock() {tryLock();}@Overridepublic void lockInterruptibly() throws InterruptedException {}@Overridepublic boolean tryLock() {// 调用有参的加锁方法即可,过期时间默认给个-1try {return tryLock(-1L, TimeUnit.SECONDS);} catch (InterruptedException e) {e.printStackTrace();}return false;}/*** 加锁方法** @param time* @param unit* @return* @throws InterruptedException*/@Overridepublic boolean tryLock(long time, TimeUnit unit) throws InterruptedException {if (time != -1) {this.expire = unit.toSeconds(time);}String script = "if redis.call('exists', KEYS[1]) == 0 or redis.call('hexists', KEYS[1], ARGV[1], 1) == 1\n" +"then \n" +"  \tredis.call('hincrby', KEYS[1], ARGV[1], 1)\n" +"  \tredis.call('expire', KEYS[1], ARGV[2])\n" +"else \n" +"  \treturn 0\n" +"end";// 如果获取锁失败,则循环重试while (!this.redisTemplate.execute(new DefaultRedisScript<>(script, Boolean.class), Arrays.asList(lockName), getUuid(), String.valueOf(expire))) {Thread.sleep(50);}return true;}/*** 解锁方法*/@Overridepublic void unlock() {String script = "if redis.call('hexists', KEYS[1], ARGV[1]) == 0\n" +"then \n" +"  \treturn nil\n" +"elseif redis.call('hincrby', KEYS[1], ARGV[1], -1) == 0\n" +"then \n" +"  \treturn redis.call('del', KEYS[1])\n" +"else \n" +"  \treturn 0\n" +"end";// 使用Long接受,当脚本返回nil,则结果为null,脚本返回1则结果1,脚本返回0则结果为0Long flag = this.redisTemplate.execute(new DefaultRedisScript<>(script, Long.class), Arrays.asList(lockName), getUuid());// 如果脚本返回nil,则释放的不是自己的锁,抛出异常if (flag == null) {throw new IllegalMonitorStateException("this lock doesn't belong to you!");}// 另外两种情况暂不需要,等后面自动续期用}/*** 给线程拼接唯一标识** @return*/String getUuid() {return uuid + ":" + Thread.currentThread().getId();}@Overridepublic Condition newCondition() {return null;}
}
自动续期
实现自动续期可以使用一个定时任务去每隔一段时间检查是否过期,如果快过期就续期。同时需要结合Lua脚本,因为续期时需要判断是否是自己的锁。
其中定时任务可选用Java自带的Timer工具实现。Lua脚本用来实现续期。
脚本如下:
if redis.call('hexists', KEYS[1], ARGV[1]) == 1
then return redis.call('expire', KEYS[1], ARGV[2])
else return 0
end
其中 ARGV[2]是过期时间。
注意点:因为我们这里是开启子线程去自动续期,所以使用锁的时候,子线程里的uuid会和主线程不一样了,会自动续期失败。所以注意把原来的getUuid方法去掉,在构造方法里直接使用主线程的id。
修改DistributedRedisLock,增加一个重置过期时间的方法,代码如下:
package com.example.distributed.lock.utils.lock;import org.springframework.beans.factory.annotation.Autowired;
import org.springframework.data.redis.core.StringRedisTemplate;
import org.springframework.data.redis.core.script.DefaultRedisScript;
import org.springframework.stereotype.Component;import java.util.Arrays;
import java.util.Timer;
import java.util.TimerTask;
import java.util.UUID;
import java.util.concurrent.TimeUnit;
import java.util.concurrent.locks.Condition;
import java.util.concurrent.locks.Lock;public class DistributedRedisLock implements Lock {private StringRedisTemplate redisTemplate;private String lockName;/*** uuid每次重新获取分布式锁时,重新生成即可*/private String uuid;/*** 过期时间默认为30*/private Long expire = 30L;/*** 有参构造方法,把使用redisTemplate和锁名称lockName都交给客户端来决定* @param redisTemplate* @param lockName*/public DistributedRedisLock(StringRedisTemplate redisTemplate, String lockName, String uuid) {this.redisTemplate = redisTemplate;this.lockName = lockName;// 存子线程使用的时候,uuid会变,所以在构造方法里,这样创建时就确认了uuidthis.uuid = uuid + ":" + Thread.currentThread().getId();}@Overridepublic void lock() {tryLock();}@Overridepublic void lockInterruptibly() throws InterruptedException {}@Overridepublic boolean tryLock() {// 调用有参的加锁方法即可,过期时间默认给个-1try {return tryLock(-1L, TimeUnit.SECONDS);} catch (InterruptedException e) {e.printStackTrace();}return false;}/*** 加锁方法** @param time* @param unit* @return* @throws InterruptedException*/@Overridepublic boolean tryLock(long time, TimeUnit unit) throws InterruptedException {if (time != -1) {this.expire = unit.toSeconds(time);}String script = "if redis.call('exists', KEYS[1]) == 0 or redis.call('hexists', KEYS[1], ARGV[1], 1) == 1\n" +"then \n" +"  \tredis.call('hincrby', KEYS[1], ARGV[1], 1)\n" +"  \tredis.call('expire', KEYS[1], ARGV[2])\n" +"else \n" +"  \treturn 0\n" +"end";// 如果获取锁失败,则循环重试while (!this.redisTemplate.execute(new DefaultRedisScript<>(script, Boolean.class), Arrays.asList(lockName), uuid, String.valueOf(expire))) {Thread.sleep(50);}// 加锁成功,则使用定时器开启自动续期this.renewExpire();return true;}/*** 解锁方法*/@Overridepublic void unlock() {String script = "if redis.call('hexists', KEYS[1], ARGV[1]) == 0\n" +"then \n" +"  \treturn nil\n" +"elseif redis.call('hincrby', KEYS[1], ARGV[1], -1) == 0\n" +"then \n" +"  \treturn redis.call('del', KEYS[1])\n" +"else \n" +"  \treturn 0\n" +"end";// 使用Long接受,当脚本返回nil,则结果为null,脚本返回1则结果1,脚本返回0则结果为0Long flag = this.redisTemplate.execute(new DefaultRedisScript<>(script, Long.class), Arrays.asList(lockName), uuid);// 如果脚本返回nil,则释放的不是自己的锁,抛出异常if (flag == null) {throw new IllegalMonitorStateException("this lock doesn't belong to you!");}// 另外两种情况暂不需要,等后面自动续期用}//    /**
//     * 给线程拼接唯一标识
//     *
//     * @return
//     */
//    String getUuid() {
//       return uuid + ":" + Thread.currentThread().getId();
//    }@Overridepublic Condition newCondition() {return null;}/*** 自动重置过期时间方法*/private void renewExpire() {String script = "if redis.call('hexists', KEYS[1], ARGV[1]) == 1\n" +"then \n" +"  \treturn redis.call('expire', KEYS[1], ARGV[2]) \n" +"else \n" +"  \treturn 0\n" +"end";// 创建定时器,每隔三分之一的过期时间跑一次任务new Timer().schedule(new TimerTask() {@Overridepublic void run() {// 如果重置成功,返回1,则继续开启一个线程去尝试执行续期方法if (redisTemplate.execute(new DefaultRedisScript<>(script, Boolean.class),Arrays.asList(lockName), uuid, expire)) {renewExpire();}}}, this.expire * 1000 / 3, this.expire * 1000 / 3);}
}
RedLock算法
上面讲的都是单节点 redis ,如果发生故障,则整个业务的分布式锁都将无法使用,即便是我们将单点的 redis 升级为 redis 主从模式或集群,对于固定的 key 来说,master 节点仍然是独立存在的,由于存在着主从同步的时间间隔,如果在这期间 master 节点发生故障,slaver 节点被选举为 master 节点,那么,master 节点上存储的分布式锁信息可能就会丢失,从而造成竞争条件。
那么,如何避免这种情况呢?
redis 官方给出了基于多个 redis 集群部署的高可用分布式锁解决方案 — RedLock。
算法步骤介绍:
- 应用程序获取系统当前时间
- 应用程序使用相同的kv值依次从多个redis实例中获取锁。如果某一个节点超过一定时间依然没有获取到锁则直接放弃,尽快尝试从下一个健康的redis节点获取锁,以避免被一个宕机了的节点阻塞
- 计算 获取锁的消耗时间=客户端程序的系统当前时间 -step1中的时间。获取锁的消耗时间小于总的锁定时间 (假如为30s) 并且半数以上节点获取锁成功,认为获取锁成功
- 计算剩余锁定时间= 总的锁定时间 - step3中的消耗时间
- 如果获取锁失败了,对所有的redis节点释放锁
五、Redisson分布式锁
Redisson介绍
官方文档:https://github.com/redisson/redisson/wiki
Redisson是一个在Redis的基础上实现的Java驻内存数据网格(In-Memory Data Grid)。它不仅提供了一系列的分布式的Java常用对象,还提供了许多分布式服务。
Redisson的宗旨是促进使用者对Redis的关注分离(Separation of Concern),从而让使用者能够将精力更集中地放在处理业务逻辑上。
一个基于Redis实现的分布式工具,有基本分布式对象和高级又抽象的分布式服务,为每个试图再造分布式轮子的程序员带来了大部分分布式问题的解决办法。
Redisson和Jedis、Lettuce有什么区别?
Redisson和它俩的区别就像一个用鼠标操作图形化界面,一个用命令行操作文件。Redisson是更高层的抽象,Jedis和Lettuce是Redis命令的封装。
- Jedis是Redis官方推出的用于通过Java连接Redis客户端的一个工具包,提供了Redis的各种命令支持
- Lettuce是一种可扩展的线程安全的 Redis 客户端,通讯框架基于Netty,支持高级的 Redis 特性,比如哨兵,集群,管道,自动重新连接和Redis数据模型。Spring Boot 2.x 开始 Lettuce 已取代 Jedis 成为首选 Redis 的客户端。
- Redisson是架设在Redis基础上,通讯基于Netty的综合的、新型的中间件,企业级开发中使用Redis的最佳范本
Jedis把Redis命令封装好,Lettuce则进一步有了更丰富的Api,也支持集群等模式。但是两者也都点到为止,只给了你操作Redis数据库的脚手架,而Redisson则是基于Redis、Lua和Netty建立起了成熟的分布式解决方案,甚至redis官方都推荐的一种工具集。
Redisson简单使用
- maven引用
<dependency><groupId>org.redisson</groupId><artifactId>redisson</artifactId><version>3.19.1</version>
</dependency>
- 配置
redisson的配置常用的有两种方式,一种是程序化配置,一种是文件配置。
这里先讲下程序化配置。
创建redisson配置文件,代码如下:
package com.example.distributed.lock.config;import org.redisson.Redisson;
import org.redisson.api.RedissonClient;
import org.redisson.config.Config;
import org.springframework.context.annotation.Bean;
import org.springframework.context.annotation.Configuration;@Configuration
public class RedissonConfig {@Beanpublic RedissonClient redissonClient () {// 默认连接地址 127.0.0.1:6379// 初始化一个配置对象Config config = new Config();// useSingleServer设置成单机模式config.useSingleServer().setAddress("127.0.0.1:6379");RedissonClient redisson = Redisson.create(config);return redisson;}}
使用Redisson锁:
新创建一个StockService3,代码修改如下:
package com.example.distributed.lock.service;import com.example.distributed.lock.utils.lock.DistributedLockClient;
import lombok.extern.slf4j.Slf4j;
import org.redisson.api.RLock;
import org.redisson.api.RedissonClient;
import org.springframework.beans.factory.annotation.Autowired;
import org.springframework.data.redis.core.StringRedisTemplate;
import org.springframework.stereotype.Service;@Service
@Slf4j
public class StockService3 {@Autowiredprivate StringRedisTemplate redisTemplate;@Autowiredprivate RedissonClient redissonClient;/*** redis 分布式锁,自动续期*/public void deduct() {// 使用redissonClientRLock lock = redissonClient.getLock("lock");lock.lock();try {// 1.获取当前库存信息String stock = redisTemplate.opsForValue().get("stock").toString();// 2.判断库存是否充足if (stock != null && stock.length()!=0) {Integer st = Integer.valueOf(stock);if (st > 0) {// 3.扣减库存redisTemplate.opsForValue().set("stock", String.valueOf(--st));}}} finally {// 解锁lock.unlock();}}
}
大家都知道,如果负责储存这个分布式锁的Redisson节点宕机以后,而且这个锁正好处于锁住的状态时,这个锁会出现锁死的状态。为了避免这种情况的发生,Redisson内部提供了一个监控锁的看门狗,它的作用是在Redisson实例被关闭前,不断的延长锁的有效期。默认情况下,看门狗的检查锁的超时时间是30秒钟,也可以通过修改Config.lockWatchdogTimeout来另行指定。
Redisson常用配置
通用配置
以下是关于org.redisson.Config类的配置参数,它适用于所有Redis组态模式(单机,集群和哨兵)。
codec
默认值: org.redisson.codec.JsonJacksonCodec
Redisson的对象编码类是用于将对象进行序列化和反序列化,以实现对该对象在Redis里的读取和存储。Redisson提供了以下几种的对象编码应用,以供大家选择:
| 编码类名称 | 说明 |
|---|---|
org.redisson.codec.JsonJacksonCodec | Jackson JSON 编码 默认编码 |
org.redisson.codec.AvroJacksonCodec | Avro 一个二进制的JSON编码 |
org.redisson.codec.SmileJacksonCodec | Smile 另一个二进制的JSON编码 |
org.redisson.codec.CborJacksonCodec | CBOR 又一个二进制的JSON编码 |
org.redisson.codec.MsgPackJacksonCodec | MsgPack 再来一个二进制的JSON编码 |
org.redisson.codec.IonJacksonCodec | Amazon Ion 亚马逊的Ion编码,格式与JSON类似 |
org.redisson.codec.KryoCodec | Kryo 二进制对象序列化编码 |
org.redisson.codec.SerializationCodec | JDK序列化编码 |
org.redisson.codec.FstCodec | FST 10倍于JDK序列化性能而且100%兼容的编码 |
org.redisson.codec.LZ4Codec | LZ4 压缩型序列化对象编码 |
org.redisson.codec.SnappyCodec | Snappy 另一个压缩型序列化对象编码 |
org.redisson.client.codec.JsonJacksonMapCodec | 基于Jackson的映射类使用的编码。可用于避免序列化类的信息,以及用于解决使用byte[]遇到的问题。 |
org.redisson.client.codec.StringCodec | 纯字符串编码(无转换) |
org.redisson.client.codec.LongCodec | 纯整长型数字编码(无转换) |
org.redisson.client.codec.ByteArrayCodec | 字节数组编码 |
org.redisson.codec.CompositeCodec | 用来组合多种不同编码在一起 |
threads
线程池数量。默认值:当前处理核数量 * 2
3.nettyThreads
Netty线程池数量。这个线程池数量是在一个Redisson实例内,被其创建的所有分布式数据类型和服务,以及底层客户端所一同共享的线程池里保存的线程数量。
默认值: 当前处理核数量 * 2
executor
线程池。单独提供一个用来执行所有RTopic对象监听器,RRemoteService调用者和RExecutorService任务的线程池(ExecutorService)实例。
eventLoopGroup
用于特别指定一个EventLoopGroup. EventLoopGroup是用来处理所有通过Netty与Redis服务之间的连接发送和接受的消息。每一个Redisson都会在默认情况下自己创建管理一个EventLoopGroup实例。因此,如果在同一个JVM里面可能存在多个Redisson实例的情况下,采取这个配置实现多个Redisson实例共享一个EventLoopGroup的目的。
只有io.netty.channel.epoll.EpollEventLoopGroup或io.netty.channel.nio.NioEventLoopGroup才是允许的类型。
lockWatchdogTimeout
监控锁的看门狗超时,单位:毫秒。
默认值:30000
监控锁的看门狗超时时间单位为毫秒。该参数只适用于分布式锁的加锁请求中未明确使用leaseTimeout参数的情况。如果该看门口未使用lockWatchdogTimeout去重新调整一个分布式锁的lockWatchdogTimeout超时,那么这个锁将变为失效状态。这个参数可以用来避免由Redisson客户端节点宕机或其他原因造成死锁的情况。
单机版
单机版的参数还可以设置以下参数:
@Configuration
public class RedissonConfig {@Beanpublic RedissonClient redissonClient () {// 默认连接地址 127.0.0.1:6379// 初始化一个配置对象Config config = new Config();// useSingleServer设置成单机模式config.useSingleServer().setAddress("127.0.0.1:6379").setDatabase(0)  // 使用redis的数据库编号.setPassword("123456")  // redis数据库密码.setConnectionMinimumIdleSize(10)  //  连接池最小线程数.setConnectionPoolSize(50)  // 连接池最大线程数.setConnectTimeout(100) // 客户端链接redis的超时时间.setIdleConnectionTimeout(100)  // 线程超时时间.setTimeout(100);  // 想要听超时时间RedissonClient redisson = Redisson.create(config);return redisson;}
集群版
集群模式除了适用于Redis集群环境,也适用于任何云计算服务商提供的集群模式,例如AWS ElastiCache集群版、Azure Redis Cache和阿里云(Aliyun)的云数据库Redis版。
程序化配置集群的用法:
Config config = new Config();
config.useClusterServers().setScanInterval(2000) // 集群状态扫描间隔时间,单位是毫秒//可以用"rediss://"来启用SSL连接.addNodeAddress("redis://127.0.0.1:7000", "redis://127.0.0.1:7001").addNodeAddress("redis://127.0.0.1:7002");RedissonClient redisson = Redisson.create(config);
ClusterServersConfig 类的设置参数如下:
1.nodeAddresses
添加节点地址。可以通过host:port的格式来添加Redis集群节点的地址。多个节点可以一次性批量添加。
scanInterval
集群扫描间隔时间。对Redis集群节点状态扫描的时间间隔。单位是毫秒。
默认值: 1000
其他全部配置请参考官方文档。
Redisson原理
参考:https://mp.weixin.qq.com/s/5RnO22eGi8o9OewoB28x1g
https://blog.csdn.net/ideaxx/article/details/128613433
说明:以下源码基于JDK11
建立连接
在Redisson中,Netty被用作底层的网络通信框架。它提供了高性能、异步非阻塞的网络通信能力,使得Redisson可以与Redis服务器进行快速、可靠的通信。
在使用Redisson创建RedissonClient实例时,它会自动初始化并启动Netty客户端,用于与Redis服务器建立连接。
从前边的分布式锁使用过程可以看出,RLock是由RedissonClient创建,那么与redis的连接交互也是由RedissonClient来实现。
Redisson不可以直接创建,是通过RedissonClient来创建,有一个无参和一个有参的方法。
如下:
public static RedissonClient create() {Config config = new Config();config.useSingleServer().setAddress("redis://127.0.0.1:6379");return create(config);
}public static RedissonClient create(Config config) {    return new Redisson(config);
}
然后调用Redisson构造函数创建:
protected Redisson(Config config) {this.config = config;Config configCopy = new Config(config);this.connectionManager = ConfigSupport.createConnectionManager(configCopy);RedissonObjectBuilder objectBuilder = null;if (config.isReferenceEnabled()) {objectBuilder = new RedissonObjectBuilder(this);}this.commandExecutor = new CommandSyncService(this.connectionManager, objectBuilder);this.evictionScheduler = new EvictionScheduler(this.commandExecutor);this.writeBehindService = new WriteBehindService(this.commandExecutor);
}
这里会复制一份配置出来,然后创建连接管理器、命令执行器、定期定出调度、以及异步写服务。
此处主要关注命令执行器和连接管理器,此处用的是同步命令执行器,当然也有其他实现比如CommandBatchService批量执行器。
然后再看下创建连接管理器:
public static ConnectionManager createConnectionManager(Config configCopy) {UUID id = UUID.randomUUID();if (configCopy.getMasterSlaveServersConfig() != null) {validate((BaseMasterSlaveServersConfig)configCopy.getMasterSlaveServersConfig());return new MasterSlaveConnectionManager(configCopy.getMasterSlaveServersConfig(), configCopy, id);} else if (configCopy.getSingleServerConfig() != null) {validate(configCopy.getSingleServerConfig());return new SingleConnectionManager(configCopy.getSingleServerConfig(), configCopy, id);} else if (configCopy.getSentinelServersConfig() != null) {validate((BaseMasterSlaveServersConfig)configCopy.getSentinelServersConfig());return new SentinelConnectionManager(configCopy.getSentinelServersConfig(), configCopy, id);} else if (configCopy.getClusterServersConfig() != null) {validate((BaseMasterSlaveServersConfig)configCopy.getClusterServersConfig());return new ClusterConnectionManager(configCopy.getClusterServersConfig(), configCopy, id);} else if (configCopy.getReplicatedServersConfig() != null) {validate((BaseMasterSlaveServersConfig)configCopy.getReplicatedServersConfig());return new ReplicatedConnectionManager(configCopy.getReplicatedServersConfig(), configCopy, id);} else if (configCopy.getConnectionManager() != null) {return configCopy.getConnectionManager();} else {throw new IllegalArgumentException("server(s) address(es) not defined!");}
}
根据不同的配置创建不同连接管理器。
接下来简单看下SingleConnectionManager。
public class SingleConnectionManager extends MasterSlaveConnectionManager {public SingleConnectionManager(SingleServerConfig cfg, Config config, UUID id) {super(create(cfg), config, id);}private static MasterSlaveServersConfig create(SingleServerConfig cfg) {MasterSlaveServersConfig newconfig = new MasterSlaveServersConfig();newconfig.setPingConnectionInterval(cfg.getPingConnectionInterval());newconfig.setSslEnableEndpointIdentification(cfg.isSslEnableEndpointIdentification());newconfig.setSslProvider(cfg.getSslProvider());newconfig.setSslTruststore(cfg.getSslTruststore());newconfig.setSslTruststorePassword(cfg.getSslTruststorePassword());newconfig.setSslKeystore(cfg.getSslKeystore());newconfig.setSslKeystorePassword(cfg.getSslKeystorePassword());newconfig.setSslProtocols(cfg.getSslProtocols());newconfig.setRetryAttempts(cfg.getRetryAttempts());newconfig.setRetryInterval(cfg.getRetryInterval());newconfig.setTimeout(cfg.getTimeout());newconfig.setPassword(cfg.getPassword());newconfig.setUsername(cfg.getUsername());newconfig.setDatabase(cfg.getDatabase());newconfig.setClientName(cfg.getClientName());newconfig.setMasterAddress(cfg.getAddress());newconfig.setMasterConnectionPoolSize(cfg.getConnectionPoolSize());newconfig.setSubscriptionsPerConnection(cfg.getSubscriptionsPerConnection());newconfig.setSubscriptionConnectionPoolSize(cfg.getSubscriptionConnectionPoolSize());newconfig.setConnectTimeout(cfg.getConnectTimeout());newconfig.setIdleConnectionTimeout(cfg.getIdleConnectionTimeout());newconfig.setDnsMonitoringInterval(cfg.getDnsMonitoringInterval());newconfig.setMasterConnectionMinimumIdleSize(cfg.getConnectionMinimumIdleSize());newconfig.setSubscriptionConnectionMinimumIdleSize(cfg.getSubscriptionConnectionMinimumIdleSize());newconfig.setReadMode(ReadMode.MASTER);newconfig.setSubscriptionMode(SubscriptionMode.MASTER);newconfig.setKeepAlive(cfg.isKeepAlive());newconfig.setTcpNoDelay(cfg.isTcpNoDelay());newconfig.setNameMapper(cfg.getNameMapper());newconfig.setCredentialsResolver(cfg.getCredentialsResolver());return newconfig;}
}
SingleConnectionManager继承了MasterSlaveConnectionManager,MasterSlaveConnectionManager的构造方法如下:
public MasterSlaveConnectionManager(MasterSlaveServersConfig cfg, Config config, UUID id) {this(config, id);this.config = cfg;if (!cfg.getSlaveAddresses().isEmpty() || cfg.getReadMode() != ReadMode.SLAVE && cfg.getReadMode() != ReadMode.MASTER_SLAVE) {this.initTimer(cfg);this.initSingleEntry();} else {throw new IllegalArgumentException("Slaves aren't defined. readMode can't be SLAVE or MASTER_SLAVE");}
}
initTimer会创建空闲连接监听管理以及发布订阅管理器,然后调用initSingleEntry初始化单机客户端。
protected void initSingleEntry() {try {if (config.checkSkipSlavesInit()) {masterSlaveEntry = new SingleEntry(this, config);} else {masterSlaveEntry = new MasterSlaveEntry(this, config);}CompletableFuture<RedisClient> masterFuture = masterSlaveEntry.setupMasterEntry(new RedisURI(config.getMasterAddress()));masterFuture.join();//省略...startDNSMonitoring(masterFuture.getNow(null));} catch (Exception e) {//省略...}
}
创建SingleEntry,然后调用setupMasterEntry方法设置主节点连接,并且会调用startDNSMonitoring方法开启线程监听ip是否发生变成,如果变成会重新连接。
继续看setupMasterEntry方法会开始创建客户端:
public CompletableFuture<RedisClient> setupMasterEntry(RedisURI address, String sslHostname) {RedisClient client = this.connectionManager.createClient(NodeType.MASTER, address, sslHostname);return this.setupMasterEntry(client);
}
Redisson里的RedisClient创建时会有一系列netty启动器的相关设置和前置准备,可以看一下创建netty客户端启动器的操作会有一个createBootstrap方法。他主要是初始化连接到连接池,如果并发比较大,连接池中初始连接数不够用,会在发起请求的时候创建新的连接。
加锁原理
加锁会先调用RedissonClient创建锁对象。
public RLock getLock(String name) {return new RedissonLock(this.commandExecutor, name);
}
然后创建RedissonLock:
public RedissonLock(CommandAsyncExecutor commandExecutor, String name) {super(commandExecutor, name);this.commandExecutor = commandExecutor;this.internalLockLeaseTime = commandExecutor.getConnectionManager().getCfg().getLockWatchdogTimeout();this.pubSub = commandExecutor.getConnectionManager().getSubscribeService().getLockPubSub();
}
调用父类构造函数,指定执行器、锁释放时间以及发布订阅组件。
然后看加锁方法lock,他也是实现了JUC里的lock方法,实现代码如下:
private void lock(long leaseTime, TimeUnit unit, boolean interruptibly) throws InterruptedException {// 获取当前线程idlong threadId = Thread.currentThread().getId();// 尝试获取锁,若返回值为null,则表示已获取到锁Long ttl = this.tryAcquire(-1L, leaseTime, unit, threadId);if (ttl != null) {// 订阅解锁消息CompletableFuture<RedissonLockEntry> future = this.subscribe(threadId);this.pubSub.timeout(future);RedissonLockEntry entry;if (interruptibly) {entry = (RedissonLockEntry)this.commandExecutor.getInterrupted(future);} else {entry = (RedissonLockEntry)this.commandExecutor.get(future);}try {while(true) {ttl = this.tryAcquire(-1L, leaseTime, unit, threadId);if (ttl == null) {return;}if (ttl >= 0L) {try {entry.getLatch().tryAcquire(ttl, TimeUnit.MILLISECONDS);} catch (InterruptedException var14) {if (interruptibly) {throw var14;}entry.getLatch().tryAcquire(ttl, TimeUnit.MILLISECONDS);}} else if (interruptibly) {entry.getLatch().acquire();} else {entry.getLatch().acquireUninterruptibly();}}} finally {this.unsubscribe(entry, threadId);}}
}
上述代码的核心逻辑是:
- 尝试获取锁,如果获取成功则返回调用
- 如果超过了等待时间,则返回获取失败
- 订阅锁释放事件,并通过await方法阻塞等待锁释放,基于信号量,当锁被其它资源占用时,当前线程通过 Redis 的 channel 订阅锁的释放事件,一旦锁释放会发消息通知待等待的线程进行竞争获取锁
- 收到锁释放的信号后,在最大等待时间之内,循环一次接着一次的尝试获取锁,获取锁成功,则返回true,若在最大等待时间之内还没获取到锁,则认为获取锁失败,返回false结束循环
- 最后无论是否获得锁,都要取消订阅解锁消息,不再参与锁获取和竞争
其中加锁的核心方法是tryAcquire,其代码如下
private Long tryAcquire(long waitTime, long leaseTime, TimeUnit unit, long threadId) {return (Long)this.get(this.tryAcquireAsync(waitTime, leaseTime, unit, threadId));
}
tryAcquireAsync代码如下:
private <T> RFuture<Long> tryAcquireAsync(long waitTime, long leaseTime, TimeUnit unit, long threadId) {RFuture ttlRemainingFuture;if (leaseTime > 0L) {ttlRemainingFuture = this.tryLockInnerAsync(waitTime, leaseTime, unit, threadId, RedisCommands.EVAL_LONG);} else {ttlRemainingFuture = this.tryLockInnerAsync(waitTime, this.internalLockLeaseTime, TimeUnit.MILLISECONDS, threadId, RedisCommands.EVAL_LONG);}CompletionStage<Long> f = ttlRemainingFuture.thenApply((ttlRemaining) -> {if (ttlRemaining == null) {if (leaseTime > 0L) {this.internalLockLeaseTime = unit.toMillis(leaseTime);} else {this.scheduleExpirationRenewal(threadId);}}return ttlRemaining;});return new CompletableFutureWrapper(f);
}
如果传入锁释放时间且大于零,使用用户传入的释放时间,否则使用默认的释放时间30秒,然后调用tryLockInnerAsync获取锁并返回中心化节点数据的ttl时间。
如果用户传入了leaseTime就不会开启看门狗机制实现自动续期,如果没有传入则开启看门口续期机制。
其核心代码tryLockInnerAsync方法如下:
<T> RFuture<T> tryLockInnerAsync(long waitTime, long leaseTime, TimeUnit unit, long threadId, RedisStrictCommand<T> command) {return this.evalWriteAsync(this.getRawName(), LongCodec.INSTANCE, command, "if ((redis.call('exists', KEYS[1]) == 0) or (redis.call('hexists', KEYS[1], ARGV[2]) == 1)) then redis.call('hincrby', KEYS[1], ARGV[2], 1); redis.call('pexpire', KEYS[1], ARGV[1]); return nil; end; return redis.call('pttl', KEYS[1]);", Collections.singletonList(this.getRawName()), new Object[]{unit.toMillis(leaseTime), this.getLockName(threadId)});
}
可以看到,其核心就是一个lua脚本。
为了保证操作的原子性,这里使用了lua脚本来操作redis,执行脚本时key是加锁的名称,ARGV分别是释放时间和线程信息。从脚本内容可以看出,锁在redis中的数据结构是hash,外层key存储的是锁的名称,内部field和value存储的是加锁客户端线程信息。脚本含义是:
- 如果hash不存在,则直接放入加锁客户端信息并设置失效时间返回
- 如果hash中存在加锁客户端的信息,则value加1实现重入逻辑,并设置过期时间返回
- 否则竞争加锁失败,返回锁对应hash的过期时间
pttl补充: 以毫秒为单位返回 key 的剩余过期时间。
当 key 不存在时,返回 -2 。
当 key 存在但没有设置剩余生存时间时,返回 -1 。
否则,以毫秒为单位,返回 key 的剩余生存时间。
自动续期
回顾下tryAcquireAsync的代码如下:
private <T> RFuture<Long> tryAcquireAsync(long waitTime, long leaseTime, TimeUnit unit, long threadId) {RFuture ttlRemainingFuture;if (leaseTime > 0L) {ttlRemainingFuture = this.tryLockInnerAsync(waitTime, leaseTime, unit, threadId, RedisCommands.EVAL_LONG);} else {ttlRemainingFuture = this.tryLockInnerAsync(waitTime, this.internalLockLeaseTime, TimeUnit.MILLISECONDS, threadId, RedisCommands.EVAL_LONG);}CompletionStage<Long> f = ttlRemainingFuture.thenApply((ttlRemaining) -> {// ttlRemaining不为空代表加锁成功if (ttlRemaining == null) {// 如果用户指定了锁释放时间就返回调用if (leaseTime > 0L) {this.internalLockLeaseTime = unit.toMillis(leaseTime);} else {// 否则就开启续期能力,也就是看门狗机制。this.scheduleExpirationRenewal(threadId);}}return ttlRemaining;});return new CompletableFutureWrapper(f);
}
其中scheduleExpirationRenewal就是执行看门狗。注意只有没有过期时间才会执行看门狗机制。
其代码如下:
protected void scheduleExpirationRenewal(long threadId) {// 创建ExpirationEntry对象,存放线程续期信息RedissonBaseLock.ExpirationEntry entry = new RedissonBaseLock.ExpirationEntry();RedissonBaseLock.ExpirationEntry oldEntry = (RedissonBaseLock.ExpirationEntry)EXPIRATION_RENEWAL_MAP.putIfAbsent(this.getEntryName(), entry);// 如果已经存在则已经存在与当前对象相同名称的续约信息,将当前线程ID加入到oldEntry中,表示需要更新该续约信息if (oldEntry != null) {oldEntry.addThreadId(threadId);} else {// 否则调用renewExpiration方法操作续期,如果线程被中断则取消续期entry.addThreadId(threadId);try {this.renewExpiration();} finally {if (Thread.currentThread().isInterrupted()) {this.cancelExpirationRenewal(threadId);}}}}
主要看一下renewExpiration实现:
private void renewExpiration() {RedissonBaseLock.ExpirationEntry ee = (RedissonBaseLock.ExpirationEntry)EXPIRATION_RENEWAL_MAP.get(this.getEntryName());if (ee != null) {Timeout task = this.commandExecutor.getConnectionManager().newTimeout(new TimerTask() {public void run(Timeout timeout) throws Exception {RedissonBaseLock.ExpirationEntry ent = (RedissonBaseLock.ExpirationEntry)RedissonBaseLock.EXPIRATION_RENEWAL_MAP.get(RedissonBaseLock.this.getEntryName());if (ent != null) {Long threadId = ent.getFirstThreadId();if (threadId != null) {CompletionStage<Boolean> future = RedissonBaseLock.this.renewExpirationAsync(threadId);future.whenComplete((res, e) -> {if (e != null) {RedissonBaseLock.log.error("Can't update lock {} expiration", RedissonBaseLock.this.getRawName(), e);RedissonBaseLock.EXPIRATION_RENEWAL_MAP.remove(RedissonBaseLock.this.getEntryName());} else {if (res) {RedissonBaseLock.this.renewExpiration();} else {RedissonBaseLock.this.cancelExpirationRenewal((Long)null);}}});}}}}, this.internalLockLeaseTime / 3L, TimeUnit.MILLISECONDS);ee.setTimeout(task);}
}
该方法做的事情就是每internalLockLeaseTime的1/3时间执行续期动作,internalLockLeaseTime默认是30秒,可以修改,并且延迟操作是通过netty的时间轮实现,每一次续期操作都会触发下一次延迟。
接着看一下renewExpirationAsync的实现:
protected CompletionStage<Boolean> renewExpirationAsync(long threadId) {return this.evalWriteAsync(this.getRawName(), LongCodec.INSTANCE, RedisCommands.EVAL_BOOLEAN, "if (redis.call('hexists', KEYS[1], ARGV[2]) == 1) then redis.call('pexpire', KEYS[1], ARGV[1]); return 1; end; return 0;", Collections.singletonList(this.getRawName()), this.internalLockLeaseTime, this.getLockName(threadId));
}
同样是通过lua脚本操作redis,检查加锁的客户端线程是否存在,如果存在则通过pexpire命令重新设置过期时间,从而达到续期作用,并返回1(代表续期成功),否则返回0(续期失败)。
解锁原理
释放锁会调用RedissonLock的unlock方法操作,看一下unlock:
public void unlock() {try {this.get(this.unlockAsync(Thread.currentThread().getId()));} catch (RedisException var2) {if (var2.getCause() instanceof IllegalMonitorStateException) {throw (IllegalMonitorStateException)var2.getCause();} else {throw var2;}}
}
然后调用unlockAsync方法:
public RFuture<Void> unlockAsync(long threadId) {RFuture<Boolean> future = this.unlockInnerAsync(threadId);CompletionStage<Void> f = future.handle((opStatus, e) -> {this.cancelExpirationRenewal(threadId);if (e != null) {throw new CompletionException(e);} else if (opStatus == null) {IllegalMonitorStateException cause = new IllegalMonitorStateException("attempt to unlock lock, not locked by current thread by node id: " + this.id + " thread-id: " + threadId);throw new CompletionException(cause);} else {return null;}});return new CompletableFutureWrapper(f);
}
根据当前线程id释放锁,并且取消看门狗续期能力,主要看unlockInnerAsync方法释放锁。
protected RFuture<Boolean> unlockInnerAsync(long threadId) {return this.evalWriteAsync(this.getRawName(), LongCodec.INSTANCE, RedisCommands.EVAL_BOOLEAN, "if (redis.call('hexists', KEYS[1], ARGV[3]) == 0) then return nil;end; local counter = redis.call('hincrby', KEYS[1], ARGV[3], -1); if (counter > 0) then redis.call('pexpire', KEYS[1], ARGV[2]); return 0; else redis.call('del', KEYS[1]); redis.call('publish', KEYS[2], ARGV[1]); return 1; end; return nil;", Arrays.asList(this.getRawName(), this.getChannelName()), new Object[]{LockPubSub.UNLOCK_MESSAGE, this.internalLockLeaseTime, this.getLockName(threadId)});
}
也是通过lua脚本来操作redis实现释放锁,上述脚本主要做了以下操作:
- 如果当前线程持有锁资源,那么减少hash中field的value值
- 如果当前线程持有的hash中field的value值大于0,那么重新设置过期时间,从而支持重入能力
- 如果当前线程持有的hash中field的value值小于0, 那么需要释放锁,通过publish命令发布释放事件通知,告诉其他竞争者去抢占锁资源
这样就释放了锁资源,并且会通知其他订阅了事件的加锁参与者去尝试加锁。
公平锁
基于Redis的Redisson分布式可重入公平锁也是实现了java.util.concurrent.locks.Lock接口的一种RLock对象。同时还提供了异步(Async)、反射式(Reactive)和RxJava2标准的接口。它保证了当多个Redisson客户端线程同时请求加锁时,优先分配给先发出请求的线程。所有请求线程会在一个队列中排队,当某个线程出现宕机时,Redisson会等待5秒后继续下一个线程,也就是说如果前面有5个线程都处于等待状态,那么后面的线程会等待至少25秒。
RLock fairLock = redisson.getFairLock("anyLock");
// 最常见的使用方法
fairLock.lock();
大家都知道,如果负责储存这个分布式锁的Redis节点宕机以后,而且这个锁正好处于锁住的状态时,这个锁会出现锁死的状态。为了避免这种情况的发生,Redisson内部提供了一个监控锁的看门狗,它的作用是在Redisson实例被关闭前,不断的延长锁的有效期。默认情况下,看门狗的检查锁的超时时间是30秒钟,也可以通过修改Config.lockWatchdogTimeout来另行指定。
另外Redisson还通过加锁的方法提供了leaseTime的参数来指定加锁的时间。超过这个时间后锁便自动解开了。
// 10秒钟以后自动解锁
// 无需调用unlock方法手动解锁
fairLock.lock(10, TimeUnit.SECONDS);// 尝试加锁,最多等待100秒,上锁以后10秒自动解锁
boolean res = fairLock.tryLock(100, 10, TimeUnit.SECONDS);
...
fairLock.unlock();
Redisson同时还为分布式可重入公平锁提供了异步执行的相关方法:
RLock fairLock = redisson.getFairLock("anyLock");
fairLock.lockAsync();
fairLock.lockAsync(10, TimeUnit.SECONDS);
Future<Boolean> res = fairLock.tryLockAsync(100, 10, TimeUnit.SECONDS);
读写锁
基于Redis的Redisson分布式可重入读写锁RReadWriteLock Java对象实现了java.util.concurrent.locks.ReadWriteLock接口。其中读锁和写锁都继承了RLock接口。
分布式可重入读写锁允许同时有多个读锁和一个写锁处于加锁状态。
RReadWriteLock rwlock = redisson.getReadWriteLock("anyRWLock");
// 最常见的使用方法
rwlock.readLock().lock();
// 或
rwlock.writeLock().lock();
大家都知道,如果负责储存这个分布式锁的Redis节点宕机以后,而且这个锁正好处于锁住的状态时,这个锁会出现锁死的状态。为了避免这种情况的发生,Redisson内部提供了一个监控锁的看门狗,它的作用是在Redisson实例被关闭前,不断的延长锁的有效期。默认情况下,看门狗的检查锁的超时时间是30秒钟,也可以通过修改Config.lockWatchdogTimeout来另行指定。
另外Redisson还通过加锁的方法提供了leaseTime的参数来指定加锁的时间。超过这个时间后锁便自动解开了。
// 10秒钟以后自动解锁
// 无需调用unlock方法手动解锁
rwlock.readLock().lock(10, TimeUnit.SECONDS);
// 或
rwlock.writeLock().lock(10, TimeUnit.SECONDS);// 尝试加锁,最多等待100秒,上锁以后10秒自动解锁
boolean res = rwlock.readLock().tryLock(100, 10, TimeUnit.SECONDS);
// 或
boolean res = rwlock.writeLock().tryLock(100, 10, TimeUnit.SECONDS);
...
lock.unlock();
信号量
在JUC中也有信号量(Semaphore)的概念。
- 可以用来控制同时访问特定资源的线程数量,常用于限流场景。
- Semaphore接收一个int整型值,表示 许可证数量。
- 线程通过调用acquire()获取许可证,执行完成之后通过调用release()归还许可证。
- 只有获取到许可证的线程才能运行,获取不到许可证的线程将会阻塞。
在Redisson的作用也是类似,但是它是分布式的信号量(RSemaphore)。
使用方法如下:
RSemaphore semaphore = redisson.getSemaphore("semaphore");// 设置资源量
semaphore.trySetPermits(3);// 获取资源
semaphore.acquire();
//或以下语法
semaphore.acquireAsync();
// 带过期时间的
semaphore.acquire(23);
semaphore.tryAcquire();
//或
semaphore.tryAcquireAsync();
// 带过期时间的
semaphore.tryAcquire(23, TimeUnit.SECONDS);
//或
semaphore.tryAcquireAsync(23, TimeUnit.SECONDS);// 释放资源
semaphore.release(10);
semaphore.release();
//或
semaphore.releaseAsync();
注意:trySetPermits会在redis中成semaphore的key,如果要修改资源量,必须手动把redis中该key删除,否则只在代码中修改,重启后无法生效。
示例,修改我们的StockService3,实现分布式限流
public void semaphoreLock() {RSemaphore semaphore = redissonClient.getSemaphore("semaphore");//设置资源量,限流的线程数semaphore.trySetPermits(3);try {semaphore.acquire(); // 获取资源,获取资源成功的线程可以继续处理业务操作,否则会被阻塞住redisTemplate.opsForList().rightPush("log", "获取资源,开始处理业务逻辑" + Thread.currentThread().getName());TimeUnit.SECONDS.sleep(new Random().nextInt(10));redisTemplate.opsForList().rightPush("log", "处理完,释放了资源" + Thread.currentThread().getName());semaphore.release(); // 手动释放资源,后续请求线程可以获取该资源} catch (InterruptedException e) {throw new RuntimeException(e);}}
闭锁
基于Redisson的Redisson分布式闭锁(CountDownLatch)Java对象RCountDownLatch采用了与java.util.concurrent.CountDownLatch相似的接口和用法。
CountDownLatch作为一个同步工具类,用来协调多个线程之间的同步,用来作为线程间的通信而不是互斥作用。它能够使一个线程在等待另外一些线程完成各自工作之后,再继续执行。使用一个计数器进行实现,计数器初始值就是线程的数量。当每个被计数的线程完成任务后,计数器值减一,当计数器的值为0时,表示所有线程都已经完成了任务,然后在CountDownLatch上等待的线程就可以恢复执行。
用法:
RCountDownLatch latch = redisson.getCountDownLatch("anyCountDownLatch");
latch.trySetCount(1);
// 阻塞当前线程,等待其他线程完成再继续向下执行
latch.await();// 在其他线程或其他JVM里,先获取,再使用countDown方法
RCountDownLatch latch = redisson.getCountDownLatch("anyCountDownLatch");
latch.countDown();
Redisson分布式锁考虑问题
一恶搞分布式锁需要考虑哪些问题?
Redisson中又是如何解决的?
1.续期问题
锁续期是分布式锁一定要考虑的问题,锁时间过短会导致锁释放了业务还在执行,但是锁又被其他客户端获取,从而导致数据不一致问题;锁时间过长又会导致其他客户端长时间等待,造成性能和体验问题。续期主要考虑以下两点:
- 自动续期:所持有过程中,会处理比较复杂的业务,需要一种机制在业务可能在释放之前处理不完的情况下,让业务无感知实现自动续期,而不影响业务的执行。
- 最大续期次数:互联网业务相对比较复杂多变,在服务依赖的资源或者服务出现短暂抖动或者不可用的情况下,可能短时间的续期解决不了问题,而无限制的续期又会影响的整个服务的性能或者拖垮服务,需要设置相对合理的策略,来限制最大续期次数和时间,从而来保证服务更高性能的表现。
2.可用性
可用性更多的依赖中心化资源的稳定性,redisson分布式锁是基于redis实现的,那么如果redis是单机模式,redisson做再大的努力也是徒劳。对于主从模式,redisson加锁肯定是操作的主节点,主从同步默认是异步的,在主节点加锁成功后,突然宕机,加锁数据尚未同步到从节点,此时从节点晋升为主节点,那么新的主节点不具有redisson加锁数据,新的请求来了之后会重新加锁,从而会出现问题。
对于集群模式下使用Redisson进行分布式锁时,至少要有半数以上的Redis节点在获取锁时才会视为成功,这个机制可以保证在网络分区或部分Redis节点故障的情况下,分布式锁仍然能够正常工作,避免因为单点故障导致整个系统的不可用性。
3.可重入性
Redisson分布式锁是支持可重入的,也就是说同一个线程可以多次获取同一个锁而不会造成死锁。当一个线程已经获取了一个分布式锁,并且没有释放锁之前,它可以再次请求获取相同名称的锁。在这种情况下,Redisson会维护一个计数器来记录锁的重入次数。每次成功获取锁时,计数器会加一;在释放锁时,计数器会相应地减一。只有当线程释放锁的次数与获取锁的次数相匹配(计数器为0),锁才会完全释放,其他线程才能获得该锁。这样可以保证同一个线程在持有锁的情况下,可以多次获取锁而不会被阻塞或产生死锁。
可重入性是Redisson分布式锁的一个重要特性,它使得在复杂的业务逻辑中能够灵活地使用锁,避免了线程自身因为重入而产生的问题。需要注意的是,重入次数计数器是基于线程级别的,不同线程之间的计数器是独立的,因此不能用于跨线程的重入。
4.死锁检测与恢复
Redisson分布式锁提供了死锁检测与恢复的机制,以帮助应对潜在的死锁情况。
首先,Redisson会为每个获取到的分布式锁设置一个过期时间(expire)。这个过期时间是最大持有锁的时间,确保即使持有锁的线程发生异常或没有正确释放锁,锁也能在一段时间后自动释放,避免长时间的死锁。
其次,Redisson引入异步续期(async renewal)机制。在获取锁成功后,Redisson会使用后台线程定期自动续期(renewal)锁的过期时间,以防止持有锁的线程因为某些原因没有及时续期导致锁的过期。这样可以减少因为网络延迟、GC暂停等问题而造成的误解锁。
此外,Redisson还提供了针对死锁的自动解锁(auto-unlock)功能。当一个线程持有锁的时间超过指定的阈值后,Redisson会自动解锁该锁,并触发一个解锁事件。通过监听解锁事件,可以实现对死锁的检测和恢复操作,例如记录日志、重试获取锁等。
需要注意的是,无法完全消除死锁的发生,因为死锁是由于复杂的并发环境和业务逻辑导致的。但是通过上述的机制,Redisson能够在大部分情况下检测到死锁,并提供自动解锁的功能,以减少死锁对系统的影响。要充分利用Redisson的死锁检测与恢复机制,建议合理设置过期时间、异步续期和自动解锁的阈值,并结合监控和日志来及时发现和解决潜在的死锁问题。
六、ZooKeeper分布式锁
参考:https://mp.weixin.qq.com/s/W9rrECILCoxHhCegABmvGw
ZooKeeper概述
ZooKeeper 是 Apache 软件基金会的一个软件项目,它为大型分布式计算提供开源的分布式配置服务、同步服务和命名注册。
ZooKeeper 的架构通过冗余服务实现高可用性。
Zookeeper 的设计目标是将那些复杂且容易出错的分布式一致性服务封装起来,构成一个高效可靠的原语集,并以一系列简单易用的接口提供给用户使用。
一个典型的分布式数据一致性的解决方案,分布式应用程序可以基于它实现诸如数据发布/订阅、负载均衡、命名服务、分布式协调/通知、集群管理、Master 选举、分布式锁和分布式队列等功能。
ZooKeeper原理
Zookeeper通常以集群模式运转,其协调能力可以理解为是基于观察者设计模式来实现的;ZK服务会使用Znode存储使用者的数据,并将这些数据以树形目录的形式来组织管理,支持使用者以观察者的角色指定自己关注哪些节点\数据的变更,当这些变更发生时,ZK会通知其观察者。
为满足本篇目标所需,着重介绍以下几个关键特性:
- 数据组织
在 zookeeper 中,可以说 zookeeper 中的所有存储的数据是由 znode 组成的,节点也称为 znode,并以 key/value 形式存储数据信息和节点信息。
整体结构类似于 linux 文件系统的模式以树形结构存储。其中根路径以 / 开头。
进入 zookeeper 安装的 bin 目录,通过sh zkCli.sh打开命令行终端,执行 “ls /” 命令显示。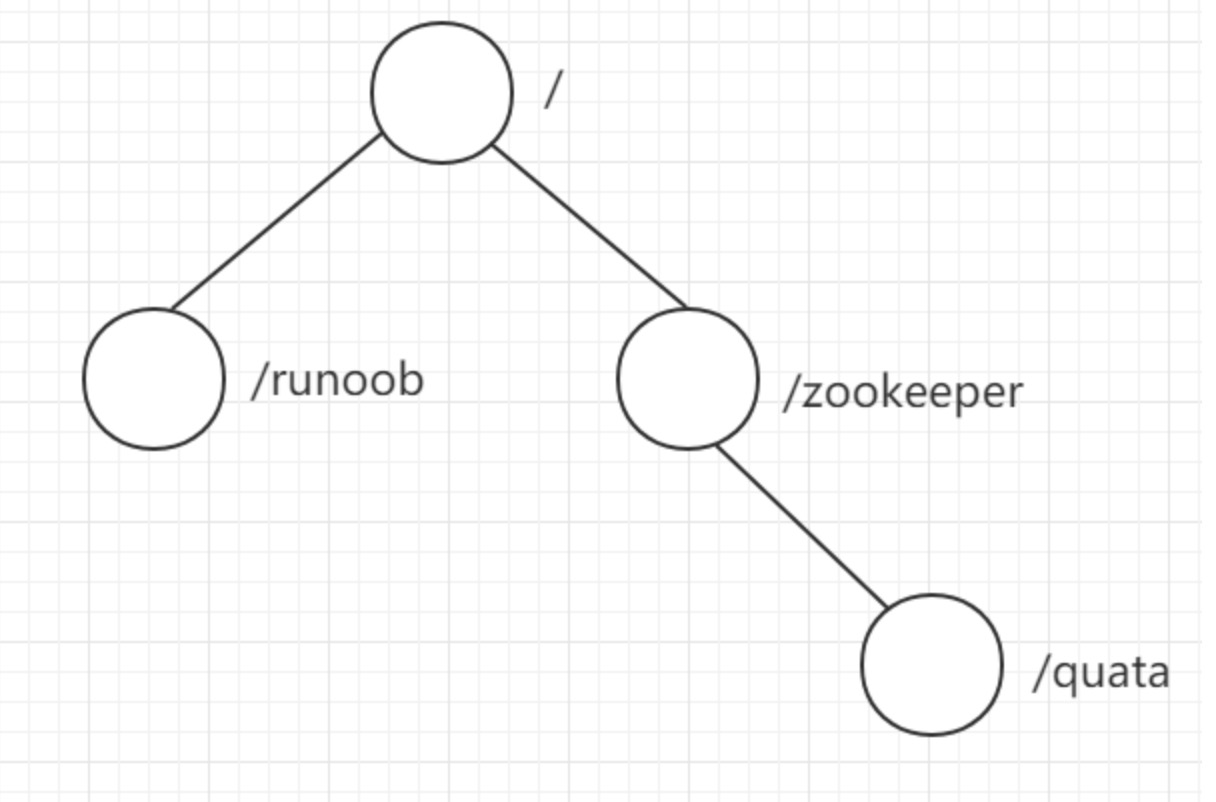
- 节点类型
在 ZooKeeper 中,节点类型可以分为持久节点(PERSISTENT )、临时节点(EPHEMERAL),以及时序节点(SEQUENTIAL ),具体在节点创建过程中,一般是组合使用。
- 持久节点:节点创建后,就一直存在,直到有删除操作来主动清除这个节点——不会因为创建该节点的客户端会话失效而消失。
- 临时节点:临时节点的生命周期和客户端会话绑定。也就是说,如果客户端会话失效,那么这个节点就会自动被清除掉。注意,这里提到的是会话失效,而非连接断开。另外,在临时节点下面不能创建子节点。
- 持久顺序节点:在ZK中,每个父节点会为他的第一级子节点维护一份时序,会记录每个子节点创建的先后顺序。基于这个特性,在创建子节点的时候,可以设置这个属性,那么在创建节点过程中,ZK会自动为给定节点名加上一个数字后缀,作为新的节点名。这个数字后缀的范围是整型的最大值。
- 临时顺序节点:和持久顺序节点一样,只是删除遵循临时节点的机制。可用于分布式锁。
- 集群模式
通常是由3、5个基数实例组成集群,当超过半数服务实例正常工作就能对外提供服务,既能避免单点故障,又尽量高可用,每个服务实例都有一个数据备份,以实现数据全局一致。
- 顺序更新
更新请求都会转由leader执行,来自同一客户端的更新将按照发送的顺序被写入到ZK,处理写请求创建Znode时,Znode名称后会被分配一个全局唯一的递增编号,可以通过顺序号推断请求的顺序,利用这个特性可以实现高级协调服务。
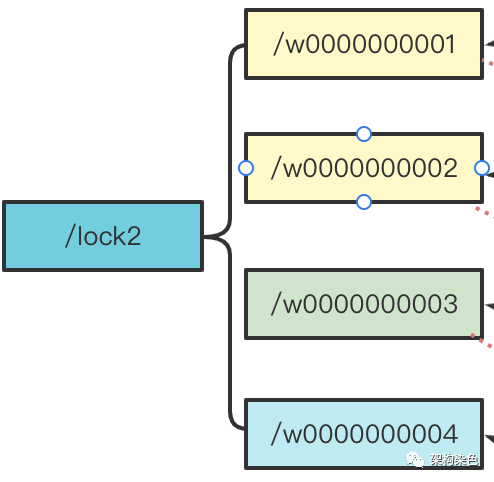
- 监听机制
给某个节点注册监听器,该节点一旦发生变更(例如更新或者删除),监听者就会收到一个Watch Event,可以感知到节点\数据的变更。
- 临时节点
session链接断开临时节点就没了,不能创建子节点(很关键)。
Java使用ZooKeeper
引入包:
<dependency><groupId>org.apache.zookeeper</groupId><artifactId>zookeeper</artifactId><version>3.5.7</version>
</dependency>
创建zk.ZKTest类,用于测试下java中如何使用ZK,代码如下:
public class ZkTest {public static void main(String[] args) throws KeeperException, InterruptedException {// 获取zookeeper链接CountDownLatch countDownLatch = new CountDownLatch(1);ZooKeeper zooKeeper = null;try {zooKeeper = new ZooKeeper("172.16.116.100:2181", 30000, new Watcher() {@Overridepublic void process(WatchedEvent event) {if (Event.KeeperState.SyncConnected.equals(event.getState()) && Event.EventType.None.equals(event.getType())) {System.out.println("获取链接成功。。。。。。" + event);countDownLatch.countDown();}}});countDownLatch.await();} catch (Exception e) {e.printStackTrace();}// 创建一个节点,1-节点路径 2-节点内容 3-节点的访问权限 4-节点类型// OPEN_ACL_UNSAFE:任何人可以操作该节点// CREATOR_ALL_ACL:创建者拥有所有访问权限// READ_ACL_UNSAFE: 任何人都可以读取该节点// zooKeeper.create("/atguigu/aa", "haha~~".getBytes(), ZooDefs.Ids.OPEN_ACL_UNSAFE, CreateMode.PERSISTENT);zooKeeper.create("/test", "haha~~".getBytes(), ZooDefs.Ids.OPEN_ACL_UNSAFE, CreateMode.EPHEMERAL);// zooKeeper.create("/atguigu/cc", "haha~~".getBytes(), ZooDefs.Ids.OPEN_ACL_UNSAFE, CreateMode.PERSISTENT_SEQUENTIAL);// zooKeeper.create("/atguigu/dd", "haha~~".getBytes(), ZooDefs.Ids.OPEN_ACL_UNSAFE, CreateMode.EPHEMERAL_SEQUENTIAL);// zooKeeper.create("/atguigu/dd", "haha~~".getBytes(), ZooDefs.Ids.OPEN_ACL_UNSAFE, CreateMode.EPHEMERAL_SEQUENTIAL);// zooKeeper.create("/atguigu/dd", "haha~~".getBytes(), ZooDefs.Ids.OPEN_ACL_UNSAFE, CreateMode.EPHEMERAL_SEQUENTIAL);// 判断节点是否存在Stat stat = zooKeeper.exists("/test", true);if (stat != null){System.out.println("当前节点存在!" + stat.getVersion());} else {System.out.println("当前节点不存在!");}// 判断节点是否存在,同时添加监听zooKeeper.exists("/test", event -> {});// 获取一个节点的数据byte[] data = zooKeeper.getData("/atguigu/ss0000000001", false, null);System.out.println(new String(data));// 查询一个节点的所有子节点List<String> children = zooKeeper.getChildren("/test", false);System.out.println(children);// 更新zooKeeper.setData("/test", "wawa...".getBytes(), stat.getVersion());// 删除一个节点//zooKeeper.delete("/test", -1);if (zooKeeper != null){zooKeeper.close();}}
}
ZooKeeper实现分布式锁
实现分布式锁主要有以下几个方面:
-
互斥 排他
-
防死锁:可自动释放锁(临时节点),获得锁之后客户端所在机器宕机了,客户端没有主动删除子节点;如果创建的是永久的节点,那么这个锁永远不会释放,导致死锁;由于创建的是临时节点,客户端宕机后,过了一定时间zookeeper没有收到客户端的心跳包判断会话失效,将临时节点删除从而释放锁。
-
可重入锁:借助于ThreadLocal
-
防误删:宕机自动释放临时节点,不需要设置过期时间,也就不存在误删问题。
-
加锁/解锁要具备原子性
-
单点问题:使用Zookeeper可以有效的解决单点问题,ZK一般是集群部署的。
-
集群问题:zookeeper集群是强一致性的,只要集群中有半数以上的机器存活,就可以对外提供服务。
基本实现
思路:
- 多个请求同时添加一个相同的临时节点,只有一个可以添加成功。添加成功的获取到锁
- 执行业务逻辑
- 完成业务流程后,删除节点释放锁
- 重试:没有获取到锁的请求重试
由于zookeeper获取链接是一个耗时过程,这里可以在项目启动时,初始化链接,并且只初始化一次。
创建ZkClient,借助于spring特性,代码实现如下:
package com.example.distributed.lock.utils.zk;import org.apache.zookeeper.*;
import org.springframework.stereotype.Component;import javax.annotation.PostConstruct;
import javax.annotation.PreDestroy;@Component
public class ZkClient {private static final String connectString = "localhost:2181";private static final String ROOT_PATH = "/distributed";private ZooKeeper zooKeeper;/*** @PostConstruct 注解会在无参构造方法完成后立即执行,* 和@Component注解配合就可以保证项目启动就执行这个方法,在这个方法里获取zk的链接,提高后面的效率*/@PostConstructpublic void init() {try {// 连接zookeeper服务器this.zooKeeper = new ZooKeeper(connectString, 30000, new Watcher() {@Overridepublic void process(WatchedEvent event) {System.out.println("获取链接成功!!");}});// 创建分布式锁根节点if (this.zooKeeper.exists(ROOT_PATH, false) == null){this.zooKeeper.create(ROOT_PATH, null, ZooDefs.Ids.OPEN_ACL_UNSAFE, CreateMode.PERSISTENT);}} catch (Exception e) {System.out.println("获取链接失败!");e.printStackTrace();}}/*** @PreDestroy 会在Spring容器销毁之前执行以下方法* 在这个方法里执行ZK断开链接即可*/@PreDestroypublic void destroy() {try {if (zooKeeper != null){zooKeeper.close();}} catch (InterruptedException e) {e.printStackTrace();}}/*** 初始化zk分布式锁对象方法*允许用户自定义锁的名称,这样可以有很多锁可以用** @param lockName* @return*/public ZkDistributedLock getLock(String lockName){return new ZkDistributedLock(zooKeeper, lockName);}}
然后创建我们的ZooKeeper分布式锁类,代码如下:
package com.example.distributed.lock.utils.zk;import org.apache.zookeeper.CreateMode;
import org.apache.zookeeper.KeeperException;
import org.apache.zookeeper.ZooDefs;
import org.apache.zookeeper.ZooKeeper;import java.util.concurrent.TimeUnit;
import java.util.concurrent.locks.Condition;
import java.util.concurrent.locks.Lock;public class ZkDistributedLock implements Lock {private ZooKeeper zooKeeper;private String lockName;/*** 锁目录的根节点*/private static final String ROOT_PATH = "/distributed";public ZkDistributedLock(ZooKeeper zooKeeper, String lockName) {this.zooKeeper = zooKeeper;this.lockName = lockName;// 判断根节点是否存在,如果不存在就去创建节点try {if (zooKeeper.exists(ROOT_PATH, false) == null) {zooKeeper.create(ROOT_PATH, null, ZooDefs.Ids.OPEN_ACL_UNSAFE, CreateMode.PERSISTENT);}} catch (KeeperException e){e.printStackTrace();} catch (InterruptedException e) {e.printStackTrace();}}@Overridepublic void lock() {// 创建znode节点的过程tryLock();}@Overridepublic void lockInterruptibly() throws InterruptedException {}@Overridepublic boolean tryLock() {// 创建znode节点的过程try {// 注意这里创建的节点类型为临时节点,防止客户端获取锁时因为宕机等原因未来得及释放锁,导致死锁zooKeeper.create(ROOT_PATH + "/" + lockName, null, ZooDefs.Ids.OPEN_ACL_UNSAFE, CreateMode.EPHEMERAL);return true;} catch (Exception e) {// 重试,隔一段时间递归调用try {Thread.sleep(200);tryLock();} catch (InterruptedException ex) {ex.printStackTrace();}}return false;}@Overridepublic boolean tryLock(long time, TimeUnit unit) throws InterruptedException {return false;}@Overridepublic void unlock() {// 删除znode节点的过程try {this.zooKeeper.delete(ROOT_PATH + "/" + lockName, 0);} catch (InterruptedException e) {e.printStackTrace();} catch (KeeperException e) {e.printStackTrace();}}@Overridepublic Condition newCondition() {return null;}
}
最后创建StockZookeeperService,使用分布式锁:
package com.example.distributed.lock.service;import com.example.distributed.lock.utils.zk.ZkClient;
import com.example.distributed.lock.utils.zk.ZkDistributedLock;
import lombok.extern.slf4j.Slf4j;
import org.redisson.api.RLock;
import org.redisson.api.RSemaphore;
import org.redisson.api.RedissonClient;
import org.springframework.beans.factory.annotation.Autowired;
import org.springframework.data.redis.core.StringRedisTemplate;
import org.springframework.stereotype.Service;import java.util.Random;
import java.util.concurrent.TimeUnit;@Service
@Slf4j
public class StockZookeeperService {@Autowiredprivate StringRedisTemplate redisTemplate;@Autowiredprivate ZkClient zkClient;/*** redis 分布式锁,自动续期*/public void deduct() {// 使用ZkDistributedLockZkDistributedLock lock = zkClient.getLock("lock");lock.lock();try {// 1.获取当前库存信息String stock = redisTemplate.opsForValue().get("stock").toString();// 2.判断库存是否充足if (stock != null && stock.length()!=0) {Integer st = Integer.valueOf(stock);if (st > 0) {// 3.扣减库存redisTemplate.opsForValue().set("stock", String.valueOf(--st));}}} finally {// 解锁lock.unlock();}}}
上面就利用了znode节点不可重复的特性实现了具有排他性的分布式锁。
但是上面实现的分布式锁也存在问题:
- 性能一般(比redis分布式锁略差)
- 不可重入
优化:阻塞锁
上面我们说了基本实现存在的一个问题是性能一般,主要是我们在获取锁时,使用了隔一段时间递归调用,也就是一种类似自旋的方式来获取锁,占用CPU资源,影响了性能。
如果实现阻塞锁,就可以避免上面的情况。在Zookeeper中,可使用临时序列化节点代替我们前面使用的临时节点实现这种阻塞锁。
原理:在每一个节点下面创建临时顺序节点(EPHEMERAL_SEQUENTIAL)类型,新的子节点后面,会加上一个次序编号,而这个生成的次序编号,是上一个生成的次序编号加一。
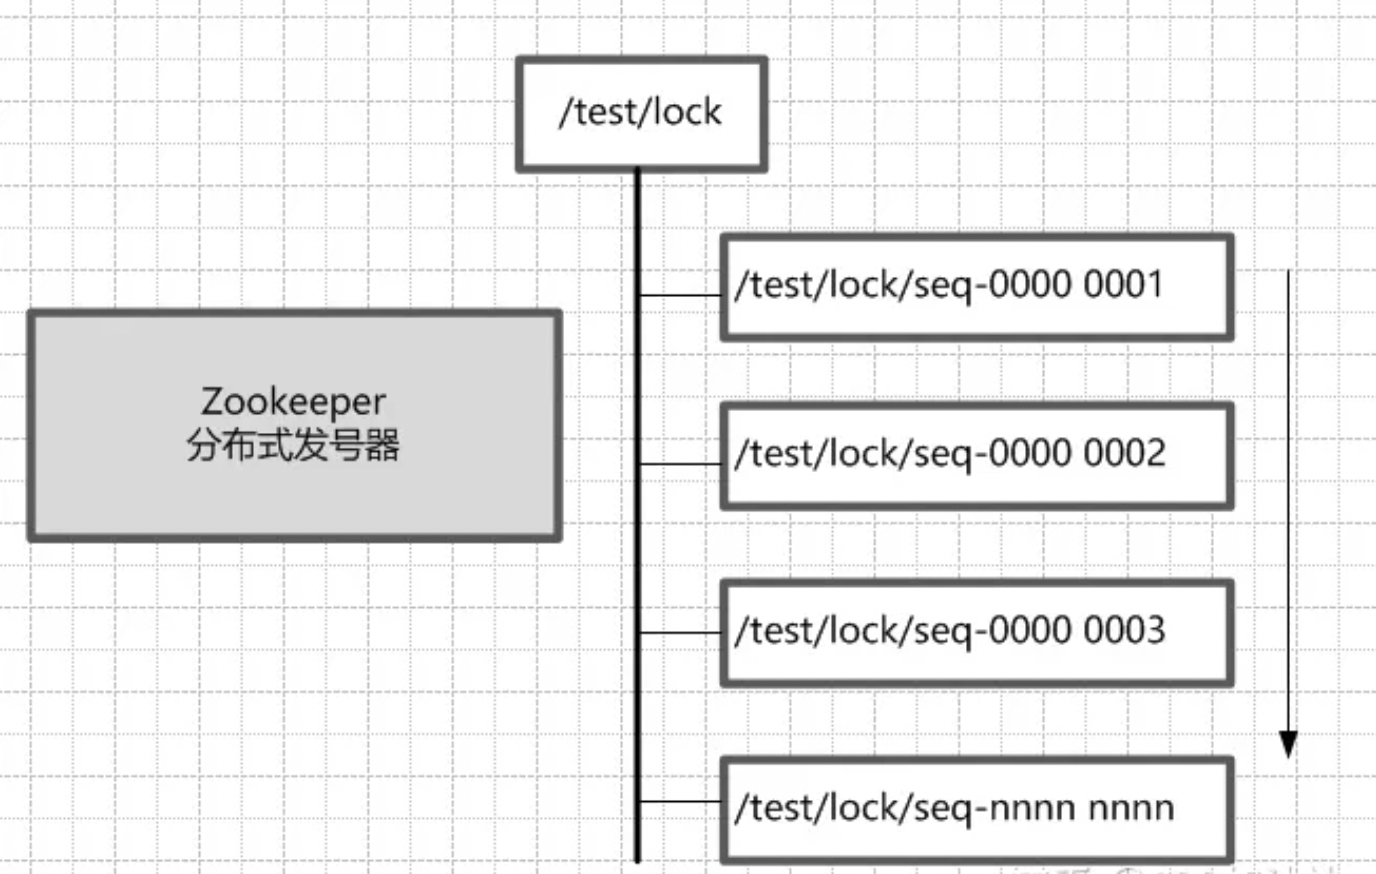
思路:
- 客户端调用 create 方法创建类似定义锁方式的临时顺序节点。
- 客户端调用 getChildren 接口来获取所有已创建的子节点列表。
- 判断是否获得锁,对于读请求如果所有比自己小的子节点都是读请求或者没有比自己序号小的子节点,表明已经成功获取共享锁,同时开始执行度逻辑。对于写请求,如果自己不是序号最小的子节点,那么就进入等待。
- 如果没有获取到共享锁,读请求向比自己序号小的最后一个写请求节点注册 watcher 监听,写请求向比自己序号小的最后一个节点注册watcher 监听。
流程图如下:
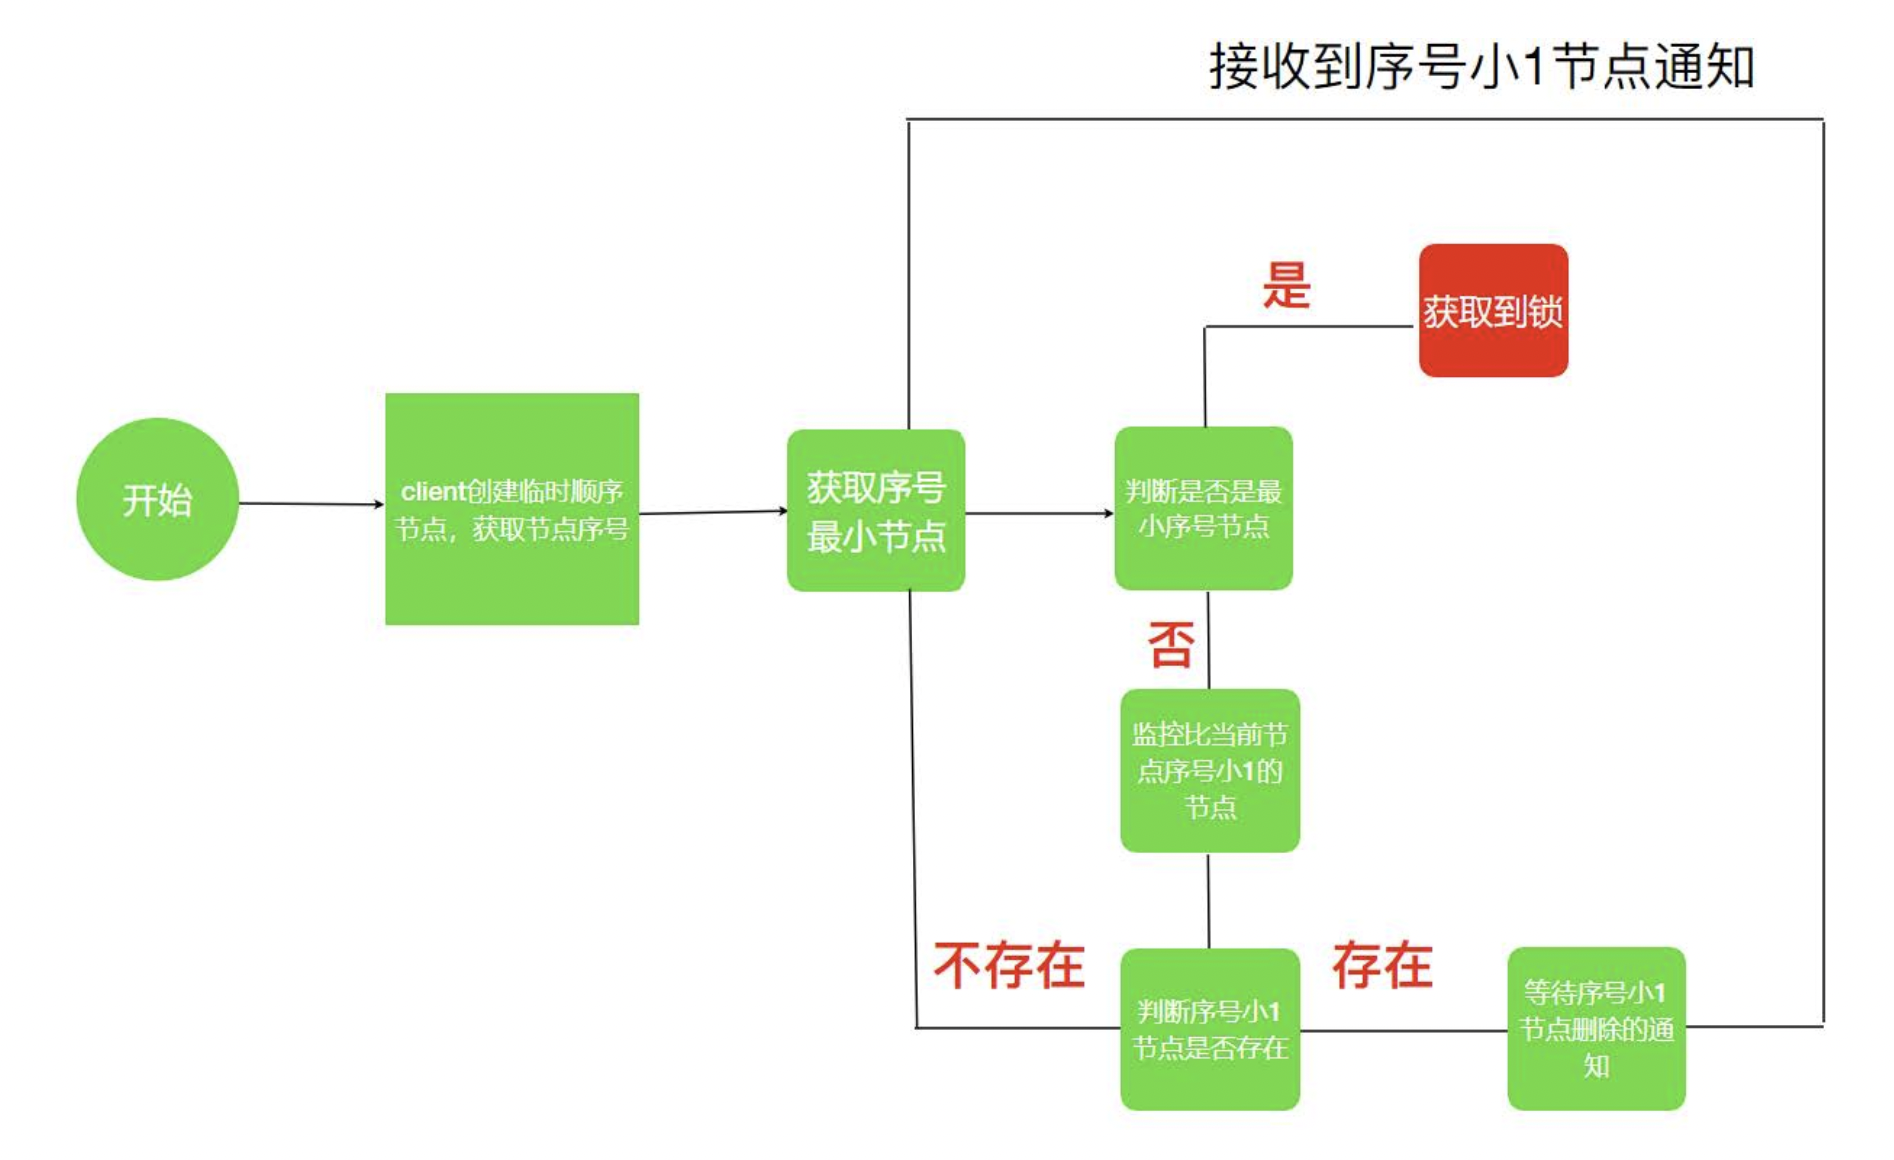
修改ZkDistributedLock代码,增加了getPreNode方法用来获取当前节点了前一个节点,如果已经会死第一个几点了,返回null,代码如下:
package com.example.distributed.lock.utils.zk;import org.apache.commons.lang.StringUtils;
import org.apache.zookeeper.*;
import org.springframework.util.CollectionUtils;import java.util.Collections;
import java.util.List;
import java.util.concurrent.CountDownLatch;
import java.util.concurrent.TimeUnit;
import java.util.concurrent.locks.Condition;
import java.util.concurrent.locks.Lock;
import java.util.stream.Collectors;public class ZkDistributedLock implements Lock {private ZooKeeper zooKeeper;private String lockName;/*** 声明当前请求的节点路径,释放锁时注意使用自己锁的路径*/private String currentNodePath;/*** 锁目录的根节点*/private static final String ROOT_PATH = "/distributed";public ZkDistributedLock(ZooKeeper zooKeeper, String lockName) {this.zooKeeper = zooKeeper;this.lockName = lockName;// 判断根节点是否存在,如果不存在就去创建节点try {if (zooKeeper.exists(ROOT_PATH, false) == null) {zooKeeper.create(ROOT_PATH, null, ZooDefs.Ids.OPEN_ACL_UNSAFE, CreateMode.PERSISTENT);}} catch (KeeperException e){e.printStackTrace();} catch (InterruptedException e) {e.printStackTrace();}}@Overridepublic void lock() {// 创建znode节点的过程tryLock();}@Overridepublic void lockInterruptibly() throws InterruptedException {}@Overridepublic boolean tryLock() {// 创建znode节点的过程try {// 注意这里创建的节点类型为临时节点,防止客户端获取锁时因为宕机等原因未来得及释放锁,导致死锁// 有请求获取锁时,先给每一个请求创建临时序列化节点,路径后面加一个-显示时好区分currentNodePath = zooKeeper.create(ROOT_PATH + "/" + lockName + "-", null, ZooDefs.Ids.OPEN_ACL_UNSAFE, CreateMode.EPHEMERAL_SEQUENTIAL);// 获取前置节点,如果前置节点为空,则获取锁成功,否则监听前置节点String preNode = this.getPreNode(currentNodePath);// 因为获取前置节点不具有原子性,所有有可能获取到前置节点后,也可能锁被释放了,所以需要再次判断前置节点是否为空if (preNode != null) {// 利用闭锁思想,等待前一个节点删除,实现阻塞功能CountDownLatch countDownLatch = new CountDownLatch(1);if (zooKeeper.exists(ROOT_PATH + "/" + preNode,new Watcher() {@Overridepublic void process(WatchedEvent watchedEvent) {// 一旦监听到前一个几点不存在了,就放行countDownLatch.countDown();}}) == null) {// 等于null,说明前置节点已经不存在了,则获取锁成功即可return true;}// 在这里阻塞住,等待前一个几点不存在放行,才能执行下面的return truecountDownLatch.await();}// preNode等于null(已经是第一个节点了)或前一个节点不存在了,返回获取锁成功return true;} catch (Exception e) {e.printStackTrace();// 重试,隔一段时间递归调用// 优化后,自旋就不再需要了
//            try {
//                Thread.sleep(200);
//                tryLock();
//            } catch (InterruptedException ex) {
//                ex.printStackTrace();
//            }}return false;}@Overridepublic boolean tryLock(long time, TimeUnit unit) throws InterruptedException {return false;}@Overridepublic void unlock() {// 删除znode节点的过程try {// 注意释放锁时要释放当前请求的路径this.zooKeeper.delete(currentNodePath, 0);} catch (InterruptedException e) {e.printStackTrace();} catch (KeeperException e) {e.printStackTrace();}}@Overridepublic Condition newCondition() {return null;}/*** 获取当前节点的前置节点** @param currentNodePath  当前节点* @return*/private String getPreNode(String currentNodePath) {try {// 获取当前节点的序列化号long curSerial = Long.parseLong(StringUtils.substringAfterLast(currentNodePath, "-"));// 获取根路径下的所有序列化子节点,注意不是全路径,而是ROOT_PATH下的相对路径List<String> childrenNodes = this.zooKeeper.getChildren(ROOT_PATH, false);// 判空if (CollectionUtils.isEmpty(childrenNodes)){throw new IllegalMonitorStateException("非法操作");}// 获取和当前资源同一资源的锁,注意不是全路径,而是ROOT_PATH下的相对路径List<String> nodes = childrenNodes.stream().filter(node -> StringUtils.startsWith(node, lockName + "-")).collect(Collectors.toList());// 判空if (CollectionUtils.isEmpty(nodes)){throw new IllegalMonitorStateException("非法操作");}// 对节点信息排序Collections.sort(nodes);// 获取当前节点的相对路径String currentNode = StringUtils.substringAfterLast(currentNodePath, "/");// 获取当前节点的下标int index = Collections.binarySearch(nodes, currentNodePath);if (index < 0) {throw new IllegalMonitorStateException("非法操作");} else if (index > 0){// 如果大于0,说明前面还有节点,则返回前一个节点return nodes.get(index - 1);}// 如果index=0,说明是第一个节点,返回nullreturn null;} catch (Exception e) {e.printStackTrace();throw new IllegalMonitorStateException("非法操作");}}
}
修改后,性能会有一点提升。
优化:可重入
上面实现的分布式锁还有个问题是不可重入。
所谓的可重入就是一个获取线程之后,相同的线程再次获取同一把锁时还可以获取成功。可使用以下两种方案:
- 在节点的内容中记录服务器、线程、及可重入信息;
- 利用ThreadLocal,线程的局部变量,线程私有
下面利用ThreadLocal来优化,代码如下:
package com.example.distributed.lock.utils.zk;import org.apache.commons.lang.StringUtils;
import org.apache.zookeeper.*;
import org.springframework.util.CollectionUtils;import java.util.Collections;
import java.util.List;
import java.util.concurrent.CountDownLatch;
import java.util.concurrent.TimeUnit;
import java.util.concurrent.locks.Condition;
import java.util.concurrent.locks.Lock;
import java.util.stream.Collectors;public class ZkDistributedLock2 implements Lock {private ZooKeeper zooKeeper;private String lockName;private static final ThreadLocal<Integer> THREAD_LOCAL = new ThreadLocal<>();/*** 声明当前请求的节点路径,释放锁时注意使用自己锁的路径*/private String currentNodePath;/*** 锁目录的根节点*/private static final String ROOT_PATH = "/distributed";public ZkDistributedLock2(ZooKeeper zooKeeper, String lockName) {this.zooKeeper = zooKeeper;this.lockName = lockName;// 判断根节点是否存在,如果不存在就去创建节点try {if (zooKeeper.exists(ROOT_PATH, false) == null) {zooKeeper.create(ROOT_PATH, null, ZooDefs.Ids.OPEN_ACL_UNSAFE, CreateMode.PERSISTENT);}} catch (KeeperException e){e.printStackTrace();} catch (InterruptedException e) {e.printStackTrace();}}@Overridepublic void lock() {// 创建znode节点的过程tryLock();}@Overridepublic void lockInterruptibly() throws InterruptedException {}@Overridepublic boolean tryLock() {// 创建znode节点的过程try {// 先判断threadLocal里是否已经有锁,如果有,就直接重入(+1)Integer flag = THREAD_LOCAL.get();// 如果flag不等于null并且大于0,说明此县城已经获取到锁了,直接把数字+1并返回获取锁成功if (flag != null && flag > 0) {THREAD_LOCAL.set(flag + 1);return true;}// 注意这里创建的节点类型为临时节点,防止客户端获取锁时因为宕机等原因未来得及释放锁,导致死锁// 有请求获取锁时,先给每一个请求创建临时序列化节点,路径后面加一个-显示时好区分currentNodePath = zooKeeper.create(ROOT_PATH + "/" + lockName + "-", null, ZooDefs.Ids.OPEN_ACL_UNSAFE, CreateMode.EPHEMERAL_SEQUENTIAL);// 获取前置节点,如果前置节点为空,则获取锁成功,否则监听前置节点String preNode = this.getPreNode(currentNodePath);// 因为获取前置节点不具有原子性,所有有可能获取到前置节点后,也可能锁被释放了,所以需要再次判断前置节点是否为空if (preNode != null) {// 利用闭锁思想,等待前一个节点删除,实现阻塞功能CountDownLatch countDownLatch = new CountDownLatch(1);if (zooKeeper.exists(ROOT_PATH + "/" + preNode,new Watcher() {@Overridepublic void process(WatchedEvent watchedEvent) {// 一旦监听到前一个几点不存在了,就放行countDownLatch.countDown();}}) == null) {// 等于null,说明前置节点已经不存在了,则获取锁成功即可THREAD_LOCAL.set(1);  // 初始化锁的重入次数为1return true;}// 在这里阻塞住,等待前一个几点不存在放行,才能执行下面的return truecountDownLatch.await();}// preNode等于null(已经是第一个节点了)或前一个节点不存在了,返回获取锁成功THREAD_LOCAL.set(1);  // 初始化锁的重入次数为1return true;} catch (Exception e) {e.printStackTrace();// 重试,隔一段时间递归调用// 优化后,自旋就不再需要了
//            try {
//                Thread.sleep(200);
//                tryLock();
//            } catch (InterruptedException ex) {
//                ex.printStackTrace();
//            }}return false;}@Overridepublic boolean tryLock(long time, TimeUnit unit) throws InterruptedException {return false;}@Overridepublic void unlock() {// 删除znode节点的过程try {// 当THREAD_LOCAL为0时才释放锁,否则就把数字-1即可THREAD_LOCAL.set(THREAD_LOCAL.get() - 1);if (THREAD_LOCAL.get() == 0) {// 注意释放锁时要释放当前请求的路径this.zooKeeper.delete(currentNodePath, 0);THREAD_LOCAL.remove();}} catch (InterruptedException e) {e.printStackTrace();} catch (KeeperException e) {e.printStackTrace();}}@Overridepublic Condition newCondition() {return null;}/*** 获取当前节点的前置节点** @param currentNodePath  当前节点* @return*/private String getPreNode(String currentNodePath) {try {// 获取当前节点的序列化号long curSerial = Long.parseLong(StringUtils.substringAfterLast(currentNodePath, "-"));// 获取根路径下的所有序列化子节点,注意不是全路径,而是ROOT_PATH下的相对路径List<String> childrenNodes = this.zooKeeper.getChildren(ROOT_PATH, false);// 判空if (CollectionUtils.isEmpty(childrenNodes)){throw new IllegalMonitorStateException("非法操作");}// 获取和当前资源同一资源的锁,注意不是全路径,而是ROOT_PATH下的相对路径List<String> nodes = childrenNodes.stream().filter(node -> StringUtils.startsWith(node, lockName + "-")).collect(Collectors.toList());// 判空if (CollectionUtils.isEmpty(nodes)){throw new IllegalMonitorStateException("非法操作");}// 对节点信息排序Collections.sort(nodes);// 获取当前节点的相对路径String currentNode = StringUtils.substringAfterLast(currentNodePath, "/");// 获取当前节点的下标int index = Collections.binarySearch(nodes, currentNodePath);if (index < 0) {throw new IllegalMonitorStateException("非法操作");} else if (index > 0){// 如果大于0,说明前面还有节点,则返回前一个节点return nodes.get(index - 1);}// 如果index=0,说明是第一个节点,返回nullreturn null;} catch (Exception e) {e.printStackTrace();throw new IllegalMonitorStateException("非法操作");}}
}
Zookeeper分布式锁总结
参照redis分布式锁的特点:
-
互斥 排他:zk节点的不可重复性,以及序列化节点的有序性
-
防死锁:
-
可自动释放锁:临时节点
-
可重入锁:借助于ThreadLocal
-
防误删:临时节点
-
加锁/解锁要具备原子性
-
单点问题:使用Zookeeper可以有效的解决单点问题,ZK一般是集群部署的。
-
集群问题:zookeeper集群是强一致性的,只要集群中有半数以上的机器存活,就可以对外提供服务。
-
公平锁:有序性节点
Curator中的分布式锁
Curator概述
Curator是netflix公司开源的一套zookeeper客户端,目前是Apache的顶级项目。与Zookeeper提供的原生客户端相比,Curator的抽象层次更高,简化了Zookeeper客户端的开发量。Curator解决了很多zookeeper客户端非常底层的细节开发工作,包括连接重连、反复注册wathcer和NodeExistsException 异常等。
通过查看官方文档,可以发现Curator主要解决了三类问题:
- 封装ZooKeeper client与ZooKeeper server之间的连接处理
- 提供了一套Fluent风格的操作API
- 提供ZooKeeper各种应用场景(recipe, 比如:分布式锁服务、集群领导选举、共享计数器、缓存机制、分布式队列等)的抽象封装,这些实现都遵循了zk的最佳实践,并考虑了各种极端情况
Curator由一系列的模块构成,对于一般开发者而言,常用的是curator-framework和curator-recipes:
- curator-framework:提供了常见的zk相关的底层操作
- curator-recipes:提供了一些zk的典型使用场景的参考。分布式锁就是该包提供的。
引入依赖
最新版本的curator 4.3.0支持zookeeper 3.4.x和3.5,但是需要注意curator传递进来的依赖,需要和实际服务器端使用的版本相符,为了避免冲突,curator-framework和org.apache.curator最好把zookeeper排除掉。
<dependency><groupId>org.apache.curator</groupId><artifactId>curator-framework</artifactId><version>4.3.0</version><exclusions><exclusion><groupId>org.apache.zookeeper</groupId><artifactId>zookeeper</artifactId></exclusion></exclusions>
</dependency>
<dependency><groupId>org.apache.curator</groupId><artifactId>curator-recipes</artifactId><version>4.3.0</version><exclusions><exclusion><groupId>org.apache.zookeeper</groupId><artifactId>zookeeper</artifactId></exclusion></exclusions>
</dependency>
使用InterProcessMutex分布式锁
Zookeeper 客户端框架 Curator 提供的 InterProcessMutex 是分布式锁的一种实现,Reentrant和JDK的ReentrantLock类似。它是由类InterProcessMutex来实现。acquire 方法阻塞|非阻塞获取锁,release 方法释放锁,另外还提供了可撤销、可重入、不会被阻塞功能。
和Redisson一样,要使用Curator的这个分布式锁,也需要一个客户端。
创建CuratorConfig类,用来初始化Curator客户端,代码如下:
package com.example.distributed.lock.config;import org.apache.curator.RetryPolicy;
import org.apache.curator.framework.CuratorFramework;
import org.apache.curator.framework.CuratorFrameworkFactory;
import org.apache.curator.retry.ExponentialBackoffRetry;
import org.springframework.context.annotation.Bean;
import org.springframework.stereotype.Component;@Component
public class CuratorConfig {@Beanpublic CuratorFramework curatorFramework(){// 重试策略,这里使用的是指数补偿重试策略,重试3次,初始重试间隔1000ms,每次重试之后重试间隔递增。RetryPolicy retry = new ExponentialBackoffRetry(1000, 3);// 初始化Curator客户端:指定链接信息 及 重试策略CuratorFramework client = CuratorFrameworkFactory.newClient("172.16.116.100:2181", retry);client.start(); // 开始链接,如果不调用该方法,很多方法无法工作return client;}}
创建StockCuratorService,代码如下:
package com.example.distributed.lock.service;import com.example.distributed.lock.utils.zk.ZkClient;
import com.example.distributed.lock.utils.zk.ZkDistributedLock;
import lombok.extern.slf4j.Slf4j;
import org.apache.curator.framework.CuratorFramework;
import org.apache.curator.framework.recipes.locks.InterProcessMutex;
import org.springframework.beans.factory.annotation.Autowired;
import org.springframework.data.redis.core.StringRedisTemplate;
import org.springframework.stereotype.Service;@Service
@Slf4j
public class StockCuratorService {@Autowiredprivate StringRedisTemplate redisTemplate;@Autowiredprivate CuratorFramework curatorFramework;/*** redis 分布式锁,自动续期*/public void deduct() {// 使用redissonClientInterProcessMutex mutex = new InterProcessMutex(curatorFramework, "/curator/lock");try {// 加锁mutex.acquire();// 1.获取当前库存信息String stock = redisTemplate.opsForValue().get("stock").toString();// 2.判断库存是否充足if (stock != null && stock.length()!=0) {Integer st = Integer.valueOf(stock);if (st > 0) {// 3.扣减库存redisTemplate.opsForValue().set("stock", String.valueOf(--st));}}// 测试可重入性this.testSub(mutex);}  catch (Exception e) {e.printStackTrace();} finally {// 解锁try {mutex.release();} catch (Exception e) {e.printStackTrace();}}}public void testSub(InterProcessMutex mutex) {try {mutex.acquire();System.out.println("测试可重入锁。。。。");mutex.release();} catch (Exception e) {e.printStackTrace();}}}
注意:如想重入,则需要使用同一个InterProcessMutex对象。
Curator中其他锁
- InterProcessSemaphoreMutex
不可重入锁。具体实现:InterProcessSemaphoreMutex。与InterProcessMutex调用方法类似,区别在于该锁是不可重入的,在同一个线程中不可重入。
主要方法:
public InterProcessSemaphoreMutex(CuratorFramework client, String path);
public void acquire();
public boolean acquire(long time, TimeUnit unit);
public void release();
- InterProcessReadWriteLock
可重入读写锁,类似JDK的ReentrantReadWriteLock。一个拥有写锁的线程可重入读锁,但是读锁却不能进入写锁。这也意味着写锁可以降级成读锁。从读锁升级成写锁是不成的。主要实现类InterProcessReadWriteLock。
主要方法:
// 构造方法
public InterProcessReadWriteLock(CuratorFramework client, String basePath);
// 获取读锁对象
InterProcessMutex readLock();
// 获取写锁对象
InterProcessMutex writeLock();
- InterProcessMultiLock
联锁。Multi Shared Lock是一个锁的容器。当调用acquire, 所有的锁都会被acquire,如果请求失败,所有的锁都会被release。同样调用release时所有的锁都被release(失败被忽略)。基本上,它就是组锁的代表,在它上面的请求释放操作都会传递给它包含的所有的锁。实现类InterProcessMultiLock。
// 构造函数需要包含的锁的集合,或者一组ZooKeeper的path
public InterProcessMultiLock(List<InterProcessLock> locks);
public InterProcessMultiLock(CuratorFramework client, List<String> paths);// 获取锁
public void acquire();
public boolean acquire(long time, TimeUnit unit);// 释放锁
public synchronized void release();
- InterProcessSemaphoreV2
一个计数的信号量类似JDK的Semaphore。JDK中Semaphore维护的一组许可(permits),而Cubator中称之为租约(Lease)。注意,所有的实例必须使用相同的numberOfLeases值。调用acquire会返回一个租约对象。客户端必须在finally中close这些租约对象,否则这些租约会丢失掉。但是,如果客户端session由于某种原因比如crash丢掉, 那么这些客户端持有的租约会自动close, 这样其它客户端可以继续使用这些租约。主要实现类InterProcessSemaphoreV2:
// 构造方法
public InterProcessSemaphoreV2(CuratorFramework client, String path, int maxLeases);// 注意一次你可以请求多个租约,如果Semaphore当前的租约不够,则请求线程会被阻塞。
// 同时还提供了超时的重载方法
public Lease acquire();
public Collection<Lease> acquire(int qty);
public Lease acquire(long time, TimeUnit unit);
public Collection<Lease> acquire(int qty, long time, TimeUnit unit)// 租约还可以通过下面的方式返还
public void returnAll(Collection<Lease> leases);
public void returnLease(Lease lease);
- 栅栏barrier
构造函数中barrierPath参数用来确定一个栅栏,只要barrierPath参数相同(路径相同)就是同一个栅栏。通常情况下栅栏的使用如下:
- 主client设置一个栅栏
- 其他客户端就会调用waitOnBarrier()等待栅栏移除,程序处理线程阻塞
- 主client移除栅栏,其他客户端的处理程序就会同时继续运行。
DistributedBarrier类的主要方法如下:
setBarrier() - 设置栅栏
waitOnBarrier() - 等待栅栏移除
removeBarrier() - 移除栅栏
- 共享计数器
利用ZooKeeper可以实现一个集群共享的计数器。只要使用相同的path就可以得到最新的计数器值, 这是由ZooKeeper的一致性保证的。Curator有两个计数器, 一个是用int来计数,一个用long来计数。
- SharedCount
- DistributedAtomicNumber:
- DistributedAtomicNumber接口是分布式原子数值类型的抽象,定义了分布式原子数值类型需要提供的方法。DistributedAtomicNumber接口有两个实现:
DistributedAtomicLong和DistributedAtomicInteger。
七、MySQL分布式锁
思路
不管是jvm锁还是mysql锁,为了保证线程的并发安全,都提供了悲观独占排他锁。所以独占排他也是分布式锁的基本要求。
可以利用唯一键索引不能重复插入的特点实现。设计表如下:
CREATE TABLE `tb_lock` (`id` bigint(20) NOT NULL AUTO_INCREMENT,`lock_name` varchar(50) NOT NULL COMMENT '锁名',PRIMARY KEY (`id`),UNIQUE KEY `idx_unique` (`lock_name`)
) ENGINE=InnoDB AUTO_INCREMENT=1332899824461455363 DEFAULT CHARSET=utf8;
创建Lock实体类:
@Data
@AllArgsConstructor
@NoArgsConstructor
@TableName("tb_lock")
public class Lock {private Long id;private String lockName;
}
LockMapper接口:
public interface LockMapper extends BaseMapper<Lock> {
}
实现思路:
- 使用插入语句来获取锁,由于有唯一索引,只会有一个线程获取成功
- 获取成功执行业务逻辑,获取失败进行重试
- 删除锁时按照锁的id进行删除,保证删除的是自己的锁
代码实现
代码如下:
package com.example.distributed.lock.service;import com.example.distributed.lock.mapper.LockMapper;
import com.example.distributed.lock.pojo.Lock;
import lombok.extern.slf4j.Slf4j;
import org.redisson.api.RLock;
import org.redisson.api.RSemaphore;
import org.redisson.api.RedissonClient;
import org.springframework.beans.factory.annotation.Autowired;
import org.springframework.data.redis.core.StringRedisTemplate;
import org.springframework.stereotype.Service;import java.util.Random;
import java.util.concurrent.TimeUnit;@Service
@Slf4j
public class StockMysqlService {@Autowiredprivate StringRedisTemplate redisTemplate;@Autowiredprivate LockMapper lockMapper;/*** 使用Mysql分布式锁*/public void deduct() {try {// 获取锁Lock lock = new Lock();lock.setLockName("lock");lockMapper.insert(lock);// 1.获取当前库存信息String stock = redisTemplate.opsForValue().get("stock").toString();// 2.判断库存是否充足if (stock != null && stock.length()!=0) {Integer st = Integer.valueOf(stock);if (st > 0) {// 3.扣减库存redisTemplate.opsForValue().set("stock", String.valueOf(--st));}}// 解锁lockMapper.deleteById(lock.getId());} catch (Exception e) {e.printStackTrace();// 重试,递归调用try {Thread.sleep(50);deduct();} catch (InterruptedException interruptedException) {interruptedException.printStackTrace();}}}}
分析
缺点:
- 这把锁强依赖数据库的可用性,数据库是一个单点,一旦数据库挂掉,会导致业务系统不可用。
解决方案:给 锁数据库 搭建主备
- 这把锁没有失效时间,一旦解锁操作失败,就会导致锁记录一直在数据库中,其他线程无法再获得到锁。
解决方案:只要做一个定时任务,每隔一定时间把数据库中的超时数据清理一遍。
- 这把锁是非重入的,同一个线程在没有释放锁之前无法再次获得该锁。因为数据中数据已经存在了。
解决方案:记录获取锁的主机信息和线程信息,如果相同线程要获取锁,直接重入。
- 受制于数据库性能,并发能力有限。
解决方案:无法解决。
针对第三点,可以修改Lock表如下:
CREATE TABLE `tb_lock` (`id` bigint(20) NOT NULL AUTO_INCREMENT,`lock_name` varchar(50) NOT NULL COMMENT '锁名',`class_name` varchar(100) DEFAULT NULL COMMENT '类名',`method_name` varchar(50) DEFAULT NULL COMMENT '方法名',`server_name` varchar(50) DEFAULT NULL COMMENT '服务器ip',`thread_name` varchar(50) DEFAULT NULL COMMENT '线程名',`create_time` timestamp NULL DEFAULT NULL ON UPDATE CURRENT_TIMESTAMP COMMENT '获取锁时间',`desc` varchar(100) DEFAULT NULL COMMENT '描述',PRIMARY KEY (`id`),UNIQUE KEY `idx_unique` (`lock_name`)
) ENGINE=InnoDB AUTO_INCREMENT=1332899824461455363 DEFAULT CHARSET=utf8;
八、分布式锁总结
实现的复杂性或者难度角度:Zookeeper > redis(Lua) > 数据库
实际性能角度:redis > Zookeeper > 数据库
可靠性角度:Zookeeper > redis = 数据库
这三种方式都不是尽善尽美,我们可以根据实际业务情况选择最适合的方案:
如果追求极致性能可以选择:redis方案
如果追求可靠性可以选择:zk

.)

)


工具,太实用了!)


项目实战)