五、SSM整合实战
目录
- 一、SSM整合理解
- 1. 什么是SSM整合?
- 2. SSM整合核心理解五连问!
- 2.1 SSM整合涉及几个IoC容器?
- 2.2 每个IoC容器盛放哪些组件?
- 2.3 IoC容器之间是什么关系?
- 2.4 需要几个配置文件和对应IoC容器关系?
- 2.5 IoC容器初始化方式?
- 二、SSM整合配置实战
- 1. 依赖添加
- 2. 控制层配置编写(SpringMVC整合)
- 3. 业务层配置编写(AOP / TX整合)
- 4. 持久层配置编写(MyBatis整合)
- 5. 容器初始化配置web.xml
- 6. 整合测试
- 三、前端程序搭建和运行
- 1. 案例功能和接口分析
- 1.1 案例功能预览
- 1.2 接口分析
- 2. 前端工程导入
- 3. 启动测试
- 1. 案例功能和接口分析
- 四、后端程序实现和测试
- 1. 准备工作
- 2. 功能实现
- 3. 前后联调
- 五、SSM技术栈总结
- 1. Spring框架总结
- 1.1 技术点总结
- 1.2 配置总结
- 1.3 注解总结
- 2. Spring MVC 框架总结
- 2.1 技术点总结
- 2.2 配置总结
- 2.3 注解总结
- 3. MyBatis框架总结
- 3.1 技术点总结
- 3.2 配置总结
- 3.3 注解总结
- 1. Spring框架总结
一、SSM整合理解
1. 什么是SSM整合?
本质:Spring接管一切(将框架核心组件交给Spring进行IoC管理),代码更加简洁。
- SpringMVC管理web相关组件
- Spring管理业务层、持久层、以及数据库相关(DataSource,MyBatis)的组件
- SSM整合最终就是编写IoC配置文件
2. SSM整合核心理解五连问!
2.1 SSM整合涉及几个IoC容器?
我们提到过SpringMVC/DispatcherServlet 加载 spring-mvc.xml,此时整个 Web 应用中只创建一个 IoC 容器。如果将Mybatis、配置声明式事务,全部在 spring-mvc.xml 配置文件中配置也是可以的。可是这样会导致配置文件太长,不容易维护。
通常情况下,SSM整合我们会创建两个IoC容器,分开管理SSM下的核心组件!
2.2 每个IoC容器盛放哪些组件?
| 容器名 | 创建类 | 盛放组件 |
|---|---|---|
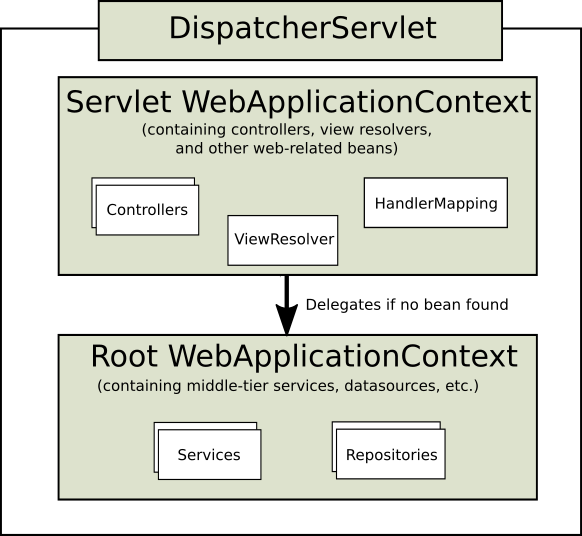
| web容器 | DispatcherServlet | web相关组件(controller,springmvc核心组件) |
| root容器 | ContextLoaderListener | 业务和持久层相关组件(service,aop,tx,dataSource,mybatis,mapper等) |
2.3 IoC容器之间是什么关系?
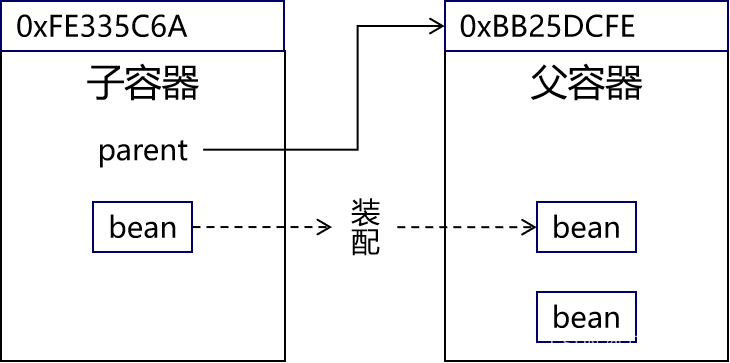
结论:两个组件分别创建的 IOC 容器是父子关系。
- 父容器:ContextLoaderListener 创建的 IOC 容器(root容器)
- 子容器:DispatcherServlet 创建的 IOC 容器(web容器)
源码部分:
ContextLoaderListener将实例化root容器,存储到ServletContext:
/*** Initialize Spring's web application context for the given servlet context,* using the application context provided at construction time, or creating a new one* according to the "{@link #CONTEXT_CLASS_PARAM contextClass}" and* "{@link #CONFIG_LOCATION_PARAM contextConfigLocation}" context-params.* @param servletContext current servlet context* @return the new WebApplicationContext* @see #ContextLoader(WebApplicationContext)* @see #CONTEXT_CLASS_PARAM* @see #CONFIG_LOCATION_PARAM*/public WebApplicationContext initWebApplicationContext(ServletContext servletContext) {if (servletContext.getAttribute(WebApplicationContext.ROOT_WEB_APPLICATION_CONTEXT_ATTRIBUTE) != null) {throw new IllegalStateException("Cannot initialize context because there is already a root application context present - " +"check whether you have multiple ContextLoader* definitions in your web.xml!");}servletContext.log("Initializing Spring root WebApplicationContext");Log logger = LogFactory.getLog(ContextLoader.class);if (logger.isInfoEnabled()) {logger.info("Root WebApplicationContext: initialization started");}long startTime = System.currentTimeMillis();try {// Store context in local instance variable, to guarantee that// it is available on ServletContext shutdown.if (this.context == null) {this.context = createWebApplicationContext(servletContext);}if (this.context instanceof ConfigurableWebApplicationContext cwac && !cwac.isActive()) {// The context has not yet been refreshed -> provide services such as// setting the parent context, setting the application context id, etcif (cwac.getParent() == null) {// The context instance was injected without an explicit parent ->// determine parent for root web application context, if any.ApplicationContext parent = loadParentContext(servletContext);cwac.setParent(parent);}configureAndRefreshWebApplicationContext(cwac, servletContext);}//将root容器存储到servletContext中servletContext.setAttribute(WebApplicationContext.ROOT_WEB_APPLICATION_CONTEXT_ATTRIBUTE, this.context);ClassLoader ccl = Thread.currentThread().getContextClassLoader();if (ccl == ContextLoader.class.getClassLoader()) {currentContext = this.context;}else if (ccl != null) {currentContextPerThread.put(ccl, this.context);}if (logger.isInfoEnabled()) {long elapsedTime = System.currentTimeMillis() - startTime;logger.info("Root WebApplicationContext initialized in " + elapsedTime + " ms");}return this.context;}catch (RuntimeException | Error ex) {logger.error("Context initialization failed", ex);servletContext.setAttribute(WebApplicationContext.ROOT_WEB_APPLICATION_CONTEXT_ATTRIBUTE, ex);throw ex;}}DispatcherServlet读取root容器,并且设置为web容器的父容器:
protected WebApplicationContext createWebApplicationContext(@Nullable ApplicationContext parent) {Class<?> contextClass = getContextClass();if (!ConfigurableWebApplicationContext.class.isAssignableFrom(contextClass)) {throw new ApplicationContextException("Fatal initialization error in servlet with name '" + getServletName() +"': custom WebApplicationContext class [" + contextClass.getName() +"] is not of type ConfigurableWebApplicationContext");}ConfigurableWebApplicationContext wac =(ConfigurableWebApplicationContext) BeanUtils.instantiateClass(contextClass);wac.setEnvironment(getEnvironment());//将root容器取出,并设置为父容器wac.setParent(parent);String configLocation = getContextConfigLocation();if (configLocation != null) {wac.setConfigLocation(configLocation);}configureAndRefreshWebApplicationContext(wac);return wac;}
容器访问流程:
2.4 需要几个配置文件和对应IoC容器关系?
文件的数量不是固定的,但是至少要两个,为了方便编写,我们可以三层架构每层对应一个配置文件,分别指定两个容器加载即可!
建议配置文件:
| 配置名 | 对应内容 | 对应容器 |
|---|---|---|
| spring-mvc.xml | controller,springmvc相关 | web容器 |
| spring-service.xml | service,aop,tx相关 | root容器 |
| spring-mapper.xml | mapper,datasource,mybatis相关 | root容器 |
2.5 IoC容器初始化方式?
在一个 Web 应用中就会出现两个 IOC 容器
- DispatcherServlet 创建一个 IOC 容器
- ContextLoaderListener 创建一个 IOC 容器
配置方式:
<!-- 通过全局初始化参数指定 Spring 配置文件的位置  root ioc容器配置-->
<context-param><param-name>contextConfigLocation</param-name><param-value>classpath:spring-service.xml,classpath:spring-mapper.xml</param-value>
</context-param><listener><!-- 指定全类名,配置监听器 --><listener-class>org.springframework.web.context.ContextLoaderListener</listener-class>
</listener><!-- web容器配置-->
<!-- 配置SpringMVC中负责处理请求的核心Servlet,也被称为SpringMVC的前端控制器 -->
<servlet><servlet-name>DispatcherServlet</servlet-name><!-- DispatcherServlet的全类名 --><servlet-class>org.springframework.web.servlet.DispatcherServlet</servlet-class><!-- 通过初始化参数指定SpringMVC配置文件位置 --><init-param><!-- 如果不记得contextConfigLocation配置项的名称,可以到DispatcherServlet的父类FrameworkServlet中查找 --><param-name>contextConfigLocation</param-name><!-- 使用classpath:说明这个路径从类路径的根目录开始才查找 --><param-value>classpath:spring-mvc.xml</param-value></init-param><!-- 作为框架的核心组件,在启动过程中有大量的初始化操作要做,这些操作放在第一次请求时才执行非常不恰当 --><!-- 我们应该将DispatcherServlet设置为随Web应用一起启动 --><load-on-startup>1</load-on-startup></servlet><servlet-mapping><servlet-name>DispatcherServlet</servlet-name><!-- 对DispatcherServlet来说,url-pattern有两种方式配置 --><!-- 方式一:配置“/”,表示匹配整个Web应用范围内所有请求。这里有一个硬性规定:不能写成“/*”。只有这一个地方有这个特殊要求,以后我们再配置Filter还是可以正常写“/*”。 --><!-- 方式二:配置“*.扩展名”,表示匹配整个Web应用范围内部分请求 --><url-pattern>/</url-pattern>
</servlet-mapping>
二、SSM整合配置实战
1. 依赖添加
-
数据库准备
依然沿用mybatis数据库测试脚本!
CREATE DATABASE `mybatis-example`;USE `mybatis-example`;CREATE TABLE `t_emp`(emp_id INT AUTO_INCREMENT,emp_name CHAR(100),emp_salary DOUBLE(10,5),PRIMARY KEY(emp_id) );INSERT INTO `t_emp`(emp_name,emp_salary) VALUES("tom",200.33); INSERT INTO `t_emp`(emp_name,emp_salary) VALUES("jerry",666.66); INSERT INTO `t_emp`(emp_name,emp_salary) VALUES("andy",777.77); -
准备项目
part04-ssm-integration
转成web项目
-
依赖导入
pom.xml
<?xml version="1.0" encoding="UTF-8"?><project xmlns="http://maven.apache.org/POM/4.0.0" xmlns:xsi="http://www.w3.org/2001/XMLSchema-instance" xsi:schemaLocation="http://maven.apache.org/POM/4.0.0 http://maven.apache.org/xsd/maven-4.0.0.xsd"> <modelVersion>4.0.0</modelVersion> <groupId>com.atguigu</groupId> <artifactId>part04-ssm-integration</artifactId> <version>1.0-SNAPSHOT</version> <packaging>war</packaging><properties><spring.version>6.0.6</spring.version><jakarta.annotation-api.version>2.1.1</jakarta.annotation-api.version><jakarta.jakartaee-web-api.version>9.1.0</jakarta.jakartaee-web-api.version><jackson-databind.version>2.15.0</jackson-databind.version><hibernate-validator.version>8.0.0.Final</hibernate-validator.version><commons-fileupload.version>1.3.1</commons-fileupload.version><mybatis.version>3.5.11</mybatis.version><mysql.version>8.0.25</mysql.version><pagehelper.version>5.1.11</pagehelper.version><druid.version>1.2.8</druid.version><mybatis-spring.version>3.0.2</mybatis-spring.version><jakarta.servlet.jsp.jstl-api.version>3.0.0</jakarta.servlet.jsp.jstl-api.version><logback.version>1.2.3</logback.version><lombok.version>1.18.26</lombok.version><maven.compiler.source>17</maven.compiler.source><maven.compiler.target>17</maven.compiler.target> <project.build.sourceEncoding>UTF-8</project.build.sourceEncoding> </properties><!--需要依赖清单分析:springioc/dispring-context / 6.0.6aopspring-aop / 6.0.6spring-aspects / 6.0.6txspring-tx / 6.0.6spring-jdbc / 6.0.6jakarta.annotation-api / 2.1.1springmvcspring-webmvc 6.0.6jakarta.jakartaee-web-api 9.1.0jackson-databind 2.15.0hibernate-validator / hibernate-validator-annotation-processor 8.0.0.Finalcommons-fileupload / 1.3.1mybatismybatis / 3.5.11mysql / 8.0.25pagehelper / 5.1.11整合需要加载spring容器 spring-web / 6.0.6整合mybatis mybatis-spring x x数据库连接池 druid / xlombok lombok / 1.18.26logback logback/ 1.2.3--><dependencies><!--spring pom.xml依赖--><dependency><groupId>org.springframework</groupId><artifactId>spring-context</artifactId><version>${spring.version}</version></dependency><dependency><groupId>jakarta.annotation</groupId><artifactId>jakarta.annotation-api</artifactId><version>${jakarta.annotation-api.version}</version></dependency><dependency><groupId>org.springframework</groupId><artifactId>spring-aop</artifactId><version>${spring.version}</version></dependency><dependency><groupId>org.springframework</groupId><artifactId>spring-aspects</artifactId><version>${spring.version}</version></dependency><dependency><groupId>org.springframework</groupId><artifactId>spring-tx</artifactId><version>${spring.version}</version></dependency><dependency><groupId>org.springframework</groupId><artifactId>spring-jdbc</artifactId><version>${spring.version}</version></dependency><!--springmvcspring-webmvc 6.0.6jakarta.jakartaee-web-api 9.1.0jackson-databind 2.15.0hibernate-validator / hibernate-validator-annotation-processor 8.0.0.Finalcommons-fileupload / 1.3.1--><dependency><groupId>org.springframework</groupId><artifactId>spring-webmvc</artifactId><version>${spring.version}</version></dependency><dependency><groupId>jakarta.platform</groupId><artifactId>jakarta.jakartaee-web-api</artifactId><version>${jakarta.jakartaee-web-api.version}</version><scope>provided</scope></dependency><!-- jsp需要依赖! jstl--><dependency><groupId>jakarta.servlet.jsp.jstl</groupId><artifactId>jakarta.servlet.jsp.jstl-api</artifactId><version>${jakarta.servlet.jsp.jstl-api.version}</version></dependency><!-- https://mvnrepository.com/artifact/commons-fileupload/commons-fileupload --><dependency><groupId>commons-fileupload</groupId><artifactId>commons-fileupload</artifactId><version>${commons-fileupload.version}</version></dependency><dependency><groupId>com.fasterxml.jackson.core</groupId><artifactId>jackson-databind</artifactId><version>${jackson-databind.version}</version></dependency><!-- https://mvnrepository.com/artifact/org.hibernate.validator/hibernate-validator --><dependency><groupId>org.hibernate.validator</groupId><artifactId>hibernate-validator</artifactId><version>${hibernate-validator.version}</version></dependency><!-- https://mvnrepository.com/artifact/org.hibernate.validator/hibernate-validator-annotation-processor --><dependency><groupId>org.hibernate.validator</groupId><artifactId>hibernate-validator-annotation-processor</artifactId><version>${hibernate-validator.version}</version></dependency><!--mybatismybatis / 3.5.11mysql / 8.0.25pagehelper / 5.1.11--><!-- mybatis依赖 --><dependency><groupId>org.mybatis</groupId><artifactId>mybatis</artifactId><version>${mybatis.version}</version></dependency><!-- MySQL驱动 mybatis底层依赖jdbc驱动实现,本次不需要导入连接池,mybatis自带! --><dependency><groupId>mysql</groupId><artifactId>mysql-connector-java</artifactId><version>${mysql.version}</version></dependency><dependency><groupId>com.github.pagehelper</groupId><artifactId>pagehelper</artifactId><version>${pagehelper.version}</version></dependency><!-- 整合第三方特殊依赖 --><dependency><groupId>org.springframework</groupId><artifactId>spring-web</artifactId><version>${spring.version}</version></dependency><dependency><groupId>org.mybatis</groupId><artifactId>mybatis-spring</artifactId><version>${mybatis-spring.version}</version></dependency><!-- 日志 , 会自动传递slf4j门面--><dependency><groupId>ch.qos.logback</groupId><artifactId>logback-classic</artifactId><version>${logback.version}</version></dependency><dependency><groupId>org.projectlombok</groupId><artifactId>lombok</artifactId><version>${lombok.version}</version></dependency><dependency><groupId>com.alibaba</groupId><artifactId>druid</artifactId><version>${druid.version}</version></dependency></dependencies></project> -
实体类添加
com.atguigu.pojo
@Data public class Employee {private Integer empId;private String empName;private Double empSalary; } -
logback配置
位置:resources/logback.xml
<?xml version="1.0" encoding="UTF-8"?>
<configuration debug="true"><!-- 指定日志输出的位置,ConsoleAppender表示输出到控制台 --><appender name="STDOUT"class="ch.qos.logback.core.ConsoleAppender"><encoder><!-- 日志输出的格式 --><!-- 按照顺序分别是:时间、日志级别、线程名称、打印日志的类、日志主体内容、换行 --><pattern>[%d{HH:mm:ss.SSS}] [%-5level] [%thread] [%logger] [%msg]%n</pattern><charset>UTF-8</charset></encoder></appender><!-- 设置全局日志级别。日志级别按顺序分别是:TRACE、DEBUG、INFO、WARN、ERROR --><!-- 指定任何一个日志级别都只打印当前级别和后面级别的日志。 --><root level="DEBUG"><!-- 指定打印日志的appender,这里通过“STDOUT”引用了前面配置的appender --><appender-ref ref="STDOUT" /></root><!-- 根据特殊需求指定局部日志级别,可也是包名或全类名。 --><logger name="com.atguigu.mybatis" level="DEBUG" /></configuration>
2. 控制层配置编写(SpringMVC整合)
主要配置controller,springmvc相关! 本次先不配置文件上传!
位置:resources/spring-mvc.xml(命名随意)
<?xml version="1.0" encoding="UTF-8"?>
<beans xmlns="http://www.springframework.org/schema/beans"xmlns:xsi="http://www.w3.org/2001/XMLSchema-instance"xmlns:context="http://www.springframework.org/schema/context"xmlns:mvc="http://www.springframework.org/schema/mvc"xsi:schemaLocation="http://www.springframework.org/schema/beans http://www.springframework.org/schema/beans/spring-beans.xsd http://www.springframework.org/schema/context https://www.springframework.org/schema/context/spring-context.xsd http://www.springframework.org/schema/mvc https://www.springframework.org/schema/mvc/spring-mvc.xsd"><!-- 扫描controller对应的包,将handler加入到ioc--><context:component-scan base-package="com.atguigu.controller" /><!--注意: 导入mvc命名空间!mvc:annotation-driven 是一个整合标签他会导入handlerMapping和handlerAdapter他会导入json数据格式转化器等等--><mvc:annotation-driven /><!-- viewResolver 不需要配置,因为我们不需要查找逻辑视图!!! --><!-- 加入这个配置,SpringMVC 就会在遇到没有 @RequestMapping 的请求时放它过去 --><!-- 所谓放它过去就是让这个请求去找它原本要访问的资源 --><mvc:default-servlet-handler/><!-- 配置动态页面语言jsp的视图解析器,快速查找jsp--><bean class="org.springframework.web.servlet.view.InternalResourceViewResolver"><property name="viewClass" value="org.springframework.web.servlet.view.JstlView"/><property name="prefix" value="/WEB-INF/views/"/><property name="suffix" value=".jsp"/></bean></beans>
3. 业务层配置编写(AOP / TX整合)
主要配置service,注解aop和声明事务相关!
位置:resources/spring-service.xml(命名随意)
<?xml version="1.0" encoding="UTF-8"?>
<beans xmlns="http://www.springframework.org/schema/beans"xmlns:xsi="http://www.w3.org/2001/XMLSchema-instance"xmlns:context="http://www.springframework.org/schema/context"xmlns:aop="http://www.springframework.org/schema/aop" xmlns:tx="http://www.springframework.org/schema/tx"xsi:schemaLocation="http://www.springframework.org/schema/beans http://www.springframework.org/schema/beans/spring-beans.xsd http://www.springframework.org/schema/context https://www.springframework.org/schema/context/spring-context.xsd http://www.springframework.org/schema/aop https://www.springframework.org/schema/aop/spring-aop.xsd http://www.springframework.org/schema/tx http://www.springframework.org/schema/tx/spring-tx.xsd"><!-- 业务层bean,增强,切点等都在此层配置 --><context:component-scan base-package="com.atguigu.service,com.atguigu.advice,com.atguigu.pointcut" /><!-- 事务注解开启 注意:数据库配置将在mapper文件中,最终会被加载到同一个容器中,此处爆红运行正常!--><bean id="transactionManager" class="org.springframework.jdbc.datasource.DataSourceTransactionManager" ><property name="dataSource" ref="dataSource" /></bean><tx:annotation-driven transaction-manager="transactionManager" />
</beans>
4. 持久层配置编写(MyBatis整合)
jdbc外部配置
位置:resources/jdbc.properties
jdbc.user=root
jdbc.password=root
jdbc.url=jdbc:mysql:///mybatis-example
jdbc.driver=com.mysql.cj.jdbc.Driver
持久层配置
位置:resources/spring-mapper.xml(命名随意)
<?xml version="1.0" encoding="UTF-8"?>
<beans xmlns="http://www.springframework.org/schema/beans"xmlns:xsi="http://www.w3.org/2001/XMLSchema-instance"xmlns:context="http://www.springframework.org/schema/context"xsi:schemaLocation="http://www.springframework.org/schema/beans http://www.springframework.org/schema/beans/spring-beans.xsd http://www.springframework.org/schema/context https://www.springframework.org/schema/context/spring-context.xsd"><!-- 加载外部属性文件 --><context:property-placeholder location="classpath:jdbc.properties"/><!-- 配置数据源 注意: dataSource被service配置文件中引用,命名为:dataSource--><bean id="dataSource" class="com.alibaba.druid.pool.DruidDataSource"><property name="username" value="${jdbc.user}"/><property name="password" value="${jdbc.password}"/><property name="driverClassName" value="${jdbc.driver}"/><property name="url" value="${jdbc.url}"/></bean></beans>
配置mybatis方式1:保留mybaits全局配置
准备mybatis-config.xml文件:去掉数据库信息,去掉mapper包映射(xml中配置)
<?xml version="1.0" encoding="UTF-8" ?>
<!DOCTYPE configurationPUBLIC "-//mybatis.org//DTD Config 3.0//EN""http://mybatis.org/dtd/mybatis-3-config.dtd">
<configuration><settings><!-- 开启驼峰式映射--><setting name="mapUnderscoreToCamelCase" value="true"/><!-- 开启logback日志输出--><setting name="logImpl" value="SLF4J"/><!--开启resultMap自动映射 --><setting name="autoMappingBehavior" value="FULL"/></settings><typeAliases><!-- 给实体类起别名 --><package name="com.atguigu.pojo"/></typeAliases><plugins><plugin interceptor="com.github.pagehelper.PageInterceptor"><!--helperDialect:分页插件会自动检测当前的数据库链接,自动选择合适的分页方式。你可以配置helperDialect属性来指定分页插件使用哪种方言。配置时,可以使用下面的缩写值:oracle,mysql,mariadb,sqlite,hsqldb,postgresql,db2,sqlserver,informix,h2,sqlserver2012,derby(完整内容看 PageAutoDialect) 特别注意:使用 SqlServer2012 数据库时,https://github.com/pagehelper/Mybatis-PageHelper/blob/master/wikis/zh/HowToUse.md#%E5%A6%82%E4%BD%95%E9%85%8D%E7%BD%AE%E6%95%B0%E6%8D%AE%E5%BA%93%E6%96%B9%E8%A8%80--><property name="helperDialect" value="mysql"/></plugin></plugins></configuration>
修改spring-mapper.xml
<?xml version="1.0" encoding="UTF-8"?>
<beans xmlns="http://www.springframework.org/schema/beans"xmlns:xsi="http://www.w3.org/2001/XMLSchema-instance"xmlns:context="http://www.springframework.org/schema/context"xsi:schemaLocation="http://www.springframework.org/schema/beans http://www.springframework.org/schema/beans/spring-beans.xsd http://www.springframework.org/schema/context https://www.springframework.org/schema/context/spring-context.xsd"><!-- 加载外部属性文件 --><context:property-placeholder location="classpath:jdbc.properties"/><!-- 配置数据源 注意: dataSource被service配置文件中引用,命名为:dataSource--><bean id="dataSource" class="com.alibaba.druid.pool.DruidDataSource"><property name="username" value="${jdbc.user}"/><property name="password" value="${jdbc.password}"/><property name="driverClassName" value="${jdbc.driver}"/><property name="url" value="${jdbc.url}"/></bean><!-- 方式1: 引用外部配置文件 --><!-- 配置 SqlSessionFactoryBean --><bean id="sqlSessionFactory" class="org.mybatis.spring.SqlSessionFactoryBean"><!-- 指定 Mybatis 全局配置文件位置 --><property name="configLocation" value="classpath:mybatis-config.xml"/><!-- 指定 Mapper 配置文件位置 --><property name="mapperLocations" value="classpath:mappers/*Mapper.xml"/><!-- 装配数据源 --><property name="dataSource" ref="dataSource"/></bean><!-- 配置 Mapper接口类型的bean的扫描器 --><bean id="mapperScannerConfigurer" class="org.mybatis.spring.mapper.MapperScannerConfigurer"><property name="basePackage" value="com.atguigu.mapper"/></bean></beans>
配置mybatis方式2:完全配置文件实现
修改spring-mapper.xml
<?xml version="1.0" encoding="UTF-8"?>
<beans xmlns="http://www.springframework.org/schema/beans"xmlns:xsi="http://www.w3.org/2001/XMLSchema-instance"xmlns:context="http://www.springframework.org/schema/context"xsi:schemaLocation="http://www.springframework.org/schema/beans http://www.springframework.org/schema/beans/spring-beans.xsd http://www.springframework.org/schema/context https://www.springframework.org/schema/context/spring-context.xsd"><!-- 加载外部属性文件 --><context:property-placeholder location="classpath:jdbc.properties"/><!-- 配置数据源 注意: dataSource被service配置文件中引用,命名为:dataSource--><bean id="dataSource" class="com.alibaba.druid.pool.DruidDataSource"><property name="username" value="${jdbc.user}"/><property name="password" value="${jdbc.password}"/><property name="driverClassName" value="${jdbc.driver}"/><property name="url" value="${jdbc.url}"/></bean><!-- 方式2: 彻底舍弃Mybatis全局配置文件 --><!-- 配置 SqlSessionFactoryBean --><bean id="sqlSessionFactory" class="org.mybatis.spring.SqlSessionFactoryBean"><!-- 舍弃 Mybatis 全局配置文件,使用 configuration 属性 --><property name="configuration"><bean class="org.apache.ibatis.session.Configuration"><property name="mapUnderscoreToCamelCase" value="true"/></bean></property><!-- 舍弃 Mybatis 全局配置文件,使用 typeAliasesPackage 属性配置实体类所在包 --><property name="typeAliasesPackage" value="com.atguigu.pojo"/><!-- 指定 Mapper 配置文件位置 --><property name="mapperLocations" value="classpath:mappers/*Mapper.xml"/><!-- 装配数据源 --><property name="dataSource" ref="dataSource"/><!-- 分页插件 --><property name="plugins"><array><bean class="com.github.pagehelper.PageInterceptor"><property name="properties"><props><!-- 启用合理化设置。当页码为负数时,设置为1, 当页码超过最大页时设置为最大页 --><prop key="reasonable">true</prop><prop key="pageHelperDialect">mysql</prop></props></property></bean></array></property></bean><!-- 配置 Mapper接口类型的bean的扫描器--><bean id="mapperScannerConfigurer" class="org.mybatis.spring.mapper.MapperScannerConfigurer"><property name="basePackage" value="com.atguigu.mapper"/></bean><!-- 也可以使用mybatis-spring名称空间 --><mybatis-spring:scan base-package="com.atguigu.mapper"/></beans>
5. 容器初始化配置web.xml
<?xml version="1.0" encoding="UTF-8"?>
<web-app xmlns="http://xmlns.jcp.org/xml/ns/javaee"xmlns:xsi="http://www.w3.org/2001/XMLSchema-instance"xsi:schemaLocation="http://xmlns.jcp.org/xml/ns/javaee http://xmlns.jcp.org/xml/ns/javaee/web-app_4_0.xsd"version="4.0"><!-- ContextLoaderListener --><!-- 通过 context-param 指定 Spring 框架的配置文件位置 --><context-param><param-name>contextConfigLocation</param-name><param-value>classpath:spring-service.xml,classpath:spring-mapper.xml</param-value></context-param><!-- 配置 ContextLoaderListener --><listener><listener-class>org.springframework.web.context.ContextLoaderListener</listener-class></listener><!-- DispatcherServlet --><servlet><servlet-name>dispatcherServlet</servlet-name><servlet-class>org.springframework.web.servlet.DispatcherServlet</servlet-class><init-param><param-name>contextConfigLocation</param-name><param-value>classpath:spring-mvc.xml</param-value></init-param><load-on-startup>1</load-on-startup></servlet><servlet-mapping><servlet-name>dispatcherServlet</servlet-name><url-pattern>/</url-pattern></servlet-mapping>
</web-app>
6. 整合测试
-
需求
查询所有员工信息,返回对应json数据!
-
controller
@Slf4j @RestController @RequestMapping("/employee") public class EmployeeController {@Autowiredprivate EmployeeService employeeService;@GetMapping("list")public List<Employee> retList(){List<Employee> employees = employeeService.findAll();log.info("员工数据:{}",employees);return employees;} } -
service
@Service public class EmployeeServiceImpl implements EmployeeService {@Autowiredprivate EmployeeMapper employeeMapper;/*** 查询所有员工信息*/@Overridepublic List<Employee> findAll() {List<Employee> employeeList = employeeMapper.queryAll();return employeeList;} } -
mapper
mapper接口 包:com.atguigu.mapper
public interface EmployeeMapper {List<Employee> queryAll();
}
mapper XML 文件位置: resources/mappers
<?xml version="1.0" encoding="UTF-8" ?>
<!DOCTYPE mapperPUBLIC "-//mybatis.org//DTD Mapper 3.0//EN""https://mybatis.org/dtd/mybatis-3-mapper.dtd">
<!-- namespace等于mapper接口类的全限定名,这样实现对应 -->
<mapper namespace="com.atguigu.mapper.EmployeeMapper"><select id="queryAll" resultType="employee"><!-- #{empId}代表动态传入的参数,并且进行赋值!后面详细讲解 -->select emp_id empId,emp_name empName, emp_salary empSalary from t_emp</select></mapper>
三、前端程序搭建和运行
1. 案例功能和接口分析
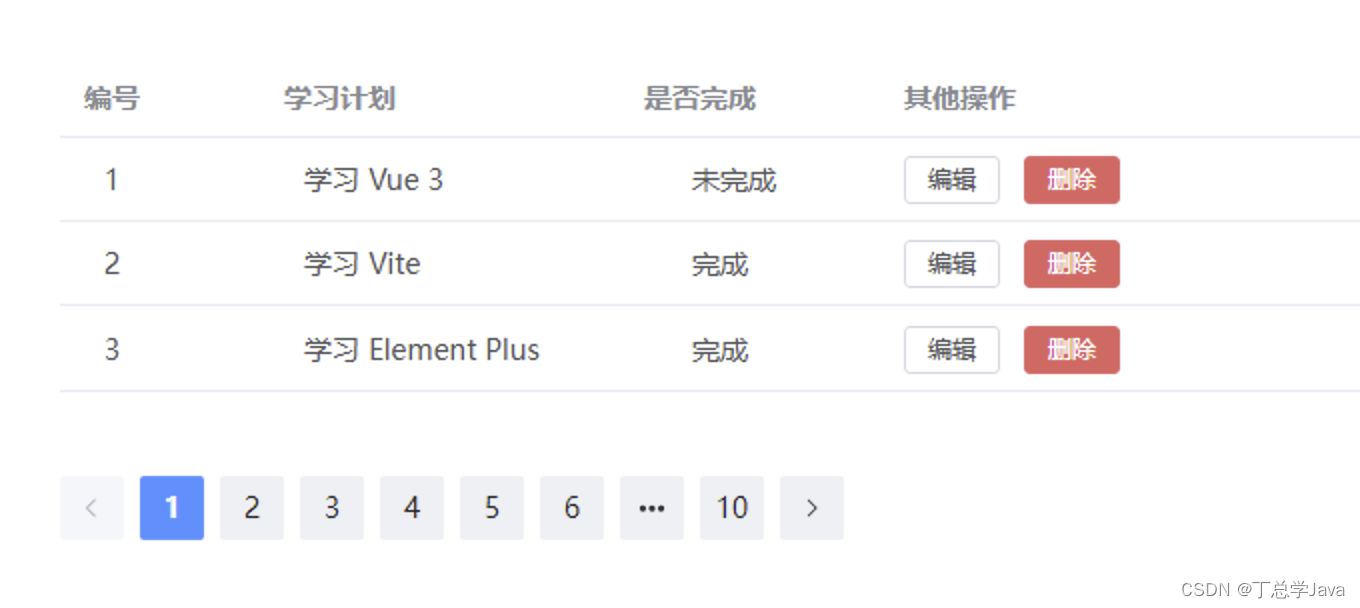
1.1 案例功能预览
1.2 接口分析
- 学习计划分页查询
/* 需求说明查询全部数据页数据 请求urischedule/{pageSize}/{currentPage} 请求方式 get 响应的json{"code":200,"flag":true,"data":{//本页数据data:[{id:1,title:'学习java',completed:true},{id:2,title:'学习html',completed:true},{id:3,title:'学习css',completed:true},{id:4,title:'学习js',completed:true},{id:5,title:'学习vue',completed:true}], //分页参数pageSize:5, // 每页数据条数 页大小total:0 , // 总记录数currentPage:1 // 当前页码}} */ - 学习计划删除
/* 需求说明根据id删除日程 请求urischedule/{id} 请求方式 delete 响应的json{"code":200,"flag":true,"data":null} */ - 学习计划保存
/* 需求说明增加日程 请求urischedule 请求方式 post 请求体中的JSON{title: '',completed: false} 响应的json{"code":200,"flag":true,"data":null} */ - 学习计划修改
/*
需求说明根据id修改数据
请求urischedule
请求方式 put
请求体中的JSON{id: 1,title: '',completed: false}
响应的json{"code":200,"flag":true,"data":null}
*/
2. 前端工程导入
3. 启动测试
npm i //安装依赖
npm run dev //运行测试
四、后端程序实现和测试
1. 准备工作
-
准备数据库脚本
CREATE TABLE schedule (id INT NOT NULL AUTO_INCREMENT,title VARCHAR(255) NOT NULL,completed BOOLEAN NOT NULL,PRIMARY KEY (id) );INSERT INTO schedule (title, completed) VALUES('学习java', true),('学习Python', false),('学习C++', true),('学习JavaScript', false),('学习HTML5', true),('学习CSS3', false),('学习Vue.js', true),('学习React', false),('学习Angular', true),('学习Node.js', false),('学习Express', true),('学习Koa', false),('学习MongoDB', true),('学习MySQL', false),('学习Redis', true),('学习Git', false),('学习Docker', true),('学习Kubernetes', false),('学习AWS', true),('学习Azure', false); -
准备pojo
包:com.atguigu.pojo
/*** projectName: com.atguigu.pojo** description: 任务实体类*/ @Data public class Schedule {private Integer id;private String title;private Boolean completed; } -
准备 R
包:com.atguigu.utils
*** projectName: com.atguigu.utils** description: 返回结果类*/
public class R {private int code = 200; //200成功状态码private boolean flag = true; //返回状态private Object data;  //返回具体数据
public static R ok(Object data){R r = new R();r.data = data;return r;}public static R fail(Object data){R r = new R();r.code = 500; //错误码r.flag = false; //错误状态r.data = data;return r;}public int getCode() {return code;}public void setCode(int code) {this.code = code;}public boolean isFlag() {return flag;}public void setFlag(boolean flag) {this.flag = flag;}public Object getData() {return data;}public void setData(Object data) {this.data = data;} } -
准备 PageBean
包:com.atguigu.utils
@Data
@NoArgsConstructor
@AllArgsConstructor
public class PageBean<T> {private int currentPage;   // 当前页码private int pageSize;      // 每页显示的数据量private long total;    // 总数据条数private List<T> data;      // 当前页的数据集合
}
2. 功能实现
- 分页查询
-
controller
/*@CrossOrigin 注释在带注释的控制器方法上启用跨源请求*/ @CrossOrigin @RequestMapping("schedule") @RestController public class ScheduleController {@Autowiredprivate ScheduleService scheduleService;@GetMapping("/{pageSize}/{currentPage}")public R showList(@PathVariable(name = "pageSize") int pageSize, @PathVariable(name = "currentPage") int currentPage){PageBean<Schedule> pageBean = scheduleService.findByPage(pageSize,currentPage);return R.ok(pageBean);} } -
service
@Slf4j @Service public class ScheduleServiceImpl implements ScheduleService {@Autowiredprivate ScheduleMapper scheduleMapper;/*** 分页数据查询,返回分页pageBean** @param pageSize* @param currentPage* @return*/@Overridepublic PageBean<Schedule> findByPage(int pageSize, int currentPage) {//1.设置分页参数PageHelper.startPage(currentPage,pageSize);//2.数据库查询List<Schedule> list = scheduleMapper.queryPage();//3.结果获取PageInfo<Schedule> pageInfo = new PageInfo<>(list);//4.pageBean封装PageBean<Schedule> pageBean = new PageBean<>(pageInfo.getPageNum(),pageInfo.getPageSize(),pageInfo.getTotal(),pageInfo.getList());log.info("分页查询结果:{}",pageBean);return pageBean;}} -
mapper
mapper接口
public interface ScheduleMapper {List<Schedule> queryPage();
}
mapperxml文件
<?xml version="1.0" encoding="UTF-8" ?>
<!DOCTYPE mapperPUBLIC "-//mybatis.org//DTD Mapper 3.0//EN""https://mybatis.org/dtd/mybatis-3-mapper.dtd">
<!-- namespace等于mapper接口类的全限定名,这样实现对应 -->
<mapper namespace="com.atguigu.mapper.ScheduleMapper"><select id="queryPage" resultType="schedule">select * from schedule</select>
</mapper>
-
- 计划添加
-
controller
@PostMapping public R saveSchedule(@RequestBody Schedule schedule){scheduleService.saveSchedule(schedule);return R.ok(null); } -
service
/*** 保存学习计划** @param schedule*/ @Override public void saveSchedule(Schedule schedule) {scheduleMapper.insert(schedule); } -
mapper
mapper接口
void insert(Schedule schedule);mapperxml文件
<insert id="insert">insert into schedule (title, completed)values(#{title}, #{completed});
</insert>
-
- 计划删除
- controller
@DeleteMapping("/{id}") public R removeSchedule(@PathVariable Integer id){scheduleService.removeById(id);return R.ok(null); } - service
/*** 移除学习计划** @param id*/ @Override public void removeById(Integer id) {scheduleMapper.delete(id); } - mapper
mapper接口
mapperxml文件void delete(Integer id);<delete id="delete">delete from schedule where id = #{id} </delete>
- controller
- 计划修改
- controller
@PutMappingpublic R changeSchedule(@RequestBody Schedule schedule){scheduleService.updateSchedule(schedule);return R.ok(null); } - service
/*** 更新学习计划** @param schedule*/ @Override public void updateSchedule(Schedule schedule) {scheduleMapper.update(schedule); } - mapper
mapper接口
mapperxml文件void update(Schedule schedule);<update id="update">update schedule set title = #{title} , completed = #{completed}where id = #{id} </update>
- controller
3. 前后联调
-
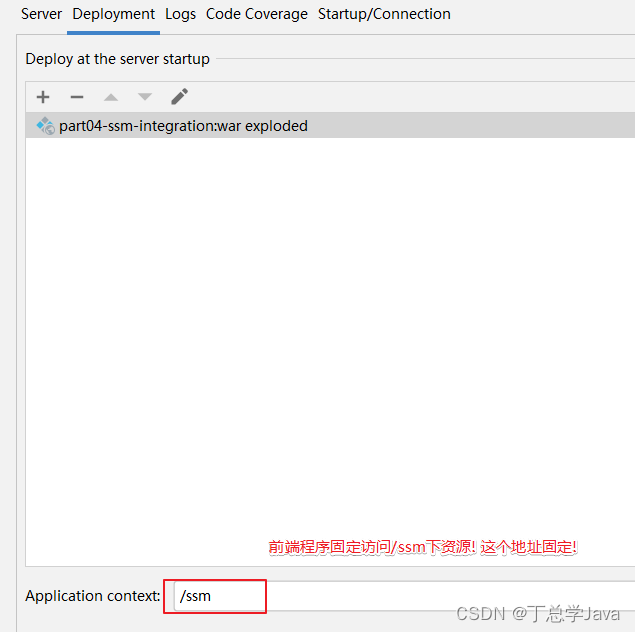
后台项目根路径设计
-
启动测试即可
五、SSM技术栈总结
1. Spring框架总结
1.1 技术点总结
- 控制反转(IoC,Inversion of Control)和依赖注入(DI,Dependency Injection)
- Spring AOP(Aspect-Oriented Programming)面向切面编程
- Spring TX声明式事务实现
1.2 配置总结
- IoC/DI配置
-
xml
<bean id="petStore" class="org.springframework.samples.jpetstore.services.PetStoreServiceImpl"><property name="accountDao" ref="accountDao"/><property name="itemDao" ref="itemDao"/><!-- additional collaborators and configuration for this bean go here --> </bean> -
注解
注解 说明 @Component 该注解用于描述 Spring 中的 Bean,它是一个泛化的概念,仅仅表示容器中的一个组件(Bean),并且可以作用在应用的任何层次,例如 Service 层、Dao 层等。 使用时只需将该注解标注在相应类上即可。 @Repository 该注解用于将数据访问层(Dao 层)的类标识为 Spring 中的 Bean,其功能与 @Component 相同。 @Service 该注解通常作用在业务层(Service 层),用于将业务层的类标识为 Spring 中的 Bean,其功能与 @Component 相同。 @Controller 该注解通常作用在控制层(如SpringMVC 的 Controller),用于将控制层的类标识为 Spring 中的 Bean,其功能与 @Component 相同。 <?xml version="1.0" encoding="UTF-8"?> <beans xmlns="http://www.springframework.org/schema/beans"xmlns:xsi="http://www.w3.org/2001/XMLSchema-instance"xmlns:context="http://www.springframework.org/schema/context"xsi:schemaLocation="http://www.springframework.org/schema/beans http://www.springframework.org/schema/beans/spring-beans.xsd http://www.springframework.org/schema/context https://www.springframework.org/schema/context/spring-context.xsd"><!-- 配置自动扫描的包 --><!-- 1.包要精准,提高性能!2.会扫描指定的包和子包内容3.多个包可以使用,分割 例如: com.atguigu.controller,com.atguigu.service等--><context:component-scan base-package="com.atguigu.components"/></beans> -
配置类
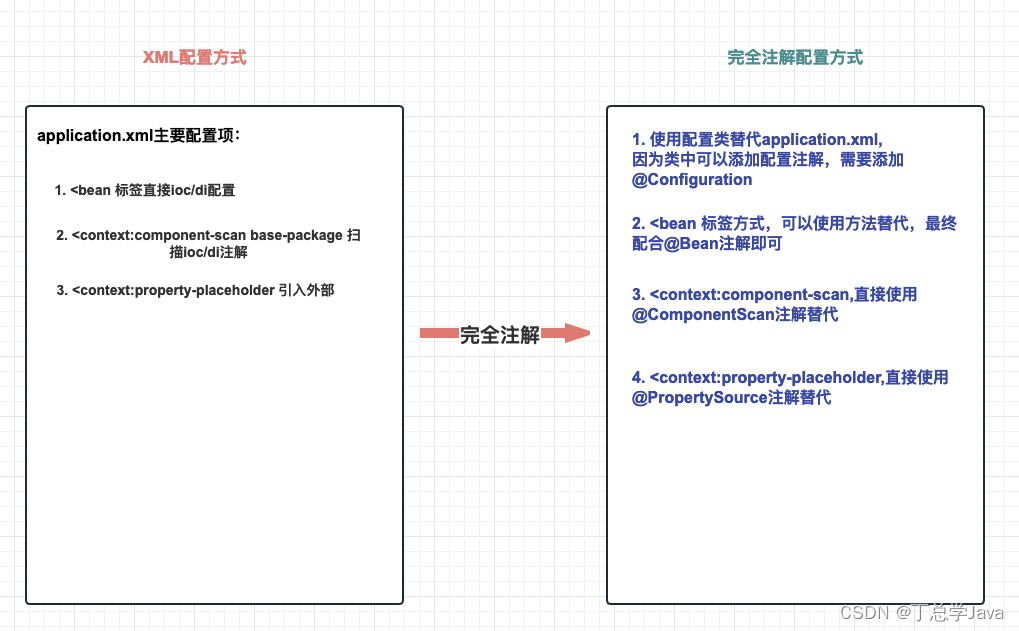
//标注当前类是配置类,替代application.xml
@Configuration
//引入jdbc.properties文件
@PropertySource({"classpath:application.properties","classpath:jdbc.properties"})
@ComponentScan(basePackages = {"com.atguigu.components"})
@Import(其他的配置类.class)
public class MyConfiguration {//如果第三方类进行IoC管理,无法直接使用@Component相关注解//解决方案: xml方式可以使用<bean标签//解决方案: 配置类方式,可以使用方法返回值+@Bean注解@Beanpublic DataSource createDataSource(@Value("${jdbc.user:default}") String username,@Value("${jdbc.password}")String password,@Value("${jdbc.url}")String url,@Value("${jdbc.driver}")String driverClassName){//使用Java代码实例化DruidDataSource dataSource = new DruidDataSource();dataSource.setUsername(username);dataSource.setPassword(password);dataSource.setUrl(url);dataSource.setDriverClassName(driverClassName);//返回结果即可return dataSource;}@Beanpublic XxxMapper createMapper(DataSource createDataSource){}}
-
- AOP配置
- 注解
<?xml version="1.0" encoding="UTF-8"?> <beans xmlns="http://www.springframework.org/schema/beans"xmlns:xsi="http://www.w3.org/2001/XMLSchema-instance"xmlns:context="http://www.springframework.org/schema/context"xmlns:aop="http://www.springframework.org/schema/aop"xsi:schemaLocation="http://www.springframework.org/schema/beans http://www.springframework.org/schema/beans/spring-beans.xsd http://www.springframework.org/schema/context https://www.springframework.org/schema/context/spring-context.xsd http://www.springframework.org/schema/aop https://www.springframework.org/schema/aop/spring-aop.xsd"><!-- 进行包扫描--><context:component-scan base-package="com.atguigu" /><!-- 开启aspectj框架注解支持--><aop:aspectj-autoproxy /> </beans>@Aspect @Order 值越小优先级越高 @Before @After @AfterReturning @AfterThrowing @Around @Pointcut - xml(了解)
<!-- 配置目标类的bean -->
<bean id="calculatorPure" class="com.atguigu.aop.imp.CalculatorPureImpl"/><!-- 配置切面类的bean -->
<bean id="logAspect" class="com.atguigu.aop.aspect.LogAspect"/><!-- 配置AOP -->
<aop:config><!-- 配置切入点表达式 --><aop:pointcut id="logPointCut" expression="execution(* *..*.*(..))"/><!-- aop:aspect标签:配置切面 --><!-- ref属性:关联切面类的bean --><aop:aspect ref="logAspect"><!-- aop:before标签:配置前置通知 --><!-- method属性:指定前置通知的方法名 --><!-- pointcut-ref属性:引用切入点表达式 --><aop:before method="printLogBeforeCore" pointcut-ref="logPointCut"/><!-- aop:after-returning标签:配置返回通知 --><!-- returning属性:指定通知方法中用来接收目标方法返回值的参数名 --><aop:after-returningmethod="printLogAfterCoreSuccess"pointcut-ref="logPointCut"returning="targetMethodReturnValue"/><!-- aop:after-throwing标签:配置异常通知 --><!-- throwing属性:指定通知方法中用来接收目标方法抛出异常的异常对象的参数名 --><aop:after-throwingmethod="printLogAfterCoreException"pointcut-ref="logPointCut"throwing="targetMethodException"/><!-- aop:after标签:配置后置通知 --><aop:after method="printLogCoreFinallyEnd" pointcut-ref="logPointCut"/><!-- aop:around标签:配置环绕通知 --><!--<aop:around method="……" pointcut-ref="logPointCut"/>--></aop:aspect></aop:config>
- 注解
- TX配置
-
注解
<bean id="transactionManager" class="org.springframework.jdbc.datasource.DataSourceTransactionManager"><!-- 事务管理器的bean只需要装配数据源,其他属性保持默认值即可 --><property name="dataSource" ref="druidDataSource"/>
</bean>
<!-- 开启基于注解的声明式事务功能 -->
<!-- 使用transaction-manager属性指定当前使用是事务管理器的bean -->
<!-- transaction-manager属性的默认值是transactionManager,如果事务管理器bean的id正好就是这个默认值,则可以省略这个属性 -->
<tx:annotation-driven transaction-manager="transactionManager"/>
@Transactional
-
xml(了解)
<?xml version="1.0" encoding="UTF-8"?>
<beans xmlns="http://www.springframework.org/schema/beans"xmlns:xsi="http://www.w3.org/2001/XMLSchema-instance"xmlns:context="http://www.springframework.org/schema/context"xmlns:tx="http://www.springframework.org/schema/tx"xmlns:aop="http://www.springframework.org/schema/aop"xsi:schemaLocation="http://www.springframework.org/schema/beans http://www.springframework.org/schema/beans/spring-beans.xsd http://www.springframework.org/schema/context https://www.springframework.org/schema/context/spring-context.xsd http://www.springframework.org/schema/tx http://www.springframework.org/schema/tx/spring-tx.xsd http://www.springframework.org/schema/aop https://www.springframework.org/schema/aop/spring-aop.xsd"><!-- 扫描包 --><context:component-scan base-package="com.atguigu" /><!-- 导入外部属性文件 --><context:property-placeholder location="classpath:jdbc.properties" /><!-- 配置数据源 --><bean id="druidDataSource" class="com.alibaba.druid.pool.DruidDataSource"><property name="url" value="${atguigu.url}"/><property name="driverClassName" value="${atguigu.driver}"/><property name="username" value="${atguigu.username}"/><property name="password" value="${atguigu.password}"/></bean><!-- 配置 JdbcTemplate --><bean id="jdbcTemplate" class="org.springframework.jdbc.core.JdbcTemplate"><!-- 装配数据源 --><property name="dataSource" ref="druidDataSource"/></bean><!-- 配置事务管理器 --><bean id="transactionManager" class="org.springframework.jdbc.datasource.DataSourceTransactionManager"><!-- 事务管理器的bean只需要装配数据源,其他属性保持默认值即可 --><property name="dataSource" ref="druidDataSource"/></bean><!-- tx:advice标签:配置事务通知 --><!-- id属性:给事务通知标签设置唯一标识,便于引用 --><!-- transaction-manager属性:关联事务管理器 --><tx:advice id="txAdvice" transaction-manager="transactionManager"><tx:attributes><!-- tx:method标签:配置具体的事务方法 --><!-- name属性:指定方法名,可以使用星号代表多个字符 --><tx:method name="get*" read-only="true"/><tx:method name="query*" read-only="true"/><tx:method name="find*" read-only="true"/><!-- read-only属性:设置只读属性 --><!-- rollback-for属性:设置回滚的异常 --><!-- no-rollback-for属性:设置不回滚的异常 --><!-- isolation属性:设置事务的隔离级别 --><!-- timeout属性:设置事务的超时属性 --><!-- propagation属性:设置事务的传播行为 --><tx:method name="save*" read-only="false" rollback-for="java.lang.Exception" propagation="REQUIRES_NEW"/><tx:method name="update*" read-only="false" rollback-for="java.lang.Exception" propagation="REQUIRES_NEW"/><tx:method name="delete*" read-only="false" rollback-for="java.lang.Exception" propagation="REQUIRES_NEW"/><!-- 兜个底--><tx:method name="*" /></tx:attributes></tx:advice><aop:config><!-- 配置切入点表达式,将事务功能定位到具体方法上 --><aop:pointcut id="txPoincut" expression="execution(* *..*Service.*(..))"/><!-- 将事务通知和切入点表达式关联起来 --><aop:advisor advice-ref="txAdvice" pointcut-ref="txPoincut"/></aop:config>
</beans>
-
1.3 注解总结
-
ioc/di注解:
@Autowired:自动装配 Bean,可用于构造方法、属性和方法上,配合
@Qualifier使用实现按名称注入。@Qualifier:指定需要注入的 Bean 的名称,通常和
@Autowired一起使用。@Resource:和
@Autowired类似,可以实现按名称注入,不过是 JSR-250 规范的注解。@Value:注入 properties 文件中的属性值,还可以注入 SpEL 表达式的值。
@Component:通用的组件注解,通常用于标记 Spring 管理的 Bean。
@Controller:标记 Spring MVC 控制器,也是
@Component的一种。@Service:标记 Service 层组件,也是
@Component的一种。@Repository:标记数据访问层组件,是
@Component的一种。 -
aop注解:
@Aspect:声明一个切面类。
@Pointcut:定义切入点表达式。
@Before:前置通知,在目标方法执行之前执行。
@AfterReturning:后置通知,在目标方法执行之后执行,返回结果时执行。
@AfterThrowing:异常通知,在目标方法抛出异常时执行。
@After:最终通知,在目标方法执行之后执行,无论是否发生异常都执行。
@Around:环绕通知,在目标方法执行前后执行,可以控制目标方法的执行。
-
tx注解:
@Transactional:声明一个事务方法,可以配置事务的属性,如传播行为、隔离级别、超时时间等。
2. Spring MVC 框架总结
2.1 技术点总结
-
简化参数接收
接收param / json / 文件 / 原生api / 共享域
-
简化数据响应
响应 页面 / 转发和重定向 / json / 文件
2.2 配置总结
<?xml version="1.0" encoding="UTF-8"?>
<beans xmlns="http://www.springframework.org/schema/beans"xmlns:xsi="http://www.w3.org/2001/XMLSchema-instance"xmlns:context="http://www.springframework.org/schema/context"xmlns:mvc="http://www.springframework.org/schema/mvc"xsi:schemaLocation="http://www.springframework.org/schema/beans http://www.springframework.org/schema/beans/spring-beans.xsd http://www.springframework.org/schema/context https://www.springframework.org/schema/context/spring-context.xsd http://www.springframework.org/schema/mvc https://www.springframework.org/schema/mvc/spring-mvc.xsd"><!-- 扫描controller对应的包,将handler加入到ioc  handler--><context:component-scan base-package="com.atguigu.controller" /><!--注意: 导入mvc命名空间!mvc:annotation-driven 是一个整合标签他会导入handlerMapping和handlerAdapter他会导入json数据格式转化器等等--><mvc:annotation-driven /><!-- viewResolver 不需要配置,因为我们不需要查找逻辑视图!!! --><!-- 加入这个配置,SpringMVC 就会在遇到没有 @RequestMapping 的请求时放它过去 --><!-- 所谓放它过去就是让这个请求去找它原本要访问的资源 --><mvc:default-servlet-handler/><!-- 配置动态页面语言jsp的视图解析器,快速查找jsp--><bean class="org.springframework.web.servlet.view.InternalResourceViewResolver"><property name="viewClass" value="org.springframework.web.servlet.view.JstlView"/><property name="prefix" value="/WEB-INF/views/"/><property name="suffix" value=".jsp"/></bean></beans>
2.3 注解总结
-
控制器相关
@Controller:用于定义控制器类;@RestController:与@Controller类似,但返回值都会被转换为 JSON 格式;@RequestMapping:用于定义请求 URI 与控制器方法的映射关系;@CrossOrigin:用于标注在 Controller 类或处理请求的方法上,表示允许跨域请求; -
接收参数相关
@RequestParam:用于获取请求参数的值;@RequestBody:用于获取 POST 请求的请求体(Request Body);@RequestHeader:用于获取请求头信息;@CookieValue:用于获取 Cookie 中的值。@PathVariable:用于获取 URI 中的参数值; -
响应数据相关
@ResponseBody:用于将 Controller 中方法返回的对象转换成指定格式(通常是 JSON 或 XML)的对象,并将其作为响应正文返回; -
校验注解相关
@Validate:用于开启对象的数据校验;@NotNull:用于检验是否为 null;@NotBlank:用于检验是否为 null 或空字符串;@Size:用于检验字符串、数组、集合的长度范围;@Min:用于检验数字的最小值;@Max:用于检验数字的最大值;@DecimalMin:用于检验 BigDecimal 和 BigInteger 的最小值;@DecimalMax:用于检验 BigDecimal 和 BigInteger 的最大值;@Pattern:用于检验正则表达式。
3. MyBatis框架总结
3.1 技术点总结
- 映射文件及 SQL 语句编写
- MyBatis 动态 SQL
- MyBatis 多表映射
- MyBatis 逆向工程
3.2 配置总结
- mapper配置
MyBatis 的真正强大在于它的语句映射,这是它的魔力所在。由于它的异常强大,映射器的 XML 文件就显得相对简单。 如果拿它跟具有相同功能的 JDBC 代码进行对比,你会立即发现省掉了将近 95% 的代码。MyBatis 致力于减少使用成本,让用户能更专注于 SQL 代码。SQL 映射文件只有很少的几个顶级元素(按照应被定义的顺序列出):resultMap – 描述如何从数据库结果集中加载对象,是最复杂也是最强大的元素。sql – 可被其它语句引用的可重用语句块。insert – 映射插入语句。update – 映射更新语句。delete – 映射删除语句。select – 映射查询语句。 - mybatis配置
MyBatis 的配置文件包含了会深深影响 MyBatis 行为的设置和属性信息。 配置文档的顶层结构如下:configuration(配置)properties(属性)settings(设置)typeAliases(类型别名)typeHandlers(类型处理器) String [] , varchar()objectFactory(对象工厂)plugins(插件)environments(环境配置)environment(环境变量)transactionManager(事务管理器)dataSource(数据源)databaseIdProvider(数据库厂商标识)mappers(映射器)
3.3 注解总结
@Param:在 MyBatis 中,@Param 注解主要用于解决在调用映射器方法时传递多个参数的问题。当你在映射器接口中定义的方法有多个参数时,你需要使用 @Param 注解来明确指出每个参数的名称,以便在 SQL 映射文件中引用它们。
例如,假设你有以下映射器接口方法:
void updateUser(@Param("id") int id, @Param("name") String name, @Param("age") int age);
在这个例子中,你定义了一个名为 updateUser 的方法,它接受三个参数:id、name 和 age。每个参数都使用了 @Param 注解,并给出了一个名称。
然后,在相应的 SQL 映射文件中,你可以使用这些名称来引用这些参数。例如:
<update id="updateUser">  UPDATE user  SET name = #{name}, age = #{age}  WHERE id = #{id}
</update>
在这个例子中,#{name}、#{age} 和 #{id} 分别引用了传递给 updateUser 方法的 name、age 和 id 参数。
总的来说,@Param 注解在 MyBatis 中用于明确指出方法的参数名称,以便在 SQL 映射文件中引用它们。


)


计算)
![[GDI绘图]画笔CPen](http://pic.xiahunao.cn/[GDI绘图]画笔CPen)
)


)