哈喽大家好,我是20YC小二!欢迎关注(20YC编程) ,现在有免费《C++程序员》视频教程下载哦!
~下面开始今天的分享内容~
1. QLineEdit介绍
QLineEdit是一个单行文本编辑器,允许用户输入和编辑纯文本。它提供了许多有用的编辑功能,如撤销和重做、剪切和粘贴、拖放等。
-
QLineEdit的主要功能和特点:
- 轻量级:QLineEdit是一个轻量级的控件,占用的系统资源较少,可以轻松地集成到各种应用程序中。
- 易用性:QLineEdit的使用方法简单明了,对于开发人员来说,可以很容易地将其添加到应用程序中并对其进行配置。
- 支持各种输入模式:QLineEdit可以根据不同的回显模式显示不同的输入内容,例如密码模式或隐藏输入模式,这增加了其在处理敏感信息时的安全性。
- 输入限制和验证:通过设置输入掩码和验证器,QLineEdit可以限制用户输入的内容类型,并进行有效性检查,这有助于确保用户输入的数据符合预期的格式和要求。
- 可交互性:QLineEdit支持添加动作和清除按钮,这增加了用户与输入框的交互性,使用户能够更方便地操作输入框。
- 外观可定制:通过设置字体、样式表等属性,QLineEdit的外观可以进行定制,以适应不同的应用程序风格和用户需求。
- 事件响应:QLineEdit可以使用信号和槽机制来响应用户的输入事件,例如文本改变、编辑完成等,这使得开发人员能够在用户输入时执行相应的操作或触发其他事件。
- 其他特性:QLineEdit也允许开发者自定义输入框的一些特性,比如可以设置输入框的只读属性,防止用户随意修改其中的内容;也可以设置光标的位置和选中文字的起始位置等
QLineEdit具有轻量级、易用性、支持各种输入模式、输入限制和验证、可交互性、外观可定制以及事件响应等特点,适用于各种需要用户输入单行文本的应用场景。
-
如何使用QLineEdit:
头文件:#include <QLineEdit>
cmake:find_package(Qt6 REQUIRED COMPONENTS Widgets)
target_link_libraries(mytarget PRIVATE Qt6::Widgets)
qmake:QT += widgets
继承于:QWidget
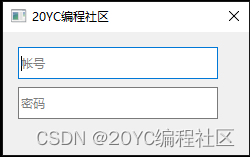
2. QLineEdit默认风格显示例子
#include <QLineEdit>
QLineEdit * p_line_edit1 = new QLineEdit(this);
p_line_edit1->setGeometry(15, 15, 200, 32);
p_line_edit1->setPlaceholderText("帐号");
QLineEdit * p_line_edit2 = new QLineEdit(this);
p_line_edit2->setGeometry(15, 55, 200, 32);
p_line_edit2->setPlaceholderText("密码");
3. QLineEdit主要信号
// 当显示文本改变时,发射该信号。
void textChanged(const QString &text)
// 当编辑文本时,发射该信号。
void textEdited(const QString &text)
// 当光标移动(位置改变)时,发射该信号。
void cursorPositionChanged(int oldPos, int newPos)
// 当按下(Return)返回键或(Enter)回车键时,发射该信号。
void returnPressed()
// 当按下(Return)返回键或(Enter)回车键,或输入框失去焦点时,发射该信号。
void editingFinished()
// 当选择文本改变时,发射该信号。
void selectionChanged()
// 当输入的按键不被文本框接受时,发射该信号。
void inputRejected()
4. QLineEdit常用属性
-
text文本:
// 访问函数
QString text() const
void setText(const QString &text)
-
displayText显示文本:
根据echoMode响应模式返回不同字符
如QLineEdit::Normal返回text内容,QLineEdit::NoEcho返回空字符串,QLineEdit::Password返回 "********"。
// 访问函数
QString displayText() const-
echoMode回应模式:
QLineEdit的echoMode属性用来决定输入的内容如何显示。
QLineEdit::EchoMode宏有以下四个取值:
QLineEdit::Normal 0 正常模式,输入什么就显示什么。(默认)
QLineEdit::NoEcho 1 无回显模式,输入的字符不会被显示出来。
QLineEdit::Password 2 密码模式,不显示实际输入的字符,而是以小圆圈代替,这样别人就无法看到输入的字符。
QLineEdit::PasswordEchoOnEdit 3 密码回显模式,当编辑框处于编辑状态时,会显示密码字符。
// 访问函数
QLineEdit::EchoMode echoMode() const
void setEchoMode(QLineEdit::EchoMode mode)/**** 例子 ****/
p_line_edit->setEchoMode(QLineEdit::Password);
-
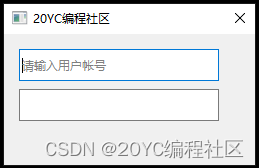
placeholderText占位符文本:
占位符文本一般用于在用户未输入任何内容时显示一些提示信息。
// 访问函数
QString placeholderText() const
void setPlaceholderText(const QString &text)/**** 例子: ****/
p_line_edit->setPlaceholderText("请输入用户帐号");

-
maxLength最大输入长度:
默认最大长度 32767。
// 访问函数
int maxLength() const
void setMaxLength(int)/**** 例子 ****/
p_line_edit->setMaxLength(32);-
isClearButtonEnabled是否启用清空按钮:
true:启用清空按钮,表示当输入框text内容不为空时,在输入框右边是否显示一个清空按钮。默认为 false。
// 访问函数
void setClearButtonEnabled(bool enable)
bool isClearButtonEnabled() const/**** 例子 ****/
p_line_edit->setClearButtonEnabled(true);
-
isReadOnly是否只读模式:
// 访问函数;默认 false。
bool isReadOnly() const
void setReadOnly(bool b)/**** 例子 ****/
p_line_edit->setReadOnly(true);-
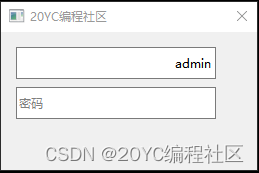
alignment文本对齐方式:
很多控件都具有对齐特性,例如QLabel、QLineEdit、QPushButton等控件。
// 访问函数:默认Qt::AlignLeft|Qt::AlignVCenter靠左垂直居中
Qt::Alignment alignment() const
void setAlignment(Qt::Alignment)/**** 例子:设置靠右垂直居中对齐 ****
p_line_edit->setAlignment(Qt::AlignRight|Qt::AlignVCenter);
-
textMargins文本边缘:
用于设置文本到边框四个边缘的距离。分别是left左边、top上边、right右边、bottom下边。
// 访问函数
void setTextMargins(int left, int top, int right, int botom)
void setTextMargins(const QMargins &margins)
void getTextMargins(int *left, int *top, int *right, int *bottom) const
QMargins textMargins() const/**** 例子:设置左边间隔15 ****/
p_line_edit->setTextMargins(15, 0, 0, 0);
-
isModified是否文本被修改:
// 访问函数
bool isModified() const
void setModified(bool b)-
isUndoAvailable是否允许撤销:
// 访问函数
bool isUndoAvailable() const-
isRedoAvailable是否允许重做:
// 访问函数
bool isRedoAvailable() const-
dragEnabled是否允许拖拽选择文本:
true:表示可以将文本框的选择文本,拖拽移动到文本框其他位置上。
默认 false 不允许拖拽。
// 访问函数
void setDragEnabled(bool b)
bool dragEnabled() const
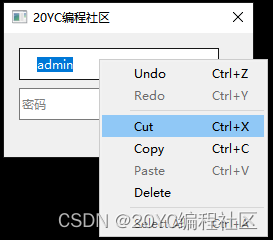
5. QLineEdit内置右键菜单
- 默认右键菜单功能截图:

6. QLineEdit光标操作管理
- 光标位置函数:
// 返回当前光标位置。默认 0
int cursorPosition() const
// 设置当前光标位置。
void setCursorPosition(int cursorPos)
// 根据 QPoint(x, y) 计算光标位置。
int cursorPositionAt(const QPoint &pos)- 光标移动函数:
mark==true:表示移动字符会加到选择文本。
mark==false:表示会取消选择文本。
// 光标前移 steps 个字符。
void cursorForward(bool mark, int steps = 1)
// 光标后移 steps 个字符。
void cursorBackward(bool mark, int steps = 1)
// 光标前移 1 个词。
void cursorWordForward(bool mark)
// 光标后移 1 个词。
void cursorWordBackward(bool mark)
// 光标移到文本开头。
void home(bool mark)
// 光标移到文本末尾。
void end(bool mark)- 光标回格和删除函数:
回格:删除光标前面字符。
删除:删除光标后面字符。
// 在光标处回格。
void backspace()
// 在光标处删除。
void del()
7. QLineEdit选择文本函数
- 选择文本函数:
// 选择全部文本。
void selectAll()
// 选择指定文本。
void setSelection(int start, int length)
// 返回选择文本。
QString selectedText() const
// 返回选择文本第一个字符位置。
int selectionStart() const
// 返回选择文本最后字符位置。
int selectionEnd() const
// 返回选择文本长度。
int selectionLength() const- 取消选择函数:
// 取消选择。
void deselect()
8. QLineEdit剪贴板操作函数
// 剪切选择文本到剪贴板。
void cut()
// 复制选择文本到剪贴板。
void copy() const
// 插入剪贴板文本内容到当前光标位置,同时删除选择文本。
void paste()
9. QLineEdit快捷操作函数
// 清空文本。
void clear()
// 撤销上一次文本操作。
void undo()
// 重做上一次文本操作。
void redo()
// 插入newText到当前光标位置,同时删除选择文本。
void insert(const QString &newText)
10. QLineEdit输入限制验证器
QLineEdit的setValidator()函数用于设置输入框的验证器,用于限制和检查用户的输入。验证器是一个实现了QValidator接口的对象,它可以定义一组规则来验证用户输入的数据是否符合要求。
用户在输入数据时,验证器将根据定义的规则对用户输入进行验证。如果输入数据不符合规则,验证器将拒绝接受输入,从而限制用户在输入框中输入无效数据。
// 访问函数
void setValidator(const QValidator *)
const QValidator * validator() const
- 限制输入整数例子:
#include <QLineEdit>
#include <QLabel>
#include <QIntValidator>QLineEdit * p_line_edit = new QLineEdit(this);// 创建一个整数验证器,限制输入为0到99之间的整数
QIntValidator *validator = new QIntValidator(0, 99, p_line_edit);
// 将验证器设置为QLineEdit的验证器
p_line_edit->setValidator(validator);- 限制输入浮点数例子:
#include <QLineEdit>
#include <QLabel>
#include <QDoubleValidator>QLineEdit * p_line_edit = new QLineEdit(this);// 创建一个浮点数验证器,限制输入为0.0到9999.99之间的浮点数,精度为小数点后2位
QDoubleValidator *validator = new QDoubleValidator(0, 9999.99, 2, p_line_edit);
validator->setNotation(QDoubleValidator::StandardNotation);
// 将验证器设置为QLineEdit的验证器
p_line_edit->setValidator(validator);
11. QLineEdit完整示例
- 创建各种显示风格、和各种属性效果输入框控件;
- 演示限制整数输入、限制浮点数输入;
- 连接QLineEdit文本改变信号等功能。

-
.h 头文件源码:
#ifndef LINE_EDIT_DEMO_DIALOG_H
#define LINE_EDIT_DEMO_DIALOG_H
#include <QDialog>
#include <QLineEdit>class line_edit_demo_dialog : public QDialog
{Q_OBJECTpublic:line_edit_demo_dialog(QWidget *parent = nullptr);~line_edit_demo_dialog();private slots:void slotTextChanged(const QString &text);private:QLineEdit * m_pLineEdit1 = nullptr;QLineEdit * m_pLineEdit2 = nullptr;QLineEdit * m_pLineEdit3 = nullptr;QLineEdit * m_pLineEdit4 = nullptr;QLineEdit * m_pLineEdit5 = nullptr;QLineEdit * m_pLineEdit6 = nullptr;QLineEdit * m_pLineEdit7 = nullptr;QLineEdit * m_pLineEdit8 = nullptr;QLineEdit * m_pLineEdit9 = nullptr;};
#endif // LINE_EDIT_DEMO_DIALOG_H
-
.cpp 源文件源码:
#include "line_edit_demo_dialog.h"
#include <QLabel>
#include <QIntValidator>
#include <QDoubleValidator>line_edit_demo_dialog::line_edit_demo_dialog(QWidget *parent): QDialog(parent)
{this->setWindowTitle("20YC编程社区");this->resize(720, 420);// 启用清空文本按钮m_pLineEdit1 = new QLineEdit(this);m_pLineEdit1->setGeometry(15, 15, 200, 32);m_pLineEdit1->setPlaceholderText("请输入用户帐号");m_pLineEdit1->setClearButtonEnabled(true);// 密码回应模式m_pLineEdit2 = new QLineEdit(this);m_pLineEdit2->setGeometry(15, 55, 200, 32);m_pLineEdit2->setPlaceholderText("密码");m_pLineEdit2->setEchoMode(QLineEdit::Password);// 限制输入整数QLabel * p_label1 = new QLabel("限制输入整数:", this);p_label1->setGeometry(240, 15, 120, 32);m_pLineEdit3 = new QLineEdit(this);m_pLineEdit3->setGeometry(240, 55, 120, 32);// 创建一个整数验证器,限制输入为0到99之间的整数QIntValidator *validator1 = new QIntValidator(0, 99, m_pLineEdit3);// 将验证器设置为QLineEdit的验证器m_pLineEdit3->setValidator(validator1);// 限制输入浮点数QLabel * p_label2 = new QLabel("限制输入浮点数:", this);p_label2->setGeometry(380, 15, 120, 32);m_pLineEdit4 = new QLineEdit(this);m_pLineEdit4->setGeometry(380, 55, 120, 32);// 创建一个浮点数验证器,限制输入为0.0到9999.99之间的浮点数,精度为小数点后2位QDoubleValidator *validator2 = new QDoubleValidator(0, 9999.99, 2, m_pLineEdit4);validator2->setNotation(QDoubleValidator::StandardNotation);// 将验证器设置为QLineEdit的验证器m_pLineEdit4->setValidator(validator2);// 右边显示文本m_pLineEdit5 = new QLineEdit(this);m_pLineEdit5->setGeometry(15, 100, 200, 32);m_pLineEdit5->setPlaceholderText("右边显示文本");m_pLineEdit5->setAlignment(Qt::AlignRight|Qt::AlignVCenter);// 左边间隔15像素m_pLineEdit6 = new QLineEdit(this);m_pLineEdit6->setGeometry(15, 140, 200, 32);m_pLineEdit6->setPlaceholderText("左边间隔15像素");m_pLineEdit6->setTextMargins(15, 0, 0, 0);// 文本和背景颜色m_pLineEdit7 = new QLineEdit(this);m_pLineEdit7->setGeometry(240, 100, 200, 32);m_pLineEdit7->setPlaceholderText("文本和背景颜色");m_pLineEdit7->setAlignment(Qt::AlignCenter|Qt::AlignVCenter);m_pLineEdit7->setStyleSheet("QLineEdit{color: rgb(255, 0, 0);  background-color:rgb(0, 255, 0);}");// 圆角边框颜色、背景透明m_pLineEdit8 = new QLineEdit(this);m_pLineEdit8->setGeometry(240, 140, 200, 32);m_pLineEdit8->setPlaceholderText("圆角边框颜色、背景透明");m_pLineEdit8->setAlignment(Qt::AlignCenter|Qt::AlignVCenter);m_pLineEdit8->setStyleSheet("QLineEdit{background-color: transparent; border: 1px solid rgb(0, 0, 255); border-radius: 4px;}");// 文本改变自动同步QLineEdit * p_line_edit9 = new QLineEdit(this);p_line_edit9->setGeometry(15, 180, 480, 32);p_line_edit9->setMaxLength(1024);p_line_edit9->setPlaceholderText("输入文本,自动同步到其他QLineEdit控件");connect(p_line_edit9, &QLineEdit::textChanged, this, &line_edit_demo_dialog::slotTextChanged);
}line_edit_demo_dialog::~line_edit_demo_dialog()
{
}void line_edit_demo_dialog::slotTextChanged(const QString &text)
{m_pLineEdit1->setText(text);m_pLineEdit2->setText(text);m_pLineEdit3->setText(text);m_pLineEdit4->setText(text);m_pLineEdit5->setText(text);m_pLineEdit6->setText(text);m_pLineEdit7->setText(text);m_pLineEdit8->setText(text);
}
-【End】-
喜欢本文章,记得点赞、分享、关注哦~

)

规范)

【系统移植】【华清远见西安中心】)


