1.Vue基础原理:
(1)vue.js中有两个核心功能:响应式数据绑定,组件系统
(2)MVC,MVP,MVVM之间的区别和理解;
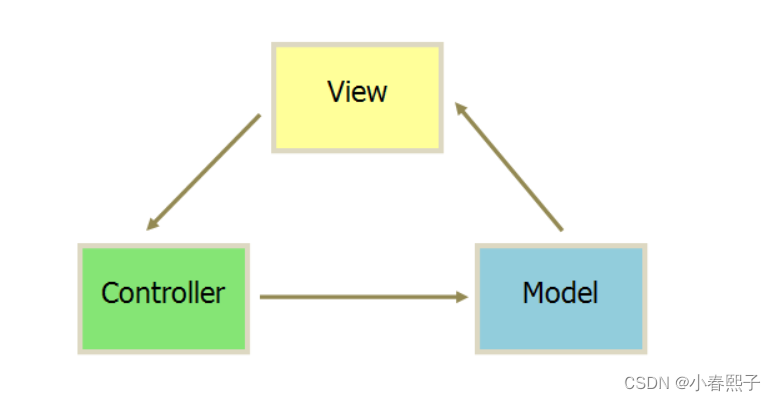
*****MVC:
1) 视图(View):用户界面2) 控制器(Controller):业务逻辑3) 模型(Model):数据保存MVC各个部分之间的通信方式如下:
1)视图传送指令到控制器2)控制器完成业务逻辑后要求模型改变状态3)模型将新的数据发送到视图,用户得到反馈
以上的所有通信都是单向的;接受用户指令的时候,MVC有两种方式。一种是通过视图接受指令,然后传递给控制器;另一种是用户直接给控制器发送指令;
实际使用中可能更加灵活,下面是Backbone.js为例说明:
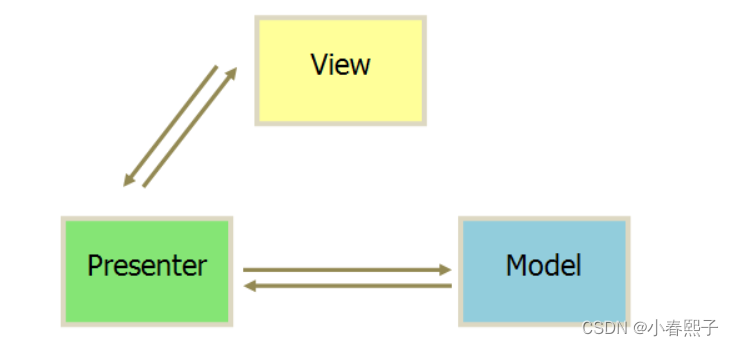
1) 用户可以向视图(View)发送指令(DOM事件),再由View直接要求Model改变状态;2) 用户也可以向Controller发送指令(改变URL触发hashChange事件,再由Controller发送给View3) Controller很薄,只起到路由作用,而View非常厚,业务逻辑都放在View,所以Backbone索性取消了Controller,只保留了Router(路由器)*****MVP:MVP适用于 事件驱动的应用架构中,如asp.net web form,window forms应用
1)各部分之间的通信都是双向的;2)视图(View)和模型(Model)不发生联系,都是通过表现(Presenter)传递的3)View非常薄,不部署任何业务逻辑,称之为被动视图(Passive View)即没有任何主动性,而Presenter非常厚,所有逻辑都在这里
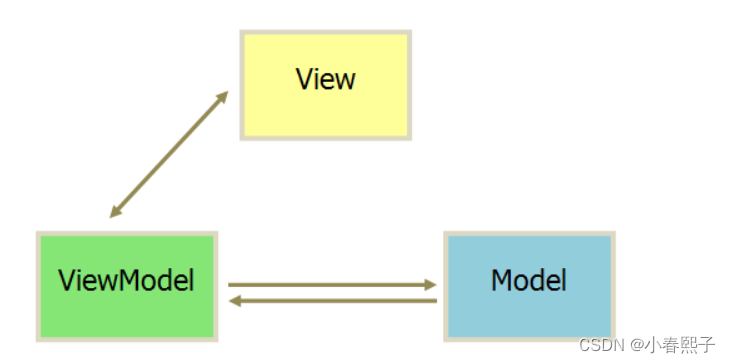
*****MVVM: MVVM模式将Presenter层替换为ViewModel,其他与MVP基本一致,示意图如下:

1) 它和MVP的区别是,采用双向绑定,视图层(View)的变动,自动反映在ViewModel,反之亦然,Angular和Vue,React采用这种方式2) MVVM的提出源于WPF,主要用于分离应用界面层和业务逻辑层,WPF,Siverlight都基于数据驱动开发3) MVVM模式中,一个ViewModel和一个View匹配,完全和View绑定,所有View中的修改变化,都会更新到ViewModel中,同时ViewModel的任何变化都会同步到View上显示;之所以自动同步是ViewModel的属性都实现了observable这样的接口,也就是说当使用属性的set方法,会同时出发属性修改的事件,使绑定的UI自动刷新; (3)数据双向绑定的流程:
1) 建立虚拟DOM Tree,通过document.createDocumentFragment(),遍历指定根节点内部节点,根据{{prop}},v-model等规则进行compile(主要负责给node节点赋值);2) 通过Object.defineProperty()进行数据变化拦截3) 截取到的数据变化,通过发布者-订阅者模式,触发Watcher,从而改变虚拟DOM中的具体数据;订阅发布模式(又称为观察者模式)定义一种一对多的关系,让多个观察者同时监听一个主题对象,主题对象状态发生改变的时候通知所有的观察者。发布者发出通知 => 主题对象收到通知并推送给订阅者 => 订阅者执行相应的操作 4) 通过改变虚拟DOM元素值,从而改变最后渲染dom树的值,完成双向绑定
完成数据双向绑定的关键在于:Object.defineProperty()

Vue的数据驱动主要实现建立在是三个对象上 Dep( 主题对象 ),Watcher,Compiler
Dep 主要负责依赖的收集Watcher 主要负责Dep和Compiler之间的联系Compiler 可以理解为virtual dom(虚拟DOM) + patch 也就是负责视图层的渲染(4)简易双绑:首先,我们把注意力集中到这个属性上: Object.defineProperty;
Object.defineProperty()方法会直接在一个对象上定义一个新属性,或者修改一个对象的现有属性,并返回这个对象语法:Object.defineProperty(obj,prop,descriptor)obj:要在其上定义属性的对象
prop:要定义或者修改的属性名字
descriptor:将定义或修改的属性描述符
举例如下:
var obj = {};
Object.defineProperty(obj,'hello',{   //这里整个都是属性描述符get:function(){//我们在这里拦截到了数据console.log("get方法被调用");},set:function(newValue){//改变数据的值,拦截下来额console.log("set方法被调用");}
});
obj.hello//输出为“get方法被调用”,输出了值。
obj.hello = 'new Hello';//输出为set方法被调用,修改了新值
通过以上方法可以看出, 获取对象属性值触发get,设置对象属性值触发set,因此我们可以想象到数据模型对象的属性 设置和读取可以驱动view层的数据变化,view的数据变化传递给数据模型对象,在Set里面可以做很多事情。
在这基础上,我们可以做到数据的双向绑定:
let obj = {};Object.defineProperty(obj, 'name', {set: function(newValue){console.log('触发setter');document.querySelector('.text-box').innerHTML = newValue;document.querySelector('.inp-text').value = newValue;},get: function(){console.log('触发getter');}});document.querySelector('.inp-text').addEventListener('keyup', function(e){obj.name = e.target.value;}, false);html:
<input class="inp-text" type="text">
<div class="text-box"></div>
以上只是 Vue的核心思想,通过对象底层属性的set和get进行数据拦截,vue的虚拟DOM又是怎么实现的呢?且看以下分解
(5)虚拟DOM树:
*****创建虚拟DOM的关键:var frag = document.createDocumentFragment()
DocumentFragment(文档片段) 可以看做是 节点容器 ,它可以包含多个子节点,可以把它插入到DOM中,只有它的子节点会插入目标节点,所以可以把它看做是一组节点容器。使用DocumentFragment处理节点 速度和性能优于直接操作DOM 。Vue进行编译的时候就是将 挂载目标的所有子节点劫持到DocumentFragment 中,进过处理后再将DocumentFragment 整体返回到挂载目标
*****view层的{{msg}}和 v-model的HTML如下:
<div id="container">{{ msg }}<input class="inp-text" type="text" v-model="inpText"><div class="text-box"><p class="show-text">{{ msg }}</p></div>
</div> *****view层的{{msg}}和 v-model的编译规则如下:
var container = document.getElementById('container');//这里我们把vue实例中的data提取出来,更加直观var data = {msg: 'Hello world!',inpText: 'Input text'};var fragment = virtualDom(container, data);container.appendChild(fragment);//虚拟dom创建方法,将目标盒子内所有子节点添加到其内部,注意这里只有子节点function virtualDom(node, data){let frag = document.createDocumentFragment();let child;// 遍历dom节点while(child = node.firstChild){compile(child, data);frag.appendChild(child);}return frag;}//编译规则,子节点通过compile进行编译,a:如果节点为元素,其nodeType = 1;b:如果节点为文本,其nodeType = 3 function compile(node, data){let reg = /\{\{(.*)\}\}/g;if(node.nodeType === 1){ // 标签let attr = node.attributes;for(let i = 0, len = attr.length; i < len; i++){// console.log(attr[i].nodeName, attr[i].nodeValue);if(attr[i].nodeName === 'v-model'){let name = attr[i].nodeValue;node.value = data[name]; //给node节点赋值data}}if(node.hasChildNodes()){node.childNodes.forEach((item) => {compile(item, data); // 递归,如果第二步子节点仍有子节点,通过hasChildNodes()来确认,如果有递归调用Compile方法});}}if(node.nodeType === 3){ // 文本节点if(reg.test(node.nodeValue)){let name = RegExp.$1;name = name.trim();node.nodeValue = data[name];}}}(6)响应式原理:
第一步:核心思想:Object.defineProperty(obj,key,{set,get})----定义访问器属性
function defineReact(obj, key, value){Object.defineProperty(obj, key, {set: function(newValue){console.log(`触发setter`);value = newValue;console.log(value);},get: function(){console.log(`触发getter`);return value;}});} 第二步:这里只是针对data数据的属性的响应式定义(从数据出发去理解原理,数据驱动),但是如何去实现 vue实例vm绑定data每个属性,通过以下方法:
function observe(obj, vm){Object.keys(obj).forEach((key) => {defineReact(vm, key, obj[key]); //定义访问器属性})} 第三步:vue的构造函数:到这里就实现了Vue实例绑定data属性
function Vue(options){this.data = options.data;let id = options.el;observe(this.data, this); // 将每个data属相绑定到Vue的实例上this} 第四步:如何去实现Vue,实例化Vue:
var vm = new Vue({el: 'container',data: {msg: 'Hello world!',inpText: 'Input text'}});console.log(vm.msg); // Hello world!console.log(vm.inpText); // Input text 第五步:要实现第四步的效果,必要前提是在Vue内部初始化虚拟Dom:
function Vue(options){this.data = options.data;let id = options.el;observe(this.data, this); // 将每个data属相绑定到Vue的实例上this//------------------------添加以下代码let container = document.getElementById(id);let fragment = virtualDom(container, this); // 这里通过vm对象初始化container.appendChild(fragment);} 第六步:至此我们已经实现了 dom的初始化, 下一步我们在v-model元素添加监听事件,这样就可以通过view层的操作来修改vm对应的属性值;在compile编译的时候,可以准确的找到v-model属性元素,因此我们把监听事件添加到compile内部
function compile(node, data){let reg = /\{\{(.*)\}\}/g;if(node.nodeType === 1){ // 标签let attr = node.attributes;for(let i = 0, len = attr.length; i < len; i++){// console.log(attr[i].nodeName, attr[i].nodeValue);if(attr[i].nodeName === 'v-model'){let name = attr[i].nodeValue;node.value = data[name];// ------------------------添加监听事件node.addEventListener('keyup', function(e){data[name] = e.target.value;}, false);// -----------------------------------}}if(node.hasChildNodes()){node.childNodes.forEach((item) => {compile(item, data);});}}if(node.nodeType === 3){ // 文本节点if(reg.test(node.nodeValue)){let name = RegExp.$1;name = name.trim();node.nodeValue = data[name];}}} 第七步: 这一步我们操作页面输入框,可以看到以下效果,证明监听事件添加有效。

到这里我们已经实现了MVVM, 即 Model -> vm -> View || View -> vm -> Model 中间桥梁就是vm实例对象;
(7)进一步完善响应式数据绑定,引入观察者模式原理:
*****订阅者:三个订阅者都有update方法
var subscribe_1 = {update: function(){console.log('This is subscribe_1');}};var subscribe_2 = {update: function(){console.log('This is subscribe_2');}};var subscribe_3 = {update: function(){console.log('This is subscribe_3');}};*****发布者:发布者通过notify方法对订阅者广播,订阅者通过update来接受信息
function Publisher(){this.subs = [subscribe_1, subscribe_2, subscribe_3]; // 添加订阅者}Publisher.prototype = {constructor: Publisher,notify: function(){ this.subs.forEach(function(sub){sub.update();})}};*****实例化publisher:
var publisher = new Publisher();publisher.notify();*****创建中间件来处理发布者-订阅者模式:var publisher = new Publisher();var middleware = {publish: function(){publisher.notify();}};middleware.publish();(8)观察者模式嵌入:
我们已经实现了,接下来要实现:更新视图,同事把订阅-发布者模式嵌入
1) 修改 v-model 属性元素 -> 触发修改vm的属性值 -> 触发set
2) 发布者添加订阅 -> notify分发订阅 -> 订阅者update数据
*****发布者:
function Publisher(){this.subs = []; // 订阅者容器}Publisher.prototype = {constructor: Publisher,add: function(sub){this.subs.push(sub); // 添加订阅者},notify: function(){this.subs.forEach(function(sub){sub.update(); // 发布订阅});}};*****订阅者: 考虑到要把订阅者绑定data的每个属性,来观察属性的变化,参数:name参数可以有compile中获取的name传参;
由于传入的node节点类型分为两种,可以分为两个订阅者来处理,同时可以对node节点类型进行判断,通过switch分别处理:
function Subscriber(node, vm, name){this.node = node;this.vm = vm;this.name = name;}Subscriber.prototype = {constructor: Subscriber,update: function(){let vm = this.vm;let node = this.node;let name = this.name;switch(this.node.nodeType){case 1:node.value = vm[name]; //赋值功能移到了订阅者这里break;case 3:node.nodeValue = vm[name]; //赋值功能移到了订阅者这里break;default:break;}}};*****我们要把订阅者添加到compile进行虚拟dom的初始化,替换掉原来的赋值:
function compile(node, data){let reg = /\{\{(.*)\}\}/g;if(node.nodeType === 1){ // 标签let attr = node.attributes;for(let i = 0, len = attr.length; i < len; i++){// console.log(attr[i].nodeName, attr[i].nodeValue);if(attr[i].nodeName === 'v-model'){let name = attr[i].nodeValue;// --------------------这里被替换掉// node.value = data[name];new Subscriber(node, data, name);// ------------------------添加监听事件node.addEventListener('keyup', function(e){data[name] = e.target.value;}, false);}}if(node.hasChildNodes()){node.childNodes.forEach((item) => {compile(item, data);});}}if(node.nodeType === 3){ // 文本节点if(reg.test(node.nodeValue)){let name = RegExp.$1;name = name.trim();// ---------------------这里被替换掉// node.nodeValue = data[name];new Subscriber(node, data, name);}}}*****既然是对虚拟dom编译的初始化, Subscriber也要初始化,即Subscriber.update,因此要对Subscriber作进一步的处理:
function Subscriber(node, vm, name){this.node = node;this.vm = vm;this.name = name;this.update();}Subscriber.prototype = {constructor: Subscriber,update: function(){let vm = this.vm;let node = this.node;let name = this.name;switch(this.node.nodeType){case 1:node.value = vm[name];break;case 3:node.nodeValue = vm[name];break;default:break;}}};*****发布者添加到 defineRect函数,来观察数据的变化:
function defineReact(data, key, value){let publisher = new Publisher();Object.defineProperty(data, key, {set: function(newValue){console.log(`触发setter`);value = newValue;console.log(value);publisher.notify(); // 发布订阅},get: function(){console.log(`触发getter`);if(Publisher.global){ //这里为什么来添加判断条件,主要是让publisher.add只执行一次,初始化虚拟dom编译的时候来执行publisher.add(Publisher.global); // 添加订阅者}return value;}});}*****这一步将订阅者添加到发布者容器内, 对订阅者改造:
function Subscriber(node, vm, name){Publisher.global = this;this.node = node;this.vm = vm;this.name = name;this.update();Publisher.global = null;}Subscriber.prototype = {constructor: Subscriber,update: function(){let vm = this.vm;let node = this.node;let name = this.name;switch(this.node.nodeType){case 1:node.value = vm[name];break;case 3:node.nodeValue = vm[name];break;default:break;}}};2.Vue的状态管理Vuex:
(1)vuex是一个专门为vue.js设计的状态管理模式,并且也可以使用devtools进行调试,可以多个组件共享状态;
简单来说,就是 共享的状态用state存放,用mutations来操作state,但是需要用store.commit来主动式的操作mutations;

(2)举例说明:
***** 在使用vues之前要先安装依赖(前提是已经 用Vue脚手架工具构建好项目)
cnpm install vuex –save*****在入口文件main.js里需要 引入 vuex,注册vuex,实例化store,把store放在全局的实例化对象里
import Vue from 'vue'
import App from './App'
//1.引入vuex
import Vuex from 'vuex'
import Apple from './components/Apple'
import Banana from './components/Banana'
Vue.config.productionTip = false
//2.注册
Vue.use(Vuex);
//3.实例化store
let store=new Vuex.Store({state:{totalPrice:0},mutations:{increment(state,price){state.totalPrice+=price},decrement(state,price){state.totalPrice-=price}},actions:{increase (context,price){context.commit('increment',price)},decrease (context,price){context.commit('decrement',price)}},getters:{discount(state){return state.totalPrice *0.8;}}
})
new Vue({el: '#app',//4.把store放在全局的实例化对象里,可以在全局的所有地方用store,components: { App},template: '<App/>'
})
*****参数介绍:
1) statevuex使用单一状态树,那么就可以用一个对象包含全部的应用层级状态,所以state就作为数据源2) mutations更改Vuex的store中的状态的唯一方法就是提交mutations,Vuex中的mutations非常类似于事件:每个mutation都有一个字符串的 事件类型(type)和一个回调函数(handler),这个回调函数就是我们实际进状态更改的地方,并且它会接受state作为第一个参数。不能直接调用一个mutation handler,这个选项更像是事件注册:当触发一个type为 increment的mutation时,就调用handler。要唤醒一个mutation handler,需要调用store.commit方法触发相应的type,可以向store.commit传入额外的参数,这个参数就叫做mutation的载荷。在更多的情况下,载荷应该是一个对象,这样可以包含更多的字段;mutations必须是同步函数,那么我们如何来异步的更新state呢?答案就是actions3) actionsactions类似于mutations,不同的是:actions提交的是mutations,而不是直接变更状态,这也就形成了actions--mutations--state的过程;actions可以包含任意异步操作;action 函数接受一个与store实例具有相同方法和属性的context对象,因此你可以调用context.commit提交一个mutation,或者通过context.state和context.getter来获取state和getter,但是如何触发呢?答案是:store.dispatch4) getters有时候我们需要从store中的state中派生出一些状态,getter会暴露为store.getter对象在组件中使用。5) modules除了上边用到的4个参数,store还有另一个参数:modules;vuex允许把store进行一个功能拆分,分割成不同的模块(module),每个模块都拥有自己的store,mutation,action,getters*****App.vue:
<template><div id="app"><Apple></Apple><Banana></Banana><p> 总价{{totalPrice}}</p><p> 折后价:{{discountPrice}}</p></div>
</template>
<script>
import HelloWorld from './components/HelloWorld'
import Apple from './components/Apple'
import Banana from './components/Banana'
export default {name: 'App',components: {HelloWorld,Apple,Banana},computed:{totalPrice(){//由于vuex的状态存储是响应式的,所以从store实例中读取状态的最简单方法就是使用计算属性来返回某个状态:return this.$store.state.totalPrice},discountPrice(){//getter 会暴露为 store.getters 对象return this.$store.getters.discount    }}
}
</script>
*****当一个组件需要获取多个状态的时候,将这些状态都声明为计算属性会有些重复和冗余,为了解决这个问题,我们可以使用mapState辅助函数帮助我们生成计算属性;
import { mapState } from 'vuex'computed: {...mapState(['totalPrice'])...}*****Banana.vue:<template>
<div><p>{{msg}} 单价{{price}}</p>    <button @click="addOne">add one</button><button @click="minusOne">minus one</button>
</div>
</template>
<script>
export default{data(){return{msg:'banana',price:15}},methods:{addOne(){                       //addOne()函数调用store.commit方法触发type为"increment"的mutation//直接commit一个mutationthis.$store.commit('increment',this.price)},minusOne(){                    //minusOne()函数调用store.commit方法触发type为"decrement"的mutationthis.$store.commit('decrement',this.price)}}
}
</script>
*****可以在组件中使用this.$store.commit('xxxx')提交mutation,或者使用 mapMutations辅助函数将组件中的methods映射为 store.commit调用;
methods:{addOne(){this.increment(this.price)},minusOne(){this.decrement(this.price)},...mapMutations(['increment', 'decrement'])
}
*****Apple.vue: action相当于中介
<template>
<div><p> {{msg}}单价:{{price}} </p>    <button @click="addOne">add one</button><button @click="minusOne">minus one</button>
</div>
</template>
<script>
export default{data(){return{msg:'apple',price:5}},methods:{addOne(){                 //addOne()函数里调用store.dispatch方法触发名为"increase"的action,对应的,在increase这个action里再去调用context.commit方法触发type为"increment"的mutation//dispatch一个action,以action作为一个中介再去commit一个mutationthis.$store.dispatch('increase',this.price)},minusOne(){this.$store.dispatch('decrease',this.price)}}
}
</script>
*****mutation和actions的区别与联系:
1) action只能调用mutation不能直接更改state,执行action来分发(dispatch)事件通知store去改变
2) action里可以进行一些异步的操作,再去触发mutation
3) mutation里必须是同步的触发操作state


)


)


