[STL]list模拟实现
文章目录
- [STL]list模拟实现
- 1. 整体结构总览
- 2. 成员变量解析
- 3. 默认成员函数
- 构造函数1
- 迭代器区间构造函数
- 拷贝构造函数
- 赋值运算符重载
- 析构函数
- 4. 迭代器及相关函数
- 迭代器整体结构总览
- 迭代器的模拟实现
- begin函数和end函数
- begin函数和end函数const版本
- 5. 数据修改函数
- push_back函数
- insert函数
- push_front函数
- erase函数
- pop_back函数
- pop_front函数
- clear函数
- 6. 完整代码链接
1. 整体结构总览
template<class T>struct list_node //结点结构 --ListNode为类名,加上模板参数后为类型{list_node* _prev;list_node* _next;T _data;list_node(const T& val = T()) //结点的构造函数{_data = val;_prev = nullptr;_next = nullptr;}};template<class T, class Ref, class Ptr> //迭代器类实现struct __list_iterator{typedef list_node<T> node; //对结点重命名typedef __list_iterator<T, Ref, Ptr> self; //对迭代器重命名//...node* _node;};template<class T>class list{typedef list_node<T> node; //对结点重命名public:typedef __list_iterator<T, T&, T*> iterator; //普通迭代器typedef __list_iterator<T, const T&, const T*> const_iterator; //const迭代器public:void empty_init();list(); //默认构造函数template<class Iteartor>list(Iteartor begin, Iteartor end);void swap(list<T>& tmp);list(const list<T>& l);list<T>& operator=(list<T> l);~list();iterator begin();iterator end();const_iterator begin()const;const_iterator end()const;void push_back(const T& x);void insert(iterator pos, const T x);void push_front(const T& x);iterator erase(iterator pos);void pop_back();void pop_front();void clear();private:node* _head;};
2. 成员变量解析
成员变量相关代码结构如下:
template<class T>
struct list_node //结点结构 --ListNode为类名,加上模板参数后为类型
{list_node* _prev; //指向上一个结点的指针list_node* _next; //指向下一个结点的指针T _val;	//结点存储的数据// ...
};
template<class T>
class list
{typedef list_node<T> node;// ...
private:node* _head; //指向哨兵位的头结点
};

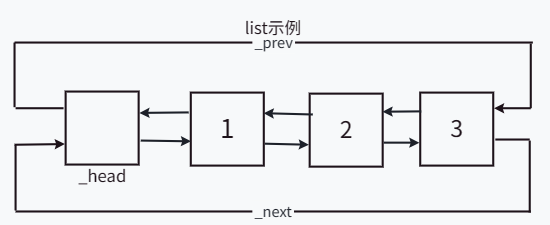
由于list是由双向循环链表实现的,因此只需要一个指向哨兵位的头结点的指针_head作成员变量,通过_head和指向上一个结点和下一个结点的指针能够很快的找到头结点和尾结点。
3. 默认成员函数
构造函数1
无参的默认构造函数,由于实现的双向循环链表,因此需要在创建链表时创建哨兵位的头结点,由于创建哨兵位的过程在后续实现中还需使用,因此将其封装成一个单独的empty_init函数。
void empty_init() //便于后续复用
{_head = new node;_head->_prev = _head;_head->_next = _head;
}list() //-const list也可以调用此构造函数,因为在初始化后才加的const属性
{empty_init();
}
迭代器区间构造函数
迭代器区间构造就是将传入的容器按其迭代器范围内的数据作为要构造的容器的数据进行构造,只需要将传入迭代器内的数据尾插即可。
template<class Iteartor>
list(Iteartor begin, Iteartor end)
{empty_init();while (begin != end){push_back(*begin);++begin;}
}
拷贝构造函数
拷贝构造函数的实现分为传统写法和现代写法。
传统写法是将要拷贝的list的数据依次进行尾插:
list(const list<T>& l)
{//传统写法empty_init();const_iterator it = l.begin();while (it != l.end()){push_back(*it);it++;}
}
现代写法是创建一个临时的list进行数据拷贝,然后将临时的list内的结点交换过来:
void swap(list<T>& tmp)
{std::swap(_head, tmp._head);
}list(const list<T>& l)
{//现代写法empty_init();  // -- 不申请结点会因为tmp变量析构野指针而报错list<T> tmp(l.begin().l.end());swap(tmp);
}
赋值运算符重载
赋值运算符重载的实现利用参数会拷贝构造的特性,然后交换参数的数据。
list<T>& operator=(list<T> l)
{swap(l);return *this;
}
析构函数
析构函数的实现可以复用能够将除了哨兵位结点外的所有结点删除的clear函数,然后删除哨兵位结点。(clear函数的实现在文末。)
qxm::list<T>::~list()
{clear();delete _head;_head = nullptr;
}
4. 迭代器及相关函数
迭代器整体结构总览
template<class T, class Ref, class Ptr>struct __list_iterator{typedef list_node<T> node; //对结点重命名typedef __list_iterator<T, Ref, Ptr> self; //对迭代器重命名node* _node; //成员变量 -- 结点指针__list_iterator(node* n){};//构造函数__list_iterator(const __list_iterator<T, T&, T*>& it){}; //普通迭代器构造const迭代器__list_iterator(const __list_iterator<T, const T&, const T*>& it){};//cosnt迭代器构造普通迭代器self& operator++(){};//前置++self operator++(int){};//后置++self& operator--(){};//前置--self operator--(int){};//后置--Ref operator*() {};//*运算符重载Ptr operator->() {};//->运算符重载bool operator!=(const self& s){};//!=运算符重载bool operator==(const self& s){};//==运算符重载};
迭代器的模拟实现
由于迭代器需要的功能很多,因此需要给迭代器单独封装一个类,成员变量是结点指针。迭代器成员变量有关的代码如下:
template<class T>struct __list_iterator{typedef list_node<T> node; //对结点重命名// ...node* _node; //指向结点的指针};
迭代器构造函数
迭代器只有一个指向结点的指针变量,迭代器构造函数只要将其初始化即可。
__list_iterator(node* n):_node(n){}
迭代器构造函数
为了实现普通迭代器和const迭代器的转换需要实现如下构造函数:
__list_iterator(const __list_iterator<T, T&, T*>& it) //普通迭代器构造const迭代器:_node(it._node){}__list_iterator(const __list_iterator<T, const T&, const T*>& it)//cosnt迭代器构造普通迭代器:_node(it._node){}
迭代器前置++运算符重载
迭代器实现++操作只需要将指针指向下一个结点即可。
template<class T>
self& operator++()//前置++
{_node = _node->_next;return _node;
}
迭代器后置++运算符重载
实现后置++和前置++相比只需要将++前的迭代器保存并且返回即可。
self operator++(int)//后置++
{self tmp(_node);_node = _node->_next;return tmp;
}
迭代器前置–运算符重载
迭代器实现–操作只需要将指针指向上一个结点即可。
self& operator--()//前置--
{_node = _node->_prev;return *this;
}
迭代器后置–运算符重载
实现后置–和前置–相比只需要将–前的迭代器保存并且返回即可。
self operator--(int)//后置--
{self tmp(_node);_node = _node->_prev;return tmp;
}
迭代器*运算符重载
迭代器进行*操作是要获取迭代器指向的数据,因此只需要将结点指向的数据返回即可。
T& operator*()
{return _node->_val;
}
迭代器->运算符重载
迭代器进行->操作是因为list存储的是自定义数据类型,->运算符的重载只需要返回数据的地址即可。
T* operator->()
{return &_node->_data;
}
为了理解->运算符重载的实现,我们看下面的例子:
struct AA
{AA(int a1 = 1, int a2 = 2):_a1(a1),_a2(a2){}int _a1;int _a2;
};void test_list2()
{qxm::list<AA> l; //qxm作用域是模拟实现时设置的命名空间l.push_back(AA(1, 1));l.push_back(AA(2, 2));l.push_back(AA(3, 3));for (qxm::list<AA>::iterator it = l.begin(); it != l.end(); it++){cout << it->_a1 << ":" << it->_a2 << endl;}
}
在这个场景中如果调用迭代器的->会返回AA类型的指针,it->_a1相当于是&AA_a1将数据地址和变量写到一块,应该是访问不到数据的错误代码,但是编译器会自动做优化,此时一个->运算符当两个->使用,也就是说本来需要(it.operator->())->_a1访问数据的,但是编译器把其中一个->优化掉了,因此现在只要it->_a1就可以访问成功了。
迭代器!=运算符重载
迭代器的!=是指向的数据不同,因此只需要判断迭代器内的指针是否相同。
bool operator!=(const self& it)
{return this->_node != it->_node;
}
迭代器!=运算符重载
迭代器的==是指向的数据相同,因此只需要判断迭代器内的指针是否相同。
bool operator==(const self& s)
{return _node == s._node;
}
const迭代器实现
const迭代器和普通迭代器的实现只有在*运算符重载和->运算符的重载的返回值上有所不同。
const迭代器的*运算符重载函数返回的是const的数据,这样const迭代器就不能修改数据了。
const T& operator*()
{return _node->_data;
}
const迭代器的->运算符重载函数返回的是const的指针,这样const迭代器就不能修改数据了。
const T* operator->()
{return &_node->_data;
}
迭代器模拟实现整体代码:
template<class T, class Ref, class Ptr> // -- Ref/Ptr控制是普通迭代器还是const迭代器struct __list_iterator{typedef list_node<T> node; //对结点重命名typedef __list_iterator<T, Ref, Ptr> self; //对迭代器重命名node* _node;__list_iterator(node* n):_node(n){}__list_iterator(const __list_iterator<T, T&, T*>& it):_node(it._node){}__list_iterator(const __list_iterator<T, const T&, const T*>& it):_node(it._node){}self& operator++()//前置++{_node = _node->_next;return *this;}self operator++(int)//后置++{self tmp(_node);_node = _node->_next;return tmp;}self& operator--()//前置--{_node = _node->_prev;return *this;}self operator--(int)//后置--{self tmp(_node);_node = _node->_prev;return tmp;}Ref operator*() //传引用返回可以修改结点内的数据{return _node->_data;}Ptr operator->(){return &_node->_data;}bool operator!=(const self& s) //!=运算符重载{return _node != s._node;}bool operator==(const self& s) //==运算符重载{return _node == s._node;}};
注意: 模板参数Ref控制的是*运算符重载的返回值类型,模板参数Ptr控制的是->运算符重载的返回值类型,进而控制了迭代器是普通迭代器还是const迭代器。
begin函数和end函数
注: 文中此位置往下是迭代器相关函数实现,实现在list类内。
begin函数:
begin函数只需要返回拥有有效数据的头结点即可。
iterator begin()
{return iterator(_head->_next);
}
end函数:
end函数只需要返回哨兵位就可,因为哨兵位没有有效数据。
iterator end()
{return iterator(_head);
}
begin函数和end函数const版本
const版本begin函数:
begin函数只需要返回拥有有效数据的头结点即可。
const_iterator begin()const
{return const_iterator(_head->_next);
}
const版本end函数:
end函数只需要返回哨兵位就可,因为哨兵位没有有效数据。
const_iterator end()const
{return const_iterator(_head);
}
5. 数据修改函数
push_back函数
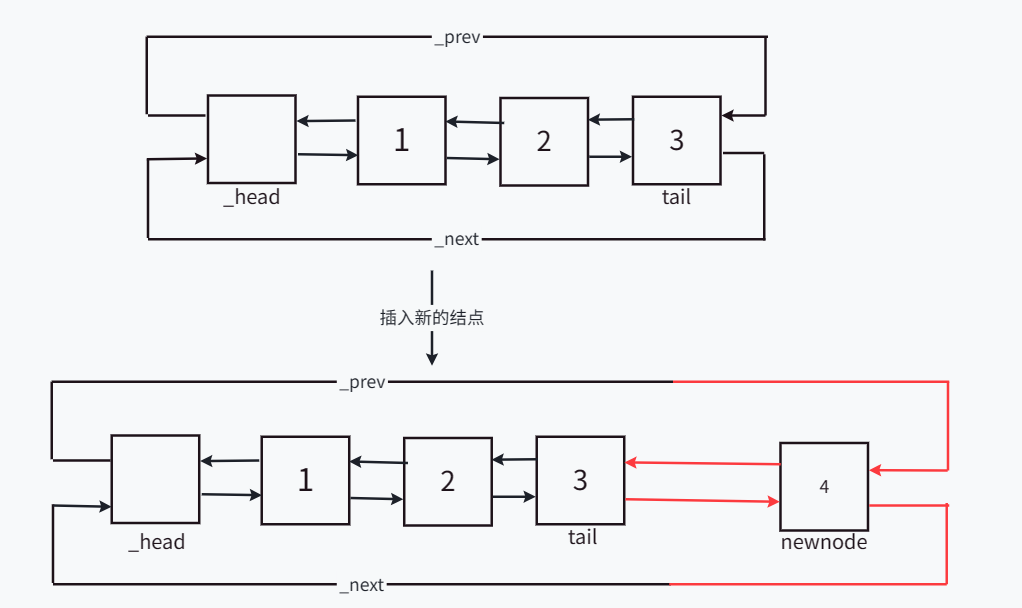
push_back函数为尾插函数,尾插示意图如下:

实现尾插函数时创建一个临时变量tail,记录插入数据前的尾结点,方便进行指针指向的改动,避免因为指针指向改动而找不到正确的结点。
void push_back(const T& val)
{node* tail = _head->_prev; //记录插入数据前的尾部结点node* newnode = new node(x);tail->_next = newnode;//指针改变的顺序不影响结果newnode->_prev = tail;newnode->_next = _head;_head->_prev = newnode;
}
insert函数
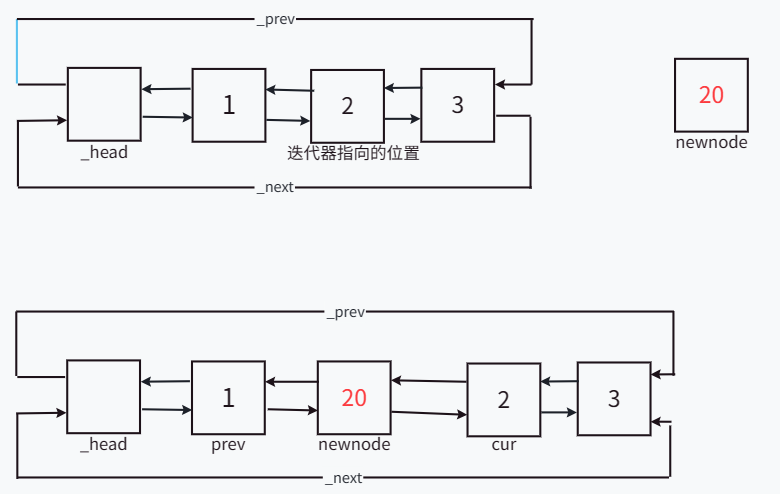
insert函数的功能是通过迭代器,在迭代器指向的结点前插入结点,insert函数的实现只需要将传入的迭代器的前一个结点和迭代器指向的结点记录,然后将要插入的新节点进行链接。
insert函数插入结点示意图:

void insert(iterator pos, const T x)
{node* cur = pos._node;node* prev = cur->_prev;node* newnode = new node(x);prev->_next = newnode;cur->_prev = newnode;newnode->_prev = prev;newnode->_next = cur;
}
说明: insert函数不会使迭代器失效,因为迭代器指向的结点不会随着插入而改变。
有了insert函数后,push_back函数可以改写为复用insert函数的版本:
void push_back(const T& x)
{insert(end(), x);
}
end函数返回的是有_head封装的迭代器,指向哨兵位,哨兵位的前一个结点就是尾结点,因此复用insert函数和end函数能实现尾插。
push_front函数
push_front函数的功能是头插结点,有了insert函数实现头插只需要在insert函数中传入头结点就可以实现。
void push_front(const T& x)
{insert(begin(), x);
}
erase函数
erase函数的功能是删除指定结点,并返回在删除之前删除结点的下一个结点,只需要将要删除的前一个结点和后一个结点记录,进行链接即可,但要注意不能删除哨兵位结点。
iterator erase(iterator pos)
{assert(pos != end());node* prev = pos._node->_prev;node* next = pos._node->_next;prev->_next = next;next->_prev = prev;delete pos._node;return iterator(next);
}
pop_back函数
pop_back函数的功能是尾删,只需要复用erase函数和end函数即可,end函数返回的是哨兵位的迭代器,–得到的是尾结点的迭代器。
void pop_back()
{erase(--end());
}
pop_front函数
pop_front函数的功能是尾删,只需要复用erase函数和begin函数即可,begin函数返回的头结点的迭代器。
void pop_front()
{erase(begin());
}
clear函数
clear函数的功能是将除了哨兵位结点外的所有结点都删除,只需要复用erase函数循环删除结点。(erase函数的实现需上翻本文)
void clear()
{iterator it = begin();while (it != end){it = erase(it); //--erase后需要重新对迭代器赋值,不然迭代器会失效。//erase(it++);  --后置++会返回++前的值,因此迭代器不会失效}
}
6. 完整代码链接
STL/List/List/List.h · 钱雪明/日常代码 - 码云 - 开源中国 (gitee.com)


攻防世界-re-BABYRE(IDA无法分析出函数-代码混淆))


)

)
)


