一 文件标签组与图标
在Swing程序设计中,标签(JLabel)被用于显示文本、图标等内容。在Swing应用程序的用户系面中,用户能够通过标签上的文本、图标等内容获得相应的提示信息。
1.1 JLable标签
标签(JLabel)的父类是JComponent类。虽然标签不能被添加监听器,但是标签显示的文本、图标等内容可以被指定对齐方式。
通过JLabel类的构造方法,可以创建多种标签,如显示只有文本的标签、只有图标的标签以及同时包含文本和图标的标签等。JLabel类常用的构造方法如下:
public JLabel():创建一个不带图标或文本的标签。
public JLabel(Icon icon):创建一个带图标的标签。
public JLabel(Icon icon,int aligment):创建一个带图标的标签,并设置图标的水平对齐方式。public JLabel(String text, int aligment):创建一个带文本的标签,并设置文本的水平对齐方式。public JLabel(String text, Icon icon, int aligment):创建一个带文本和图标的JLabel对象,并设置文本和图标的水平对齐方式。
【代码实列】
import java.awt.Container;
import java.awt.Font;import javax.swing.*;public class Demo extends JFrame{public Demo() {setBounds(100,100,500,300);//设置位置以及大小setDefaultCloseOperation(EXIT_ON_CLOSE);//设置窗体关闭的方式Container c = getContentPane();JLabel JL = new JLabel("这是一个标签");c.add(JL);JL.setFont(new Font("楷体",Font.BOLD,15));//设置字体样式JL.setForeground(getForeground().RED);setVisible(true);//设置窗体可见}public static void main(String[] args) {new Demo();}
}
【运行效果】

1.2 图标的使用
在Swing程序设计中,图标经常被添加到标签、按钮等组件,使用javax.swing.Imagelcon类可以依据现有的图片创建图标。Imagelcon类实现了Icon接口,它有多个构造方法,常用的如下:
public ImageIcon):创建一个Imagelcon对象,创建Imagelcon对象后,使用其调用 setlmage
(Image image)方法设置图片。
public ImageIcon(Image image):依据现有的图片创建图标。
public ImageIcon(URL url):依据现有图片的路径创建图标。
【代码实列】
import java.awt.Container;
import java.awt.Font;import javax.swing.*;public class Demo extends JFrame{public Demo() {setBounds(0,0,1600,1000);//设置位置以及大小setDefaultCloseOperation(EXIT_ON_CLOSE);//设置窗体关闭的方式Container c = getContentPane();JLabel JL = new JLabel("王者启动");Icon k = new ImageIcon("src/WZ.png");c.add(JL);JL.setIcon(k);JL.setFont(new Font("楷体",Font.BOLD,100));//设置字体样式JL.setForeground(getForeground().black);setVisible(true);//设置窗体可见}public static void main(String[] args) {new Demo();}
}
}
【运行效果】

二 按钮组件
在Swing程序设计中,按钮是较为常见的组件,被用于触发特定的动作。Swing提供了多种按钮组件:按钮,单选按钮,复选框等。
2.1 JButton按钮
Swing按钮由JButton对象表示,JButton常用的构造方法如下:
public JButton(:创建一个不带文本或图标的按钮。
public JButton(String text):创建一个带文本的按钮。
public JButton(Icon icon):创建一个带图标的按钮。
public JButton(String text, Icon icon):创建一个带文本和图标的按钮。
创建JButton对象后,如果要对JButton对象进行设置,那么可以使用JButton类提供的方法。
JButton类的常用方法

【代码实列】
import java.awt.Color;
import java.awt.Container;
import java.awt.GridLayout;
import java.awt.event.ActionEvent;
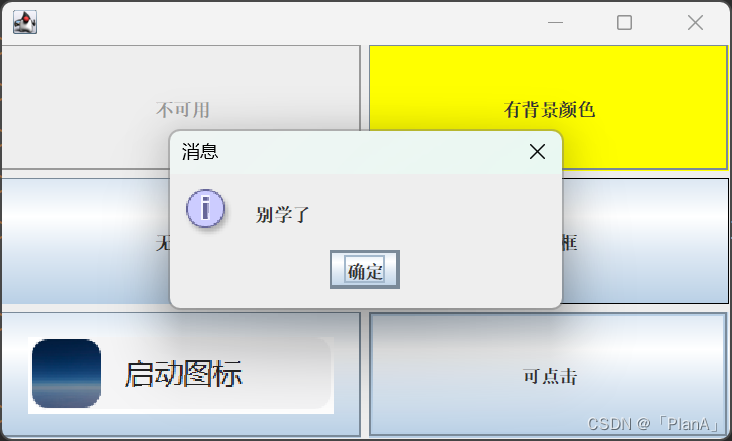
import java.awt.event.ActionListener;import javax.swing.*;public class Demo extends JFrame{public Demo() {setBounds(100,100,500,300);//设置位置以及大小setDefaultCloseOperation(EXIT_ON_CLOSE);//设置窗体关闭的方式Container c = getContentPane();c.setLayout(new GridLayout(3,2,5,5));//创建的布局为3行2列,水平和垂直的间距为5;JButton btn[] = new JButton[6];//创建了一个按钮数组for(int i=0;i<btn.length;i++) {btn[i]= new JButton();c.add(btn[i]);}btn[0].setText("不可用");//设置文本为不可用btn[0].setEnabled(false);btn[1].setText("有背景颜色");btn[1].setBackground(Color.YELLOW);btn[2].setText("无边框");btn[2].setBorderPainted(false);btn[3].setText("有边框");btn[3].setBorder(BorderFactory.createLineBorder(Color.black));//设置背景边框Icon icon = new ImageIcon("src/Qd.png");//获取按钮的方式btn[4].setIcon(icon);//给按钮设置图片btn[4].setToolTipText("图片按钮");//鼠标悬停提示btn[5].setText("可点击");btn[5].addActionListener(new ActionListener() {//添加事件监听public void actionPerformed(ActionEvent e) {//监听触发的方法JOptionPane.showMessageDialog(Demo.this, "别学了");//弹出小对话框}});setVisible(true);}public static void main(String[] args) {new Demo();}
}
【运行效果】

2.2 JRadioBUtton单选按钮
Swing单选按钮由JRadioButton对象表示。在Swing程序设计中,需要把多个单选按钮添加到按钮组,当用户选中某个单选按钮时,按钮组中的其他单选按钮将不能被同时选中。
1.单选按钮
使用JRadioButton类的构造方法创建一个文本为“选项A”的单选按钮,关键代码如下:JRadioButton rbtn =new JRadioButton("选项A”);
2.按钮组
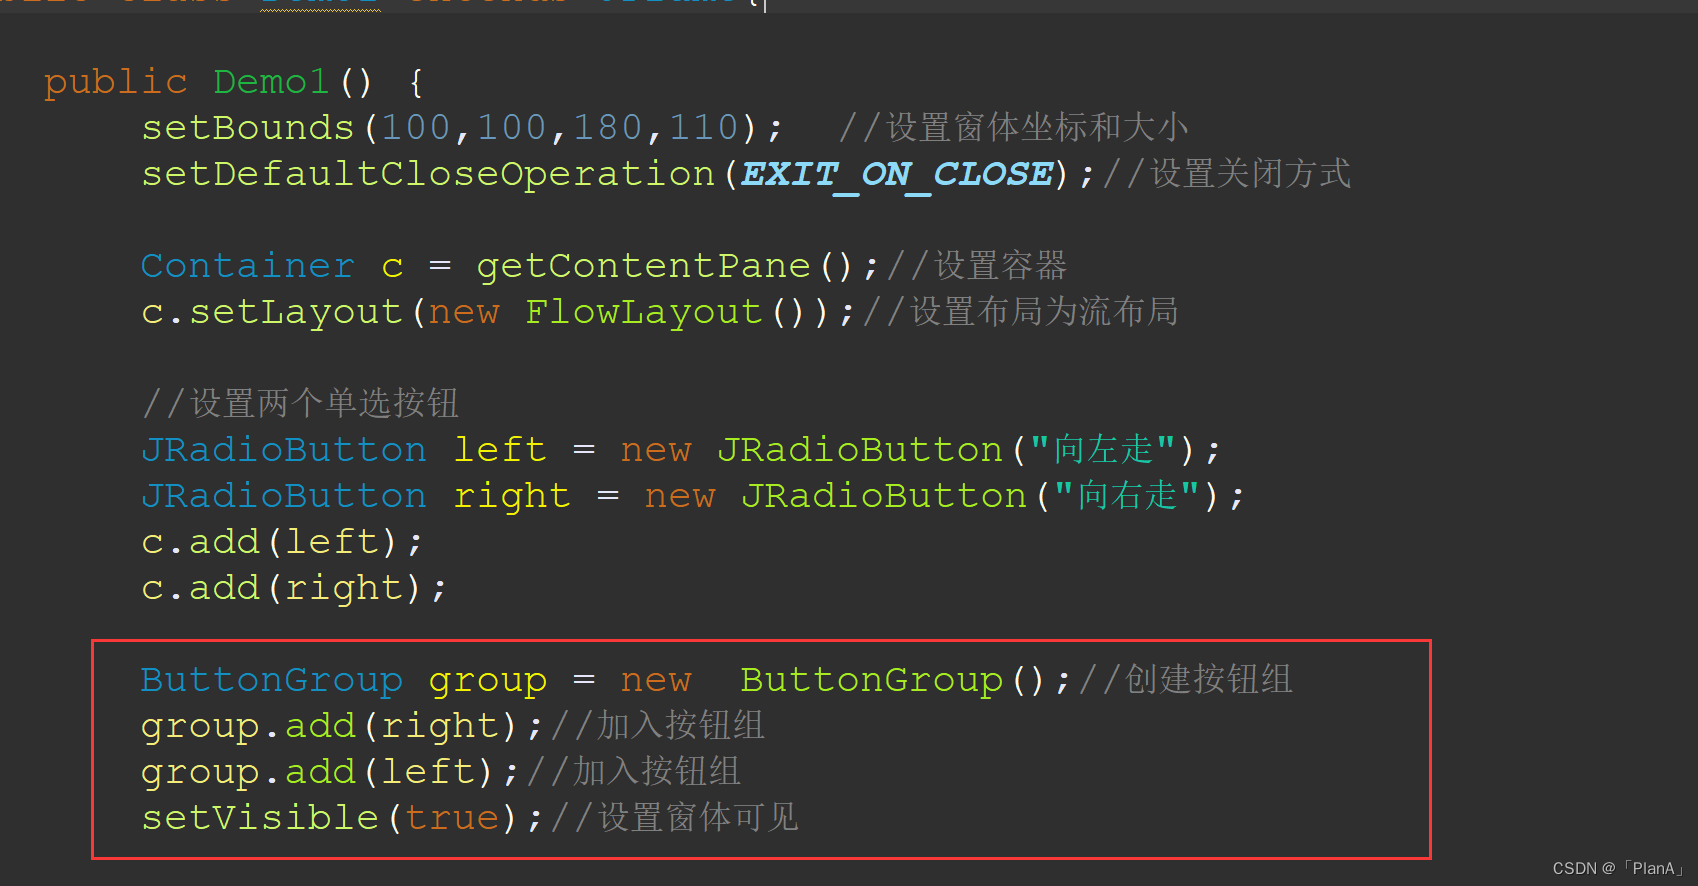
Swing按钮组由ButtonGroup对象表示,多个单选按钮被添加到按钮组后,能够实现“选项有多个,但只能选中一个”的效果。ButtonGroup对象被创建后,可以使用add()方法把多个单选按钮添加到ButtonGroup对象中。
🤔加入单选按钮没有加入到按钮组中,那么就会出现多选效果:
 🤔加入按钮组便可以去除多选效果:
【代码实列】
import java.awt.Container;
import java.awt.FlowLayout;
import java.awt.event.ActionEvent;
import java.awt.event.ActionListener;import javax.swing.ButtonGroup;
import javax.swing.JButton;
import javax.swing.JFrame;
import javax.swing.JRadioButton;public class Demo1 extends JFrame{public Demo1() {setBounds(100,100,180,110);  //设置窗体坐标和大小setDefaultCloseOperation(EXIT_ON_CLOSE);//设置关闭方式Container c = getContentPane();//设置容器c.setLayout(new FlowLayout());//设置布局为流布局//设置两个单选按钮JRadioButton left = new JRadioButton("向左走");JRadioButton right = new JRadioButton("向右走");c.add(left);c.add(right);ButtonGroup group = new  ButtonGroup();//创建按钮组group.add(right);//加入按钮组group.add(left);//加入按钮组JButton btn = new JButton("确定");//创建一个确定的按钮,当点击时实现打印效果btn.addActionListener(new ActionListener() {public void actionPerformed(ActionEvent e) {System.out.println(left.getText()+"选中状态:"+left.isSelected());System.out.println(right.getText()+"选中状态:"+right.isSelected());group.clearSelection();//清空点击后的按钮}});c.add(btn);left.setSelected(true);//设置默认选中状态setVisible(true);//设置窗体可见}public static void main(String[] args) {new Demo1();}
}
【运行效果】

2.3JCheckBox复选框
复选框组件由JCheckBox对象表示。与单选按钮不同的是,窗体中的复选框可以被选中多个,这是因为每一个复选框都提供了选中与不被选中的两种状态。JCheckBox的构造方法如下:
JCheckBox():创建一个文本,图标未被设定且默认未被选中的复选框。
JCheckBox(Icon icon,Boolean checked):创建一个具有指定图标,指定初始时是否被选中,但文本未被设定的复选框。
JCheckBox(Stirng text,Boolean checked):创建一未设定图标,指定初始时是否被选中,有指定文本的复选框。
【代码实列】
import java.awt.Container;
import java.awt.FlowLayout;
import java.awt.event.ActionEvent;
import java.awt.event.ActionListener;import javax.swing.JButton;
import javax.swing.JCheckBox;
import javax.swing.JFrame;public class Demo extends JFrame{public Demo() {setBounds(100,100,100,100);//设置窗体位置,大小setDefaultCloseOperation(EXIT_ON_CLOSE);//设置窗体关闭方式Container c =getContentPane();//创建窗体容器c.setLayout(new FlowLayout());//设置为流布局//创建复选框JCheckBox Jc1 = new JCheckBox("1");JCheckBox Jc2 = new JCheckBox("2");JCheckBox Jc3 = new JCheckBox("3");c.add(Jc1);c.add(Jc2);c.add(Jc3);//加入到容器中Jc1.setSelected(true);//设置为默认选中状态JButton btn = new JButton("确定");btn.addActionListener(new ActionListener() {public void actionPerformed(ActionEvent e) {System.out.println(Jc1.getText()+"选中状态"+Jc1.isSelected());System.out.println(Jc2.getText()+"选中状态"+Jc2.isSelected());System.out.println(Jc3.getText()+"选中状态"+Jc3.isSelected());}});c.add(btn);setVisible(true);}public static void main(String[] args) {new Demo();}
}
【运行效果】

三 列表组件
Swing中提供两种列表组件,分别为下拉列表框(JComboBox)与列表框(JList)。下拉列表框与列表框都是带有一系列列表项的组件,用户可以从中选择需要的列表项。列表框较下拉列表框更直观,它将所有的列表项罗列在列表框中。但是,下拉列表框较列表框更为便捷、美观,它将所有的列表项隐藏起来,当用户选用其中的列表项时才会显现出来。
3.1JComboBox下拉列表
下拉列表框是一个条状的显示区,它具有下拉功能,在下拉列表框的右侧存在一个倒三角形的按钮,当用户单击该按钮时,下拉列表框中的项目将会以列表形式显示出来。
下拉列表框组件由JComboBox对象表示,JComboBox类是javax.swing.JComponent类的子类。JComboBox类的常用构造方法如下:
public JComboBox(ComboBoxModel dataModel):创建一个JComboBox对象,下拉列表中的列表项使用 ComboBoxModel中的列表项,ComboBoxModel是一个用于组合框的数据模型。
public JComboBox(Object[] arrayData):创建一个包含指定数组中的元素的JComboBox对象。
public JComboBox(Vector vector):创建一个包含指定Vector对象中的元素的JComboBox对象。Vector对象中的元素可以通过整数索引进行访问,而且Vector对象中的元素可以根据需求被添加或者移除。

【代码实列】
import java.awt.Container;
import java.awt.event.ActionEvent;
import java.awt.event.ActionListener;import javax.swing.ComboBoxModel;
import javax.swing.DefaultComboBoxModel;
import javax.swing.JButton;
import javax.swing.JComboBox;
import javax.swing.JFrame;public class Demo extends JFrame{public Demo() {setBounds(100,100,200,180);//设置窗体位置,大小setDefaultCloseOperation(EXIT_ON_CLOSE);//设置窗体关闭方式Container c =getContentPane();//创建窗体容器c.setLayout(null);//设置为绝对布局/*添加列表方法一JComboBox<String> comboBox = new JComboBox<String>();comboBox.addItem("学生证");comboBox.addItem("工作证");comboBox.addItem("军人证");comboBox.setBounds(10, 10,80,20);c.add(comboBox);*//*添加列表方法二String item[] = {"灰太狼","喜羊羊","懒洋洋"};JComboBox<String> comboBox = new JComboBox<String>(item);//使用String数组添加下拉列表元素comboBox.setBounds(10, 10,80,20);c.add(comboBox);*/JComboBox<String> comboBox = new JComboBox<String>();String item[] = {"灰太狼","喜羊羊","懒洋洋"};ComboBoxModel<String> cm = new DefaultComboBoxModel<String>(item);//创建了一个下拉列表模型comboBox.setModel(cm);//向下拉列表中添加数据模型comboBox.setBounds(10, 10,80,20);c.add(comboBox);JButton btn = new JButton("确定");btn.addActionListener(new ActionListener() {public void actionPerformed(ActionEvent e) {System.out.println("选中的索引"+comboBox.getSelectedIndex());System.out.println("选中的内容:"+comboBox.getSelectedItem());}});btn.setBounds(100, 10, 60, 20);c.add(btn);setVisible(true);}public static void main(String[] args) {new Demo();}
}
【运行效果】

3.2 JList列表框
列表框组件被添加到窗体中后,就会被指定长和宽。如果 列表框的大小不足以容纳列表项的个数,那么需要设置列表框具有滚动效果,即把列表框添加到滚动面板。用户在选择列表框中的列表项时,既可以通过单击列表项的方式选择列表项,也可以通过“单击列表项+按住Shift键”的方式连续选择列表项,还可以通过“单击列表项+按住Ctrl键”的方式跳跃式选择列表项,并能够在非选择状态和选择状态之间反复切换。列表框组件由JList对象表示,JList类的常用构造方法如下:
public void JList():创建一个空的JList对象。
public void JList(Object] listData):创建一个显示指定数组中的元素的JList对象。public void JList(Vector listData):创建一个显示指定Vector中的元素的JList对象。public void JList(ListModel dataModel):创建一个显示指定的非null模型的元素的JList对象。
在向列表中添加元素时,我们可以用数组类型的数据作为创建List对象的参数,关键代码如下:
String item[] = {"李白","曹操","刘备","关羽","张飞","孙权","孙策","吕布","貂蝉"};
JList<String> Jl = new JList<String>(item);
除了上述方法我们还可以用列表模型导入数据,关键代码如下:
String item[] = {"李白","曹操","刘备","关羽","张飞","孙权","孙策","吕布","貂蝉"};
DefaultListModel<String> model = new DefaultListModel<String>();//列表框的数据模型
for(String temp:item) {
model.addElement(temp); //向数据模型中添加元组
}
JList<String> Jl = new JList<String>();
Jl.setModel(model);//列表框载入数据模型
【代码实列】
import java.awt.Container;
import java.awt.event.ActionEvent;
import java.awt.event.ActionListener;import javax.swing.*;public class Demo extends JFrame{public Demo() {setBounds(100,100,250,200);//设置窗体位置,大小setTitle("请选择英雄");setDefaultCloseOperation(EXIT_ON_CLOSE);//设置窗体关闭方式Container c =getContentPane();//创建窗体容器c.setLayout(null);//设置为绝对布局String item[] = {"李白","曹操","刘备","关羽","张飞","孙权","孙策","吕布","貂蝉"};DefaultListModel<String> model = new DefaultListModel<String>();//列表框的数据模型for(String temp:item) {model.addElement(temp);  //向数据模型中添加元组}JList<String> Jl = new JList<String>();Jl.setModel(model);//列表框载入数据模型Jl.setSelectionMode(ListSelectionModel.SINGLE_SELECTION);//设置为单选JScrollPane JS = new JScrollPane(Jl);//为列表添加滚动面板JS.setBounds(10, 10, 100, 100);//c.add(JS);JButton btn = new JButton("确认");btn.addActionListener(new ActionListener() {public void actionPerformed(ActionEvent e) {java.util.List<String> values = Jl.getSelectedValuesList();System.out.println("你选择的英雄如下:");for(String temp:values) {System.out.println(temp);}System.out.println("-------end-------");}});btn.setBounds(115, 10, 60,40);c.add(btn);setVisible(true);}public static void main(String[] args) {new Demo();}
}
【运行效果】

四 文本组件
在文本组件常用到的是文本框组件和密码框组件。使用文本组件可以很轻松地操作单行文字,多行文字,口令字段等文本内容。
4.1 JTextField文本框
文本框组件由JTextField对象表示。JTextField类的常用构造方法如下:
public JTextField):创建一个文本未被指定的文本框。
public JTextField(String text):创建一个指定文本的文本框。
public JTextField(int fieldwidth):创建一个指定列宽的文本框。
public JTextField(String text, int fieldwidth):创建一个指定文本和列宽的文本框。public JTextField(Document docModel, String text,int fieldWidth):创建一个指定文本模型、文本内容和列宽的文本框。
如果要为一个文本未被指定的文本框设置文本内容,那么需要使用setTextO方法。setText0方法的语法如下:
public void setText(String t);
【代码实列】
import java.awt.Container;
import java.awt.FlowLayout;
import java.awt.Font;
import java.awt.event.ActionEvent;
import java.awt.event.ActionListener;import javax.swing.*;public class Demo extends JFrame{public Demo() {setBounds(100,100,250,200);//设置窗体位置,大小setDefaultCloseOperation(EXIT_ON_CLOSE);//设置窗体关闭方式Container c =getContentPane();//创建窗体容器c.setLayout(new FlowLayout());//设置为流布局JTextField JT = new JTextField();JT.setColumns(20);//设置文本框长度,20个字符JT.setText("+86");//设置初始文本JT.setFont(new Font("黑体", Font.PLAIN, 20));//设置字体格式c.add(JT);JButton btn = new JButton("确认");btn.addActionListener(new ActionListener() {public void actionPerformed(ActionEvent e) {System.out.println("电话号码为:"+JT.getText());JT.setText("");//清空文本内容JT.requestFocus();//获取光标}});c.add(btn);setVisible(true);}public static void main(String[] args) {new Demo();}
}
【运行效果】

4.2JPasswordField密码框
密码框组件由JPasswordField对象表示,其作用是把用户输入的字符串以某种符号进行加密。JPasswordField类的常用构造方法如下:
public JPasswordField():创建一个文本未被指定的密码框。
public JPasswordFiled(String text):创建一个指定文本的密码框。
public JPasswordField(int fieldwidth):创建一个指定列宽的密码框。
public JPasswordField(String text, int fieldwidth):创建一个指定文本和列宽的密码框。public JPasswordField(Document docModel, String text, int fieldWidth):创建一个指定文本模型和列宽的密码框。
JPasswordField类提供了setEchoChar)方法,这个方法被用于改变密码框的回显字符。setEchoChar(方法的语法如下:
public void setEchoChar(char c)其中,c表示密码框要显示的回显字符。
例如,创建JPasswordField对象,并设置密码框的回显字符为“#”。关键代码如下:
JPasswordField jp = new JPasswordField();
jp.setEchoChar(#); //设置回显字符
那么,如何获取JPasswordField对象中的字符呢?关键代码如下:
JPasswordField passwordField = new JPasswordField() //密码框对象
char ch, = passwordField.getPassword(); //获取密码字符数组
String pwd =new String(ch); //将字符数组转换为字符串
【代码实列】
import java.awt.Container;
import java.awt.FlowLayout;
import java.awt.Font;
import java.awt.event.ActionEvent;
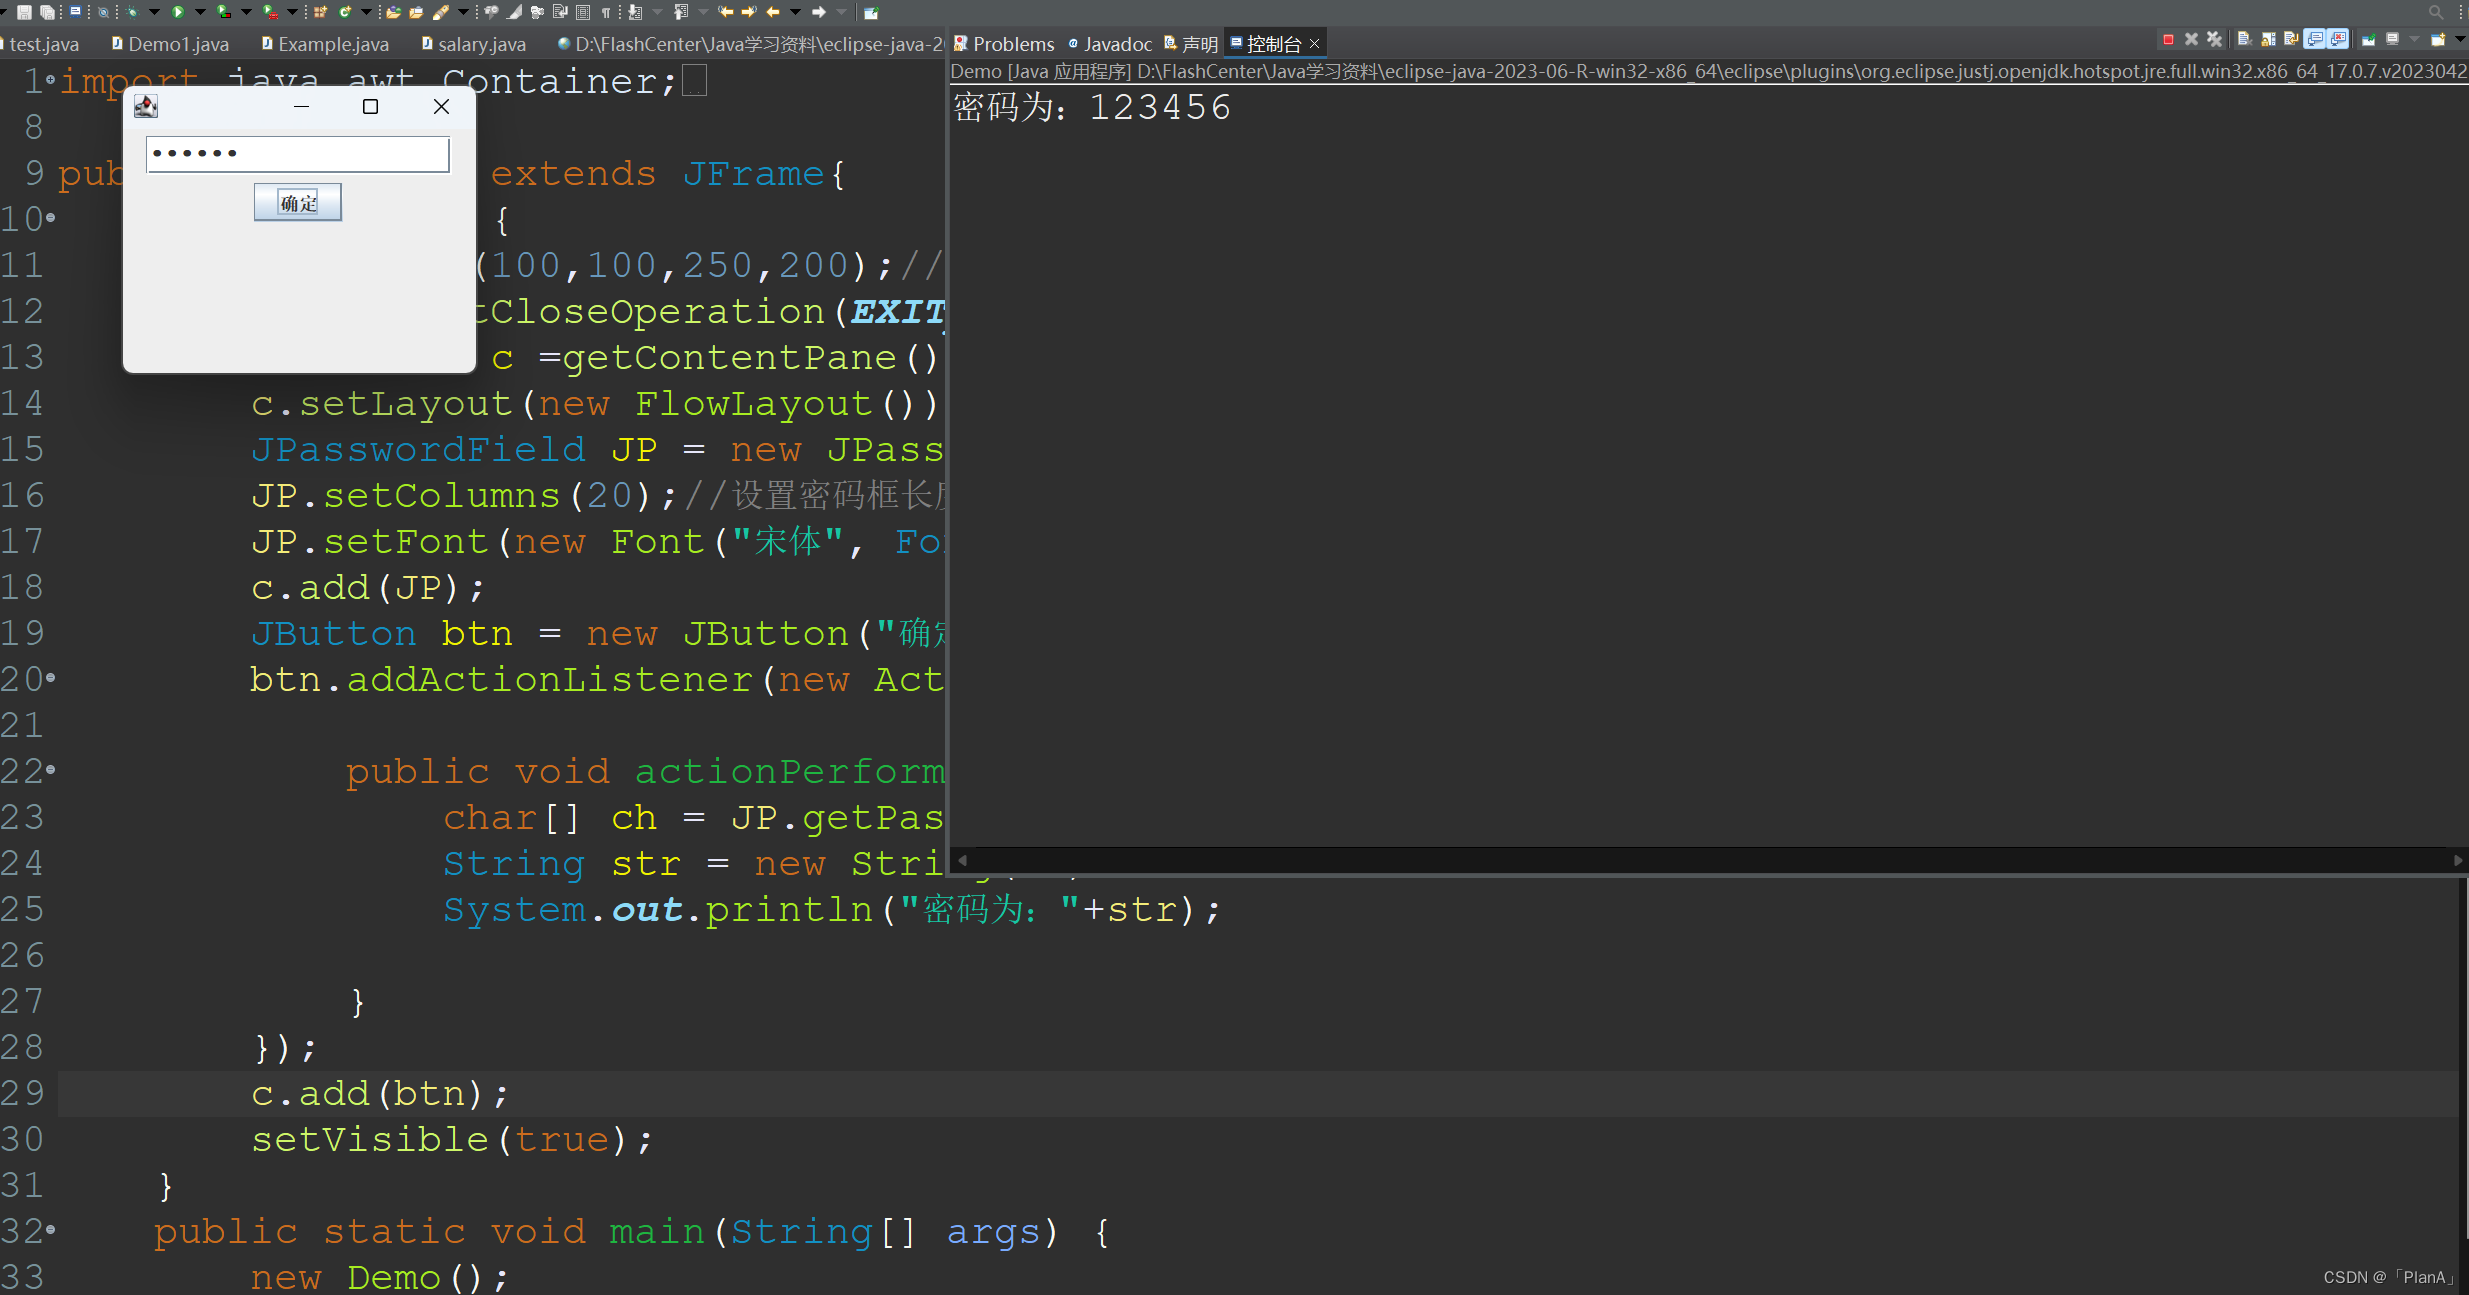
import java.awt.event.ActionListener;import javax.swing.*;public class Demo extends JFrame{public Demo() {setBounds(100,100,250,200);//设置窗体位置,大小setDefaultCloseOperation(EXIT_ON_CLOSE);//设置窗体关闭方式Container c =getContentPane();//创建窗体容器c.setLayout(new FlowLayout());//设置为流布局JPasswordField JP = new JPasswordField();JP.setColumns(20);//设置密码框长度,20个字符JP.setFont(new Font("宋体", Font.BOLD, 18));//设置字体c.add(JP);JButton btn = new JButton("确定");btn.addActionListener(new ActionListener() {public void actionPerformed(ActionEvent e) {char[] ch = JP.getPassword();//获得密码的字符数组String str = new String(ch);System.out.println("密码为:"+str);}});c.add(btn);setVisible(true);}public static void main(String[] args) {new Demo();}
}
【运行效果】
4.3JTextArea文本域
文本域组件由JTextArea对象表示,其作用是接受用户的多行文本输入。JTextArea类的常用构造方法如下:
public JTextArea():创建一个文本未被指定的文本域。
public JTextArea(String text):创建一个指定文本的文本域。
public JTextArea(int rows,int columns):创建一个指定行高和列宽,但文本未被指定的文本域。
public JTextArea(Document doc):创建一个指定文档模型的文本域。
poble JTeAre(Docunent doc,String Text,int rows,int columns):创建一个指定文档模型、文内容以及行高和列宽的文本域。
JTextArea类提供了一个setLineWrap(boolean wrap)方法,这个方法被用于设置文本域中的文本内客是否可以自动换行。如果参数wrap的值为true,那么文本域中的文本内容会自动换行;否则不会自动换行。
此外,JTextArea类还提供了一个append(String str)方法,这个方法被用于向文本域中添加文本内容 。
【代码实列】
import javax.swing.*;
import java.awt.*;public class Demo extends JFrame{public Demo() {setBounds(100,100,400,400);//设置位置以及大小setDefaultCloseOperation(EXIT_ON_CLOSE);//设置关闭方式Container c = getContentPane();//获取容器c.setLayout(new FlowLayout());//设置布局为流布局JTextArea JT = new JTextArea();//创建文本域JT.setFont(new Font("楷体",Font.BOLD, 20));JT.setText("文本内容");JT.setRows(10);//设置行数JT.setColumns(20);//设置列数JT.append("添加内容");//添加内容JT.insert("插入的内容", 2);//在第二个字符后面插入内容JScrollPane JS = new JScrollPane(JT);//设置滚动面板c.add(JS);setVisible(true);//设置窗体可见}public static void main(String[] args) {new Demo();}
}
【运行效果】 
五 表格组件
5.1创建表格
JTable 类除提供了默认的构造方法外,还提供了被用于显示二维数组中的元素的构造方法,这个沟造方法的语法如下:
JTable(Object[][], rowData, Object[] columnNames)
▣rowData:存储表格数据的二维数组。
▣columnNames:存储表格列名的一维数组。
在使用表格时,要先把表格添加到滚动面板,再把滚动面板添加到窗体的相应位置。

【代码实列】
import javax.swing.*;
import java.awt.*;public class Demo extends JFrame{public Demo() {setBounds(100,100,500,370);//设置位置以及大小setTitle("表格");//设置标题setDefaultCloseOperation(EXIT_ON_CLOSE);//设置关闭方式Container c = getContentPane();//创建容器String[] columnNames = {"A","B","C","D","E","F","G"};//定义表格列名String[][] tableValues = new String[20][columnNames.length];//定义一个二维数组,用来存储表格数据for(int i=0;i<tableValues.length;i++) {for(int j=0;j<columnNames.length;j++) {tableValues[i][j] = columnNames[j]+i;}}JTable table = new JTable(tableValues, columnNames);JScrollPane JS = new JScrollPane(table);//设置为滑动面板c.add(JS,BorderLayout.CENTER);//放在中间table.setSelectionForeground(Color.red);//设置前景色,字体颜色table.setSelectionBackground(Color.yellow);//背景色table.setRowHeight(30);//设置行高table.setSelectionMode(ListSelectionModel.SINGLE_SELECTION);//设置选择模式System.out.println("行数:"+table.getRowCount()+",列数:"+table.getColumnCount());System.out.println("第二列的名称是:"+table.getColumnName(1));System.out.println("第二行第二列的内容是:"+table.getValueAt(1, 1));setVisible(true);//设置窗体可见}public static void main(String[] args) {new Demo();}
}
【运行效果】

5.2DefaultTableModel表格数据模型
Swing使用 TableModel接口定义了一个表格模型,AbstractTableModel抽象类实现了TableMode接口的大部分方法,只有以下3个抽象方法没有实现:
▣public int getRowCount(); //获得行数
▣public int getColumnCount(); //获得列数
▣public Object getValueAt(int rowIndex, int columnIndex); //获得一格具体值

为了实现使用表格模型创建表格的功能,Swing提供了表格模型类,即DefaultTableModel类。DefaultTableModel类继承了AbstractTableModel抽象类且实现了上述3个抽象方法。
DefaultTableModel类提供的常用构造方法

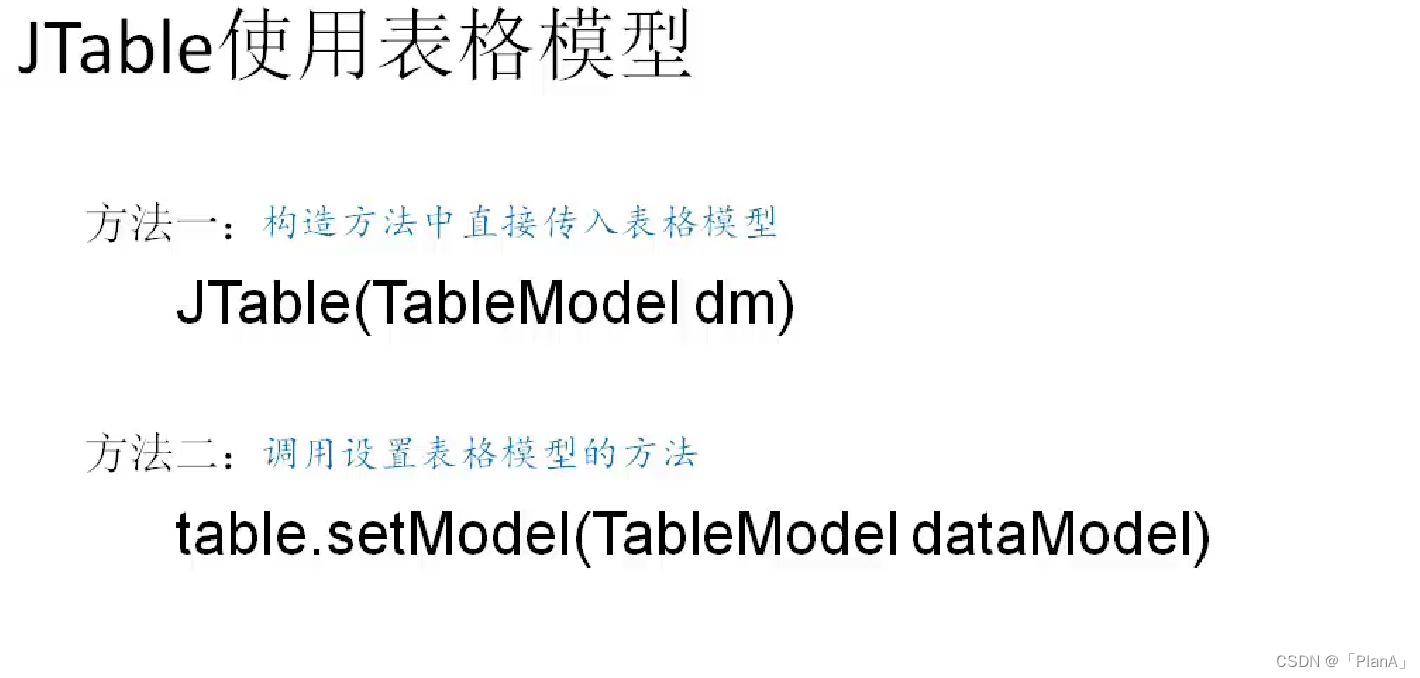
表格模型被创建后,使用JTable类的构造方法JTable(TableModel dm)即可创建表格。表格被创建后,还可以使用setRowSorter)方法为表格设置排序器:当单击表格的某一列的列头时,在这一列的列名后将出现上三角标记,说明将按升序排列表格中的所有行;当再次单击这一列的列头时,标记将变为下三角,说明按降序排列表格中的所有行。
【代码实列】
import javax.swing.*;
import javax.swing.table.DefaultTableModel;import java.awt.*;
import java.awt.event.ActionEvent;
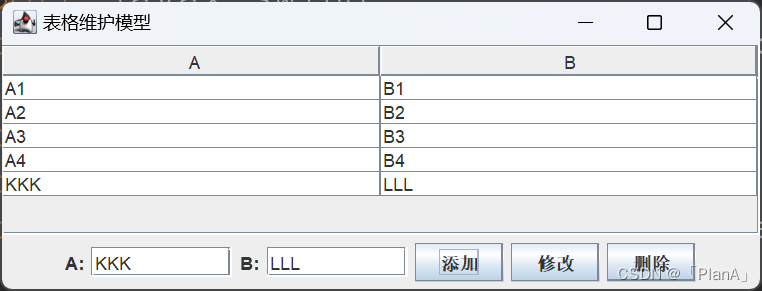
import java.awt.event.ActionListener;public class Demo extends JFrame{private DefaultTableModel tableModel;//定义表格模型对象private JTable table;                //定义表格对象private JTextField atext;//文本框1private JTextField btext;//文本框2private JButton addbtn,delbtn,updbtn;//添加,删除,修改按钮public Demo() {setTitle("表格维护模型");//设置标题setBounds(100, 100, 520, 200);//设置位置大小setDefaultCloseOperation(EXIT_ON_CLOSE);//设置窗体关闭方式Container c = getContentPane();//设置容器String[] columnNames = {"A","B"};//设置列名String[][] tablesValues = {{"A1","B1"},{"A2","B2"},{"A3","B3"},{"A4","B4"}};tableModel = new DefaultTableModel(tablesValues,columnNames);//table = new JTable(tableModel);//创建指定表格模型的表格JScrollPane JS = new JScrollPane(table);//添加滑动面板c.add(JS, BorderLayout.CENTER);//加入容器中并设置位置JPanel pane1 = new JPanel();//面板c.add(pane1,BorderLayout.SOUTH);//设置面板在南pane1.add(new JLabel("A:"));//在面板里面添加标签atext = new JTextField(10);pane1.add(atext);pane1.add(new JLabel("B:"));btext = new JTextField(10);pane1.add(btext);addbtn=new JButton("添加");updbtn=new JButton("修改");delbtn=new JButton("删除");pane1.add(addbtn);pane1.add(updbtn);pane1.add(delbtn);//设置点击添加按钮的事件addbtn.addActionListener(new ActionListener() {public void actionPerformed(ActionEvent e) {String[] rowValues = {atext.getText(),btext.getText()};//获得文本框的内容tableModel.addRow(rowValues);//表格模型添加一行数据}});//设置点击修改按钮的事件updbtn.addActionListener(new ActionListener() {public void actionPerformed(ActionEvent e) {int selectRow = table.getSelectedRow();//选中行的索引if(selectRow!=-1) {//存在被选中的行tableModel.setValueAt(atext.getText(), selectRow, 0);tableModel.setValueAt(btext.getText(), selectRow, 1);}}});//设置点击删除按钮的事件delbtn.addActionListener(new ActionListener() {public void actionPerformed(ActionEvent e) {int selectionRow = table.getSelectedRow();//选中行的索引if(selectionRow!=-1) {tableModel.removeRow(selectionRow);}}});}public static void main(String[] args) {Demo fram = new Demo();fram.setVisible(true);//设置窗体可见}
}
【运行效果】

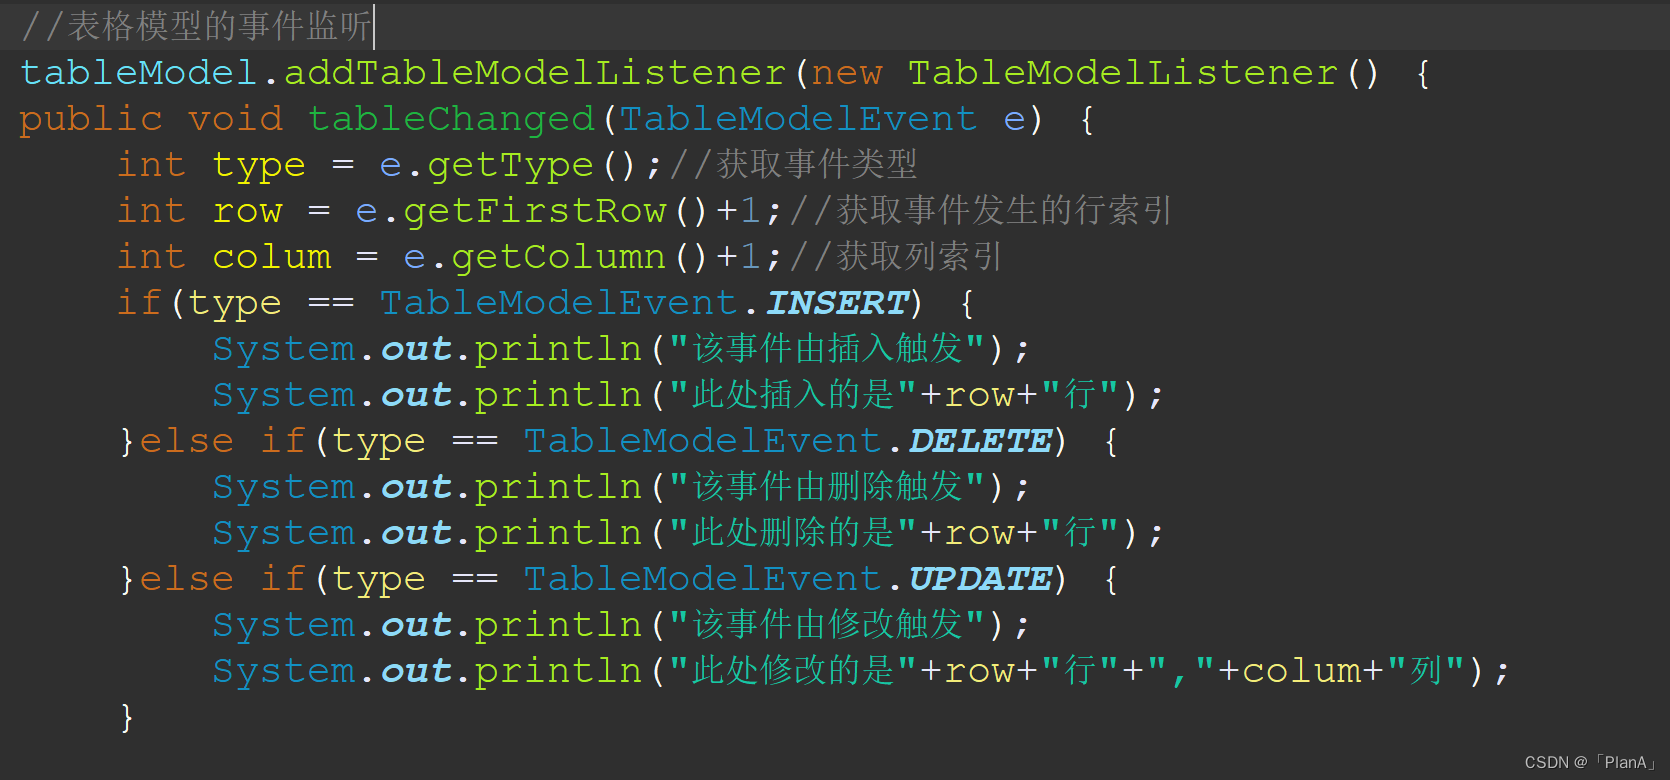
此外我们还可以添加表格事件模型的触发提示:
代码如下:
六 事件监听器
我们知道前面的所有组件本身并不带有任何功能,比如我们创建了一个按钮,当我们点击它的时候并没有任何反应,没有实现任何功能。所以为了当我们点击时,事件能做出相应的反应,我们要添加特定的事件监听器,即动作事件监听器,键盘事件监听器,鼠标事件监听器。
6.1 ActionEvent动作事件
动作事件监听是比较常用的事件监听,很多组件的动作都会使用它。

【代码实现】
import java.awt.BorderLayout;
import java.awt.Container;
import java.awt.Font;
import java.awt.event.ActionEvent;
import java.awt.event.ActionListener;import javax.swing.*;public class Demo extends JFrame{public Demo() {setBounds(100,100,800,100);setDefaultCloseOperation(EXIT_ON_CLOSE);Container c = getContentPane();//获取容器JPanel Jp1 = new JPanel();//面板1c.add(Jp1, BorderLayout.CENTER);JPanel Jp2 = new JPanel();//面板1c.add(Jp2, BorderLayout.SOUTH);JLabel JL = new JLabel("请选择");//标签JL.setFont(new Font("楷体", Font.BOLD, 18));Jp2.add(JL);JButton btn = new JButton("按钮");//按钮//添加监听事件btn.addActionListener(new ActionListener() {public void actionPerformed(ActionEvent e) {JL.setText("就知道你会点按钮!");}});Jp1.add(btn);//添加按钮JTextField JT = new JTextField(20);//文本框//添加事件监听JT.addActionListener(new ActionListener() {public void actionPerformed(ActionEvent e) {Object obj = e.getSource();JTextField jt = (JTextField) obj;JL.setText("点击了回车!"+jt.getText());}});Jp1.add(JT);//添加文本框JCheckBox JC = new JCheckBox("复选框");//复选框Jp1.add(JC);JC.addActionListener(new ActionListener() {public void actionPerformed(ActionEvent e) {JL.setText("点击了复选框!");}});JRadioButton JR = new JRadioButton("单选框");//单选框Jp1.add(JR);JR.addActionListener(new ActionListener() {public void actionPerformed(ActionEvent e) {JL.setText("点击了单选框!");}});String item[] = {"喜羊羊","灰太狼","懒洋洋"};JComboBox<String> Jc = new JComboBox<>(item);Jc.addActionListener(new ActionListener() {public void actionPerformed(ActionEvent e) {JL.setText("下拉列表被选择!"+Jc.getSelectedItem());}});Jp1.add(Jc);}public static void main(String[] args) {Demo fram = new Demo();fram.setVisible(true);//设置窗体可见}
}
【实现效果】


6.2 KeyEvent键盘事件
当向文本框中输入内容时,将发生键盘事件。KeyEvent类负责捕获键盘事件,可以通过为组件添加实现了KeyListener接口的监听器类来处理相应的键盘事件。
KeyListener接口共有3个抽象方法,分别在发生击键事件(按下并释放键)、按键被按下(手指按下键但不松开)和按键被释放(手指从按下的键上松开)时被触发,具体如下:public interface KeyListener extends EventListener (public void keyTyped(KeyEvent e); //发生击键事件时被触发public void keyPressed(KeyEvent e); //按键被按下时被触发public void keyReleased(KeyEvent e); //按键被释放时被触发 )
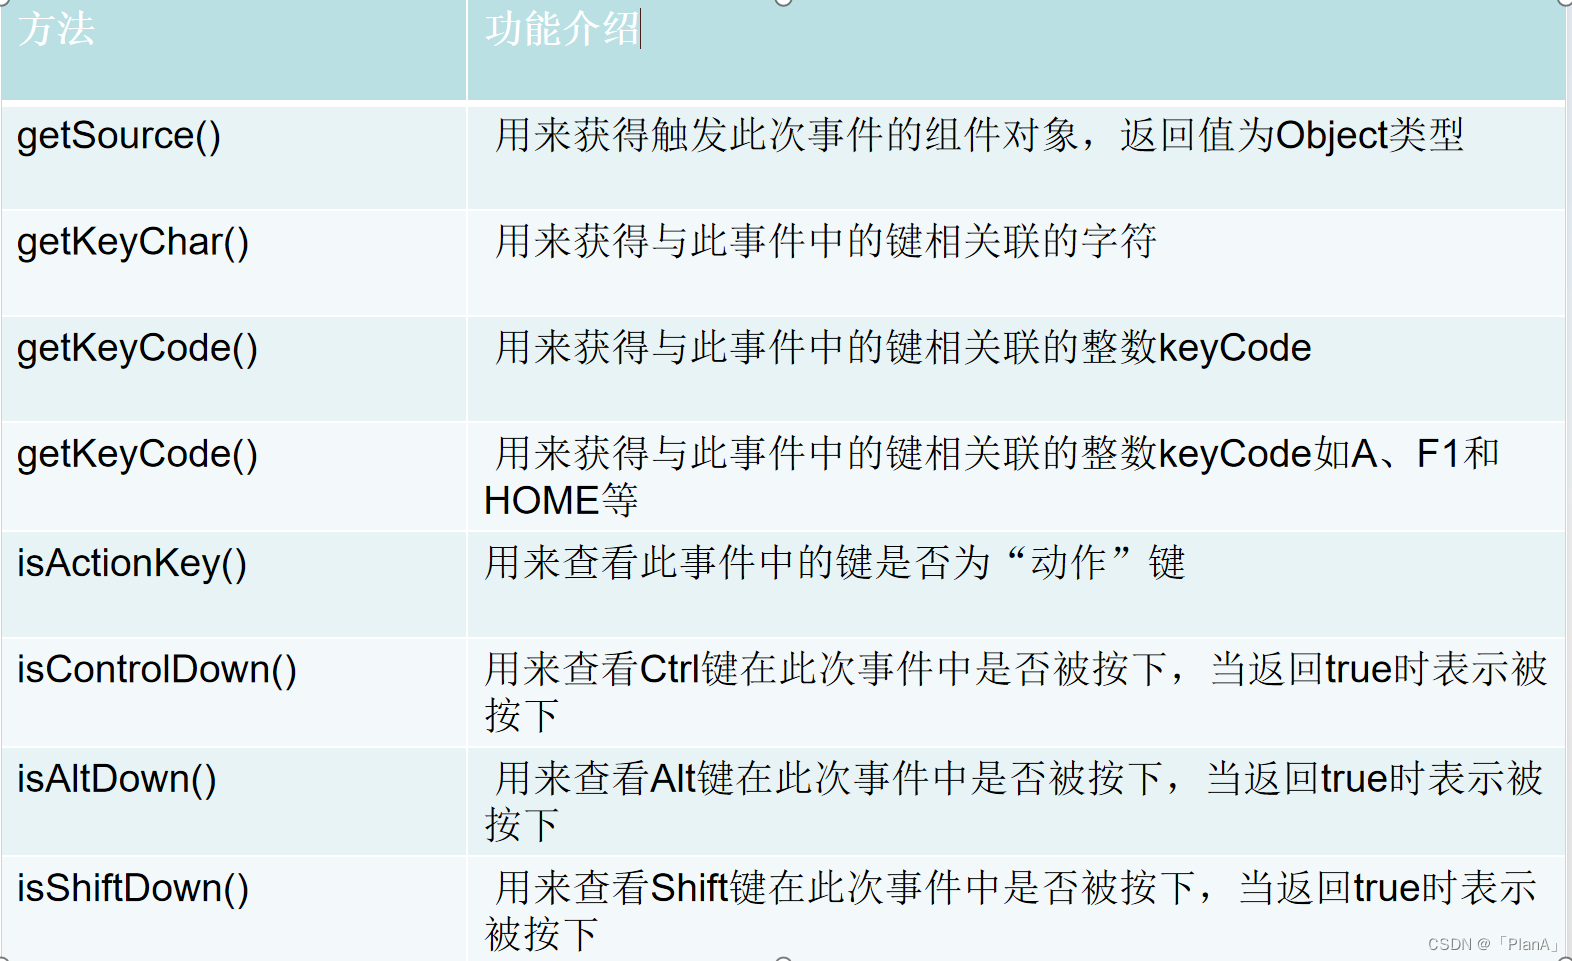
keyEvent类中的常用方法
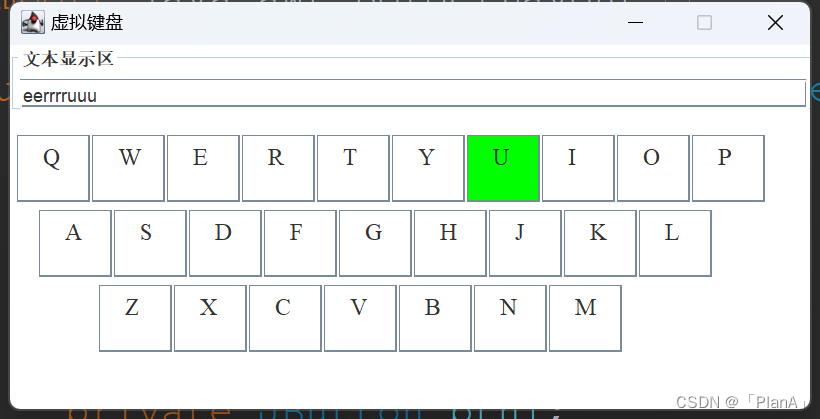
【】模拟键盘敲击事件
【代码实列】
import java.awt.BorderLayout;
import java.awt.Color;
import java.awt.Component;
import java.awt.EventQueue;
import java.awt.Font;
import java.awt.event.KeyEvent;
import java.awt.event.KeyListener;
import java.util.ArrayList;
import java.util.List;import javax.swing.JButton;
import javax.swing.JFrame;
import javax.swing.JPanel;
import javax.swing.JTextField;
import javax.swing.SwingConstants;
import javax.swing.border.EmptyBorder;
import javax.swing.border.TitledBorder;
import javax.swing.plaf.FontUIResource;public class KeyBorad extends JFrame{//创建键盘类继承JFrame窗体private JPanel Jp;//面板private JTextField JT;//文本框private JButton btnQ;private JButton btnW;private JButton btnE;private JButton btnR;private JButton btnT;private JButton btnY;private JButton btnU;private JButton btnI;private JButton btnO;private JButton btnP;private JButton btnA;private JButton btnS;private JButton btnD;private JButton btnF;private JButton btnG;private JButton btnH;private JButton btnJ;private JButton btnK;private JButton btnL;private JButton btnZ;private JButton btnX;private JButton btnC;private JButton btnV;private JButton btnB;private JButton btnN;private JButton btnM;Color green = Color.GREEN;//定义颜色绿色,表示键盘按下的颜色Color white = Color.white;//定义颜色白色,表示键盘释放的颜色/**主方法*/public static void main(String[] args) {EventQueue.invokeLater(new Runnable() {public void run() {KeyBorad frame = new KeyBorad();frame.setVisible(true);}});}public  KeyBorad() {//keyBorad的构造方法setTitle("虚拟键盘");setResizable(false);setDefaultCloseOperation(EXIT_ON_CLOSE);setBounds(100,100 ,548,280);Jp = new JPanel();Jp.setBackground(Color.WHITE);//设置背景颜色Jp.setBorder(new EmptyBorder(5,5,5,5));setContentPane(Jp);Jp.setLayout(null);btnQ = new JButton("Q");btnQ.setBackground(Color.WHITE);btnQ.setVerticalAlignment(SwingConstants.TOP);btnQ.setHorizontalAlignment(SwingConstants.LEADING);btnQ.setFont(new FontUIResource("Times New Roman", Font.PLAIN, 16));btnQ.setBounds(5, 60, 49, 45);Jp.add(btnQ);btnW = new JButton("W");btnW.setBackground(Color.WHITE);btnW.setVerticalAlignment(SwingConstants.TOP);btnW.setHorizontalAlignment(SwingConstants.LEADING);btnW.setFont(new FontUIResource("Times New Roman", Font.PLAIN, 16));btnW.setBounds(55, 60, 49, 45);Jp.add(btnW);btnE = new JButton("E");btnE.setBackground(Color.WHITE);btnE.setVerticalAlignment(SwingConstants.TOP);btnE.setHorizontalAlignment(SwingConstants.LEADING);btnE.setFont(new FontUIResource("Times New Roman", Font.PLAIN, 16));btnE.setBounds(105, 60, 49, 45);Jp.add(btnE);btnR = new JButton("R");btnR.setBackground(Color.WHITE);btnR.setVerticalAlignment(SwingConstants.TOP);btnR.setHorizontalAlignment(SwingConstants.LEADING);btnR.setFont(new FontUIResource("Times New Roman", Font.PLAIN, 16));btnR.setBounds(155, 60, 49, 45);Jp.add(btnR);btnT = new JButton("T");btnT.setBackground(Color.WHITE);btnT.setVerticalAlignment(SwingConstants.TOP);btnT.setHorizontalAlignment(SwingConstants.LEADING);btnT.setFont(new FontUIResource("Times New Roman", Font.PLAIN, 16));btnT.setBounds(205, 60, 49, 45);Jp.add(btnT);btnY = new JButton("Y");btnY.setBackground(Color.WHITE);btnY.setVerticalAlignment(SwingConstants.TOP);btnY.setHorizontalAlignment(SwingConstants.LEADING);btnY.setFont(new FontUIResource("Times New Roman", Font.PLAIN, 16));btnY.setBounds(255, 60, 49, 45);Jp.add(btnY);btnU = new JButton("U");btnU.setBackground(Color.WHITE);btnU.setVerticalAlignment(SwingConstants.TOP);btnU.setHorizontalAlignment(SwingConstants.LEADING);btnU.setFont(new FontUIResource("Times New Roman", Font.PLAIN, 16));btnU.setBounds(305, 60, 49, 45);Jp.add(btnU);btnI = new JButton("I");btnI.setBackground(Color.WHITE);btnI.setVerticalAlignment(SwingConstants.TOP);btnI.setHorizontalAlignment(SwingConstants.LEADING);btnI.setFont(new FontUIResource("Times New Roman", Font.PLAIN, 16));btnI.setBounds(355, 60, 49, 45);Jp.add(btnI);btnO = new JButton("O");btnO.setBackground(Color.WHITE);btnO.setVerticalAlignment(SwingConstants.TOP);btnO.setHorizontalAlignment(SwingConstants.LEADING);btnO.setFont(new FontUIResource("Times New Roman", Font.PLAIN, 16));btnO.setBounds(405, 60, 49, 45);Jp.add(btnO);btnP = new JButton("P");btnP.setBackground(Color.WHITE);btnP.setVerticalAlignment(SwingConstants.TOP);btnP.setHorizontalAlignment(SwingConstants.LEADING);btnP.setFont(new FontUIResource("Times New Roman", Font.PLAIN, 16));btnP.setBounds(455, 60, 49, 45);Jp.add(btnP);btnA = new JButton("A");btnA.setBackground(Color.WHITE);btnA.setVerticalAlignment(SwingConstants.TOP);btnA.setHorizontalAlignment(SwingConstants.LEADING);btnA.setFont(new FontUIResource("Times New Roman", Font.PLAIN, 16));btnA.setBounds(20, 110, 49, 45);Jp.add(btnA);btnS = new JButton("S");btnS.setBackground(Color.WHITE);btnS.setVerticalAlignment(SwingConstants.TOP);btnS.setHorizontalAlignment(SwingConstants.LEADING);btnS.setFont(new FontUIResource("Times New Roman", Font.PLAIN, 16));btnS.setBounds(70, 110, 49, 45);Jp.add(btnS);btnD = new JButton("D");btnD.setBackground(Color.WHITE);btnD.setVerticalAlignment(SwingConstants.TOP);btnD.setHorizontalAlignment(SwingConstants.LEADING);btnD.setFont(new FontUIResource("Times New Roman", Font.PLAIN, 16));btnD.setBounds(120, 110, 49, 45);Jp.add(btnD);btnF = new JButton("F");btnF.setBackground(Color.WHITE);btnF.setVerticalAlignment(SwingConstants.TOP);btnF.setHorizontalAlignment(SwingConstants.LEADING);btnF.setFont(new FontUIResource("Times New Roman", Font.PLAIN, 16));btnF.setBounds(170, 110, 49, 45);Jp.add(btnF);btnG = new JButton("G");btnG.setBackground(Color.WHITE);btnG.setVerticalAlignment(SwingConstants.TOP);btnG.setHorizontalAlignment(SwingConstants.LEADING);btnG.setFont(new FontUIResource("Times New Roman", Font.PLAIN, 16));btnG.setBounds(220, 110, 49, 45);Jp.add(btnG);btnH = new JButton("H");btnH.setBackground(Color.WHITE);btnH.setVerticalAlignment(SwingConstants.TOP);btnH.setHorizontalAlignment(SwingConstants.LEADING);btnH.setFont(new FontUIResource("Times New Roman", Font.PLAIN, 16));btnH.setBounds(270, 110, 49, 45);Jp.add(btnH);btnJ = new JButton("J");btnJ.setBackground(Color.WHITE);btnJ.setVerticalAlignment(SwingConstants.TOP);btnJ.setHorizontalAlignment(SwingConstants.LEADING);btnJ.setFont(new FontUIResource("Times New Roman", Font.PLAIN, 16));btnJ.setBounds(320, 110, 49, 45);Jp.add(btnJ);btnK = new JButton("K");btnK.setBackground(Color.WHITE);btnK.setVerticalAlignment(SwingConstants.TOP);btnK.setHorizontalAlignment(SwingConstants.LEADING);btnK.setFont(new FontUIResource("Times New Roman", Font.PLAIN, 16));btnK.setBounds(370, 110, 49, 45);Jp.add(btnK);btnL = new JButton("L");btnL.setBackground(Color.WHITE);btnL.setVerticalAlignment(SwingConstants.TOP);btnL.setHorizontalAlignment(SwingConstants.LEADING);btnL.setFont(new FontUIResource("Times New Roman", Font.PLAIN, 16));btnL.setBounds(420, 110, 49, 45);Jp.add(btnL);btnZ = new JButton("Z");btnZ.setBackground(Color.WHITE);btnZ.setVerticalAlignment(SwingConstants.TOP);btnZ.setHorizontalAlignment(SwingConstants.LEADING);btnZ.setFont(new FontUIResource("Times New Roman", Font.PLAIN, 16));btnZ.setBounds(60, 160, 49, 45);Jp.add(btnZ);btnX = new JButton("X");btnX.setBackground(Color.WHITE);btnX.setVerticalAlignment(SwingConstants.TOP);btnX.setHorizontalAlignment(SwingConstants.LEADING);btnX.setFont(new FontUIResource("Times New Roman", Font.PLAIN, 16));btnX.setBounds(110, 160, 49, 45);Jp.add(btnX);btnC = new JButton("C");btnC.setBackground(Color.WHITE);btnC.setVerticalAlignment(SwingConstants.TOP);btnC.setHorizontalAlignment(SwingConstants.LEADING);btnC.setFont(new FontUIResource("Times New Roman", Font.PLAIN, 16));btnC.setBounds(160, 160, 49, 45);Jp.add(btnC);btnV = new JButton("V");btnV.setBackground(Color.WHITE);btnV.setVerticalAlignment(SwingConstants.TOP);btnV.setHorizontalAlignment(SwingConstants.LEADING);btnV.setFont(new FontUIResource("Times New Roman", Font.PLAIN, 16));btnV.setBounds(210, 160, 49, 45);Jp.add(btnV);btnB = new JButton("B");btnB.setBackground(Color.WHITE);btnB.setVerticalAlignment(SwingConstants.TOP);btnB.setHorizontalAlignment(SwingConstants.LEADING);btnB.setFont(new FontUIResource("Times New Roman", Font.PLAIN, 16));btnB.setBounds(260, 160, 49, 45);Jp.add(btnB);btnN = new JButton("N");btnN.setBackground(Color.WHITE);btnN.setVerticalAlignment(SwingConstants.TOP);btnN.setHorizontalAlignment(SwingConstants.LEADING);btnN.setFont(new FontUIResource("Times New Roman", Font.PLAIN, 16));btnN.setBounds(310, 160, 49, 45);Jp.add(btnN);btnM = new JButton("M");btnM.setBackground(Color.WHITE);btnM.setVerticalAlignment(SwingConstants.TOP);btnM.setHorizontalAlignment(SwingConstants.LEADING);btnM.setFont(new FontUIResource("Times New Roman", Font.PLAIN, 16));btnM.setBounds(360, 160, 49, 45);Jp.add(btnM);JPanel Jp1 = new JPanel();Jp1.setBorder( new TitledBorder(null,"文本显示区",TitledBorder.LEADING,TitledBorder.CENTER));Jp1.setBackground(Color.WHITE);Jp1.setBounds(0, 0, 540, 45);getContentPane().add(Jp1);JT = new JTextField(58);//文本框Jp1.add(JT,BorderLayout.CENTER);List<JButton> list = new ArrayList<JButton>();//用list集合获取所有按钮Component iteams[] = Jp.getComponents();//返回容器中所有的组件for(Component c:iteams) {if(c instanceof JButton) {//判断组件是否是按钮list.add((JButton)c);}}JT.addKeyListener(new KeyListener() {//为文本框添加键盘监听事件public void keyReleased(KeyEvent e) {//按键释放char ch = e.getKeyChar();//获取案件字符for(JButton btn:list) {String btnText = btn.getText();if(btnText.equalsIgnoreCase(String.valueOf(ch))) {btn.setBackground(Color.WHITE);}}}public void keyPressed(KeyEvent e) {//案件被按下char ch = e.getKeyChar();//获取案件字符for(JButton btn:list) {String btnText = btn.getText();if(btnText.equalsIgnoreCase(String.valueOf(ch))) {btn.setBackground(Color.GREEN);}}}@Overridepublic void keyTyped(KeyEvent e) {// TODO 自动生成的方法存根}});}}
【运行效果】
6.3 MouseEvent鼠标事件
所有组件都能及生鼠标事件,MouseEvent 类负责捕获鼠标事件,可以通过为组件添加实现了Mouselistener接口的监听器类来处理相应的鼠标事件。
MouseListener接口共有5个抽象方法,分别在光标移入或移出组件、鼠标按键被按下或释放和发生单击事件时被触发。所谓单击事件,就是按键被按下并释放。需要注意的是,如果按键是在移出组件之后才被释放,则不会触发单击事件。MouseListener接口的具体定义如下:
public interface MouseListener extends EventListener(public void mouseEntered(MouseEvent e); 1/光标移入组件时被触发public void mousePressed(MouseEvent e); //鼠标按键被按下时被触发public void mouseReleased(MouseEvent e); //鼠标按键被释放时被触发public void mouseClicked(MouseEvent e); //发生单击事件时被触发public void mouseExited(MouseEvent e); //光标移出组件时被触发
}
MouseEvent类中的常用方法

当需要判断此次发生的事件是那个按键时,可以用getButton()方法返回的int值来代表按键:
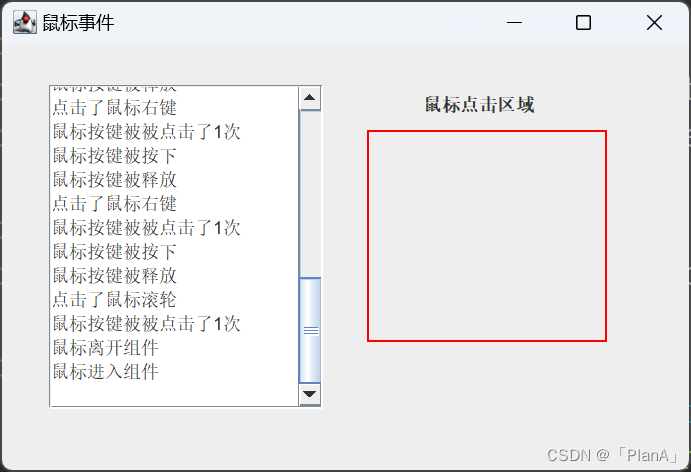
 【代码实列】
import java.awt.Color;
import java.awt.event.MouseEvent;
import java.awt.event.MouseListener;import javax.swing.*;
import javax.swing.border.LineBorder;public class mouseevent extends JFrame{public static void main(String[] args) {mouseevent frame = new mouseevent();frame.setVisible(true);//设置窗体可见} public mouseevent() {super();setTitle("鼠标事件");setBounds(100,100,473,321);//设置窗体位置大小setDefaultCloseOperation(EXIT_ON_CLOSE);//设置窗体关闭方式getContentPane().setLayout(null);//设置布局为绝对布局JLabel label =new JLabel();label.setBounds(244, 57, 160, 141);label.setBorder(new LineBorder(Color.RED,2));//设置边框线getContentPane().add(label);JScrollPane Js = new JScrollPane();Js.setBounds(32, 27, 183, 216);getContentPane().add(Js);JTextArea Jt = new JTextArea();Js.setViewportView(Jt);JLabel jl = new JLabel("鼠标点击区域");jl.setBounds(281,32,84,15);getContentPane().add(jl);label.addMouseListener(new MouseListener() {@Overridepublic void mouseReleased(MouseEvent e) {Jt.append("鼠标按键被释放\n");}@Overridepublic void mousePressed(MouseEvent e) {Jt.append("鼠标按键被按下\n");}@Overridepublic void mouseExited(MouseEvent e) {Jt.append("鼠标离开组件\n");}@Overridepublic void mouseEntered(MouseEvent e) {Jt.append("鼠标进入组件\n");}@Overridepublic void mouseClicked(MouseEvent e) {int count  = e.getClickCount();int btn = e.getButton();switch(btn) {case MouseEvent.BUTTON1:Jt.append("点击了鼠标左键\n");break;case MouseEvent.BUTTON2:Jt.append("点击了鼠标滚轮\n");break;case MouseEvent.BUTTON3:Jt.append("点击了鼠标右键\n");break;}Jt.append("鼠标按键被被点击了"+count+"次\n");}});}
}
【运行效果】


)


)
)

![NSS [NSSCTF 2022 Spring Recruit]babyphp](http://pic.xiahunao.cn/NSS [NSSCTF 2022 Spring Recruit]babyphp)