之——基础组件
目录
之——基础组件
杂谈
正文
1.Image
1.0 数据源
1.1 缩放
1.2 大小
1.3 网络图片
2.Text
2.0 数据源
2.1 大小
2.2 粗细
2.3 颜色
2.5 样式字体
2.6 基础示例
2.7 对齐
2.8 省略
2.9 划线
3.TextInput
3.1 输入类型
3.2 提示文本属性
3.3 光标
4.Button
4.1 样式
4.2 子组件
5.LoadingProgress
杂谈
基础组件的使用。
组件(Component)是界面搭建与显示的最小单位,HarmonyOS ArkUI声明式开发范式为开发者提供了丰富多样的UI组件,我们可以使用这些组件轻松的编写出更加丰富、漂亮的界面。
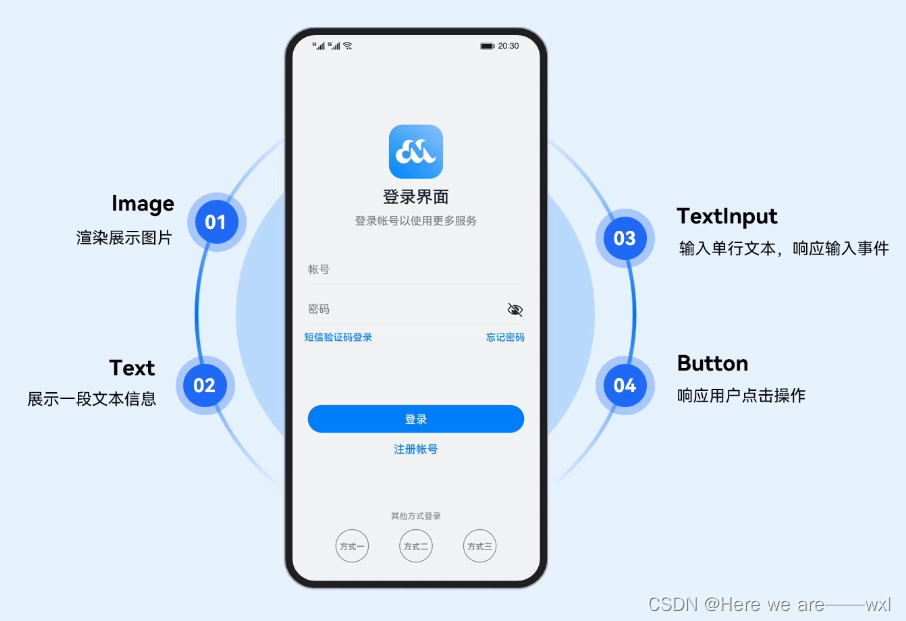
组件根据功能可以分为以下五大类:基础组件、容器组件、媒体组件、绘制组件、画布组件。其中基础组件是视图层的基本组成单元,包括Text、Image、TextInput、Button、LoadingProgress等。
例如下面这个常用的登录界面就是由这些基础组件组合而成:

正文
1.Image
渲染和展示图片,支持加载本地和网络图片。
Image组件用来渲染展示图片,它可以让界面变得更加丰富多彩。只需要给Image组件设置图片地址、宽和高,图片就能加载出来。

Image($r("app.media.icon")).width(100).height(100)1.0 数据源
其中,图片数据源:
1.1 缩放
为了使图片在页面中有更好的显示效果,有时候需要对图片进行缩放处理。可以使用objectFit属性设置图片的缩放类型,objectFit的参数类型为ImageFit。
//将图片加载到Image组件,设置宽高各100,设置objectFit为Cover(默认值),设置图片背景色为灰色0xCCCCCC
Image($r("app.media.image2")).objectFit(ImageFit.Cover).backgroundColor(0xCCCCCC).width(100).height(100) ImageFit包含以下几种类型:
Contain:保持宽高比进行缩小或者放大,使得图片完全显示在显示边界内。
Cover(默认值):保持宽高比进行缩小或者放大,使得图片两边都大于或等于显示边界。
Auto:自适应显示。
Fill:不保持宽高比进行放大缩小,使得图片充满显示边界。
ScaleDown:保持宽高比显示,图片缩小或者保持不变。
None:保持原有尺寸显示。
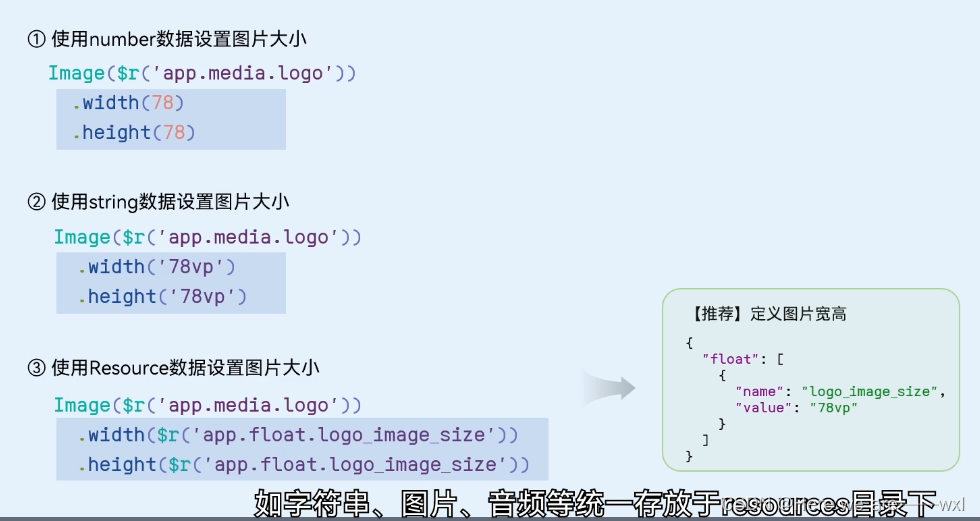
1.2 大小
大小调整,float.json:
1.3 网络图片
浏览新闻的时候,图片一般从网络加载而来,Image组件支持加载网络图片,将图片地址换成网络图片地址进行加载。
Image('https://www.example.com/xxx.png')为了成功加载网络图片,需要在module.json5文件中申明网络访问权限。
{"module" : {"requestPermissions":[{"name": "ohos.permission.INTERNET"}]}
}
2.Text
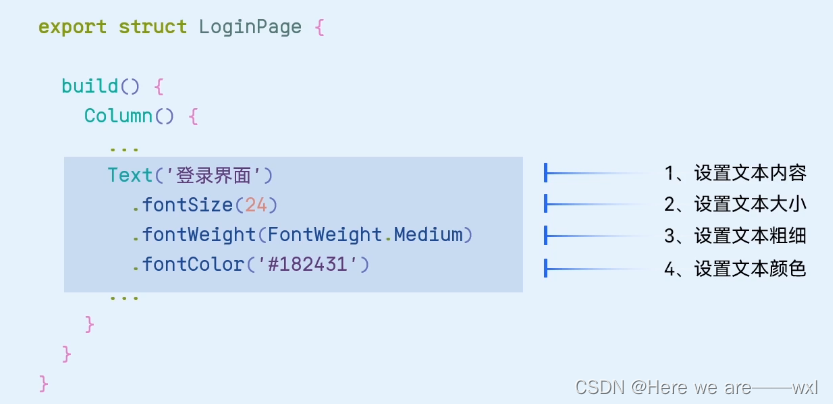
展示文本信息。
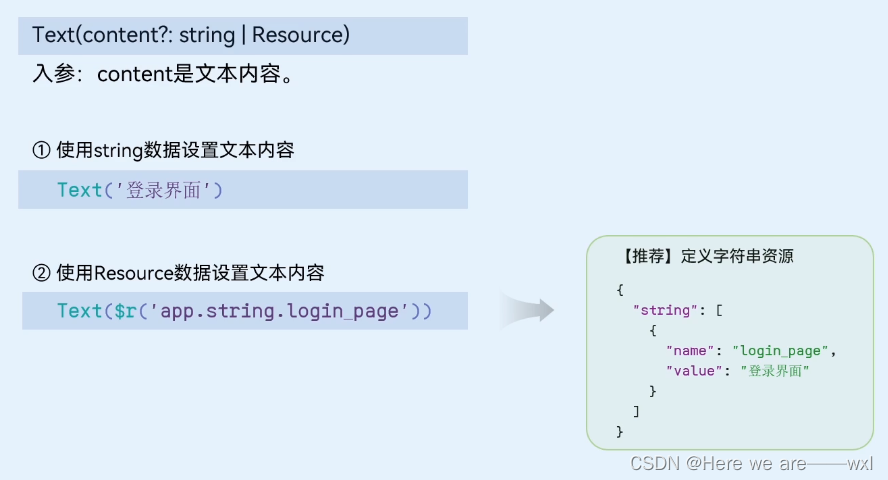
2.0 数据源
其中,文本来源,string..json:
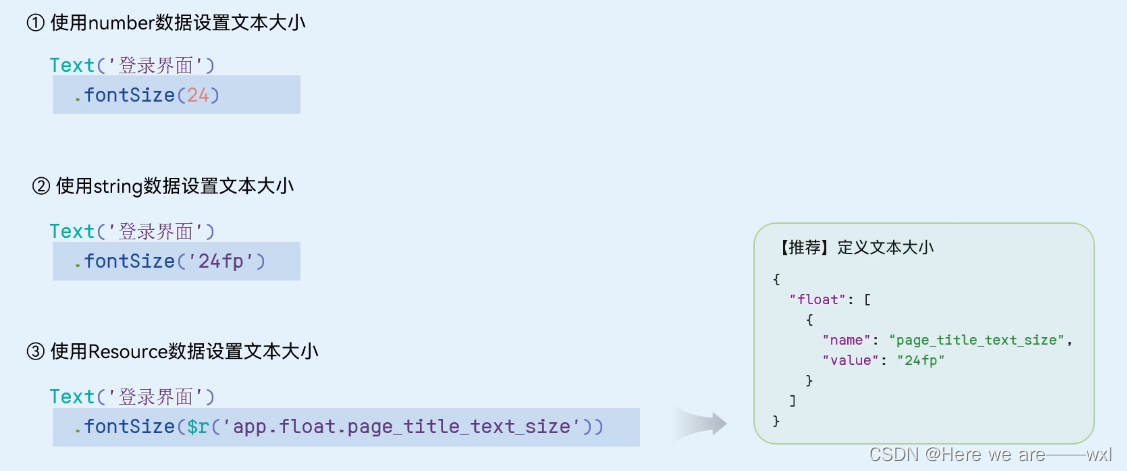
2.1 大小
文本大小fontSize,float.json:
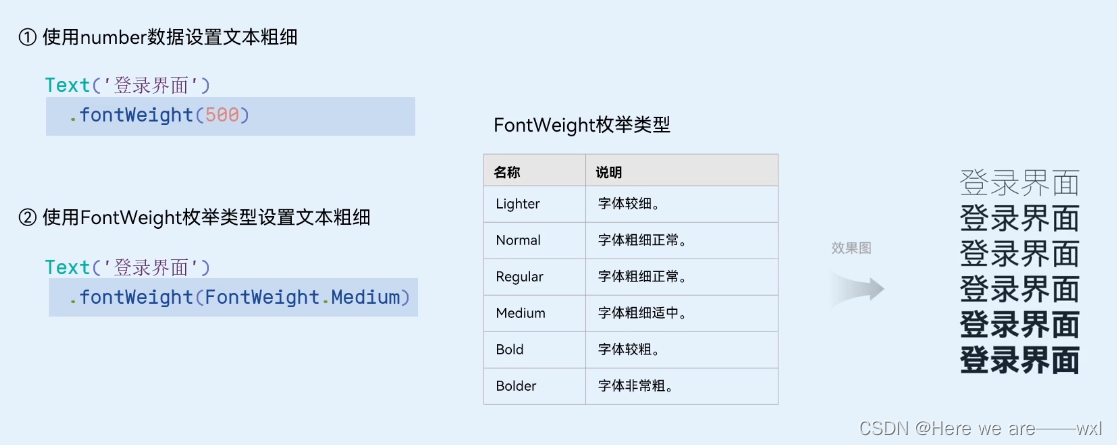
2.2 粗细
文本粗细fontWeight:
设置文本的字体粗细,number类型取值[100, 900],取值间隔为100,默认为400,取值越大,字体越粗。string类型仅支持number类型取值的字符串形式,例如“400”,以及“bold”、“bolder”、“lighter”、“regular”、“medium”,分别对应FontWeight中相应的枚举值。默认值:FontWeight.Normal
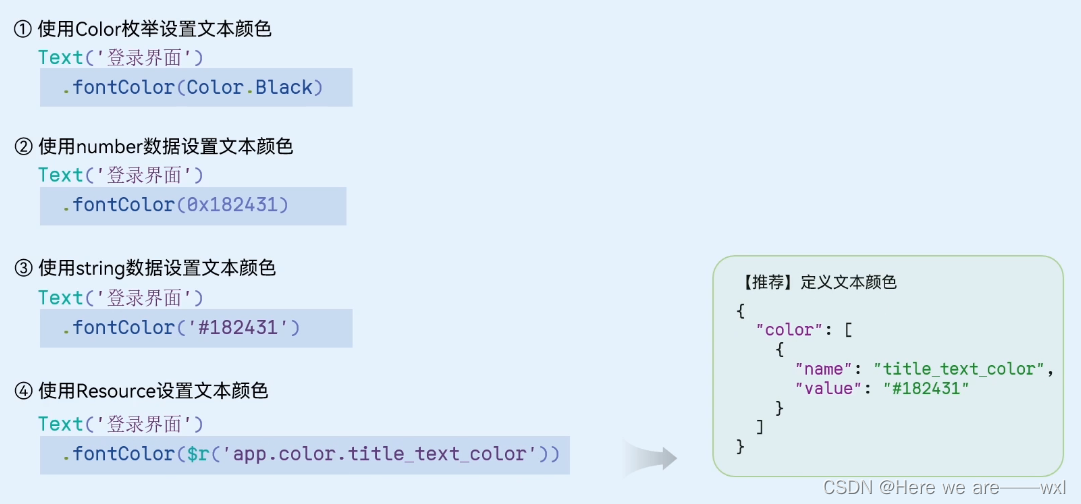
2.3 颜色
文本颜色fontColor:
2.5 样式字体
还有fontStyle设置样式,FontStyle.Italic是斜体;fontFamily设置文本的字体列表。使用多个字体,使用“,”进行分割,优先级按顺序生效。例如:“Arial,sans-serif”。
2.6 基础示例
@Entry
@Component
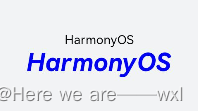
struct TextDemo {build() {Row() {Column() {Text('HarmonyOS')Text('HarmonyOS').fontColor(Color.Blue).fontSize(20).fontStyle(FontStyle.Italic).fontWeight(FontWeight.Bold).fontFamily('Arial')}.width('100%')}.backgroundColor(0xF1F3F5).height('100%')}
}
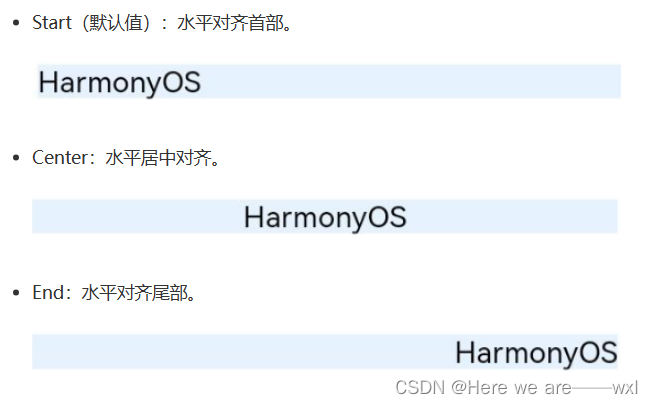
2.7 对齐
文本对齐方式,textAlign:
Text('HarmonyOS').width(200).textAlign(TextAlign.Start).backgroundColor(0xE6F2FD)TextAlign.Start/Center/End
2.8 省略
文本超长显示,textOverflow:(需配合maxLines使用,单独设置不生效)
Text('This is the text content of Text Component This is the text content of Text Component').fontSize(16).maxLines(1).textOverflow({overflow:TextOverflow.Ellipsis}).backgroundColor(0xE6F2FD)
2.9 划线
文本装饰线,decoration:
Text('HarmonyOS').fontSize(20).decoration({ type: TextDecorationType.Underline, color: Color.Black }).backgroundColor(0xE6F2FD)TextDecorationTyp包含None、Overline、LineThrough、Underline。
3.TextInput
输入单行文本,响应输入事件,获取用户输入的文本信息。
TextInput().fontColor(Color.Blue).fontSize(20).fontStyle(FontStyle.Italic).fontWeight(FontWeight.Bold).fontFamily('Arial') 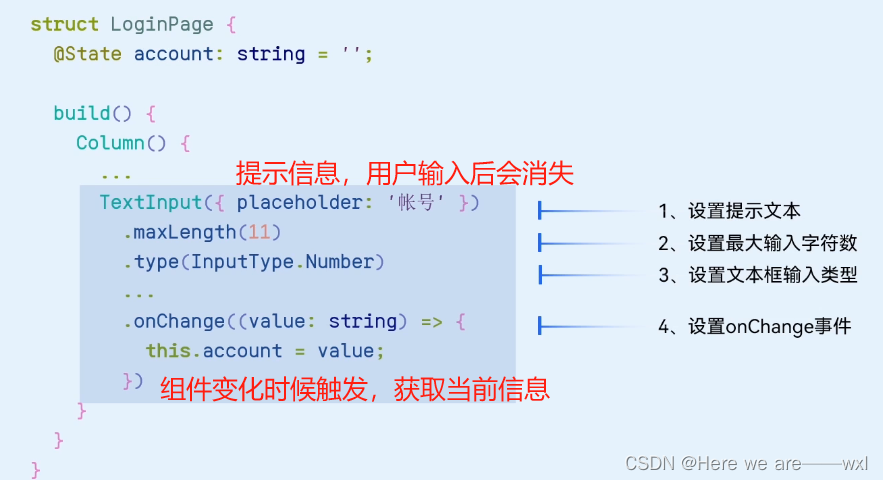
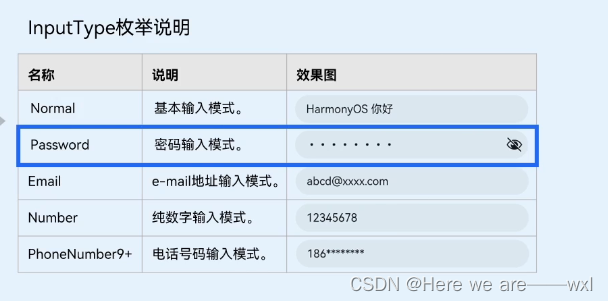
3.1 输入类型
输入类型枚举:
3.2 提示文本属性
提示文本样式,placeholderFont:
TextInput({ placeholder: '请输入帐号' }).placeholderColor(0x999999).placeholderFont({ size: 20, weight: FontWeight.Medium, family: 'cursive', style: FontStyle.Italic })
3.3 光标
光标位置,TextInputController的caretPosition动态设置光标位置:
@Entry
@Component
struct TextInputDemo {controller: TextInputController = new TextInputController()build() {Column() {TextInput({ controller: this.controller })Button('设置光标位置').onClick(() => {this.controller.caretPosition(2)})}.height('100%').backgroundColor(0xE6F2FD)}
}
4.Button
响应点击操作。
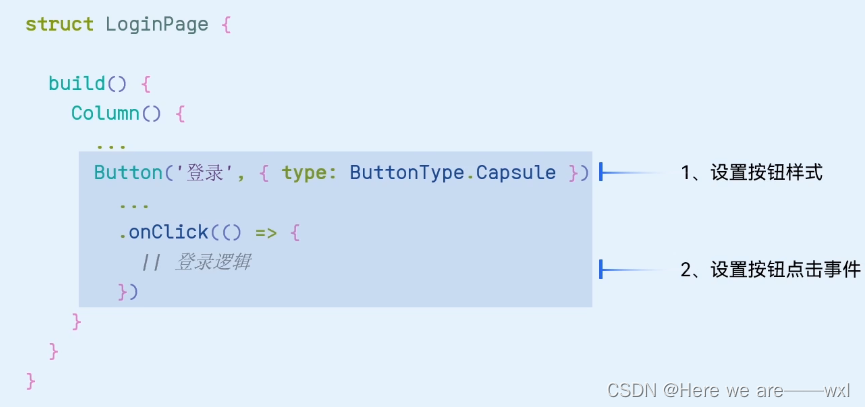
Button('登录', { type: ButtonType.Capsule, stateEffect: true }).width('90%').height(40).fontSize(16).fontWeight(FontWeight.Medium).backgroundColor('#007DFF')type用于定义按钮样式,示例代码中ButtonType.Capsule表示胶囊形按钮;stateEffect用于设置按钮按下时是否开启切换效果,当状态置为false时,点击效果关闭,默认值为true。
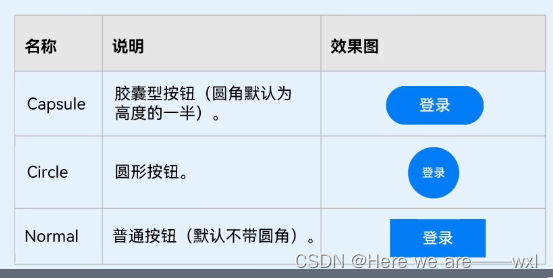
4.1 样式
Button样式枚举:
4.2 子组件
Button组件可以包含子组件,以开发出更丰富多样的Button,下面的示例代码中Button组件包含了一个Image组件:
Button({ type: ButtonType.Circle, stateEffect: true }) {Image($r('app.media.icon_delete')).width(30).height(30)
}
.width(55)
.height(55)
.backgroundColor(0x317aff)
5.LoadingProgress
LoadingProgress组件用于显示加载进展,比如应用的登录界面,当我们点击登录的时候,显示的“正在登录”的进度条状态。LoadingProgress的使用非常简单,只需要设置颜色和宽高就可以了。
LoadingProgress().color(Color.Blue).height(60).width(60)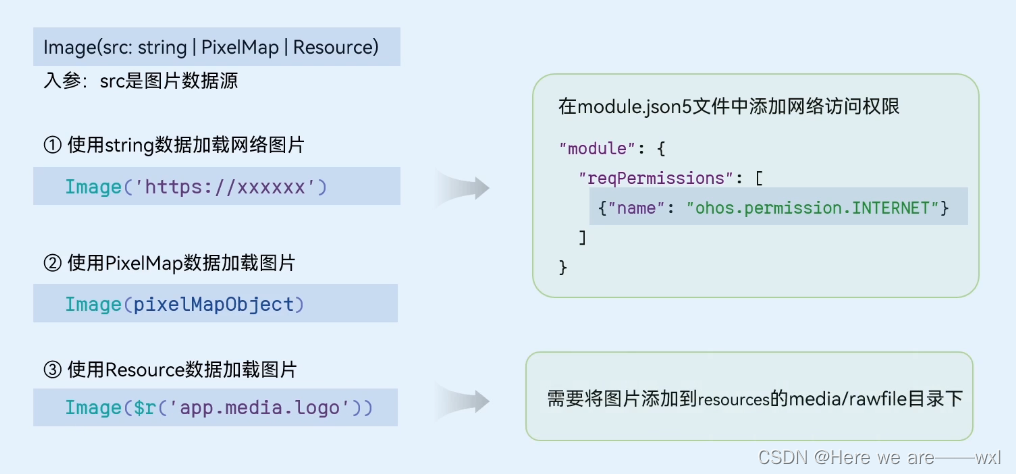





)


)

顺序表的查找)


——网络边缘)
-Part.09 安装OpenLDAP)


