前言
pytest-html 是一个用于生成漂亮的 HTML 测试报告的 pytest 插件。它可以方便地将 pytest 运行的测试结果转换为易于阅读和理解的 HTML 报告,提供了丰富的测试结果展示功能和交互性。
一、安装
# 版本查看命令
pytest版本: pytest --version
pytest-html版本: pip show pytest-html# 安装指定版本(在V3.2.0版本报告中,中文显示乱码,目前不知道什么原因)
卸载pytest-html: pip uninstall pytest-html
安装指定版本: pip install pytest-html==3.1.1# 当前演示环境版本
pytest版本:7.4.0
pytest-html版本:3.1.1
二、生成方法
1、生成默认报告
# test_run.py
import pytestdef test_A():'''执行A测试用例'''assert Truedef test_B():'''执行B测试用例'''assert Truedef test_C():'''执行C测试用例'''assert Falseif __name__ == '__main__':pytest.main(['test_run.py', '-v', '--html=./directory/report.html','--self-contained-html'])
# --html=./directory/report.html (在当前directory目录下生成普通HTML报告,CSS是独立的)
# --self-contained-html(合并CSS的HTML报告)
- 默认报告样式:

2、修改报告样式
在测试用例的同目录下新建conftest.py文件,并复制以下内容:
# conftest.py
import pytest
from py._xmlgen import html
from time import strftime# 一、修改测试报告标题
# 使用带有`optionalhook=True`的`hookimpl`装饰器
@pytest.hookimpl(optionalhook=True)
def pytest_html_report_title(report):# 设置报告标题report.title = "自动化测试报告"# 二、修改Summary部分的信息
@pytest.mark.parametrize
def pytest_html_results_summary(prefix, summary, postfix):# 添加自定义的段落信息prefix.extend([html.p("所属部门:测试组")])prefix.extend([html.p("测试人员:张三")])# 三、修改Results部分的信息
def pytest_html_results_table_header(cells):# 在索引1处插入“描述”列标题cells.insert(1, html.th('Description'))# 在索引2处插入“任务完成时间”列标题cells.insert(2, html.th('TaskCompleteTime'))# 删除最后一列“link列”cells.pop(-1)def pytest_html_results_table_row(report, cells):# 在索引1处插入报告的描述信息cells.insert(1, html.td(report.Description))# 在索引2处插入报告的任务完成时间信息cells.insert(2, html.td(report.TaskCompleteTime))# 删除最后一列“link”cells.pop(-1)@pytest.hookimpl(hookwrapper=True)
def pytest_runtest_makereport(item, call):outcome = yieldreport = outcome.get_result()# 将报告的描述信息设置为测试项的文档字符串report.Description = str(item.function.__doc__)# 将报告的任务完成时间设置为当前时间report.TaskCompleteTime = str(strftime("%Y-%m-%d %H:%M:%S"))
- 运行test_run.py生成报告:

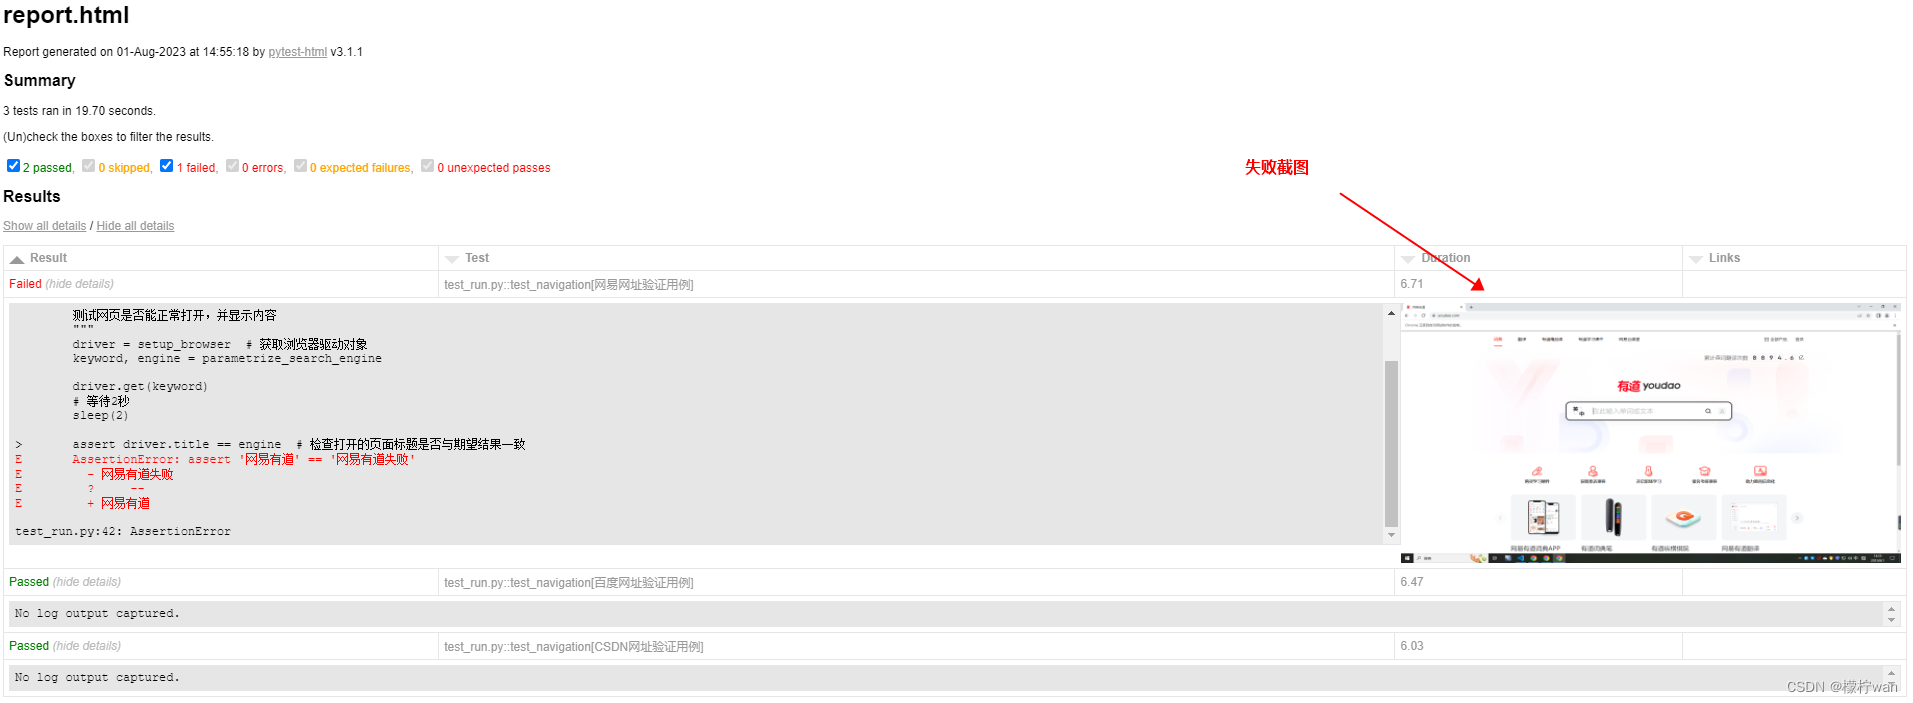
3、用例失败自动截图
# test_run.py
import pytest
from selenium import webdriver
from time import sleep@pytest.fixture(scope="function")
def setup_browser():"""设置和关闭浏览器的测试夹具"""driver = webdriver.Chrome()driver.maximize_window()yield driver  # 返回driver对象供测试使用driver.quit()  # 测试结束后关闭浏览器@pytest.fixture(params=[("https://www.baidu.com/", "百度一下,你就知道"),("https://www.csdn.net/", "CSDN - 专业开发者社区"),("https://www.youdao.com/", "网易有道失败")],ids=["百度网址验证用例", "CSDN网址验证用例", "网易网址验证用例"])
def parametrize_search_engine(request):"""参数化的搜索引擎测试夹具"""return request.paramdef test_navigation(setup_browser, parametrize_search_engine):"""测试网页是否能正常打开,并显示内容"""driver = setup_browser  # 获取浏览器驱动对象keyword, engine = parametrize_search_engine# 请求网址driver.get(keyword)# 等待2秒sleep(2)assert driver.title == engine  # 检查打开的页面标题是否与期望结果一致if __name__ == '__main__':pytest.main(['test_run.py', '-v', '--html=./directory/report.html','--self-contained-html'])
# conftest.py
import pytest
import pyautogui
import base64
import io@pytest.hookimpl(hookwrapper=True)
def pytest_runtest_makereport(item):'''pytest_runtest_makereport是一个钩子函数,用于在每个测试用例执行完成后生成测试报告item参数表示当前正在执行的测试用例'''# 获取pytest-html插件实例,用于生成HTML格式的测试报告pytest_html = item.config.pluginmanager.getplugin('html')# yield语句暂停函数的执行,并返回给调用方一个值(被yield关键字后面的值)# 当函数恢复执行时,outcome变量将接收到yield语句后面yielded的值outcome = yield# 从outcome中获取测试用例的结果报告report = outcome.get_result()# 获取report对象的extra属性,如果不存在则返回一个空列表extra = getattr(report, 'extra', [])# 如果测试用例是在"call"或"setup"阶段执行时# 也就是在测试用例被调用执行或设置阶段出现问题时if report.when == 'call' or report.when == 'setup':# 检查报告对象中是否有wasxfail属性,表示测试用例是否被标记为预期失败(xfail)xfail = hasattr(report, 'wasxfail')# 如果测试用例被跳过且是预期失败,或者测试用例执行失败且不是预期失败if (report.skipped and xfail) or (report.failed and not xfail):# 使用pyautogui库进行屏幕截图screenshot = pyautogui.screenshot()# 创建一个BytesIO对象,用于存储屏幕截图的二进制数据screenshot_buffer = io.BytesIO()# 将屏幕截图保存到BytesIO对象中,格式为PNGscreenshot.save(screenshot_buffer, format='PNG')# 使用base64对屏幕截图的二进制数据进行编码,得到base64编码后的字符串screenshot_base64 = base64.b64encode(screenshot_buffer.getvalue()).decode('utf-8')# 构建一个HTML的div元素,其中包含一个img元素,用于显示屏幕截图# 图片源使用base64编码的字符串,点击图片时可以在新窗口打开原始截图# div元素的样式设置了图片的宽度和高度,并将其右对齐html = '<div><img src="data:image/png;base64,{}" alt="screenshot" style="width:500px;height:260px;" ' \'οnclick="window.open(this.src)" align="right"/></div>'.format(screenshot_base64)# 将构建的HTML字符串添加到extra列表中,作为测试报告的额外信息extra.append(pytest_html.extras.html(html))# 将extra列表设置为报告对象report的extra属性,更新测试报告的额外信息report.extra = extra
- 运行test_run.py生成报告:

4、完整代码
# conftest.py
import pytest
from py._xmlgen import html
from time import strftime
import pyautogui
import base64
import io# 一、修改测试报告标题
@pytest.hookimpl(optionalhook=True)
def pytest_html_report_title(report):report.title = "自动化测试报告"# 二、修改Summary部分的信息
@pytest.mark.parametrize
def pytest_html_results_summary(prefix, summary, postfix):prefix.extend([html.p("所属部门:测试组")])prefix.extend([html.p("测试人员:张三")])# 三、修改Results部分的信息,并自动截取错误截图
def pytest_html_results_table_header(cells):cells.insert(1, html.th('Description'))cells.insert(2, html.th('TaskCompleteTime'))cells.pop(-1)def pytest_html_results_table_row(report, cells):cells.insert(1, html.td(report.Description))cells.insert(2, html.td(report.TaskCompleteTime))cells.pop(-1)@pytest.hookimpl(hookwrapper=True)
def pytest_runtest_makereport(item):pytest_html = item.config.pluginmanager.getplugin('html')outcome = yieldreport = outcome.get_result()report.Description = str(item.function.__doc__)report.TaskCompleteTime = str(strftime("%Y-%m-%d %H:%M:%S"))extra = getattr(report, 'extra', [])if report.when == 'call' or report.when == 'setup':xfail = hasattr(report, 'wasxfail')if (report.skipped and xfail) or (report.failed and not xfail):screenshot = pyautogui.screenshot()screenshot_buffer = io.BytesIO()screenshot.save(screenshot_buffer, format='PNG')screenshot_base64 = base64.b64encode(screenshot_buffer.getvalue()).decode('utf-8')html = '<div><img src="data:image/png;base64,{}" alt="screenshot" style="width:500px;height:260px;" ' \'οnclick="window.open(this.src)" align="right"/></div>'.format(screenshot_base64)extra.append(pytest_html.extras.html(html))report.extra = extra

——Redis哨兵模式、集群脑裂)


)
方法】)
)

增加界面显示)


)
