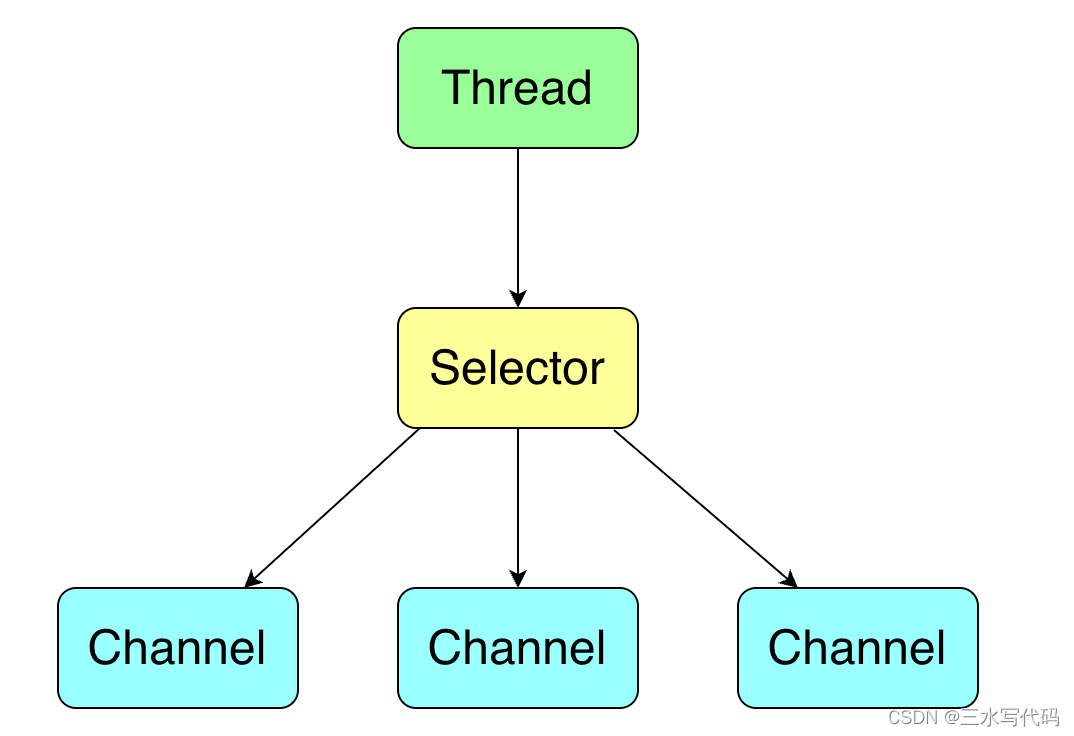
Java 从1.4开始引入NIO(New IO),是一种基于块(Block)的IO机制,也称为非阻塞IO。相比于传统的Java IO(IO流)方式,Java NIO提供了更快速、高效、灵活的IO操作。
Java NIO的核心组件包括以下几个部分:
-
Channel(通道):Channel是Java NIO的基础,代表了一个与IO设备(如文件、套接字)交互的双向通信通道。它可以读取和写入数据。Channel可以通过Selector来实现非阻塞IO操作。
-
Buffer(缓冲区):Buffer是一个用来存储数据的对象,NIO的读写操作都是基于缓冲区的。它提供一组方法来读写数据,并且在读写过程中维护缓冲区的状态信息。
-
Selector(多路复用选择器):Selector是一个用于多路复用的对象,它可以同时监控多个Channel的状态,以便在有IO事件到来时通知程序进行处理。通过Selector,可以使单个线程就可以处理多个Channel的IO操作。
-
Non-blocking IO(非阻塞IO):Java NIO提供了非阻塞IO的特性,即在等待IO操作完成时,线程不会被阻塞,可以继续执行其他任务。这样,一个线程可以同时处理多个Channel的IO操作,提高了系统的吞吐量和响应性能。
Java NIO相对于传统的Java IO方式,具有如下优势:
-
更快速的IO操作:通过使用缓冲区和非阻塞IO,Java NIO能够更高效地进行数据读写操作。
-
处理多个连接:使用Selector可以单线程处理多个连接,提高系统的并发能力和资源利用率。
-
异步IO:Java NIO还提供了一些异步IO的方式,通过回调或者Future来实现。
Channel :
java.nio.channels.Channel 是Java NIO的基础,代表了一个与IO设备(如文件、Socket)交互的通道。常用的实现类包括:
-
FileChannel : 用于读写文件中的数据,可以从文件中读取字节数据到Buffer,或将Buffer中的数据写入文件。
-
SocketChannel:用于通过 TCP 协议进行网络数据的读写操作,可以与远程Socket建立连接,并进行读写操作。
-
ServerSocketChannel:用于监听并接受客户端连接请求。
-
DatagramChannel:用于通过 UDP 协议进行网络数据的读写操作。
FileChannel 的使用:
用于读写文件中的数据,可以从文件中读取字节数据到Buffer,或将Buffer中的数据写入文件。
1、打开FileChannel
1.1 通过FileInputStream或FileOutputStream获取FileChannel
FileInputStream fis = new FileInputStream("path/to/file");
FileChannel channel = fis.getChannel();FileOutputStream fos = new FileOutputStream("path/to/file");
FileChannel channel = fos.getChannel();
1.2 通过RandomAccessFile获取FileChannel:
RandomAccessFile file = new RandomAccessFile("path/to/file", "rw");
FileChannel channel = file.getChannel();
1.3 使用java.nio.file.Files工具类获取FileChannel:open(Path path, OpenOption... options)
Path path = Paths.get("path/to/file");
FileChannel channel = FileChannel.open(path, StandardOpenOption.READ);
Java中的Files类是java.nio.file包提供的一个实用工具类,用于进行文件和目录的各种操作。它包含了大量的静态方法,用于操作文件、目录、路径等。Files类的一些常用方法:
Path path = Paths.get("path/to/file");// 判断文件或目录是否存在:exists(Path path)
boolean exists = Files.exists(path);// 创建文件:createFile(Path path, FileAttribute<?>... attrs)
Files.createFile(path);// 删除文件或目录:delete(Path path)
Files.delete(path);// 创建目录:createDirectory(Path dir, FileAttribute<?>... attrs)
Path dir = Paths.get("path/to/directory");
Files.createDirectory(dir);Path source = Paths.get("path/to/source");
Path target = Paths.get("path/to/target");
// 复制文件或目录:copy(Path source, Path target, CopyOption... options)
Files.copy(source, target);// 移动/重命名文件或目录:move(Path source, Path target, CopyOption... options)
Files.move(source, target);// 写入内容到文件:writeString(Path path, CharSequence csq, Charset charset, OpenOption... options)
String content = "Hello, World!";
Files.writeString(path, content, StandardCharsets.UTF_8);// 获取文件属性:readAttributes(Path path, Class<A> type, LinkOption... options)
BasicFileAttributes attributes = Files.readAttributes(path, BasicFileAttributes.class);
1.4 通过java.nio.file.FileSystems工具类获取FileChannel
// 返回代表默认文件系统的FileSystem对象
FileSystem fs = FileSystems.getDefault();
Path path = fs.getPath("path/to/file");
FileChannel channel = FileChannel.open(path, StandardOpenOption.WRITE);
FileSystems类提供了一些方便的方法,用于获取默认文件系统、根据URI或Path构建文件系统以及获取文件系统提供程序。它们可以用于实现更灵活多样的文件系统操作。需要注意的是,使用FileSystems类时,需要考虑安全性、权限和适用性等因素,以确保操作正确可靠。如:
// 根据URI获取文件系统 newFileSystem(URI uri, Map<String, ?> env)
URI uri = new URI("file:/path/to/directory/");
FileSystem fs = FileSystems.newFileSystem(uri, null);//根据Path获取文件系统 newFileSystem(Path path, ClassLoader loader)
Path path = Paths.get("/path/to/jarfile.jar");
FileSystem fs2 = FileSystems.newFileSystem(path, null);// 获取支持的文件系统提供程序:newFileSystemProvider(Class<? extends FileSystem> type)
FileSystemProvider provider = FileSystems.newFileSystemProvider(FTPFileSystem.class);
1.5 通过FileDescriptor获取FileChannel
FileInputStream fis = new FileInputStream("path/to/file");
FileDescriptor fd = fis.getFD();
FileChannel channel = new FileInputStream(fd).getChannel();
在Java中,FileDescriptor类表示一个文件描述符,它是与底层操作系统文件句柄相关联的标识符。FileDescriptor主要用于在Java程序中直接操作底层文件句柄,例如创建FileInputStream、FileOutputStream等。
2、从FileChannel读取数据到缓冲区
// 创建一个大小为1024 bit 的缓冲区
ByteBuffer buffer = ByteBuffer.allocate(1024);
// FileChannel 数据读到缓冲区
int bytesRead = channel.read(buffer);
3、将数据从缓冲区写入到FileChannel
// flip() 将缓冲区 读/写 模式切换
buffer.flip();
while (buffer.hasRemaining()) {channel.write(buffer);
}
buffer.clear();
4、关闭FileChannel
channel.close();5、其它操作
- 移动FileChannel的位置:
// 移动文件指针位置到当前位置后的50个字节 long newPosition = channel.position() + 50; channel.position(newPosition); - 截断文件(截短或扩展文件长度)
channel.truncate(1024); // 将文件截断为1024个字节 - 强制将FileChannel的内容刷新到磁盘:
channel.force(true); // 强制刷新文件数据到磁盘
2、SocketChannel 使用
SocketChannel是用于进行套接字通信的重要组件,它提供了非阻塞的、基于缓冲区的I/O操作。你可以使用SocketChannel来建立连接、发送和接收数据,以及关闭连接等操作。
// 打开一个SocketChannel实例
SocketChannel socketChannel = SocketChannel.open();
// 切换为非阻塞模式
channel.configureBlocking(false);// 连接远程服务器:使用connect()方法连接到远程服务器
InetSocketAddress remoteAddress = new InetSocketAddress("127.0.0.1", 9001);
socketChannel.connect(remoteAddress);while (!socketChannel.finishConnect()) { // 等待连接完成// 写入数据到SocketChannelByteBuffer buffer = ByteBuffer.allocate(1024);buffer.put("要发送的数据".getBytes());buffer.flip();  // 将缓冲区切换为读模式socketChannel.write(buffer);// 从SocketChannel中读取数据到ByteBufferByteBuffer buffer2 = ByteBuffer.allocate(1024);int bytesRead = channel.read(buffer2);
}channel.close();
3、ServerSocketChannel 使用
ServerSocketChannel是一种用于监听传入连接的通道。它作为服务器端通道,用于接受客户端的连接请求。
// 打开ServerSocketChannel
ServerSocketChannel serverChannel = ServerSocketChannel.open();
// 切换为非阻塞模式 [根据情况选择是否要这么处理]
serverChannel.configureBlocking(false);//绑定端口和地址
serverChannel.bind(new InetSocketAddress("localhost", 8080));// 接受客户端的连接请求。该方法默认会阻塞,直到有客户端连接到达,返回一个SocketChannel对象
// 如果切换到了非阻塞, 这里就不会阻塞
SocketChannel clientChannel = serverChannel.accept();serverChannel.close();
4、DatagramChannel 使用
DatagramChannel是一种用于进行UDP协议通信的通道。它可以发送和接收UDP数据报
// 打开DatagramChannel
DatagramChannel channel = DatagramChannel.open();// 绑定IP和端口
channel.bind(new InetSocketAddress("localhost", 8080));// 该方法会阻塞,直到接收到数据报,返回一个SocketAddress和接收到的数据报的数量
ByteBuffer buffer = ByteBuffer.allocate(1024);
SocketAddress address = channel.receive(buffer);//发送数据
ByteBuffer buffer = ByteBuffer.allocate(1024);
buffer.put("Hello, Server!".getBytes());
buffer.flip();
int bytesSent = channel.send(buffer, new InetSocketAddress("example.com", 8080));// 配置阻塞模式, 默认情况下是阻塞模式
channel.configureBlocking(true);channel.close();
Buffer :
Buffer介绍:
java.nio.Buffer 用于读写数据,是Java NIO读写操作的中间容器。数据从通道读入缓冲区,从缓冲区写入通道。

缓冲区本质上是一块可以写入和读取数据的内存,这块内存被包装成NIO Buffer对象,并提供了一组方法,用来方便该块的内存访问。缓冲区实际上就是一个容器对象/数组。
-
常用的Buffer子类包括:
-
ByteBuffer:ByteBuffer是最常用的Buffer实现类,用于读写字节数据。
-
CharBuffer:用于读写字符数据
-
ShortBuffer/ IntBuffer/ LongBuffer/ FloatBuffer/ DoubleBuffer:用于读写特定类型数据
-
-
Buffer的主要特性:
- 容量(Capacity):缓冲区的容量表示它可以存储的最大数据量,一旦缓冲区被创建,其容量不能更改。
- 位置(Position):读写操作的位置,表示下一个要读取或写入的元素的索引
-
上界(Limit):缓冲区当前有效数据的边界,即下一个要读取或写入的元素的索引。
-
标记(Mark):记住某个特定位置的索引,可以通过
mark()和reset()方法来返回该位置。 -
读写模式切换:缓冲区可以处于读模式(读取数据到缓冲区)或写模式(将数据从缓冲区写出)。
Buffer使用:
1、创建Buffer,分配空间:通过调用Buffer的静态方法allocate()来分配指定容量的缓冲区。
// 分配一个容量为1024字节的ByteBuffer实例
ByteBuffer buffer = ByteBuffer.allocate(1024);
2、写入数据到缓冲区:使用Buffer的put()方法将数据写入缓冲区
// 写入一个字节数据到缓冲区
buffer.put((byte) 65);
3、转换为读模式:通过调用Buffer的flip()方法,将Buffer切换为读取模式。在读模式下,可以读取缓冲区中的数据。
// 切换为读取模式
buffer.flip();
4、从缓冲区读取数据:使用Buffer的get()方法读取缓冲区中的数据。
// 从缓冲区读取一个字节数据
byte data = buffer.get();
5、重复读取:Buffer的rewind()方法将缓冲区切换为读模式,但保留之前读取到的数据。然后再次使用get()方法读取数据。
// 重复读取前需要调用rewind()方法
buffer.rewind(); // 重新读取一个字节数据
byte data = buffer.get();
6、清空缓冲区:
- clear()方法,将Buffer切换为写入模式,并清空缓冲区的数据。在写入模式下,可以写入新的数据;
- compact()方法:相比clear()方法,compact()方法会清除已经读取的数据,但是会保留未读取的数据。未读取的数据会被移动到缓冲区的开头,可以继续写入新的数据。
Buffer的其他API:
- int capacity() : 获取缓冲区的大小
- int limit() :获取缓冲区的限制位置,即缓冲区中可读写的数据范围。写入模式下,默认等于缓冲区的容量;读取模式下,默认等于写入模式下的位置
- Buffer limit( int newLimit):设置缓冲区的限制位置
- int position() : 获取缓冲区的当前位置,即读取或写入数据的位置
- Buffer position( int newPosition):设置当前位置的绝对位置
- boolean hasRemaining() : 判断缓冲区是否还有未读取的数据
- void mark(): 将当前位置设置为标记位置
- void reset() : 重置位置为标记位置
- void flip() : 切换为读取模式
- void clear() :清空缓冲区,切换为写入模式
- void compact() : 压缩缓冲区,将未读取的数据移到开头
- void rewind() : 重绕缓冲区,切换为读取模式
Selector:
java.nio.channels.Selector 是一种用于多路复用的对象,用于管理多个通道的I/O事件。它允许单个线程同时监视多个通道,以及在有准备就绪的通道上进行读写操作,从而提高系统的性能和可伸缩性。

Selector的工作原理如下:
-
首先,通过Selector.open()创建一个Selector实例。
-
然后,将需要进行IO操作的通道注册到Selector上,通过调用通道的register()方法完成注册,此时Selector上生成一个SelectionKey。通道是抽象类SelectableChannel,其子类有: SocketChannel、ServerSocketChannel、DatagramChannel 等。
-
Selector调用select()方法进行阻塞,等待注册的通道中有事件发生。当有一个或多个通道有事件发生时,select()方法返回,并返回发生事件的通道的数量。
-
根据返回的数量,可以通过selectedKeys()方法获取发生事件的通道的集合,然后进行相应的IO操作。
-
建议在处理完一个通道的事件后,调用selectedKeys()的remove()方法将该通道从集合中移除,以避免重复处理。
Selector使用示例:
Selector selector = Selector.open();
SelectableChannel channel = SocketChannel.open();
channel.configureBlocking(false); // 非阻塞模式
SelectionKey key = channel.register(selector, SelectionKey.OP_READ);while (true) {int readyChannels = selector.select();if (readyChannels == 0) {continue;}Set<SelectionKey> selectedKeys = selector.selectedKeys();Iterator<SelectionKey> keyIterator = selectedKeys.iterator();while (keyIterator.hasNext()) {SelectionKey key = keyIterator.next();if (key.isReadable()) {// 处理可读事件// ...}keyIterator.remove();}
}
Selector API
static Selector open(): 创建一个新的Selector对象。int select(): 阻塞等待就绪的通道,返回已就绪通道的数量int select(long timeout): 最多阻塞timeout毫秒,等待就绪的通道int selectNow(): 非阻塞立即返回就绪的通道数量Set<SelectionKey> selectedKeys(): 获取就绪通道的SelectionKey集合Set<SelectionKey> keys(): 获取所有注册通道的SelectionKey集合- Selector wakeup() :唤醒其他阻塞线程的 select 方法立刻执行并返回
- void close() :关闭Selector
其它与Selector相关的API
Selector 的使用过程中, SelectableChannel 和 SelectionKey 一直贯穿着Selector的始终,SelectableChannel 是注册进Selector的通道, SelectionKey 是通道注册进Selector后生成对象,里面包含了通道注册信息和进程状态信息。
- SelectableChannel 的 API :
- SelectionKey register(Selector sel, int ops):将通道注册到Selector上,同时指定关注的事件类型,常用的时间类型有:
- SelectionKey.OP_READ = 1 << 0:读事件
- SelectionKey.OP_WRITE = 1 << 2:写事件
- SelectionKey.OP_CONNECT = 1 << 3:连接事件
- SelectionKey.OP_ACCEPT = 1 << 4 :接收事件
- SelectableChannel configureBlocking(boolean block) : 设置通道为【非】阻塞模
- boolean isRegistered(): 判断通道是否已经注册到Selector上
- boolean isBlocking() : 通道是否阻塞
- SelectionKey keyFor(Selector sel) :返回通道在Selector中最后一次注册的信息
- Object blockingLock() :返回的是通道对象关联的锁对象,用于同步操作阻塞模式切换。它并不是用于直接控制通道的阻塞/非阻塞状态。
- SelectionKey register(Selector sel, int ops):将通道注册到Selector上,同时指定关注的事件类型,常用的时间类型有:
- SelectionKey 的API :SelectionKey类表示一个通道在选择器上的注册信息。
- SelectableChannel channel() : 获取关联的通道
- Selector selector() :获取关联的选择器
- boolean isReadable() | isWritable() | isConnectable() | isAcceptable() : 判断通道是否可读、写、连接、接受连接
- int readyOps() : 获取准备就绪的操作集合
- int interestOps() : 获取所有注册的操作集合
- SelectionKey interestOps(int ops) : 修改操作集合
- void cancel() : 取消注册
- Object attach(Object ob) : 这是关联的附加对象
- Object attachment() : 获取关联的附加对象
Scatter/Gather
Java NIO(New I/O)中的Scatter/Gather是一种用于处理I/O操作的重要模式,通过将数据分散读取(Scatter Read)或聚集写入(Gather Write),可以有效地处理复杂的数据结构。在Scatter/Gather模式下,可以一次性读取多个数据块到多个缓冲区,或将多个缓冲区中的数据一次性写入到目标通道。
1. Scatter Read(分散读取)
- 使用多个缓冲区准备好接收数据。
- 调用通道的read()方法,将数据按照缓冲区的顺序依次读取到各个缓冲区中。
ByteBuffer buffer1 = ByteBuffer.allocate(64);
ByteBuffer buffer2 = ByteBuffer.allocate(128);
ByteBuffer[] buffers = { buffer1, buffer2 };channel.read(buffers);
2. Gather Write(聚集写入)
- 使用多个缓冲区存储要写入的数据。
- 调用通道的write()方法,将多个缓冲区中的数据一起写入到目标通道。
ByteBuffer buffer1 = ByteBuffer.allocate(64);
ByteBuffer buffer2 = ByteBuffer.allocate(128);
ByteBuffer[] buffers = { buffer1, buffer2 };channel.write(buffers);
Scatter/Gather模式可以用于处理复杂的数据结构,例如由多个部分组成的消息。通过Scatter将数据分散到多个缓冲区,可以对消息的各个部分进行独立处理。而通过Gather将多个缓冲区中的数据聚集写入到目标通道,可以将多个部分组装成完整的消息并进行发送。
需要注意的是,Scatter/Gather模式依赖于底层通道的能力支持。并非所有的通道都支持Scatter/Gather操作,只有实现了`ReadableByteChannel`(可读通道)或`WritableByteChannel`(可写通道)接口的通道才能进行Scatter/Gather操作。
总结:
Java NIO还提供了其他一些类和接口,如FileLock、MappedByteBuffer、Pipe等,用于实现更复杂的IO操作和功能。
需要注意的是,Java NIO的使用与传统的Java IO方式有很大的区别,它对于开发者而言更加复杂。但在高并发、大规模等场景下,Java NIO可以提供更好的性能和可扩展性。
| IO | NIO |
|---|---|
| 面向流(Stream Oriented) | 面向缓冲区(Buffer Oriented) |
| 阻塞IO | 非阻塞IO |
| (无) | 选择器(Selectors) |


)


-----Windows窗体应用和Windows窗体应用(.Net Framework)有啥区别?)

(答案))

.then中return值对.then执行顺序的影响)


)