导出onnx文件
直接使用脚本
import torch
from mmdet.apis import init_detector, inference_detectorconfig_file = './configs/yolox/yolox_tiny_8xb8-300e_coco.py'
checkpoint_file = 'yolox_tiny_8x8_300e_coco_20211124_171234-b4047906.pth'
model = init_detector(config_file, checkpoint_file, device='cpu')  # or device='cuda:0'
torch.onnx.export(model, (torch.zeros(1, 3, 416, 416),), "yolox.onnx", opset_version=11)
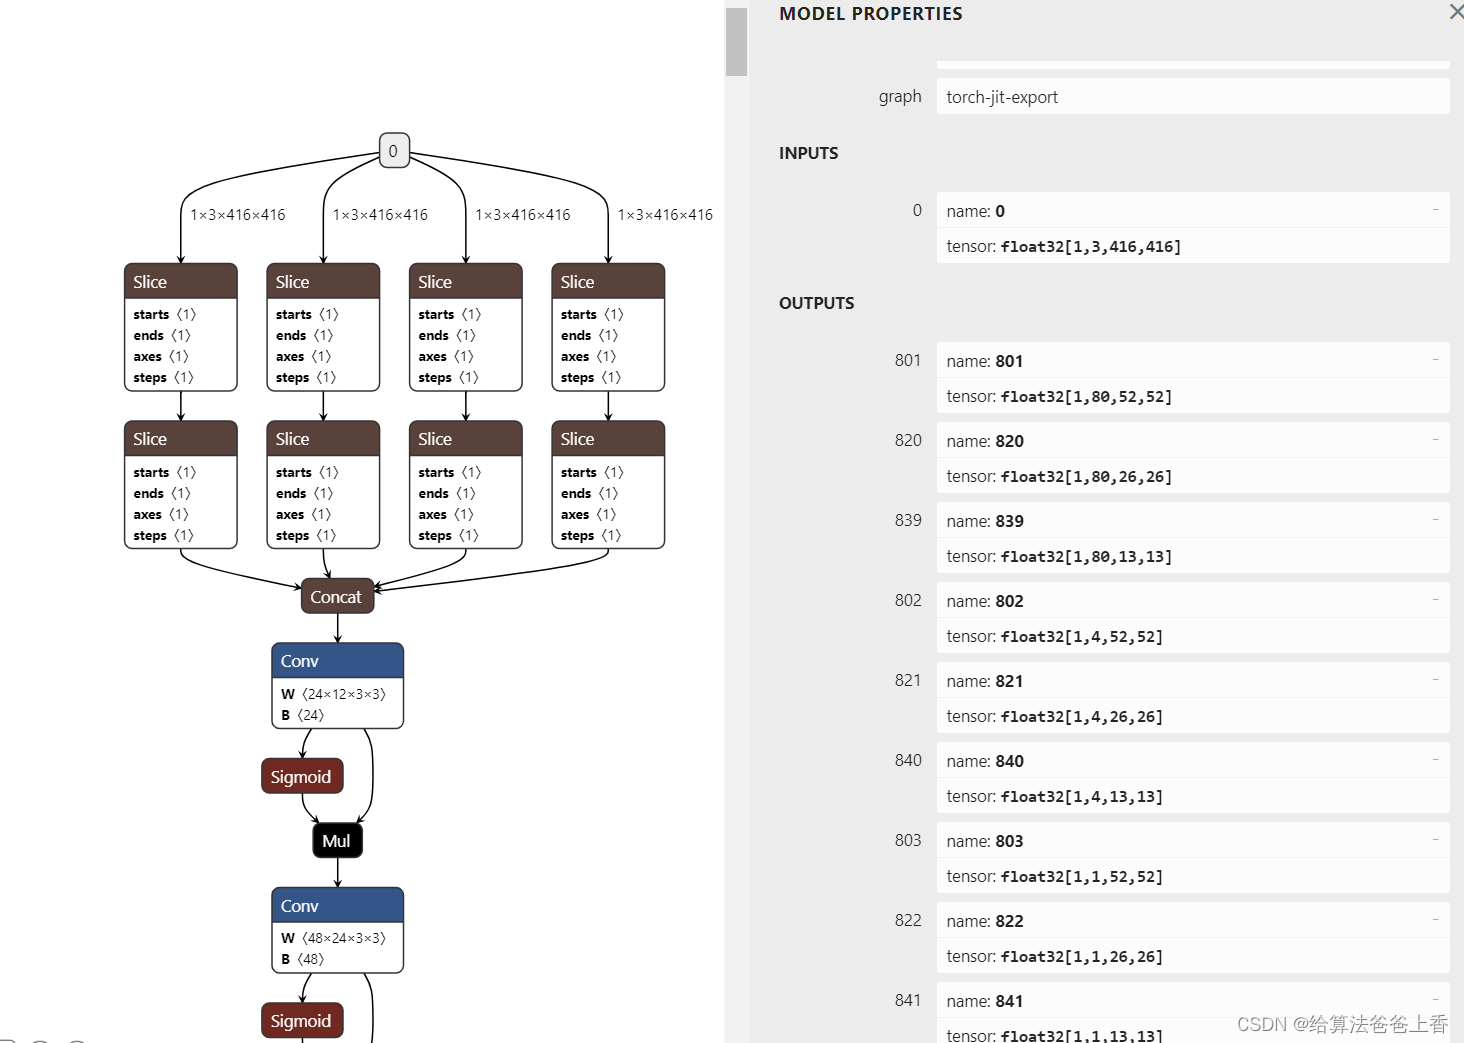
导出的onnx结构如下:

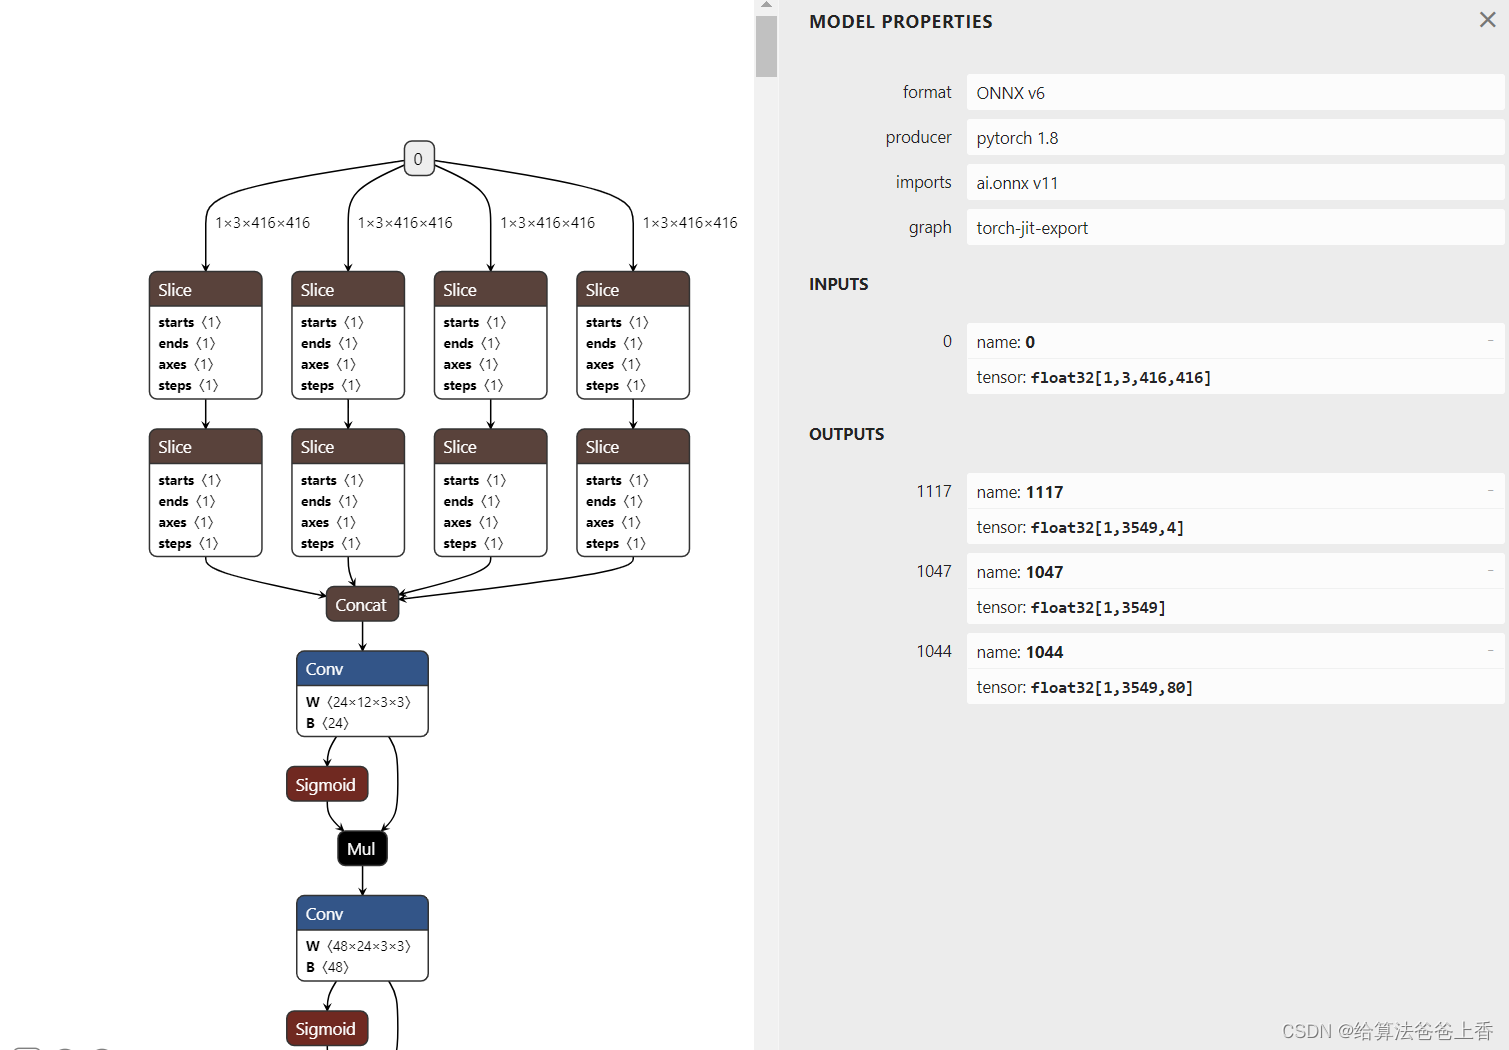
输出是包含多个检测头的输出。若需要合并检测结果,需要修改脚本如下:
import torch
import cv2
import numpy as np
from mmdet.apis import init_detector, inference_detectorconfig_file = './configs/yolox/yolox_tiny_8xb8-300e_coco.py'
checkpoint_file = 'yolox_tiny_8x8_300e_coco_20211124_171234-b4047906.pth'
model = init_detector(config_file, checkpoint_file, device='cpu')  # or device='cuda:0'class YOLOX(torch.nn.Module):def __init__(self):super().__init__()self.model = init_detector(config_file, checkpoint_file, device='cpu')self.class_num = 80self.strides = [(8, 8), (16, 16), (32, 32)]def _meshgrid(self, x, y):yy, xx = torch.meshgrid(y, x)return xx.reshape(-1), yy.reshape(-1)def grid_priors(self, featmap_sizes):multi_level_priors = []for i in range(len(featmap_sizes)):feat_h, feat_w = featmap_sizes[i]stride_w, stride_h = self.strides[i]shift_x = torch.arange(0, feat_w) * stride_wshift_y = torch.arange(0, feat_h) * stride_hshift_xx, shift_yy = self._meshgrid(shift_x, shift_y)stride_w = shift_xx.new_full((shift_xx.shape[0], ), stride_w)stride_h = shift_xx.new_full((shift_yy.shape[0], ), stride_h)shifts = torch.stack([shift_xx, shift_yy, stride_w, stride_h], dim=-1)       multi_level_priors.append(shifts)return multi_level_priorsdef bbox_decode(self, priors, bbox_preds):xys = (bbox_preds[..., :2] * priors[:, 2:]) + priors[:, :2]whs = bbox_preds[..., 2:].exp() * priors[:, 2:]tl_x = (xys[..., 0] - whs[..., 0] / 2)tl_y = (xys[..., 1] - whs[..., 1] / 2)br_x = (xys[..., 0] + whs[..., 0] / 2)br_y = (xys[..., 1] + whs[..., 1] / 2)decoded_bboxes = torch.stack([tl_x, tl_y, br_x, br_y], -1)return decoded_bboxesdef forward(self, x):x = self.model.backbone(x)x = self.model.neck(x)pred_maps = self.model.bbox_head(x)cls_scores, bbox_preds, objectnesses = pred_maps       featmap_sizes = [cls_score.shape[2:] for cls_score in cls_scores]      mlvl_priors = self.grid_priors(featmap_sizes)flatten_cls_scores = [cls_score.permute(0, 2, 3, 1).reshape(1, -1, self.class_num) for cls_score in cls_scores]flatten_bbox_preds = [bbox_pred.permute(0, 2, 3, 1).reshape(1, -1, 4) for bbox_pred in bbox_preds]flatten_objectness = [objectness.permute(0, 2, 3, 1).reshape(1, -1) for objectness in objectnesses]flatten_cls_scores = torch.cat(flatten_cls_scores, dim=1).sigmoid()flatten_bbox_preds = torch.cat(flatten_bbox_preds, dim=1)flatten_objectness = torch.cat(flatten_objectness, dim=1).sigmoid()flatten_priors = torch.cat(mlvl_priors)flatten_bboxes = self.bbox_decode(flatten_priors, flatten_bbox_preds)return flatten_bboxes, flatten_objectness, flatten_cls_scoresmodel = YOLOX().eval()
input = torch.zeros(1, 3, 416, 416, device='cpu')
torch.onnx.export(model, input, "yolox.onnx", opset_version=11)
导出的onnx结构如下:

安装mmdeploy的话,可以通过下面脚本导出onnx模型。
from mmdeploy.apis import torch2onnx
from mmdeploy.backend.sdk.export_info import export2SDKimg = 'bus.jpg'
work_dir = './work_dir/onnx/yolox'
save_file = './end2end.onnx'
deploy_cfg = 'mmdeploy/configs/mmdet/detection/detection_onnxruntime_dynamic.py'
model_cfg = 'mmdetection/configs/yolox/yolox_tiny_8xb8-300e_coco.py'
model_checkpoint = 'checkpoints/yolox_tiny_8x8_300e_coco_20211124_171234-b4047906.pth'
device = 'cpu'# 1. convert model to onnx
torch2onnx(img, work_dir, save_file, deploy_cfg, model_cfg, model_checkpoint, device)# 2. extract pipeline info for sdk use (dump-info)
export2SDK(deploy_cfg, model_cfg, work_dir, pth=model_checkpoint, device=device)
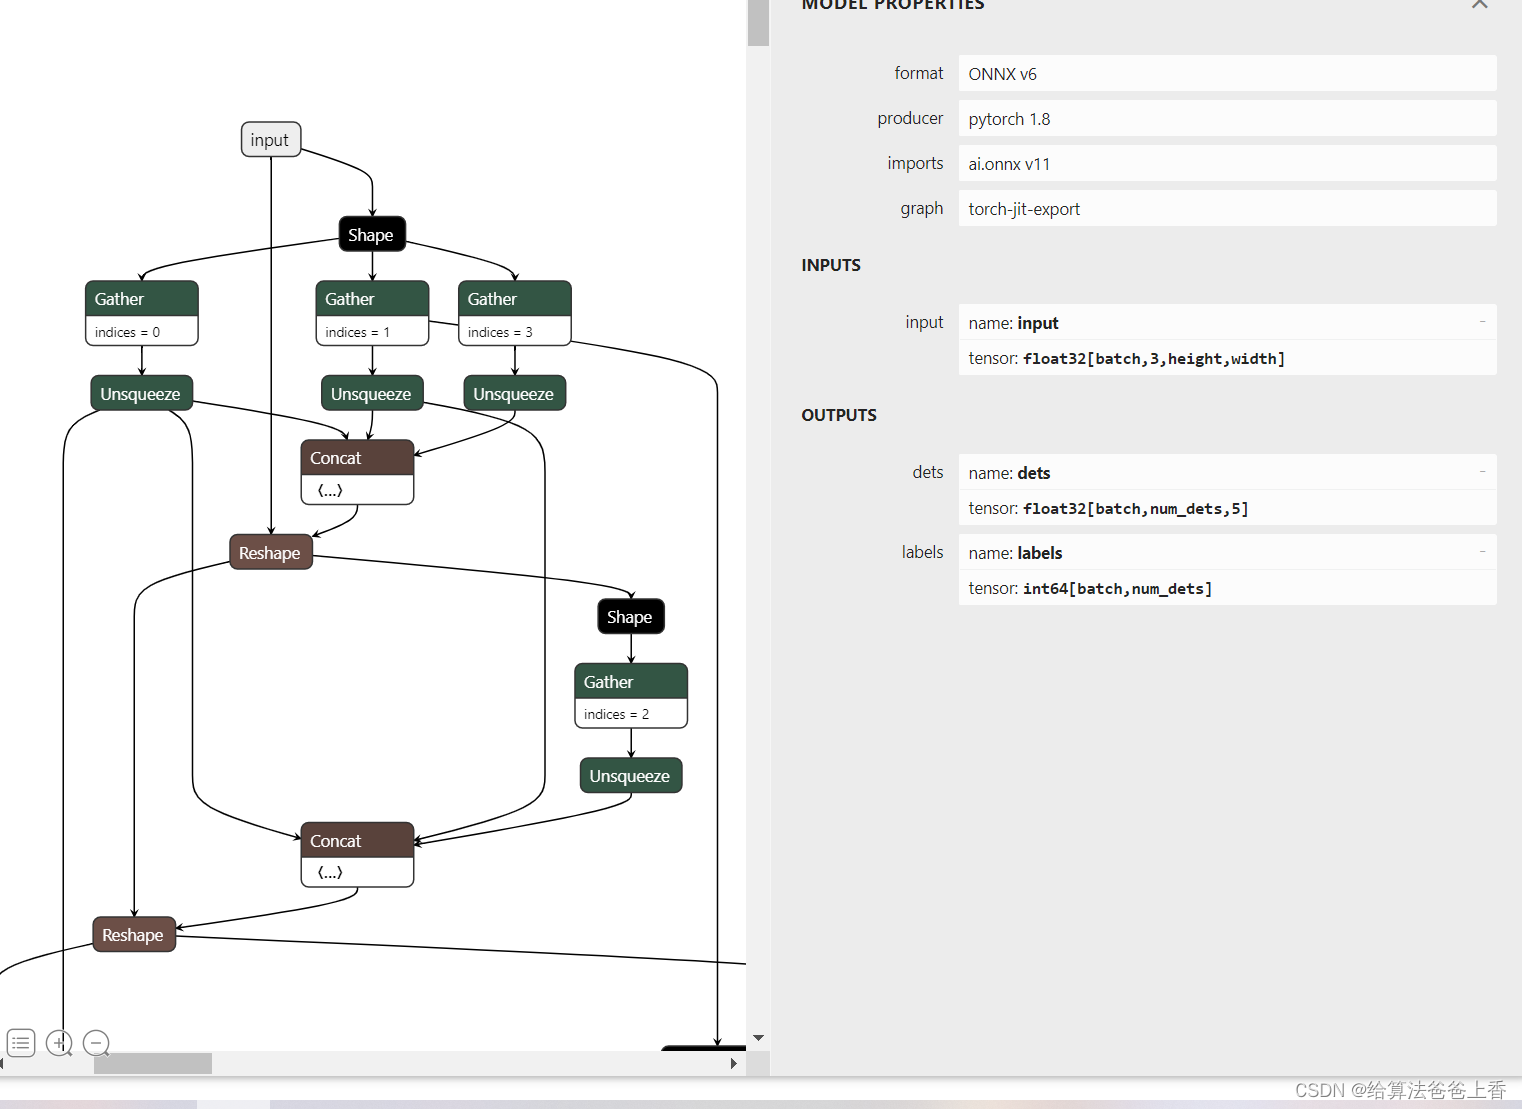
onnx模型的结构如下:
onnxruntime推理
手动导出的onnx模型使用onnxruntime推理:
import cv2
import numpy as np
import onnxruntimeclass_names = ['person', 'bicycle', 'car', 'motorcycle', 'airplane', 'bus', 'train', 'truck', 'boat', 'traffic light','fire hydrant', 'stop sign', 'parking meter', 'bench', 'bird', 'cat', 'dog', 'horse', 'sheep', 'cow','elephant', 'bear', 'zebra', 'giraffe', 'backpack', 'umbrella', 'handbag', 'tie', 'suitcase', 'frisbee','skis', 'snowboard', 'sports ball', 'kite', 'baseball bat', 'baseball glove', 'skateboard', 'surfboard','tennis racket', 'bottle', 'wine glass', 'cup', 'fork', 'knife', 'spoon', 'bowl', 'banana', 'apple','sandwich', 'orange', 'broccoli', 'carrot', 'hot dog', 'pizza', 'donut', 'cake', 'chair', 'couch','potted plant', 'bed', 'dining table', 'toilet', 'tv', 'laptop', 'mouse', 'remote', 'keyboard', 'cell phone','microwave', 'oven', 'toaster', 'sink', 'refrigerator', 'book', 'clock', 'vase', 'scissors', 'teddy bear','hair drier', 'toothbrush'] #coco80类别
input_shape = (416, 416)
score_threshold = 0.2
nms_threshold = 0.5
confidence_threshold = 0.2   def nms(boxes, scores, score_threshold, nms_threshold):x1 = boxes[:, 0]y1 = boxes[:, 1]x2 = boxes[:, 2]y2 = boxes[:, 3]areas = (y2 - y1 + 1) * (x2 - x1 + 1)keep = []index = scores.argsort()[::-1] while index.size > 0:i = index[0]keep.append(i)x11 = np.maximum(x1[i], x1[index[1:]]) y11 = np.maximum(y1[i], y1[index[1:]])x22 = np.minimum(x2[i], x2[index[1:]])y22 = np.minimum(y2[i], y2[index[1:]])w = np.maximum(0, x22 - x11 + 1)                              h = np.maximum(0, y22 - y11 + 1) overlaps = w * hious = overlaps / (areas[i] + areas[index[1:]] - overlaps)idx = np.where(ious <= nms_threshold)[0]index = index[idx + 1]return keepdef filter_box(outputs): outputs0, outputs1, outputs2 = outputsflag = outputs1 > confidence_thresholdoutput0 = outputs0[flag].reshape(-1, 4)output1 = outputs1[flag].reshape(-1, 1)classes_scores = outputs2[flag].reshape(-1, 80)outputs = np.concatenate((output0, output1, classes_scores), axis=1)boxes = []scores = []class_ids = []for i in range(len(classes_scores)):class_id = np.argmax(classes_scores[i])outputs[i][4] *= classes_scores[i][class_id]outputs[i][5] = class_idif outputs[i][4] > score_threshold:boxes.append(outputs[i][:6])scores.append(outputs[i][4])class_ids.append(outputs[i][5])boxes = np.array(boxes)scores = np.array(scores)indices = nms(boxes, scores, score_threshold, nms_threshold) output = boxes[indices]return outputdef letterbox(im, new_shape=(416, 416), color=(114, 114, 114)):# Resize and pad image while meeting stride-multiple constraintsshape = im.shape[:2]  # current shape [height, width]# Scale ratio (new / old)r = min(new_shape[0] / shape[0], new_shape[1] / shape[1])# Compute paddingnew_unpad = int(round(shape[1] * r)), int(round(shape[0] * r))    dw, dh = (new_shape[1] - new_unpad[0])/2, (new_shape[0] - new_unpad[1])/2  # wh padding top, bottom = int(round(dh - 0.1)), int(round(dh + 0.1))left, right = int(round(dw - 0.1)), int(round(dw + 0.1))if shape[::-1] != new_unpad:  # resizeim = cv2.resize(im, new_unpad, interpolation=cv2.INTER_LINEAR)im = cv2.copyMakeBorder(im, top, bottom, left, right, cv2.BORDER_CONSTANT, value=color)  # add borderreturn imdef scale_boxes(boxes, shape):# Rescale boxes (xyxy) from input_shape to shapegain = min(input_shape[0] / shape[0], input_shape[1] / shape[1])  # gain  = old / newpad = (input_shape[1] - shape[1] * gain) / 2, (input_shape[0] - shape[0] * gain) / 2  # wh paddingboxes[..., [0, 2]] -= pad[0]  # x paddingboxes[..., [1, 3]] -= pad[1]  # y paddingboxes[..., :4] /= gainboxes[..., [0, 2]] = boxes[..., [0, 2]].clip(0, shape[1])  # x1, x2boxes[..., [1, 3]] = boxes[..., [1, 3]].clip(0, shape[0])  # y1, y2return boxesdef draw(image, box_data):box_data = scale_boxes(box_data, image.shape)boxes = box_data[...,:4].astype(np.int32) scores = box_data[...,4]classes = box_data[...,5].astype(np.int32)for box, score, cl in zip(boxes, scores, classes):top, left, right, bottom = boxcv2.rectangle(image, (top, left), (right, bottom), (255, 0, 0), 1)cv2.putText(image, '{0} {1:.2f}'.format(class_names[cl], score), (top, left), cv2.FONT_HERSHEY_SIMPLEX, 0.6, (0, 0, 255), 1)if __name__=="__main__":image = cv2.imread('bus.jpg')input = letterbox(image, input_shape)input = cv2.resize(image, input_shape)input = input[:, :, ::-1].transpose(2, 0, 1).astype(dtype=np.float32)  #BGR2RGB和HWC2CHWinput = np.expand_dims(input, axis=0)onnx_session = onnxruntime.InferenceSession('yolox.onnx', providers=['CPUExecutionProvider'])input_name = []for node in onnx_session.get_inputs():input_name.append(node.name)output_name = []for node in onnx_session.get_outputs():output_name.append(node.name)inputs = {}for name in input_name:inputs[name] = inputoutputs = onnx_session.run(None, inputs)boxes = filter_box(outputs)draw(image, boxes)cv2.imwrite('result.jpg', image)
mmdeploy导出的onnx模型使用onnxruntime推理:
import cv2
import numpy as np
import onnxruntimeclass_names = ['person', 'bicycle', 'car', 'motorcycle', 'airplane', 'bus', 'train', 'truck', 'boat', 'traffic light','fire hydrant', 'stop sign', 'parking meter', 'bench', 'bird', 'cat', 'dog', 'horse', 'sheep', 'cow','elephant', 'bear', 'zebra', 'giraffe', 'backpack', 'umbrella', 'handbag', 'tie', 'suitcase', 'frisbee','skis', 'snowboard', 'sports ball', 'kite', 'baseball bat', 'baseball glove', 'skateboard', 'surfboard','tennis racket', 'bottle', 'wine glass', 'cup', 'fork', 'knife', 'spoon', 'bowl', 'banana', 'apple','sandwich', 'orange', 'broccoli', 'carrot', 'hot dog', 'pizza', 'donut', 'cake', 'chair', 'couch','potted plant', 'bed', 'dining table', 'toilet', 'tv', 'laptop', 'mouse', 'remote', 'keyboard', 'cell phone','microwave', 'oven', 'toaster', 'sink', 'refrigerator', 'book', 'clock', 'vase', 'scissors', 'teddy bear','hair drier', 'toothbrush'] #coco80类别
input_shape = (416, 416)
confidence_threshold = 0.2def filter_box(outputs): #删除置信度小于confidence_threshold的BOXflag = outputs[0][..., 4] > confidence_thresholdboxes = outputs[0][flag] class_ids = outputs[1][flag].reshape(-1, 1) output = np.concatenate((boxes, class_ids), axis=1)  return outputdef letterbox(im, new_shape=(416, 416), color=(114, 114, 114)):# Resize and pad image while meeting stride-multiple constraintsshape = im.shape[:2]  # current shape [height, width]# Scale ratio (new / old)r = min(new_shape[0] / shape[0], new_shape[1] / shape[1])# Compute paddingnew_unpad = int(round(shape[1] * r)), int(round(shape[0] * r))    dw, dh = (new_shape[1] - new_unpad[0])/2, (new_shape[0] - new_unpad[1])/2  # wh padding top, bottom = int(round(dh - 0.1)), int(round(dh + 0.1))left, right = int(round(dw - 0.1)), int(round(dw + 0.1))if shape[::-1] != new_unpad:  # resizeim = cv2.resize(im, new_unpad, interpolation=cv2.INTER_LINEAR)im = cv2.copyMakeBorder(im, top, bottom, left, right, cv2.BORDER_CONSTANT, value=color)  # add borderreturn imdef scale_boxes(input_shape, boxes, shape):# Rescale boxes (xyxy) from input_shape to shapegain = min(input_shape[0] / shape[0], input_shape[1] / shape[1])  # gain  = old / newpad = (input_shape[1] - shape[1] * gain) / 2, (input_shape[0] - shape[0] * gain) / 2  # wh paddingboxes[..., [0, 2]] -= pad[0]  # x paddingboxes[..., [1, 3]] -= pad[1]  # y paddingboxes[..., :4] /= gainboxes[..., [0, 2]] = boxes[..., [0, 2]].clip(0, shape[1])  # x1, x2boxes[..., [1, 3]] = boxes[..., [1, 3]].clip(0, shape[0])  # y1, y2return boxesdef draw(image, box_data):box_data = scale_boxes(input_shape, box_data, image.shape)boxes = box_data[...,:4].astype(np.int32) scores = box_data[...,4]classes = box_data[...,5].astype(np.int32)for box, score, cl in zip(boxes, scores, classes):top, left, right, bottom = boxcv2.rectangle(image, (top, left), (right, bottom), (255, 0, 0), 1)cv2.putText(image, '{0} {1:.2f}'.format(class_names[cl], score), (top, left), cv2.FONT_HERSHEY_SIMPLEX, 0.6, (0, 0, 255), 1)if __name__=="__main__":images = cv2.imread('bus.jpg')input = letterbox(images, input_shape)input = input[:, :, ::-1].transpose(2, 0, 1).astype(dtype=np.float32)  #BGR2RGB和HWC2CHWinput = np.expand_dims(input, axis=0)onnx_session = onnxruntime.InferenceSession('../work_dir/onnx/yolox/end2end.onnx', providers=['CPUExecutionProvider'])input_name = []for node in onnx_session.get_inputs():input_name.append(node.name)output_name = []for node in onnx_session.get_outputs():output_name.append(node.name)inputs = {}for name in input_name:inputs[name] = inputoutputs = onnx_session.run(None, inputs)boxes = filter_box(outputs)draw(images, boxes)cv2.imwrite('result.jpg', images)
直接使用mmdeploy的api推理:
from mmdeploy.apis import inference_modelmodel_cfg = 'mmdetection/configs/yolox/yolox_tiny_8xb8-300e_coco.py'
deploy_cfg = 'mmdeploy/configs/mmdet/detection/detection_onnxruntime_dynamic.py'
img = 'bus.jpg'
backend_files = ['work_dir/onnx/yolox/end2end.onnx']
device = 'cpu'result = inference_model(model_cfg, deploy_cfg, backend_files, img, device)
print(result)
或者:
from mmdeploy_runtime import Detector
import cv2# 读取图片
img = cv2.imread('bus.jpg')# 创建检测器
detector = Detector(model_path='work_dir/onnx/yolox', device_name='cpu')# 执行推理
bboxes, labels, _ = detector(img)
# 使用阈值过滤推理结果,并绘制到原图中
indices = [i for i in range(len(bboxes))]
for index, bbox, label_id in zip(indices, bboxes, labels):[left, top, right, bottom], score = bbox[0:4].astype(int),  bbox[4]if score < 0.3:continuecv2.rectangle(img, (left, top), (right, bottom), (0, 255, 0))
cv2.imwrite('result.jpg', img)
导出engine文件
这里通过trtexec转换onnx文件,LZ的版本是TensorRT-8.2.1.8。
./trtexec.exe --onnx=yolox.onnx --saveEngine=yolox.engine --workspace=20480
tensorrt推理
手动导出的模型使用tensorrt推理:
import cv2
import numpy as np
import tensorrt as trt
import pycuda.autoinit
import pycuda.driver as cuda  class_names = ['person', 'bicycle', 'car', 'motorcycle', 'airplane', 'bus', 'train', 'truck', 'boat', 'traffic light','fire hydrant', 'stop sign', 'parking meter', 'bench', 'bird', 'cat', 'dog', 'horse', 'sheep', 'cow','elephant', 'bear', 'zebra', 'giraffe', 'backpack', 'umbrella', 'handbag', 'tie', 'suitcase', 'frisbee','skis', 'snowboard', 'sports ball', 'kite', 'baseball bat', 'baseball glove', 'skateboard', 'surfboard','tennis racket', 'bottle', 'wine glass', 'cup', 'fork', 'knife', 'spoon', 'bowl', 'banana', 'apple','sandwich', 'orange', 'broccoli', 'carrot', 'hot dog', 'pizza', 'donut', 'cake', 'chair', 'couch','potted plant', 'bed', 'dining table', 'toilet', 'tv', 'laptop', 'mouse', 'remote', 'keyboard', 'cell phone','microwave', 'oven', 'toaster', 'sink', 'refrigerator', 'book', 'clock', 'vase', 'scissors', 'teddy bear','hair drier', 'toothbrush'] #coco80类别
input_shape = (416, 416)
score_threshold = 0.2
nms_threshold = 0.5
confidence_threshold = 0.2   def nms(boxes, scores, score_threshold, nms_threshold):x1 = boxes[:, 0]y1 = boxes[:, 1]x2 = boxes[:, 2]y2 = boxes[:, 3]areas = (y2 - y1 + 1) * (x2 - x1 + 1)keep = []index = scores.argsort()[::-1] while index.size > 0:i = index[0]keep.append(i)x11 = np.maximum(x1[i], x1[index[1:]]) y11 = np.maximum(y1[i], y1[index[1:]])x22 = np.minimum(x2[i], x2[index[1:]])y22 = np.minimum(y2[i], y2[index[1:]])w = np.maximum(0, x22 - x11 + 1)                              h = np.maximum(0, y22 - y11 + 1) overlaps = w * hious = overlaps / (areas[i] + areas[index[1:]] - overlaps)idx = np.where(ious <= nms_threshold)[0]index = index[idx + 1]return keepdef filter_box(outputs): outputs0, outputs1, outputs2 = outputsflag = outputs1 > confidence_thresholdoutput0 = outputs0[flag].reshape(-1, 4)output1 = outputs1[flag].reshape(-1, 1)classes_scores = outputs2[flag].reshape(-1, 80)outputs = np.concatenate((output0, output1, classes_scores), axis=1)boxes = []scores = []class_ids = []for i in range(len(classes_scores)):class_id = np.argmax(classes_scores[i])outputs[i][4] *= classes_scores[i][class_id]outputs[i][5] = class_idif outputs[i][4] > score_threshold:boxes.append(outputs[i][:6])scores.append(outputs[i][4])class_ids.append(outputs[i][5])boxes = np.array(boxes)scores = np.array(scores)indices = nms(boxes, scores, score_threshold, nms_threshold) output = boxes[indices]return outputdef letterbox(im, new_shape=(416, 416), color=(114, 114, 114)):# Resize and pad image while meeting stride-multiple constraintsshape = im.shape[:2]  # current shape [height, width]# Scale ratio (new / old)r = min(new_shape[0] / shape[0], new_shape[1] / shape[1])# Compute paddingnew_unpad = int(round(shape[1] * r)), int(round(shape[0] * r))    dw, dh = (new_shape[1] - new_unpad[0])/2, (new_shape[0] - new_unpad[1])/2  # wh padding top, bottom = int(round(dh - 0.1)), int(round(dh + 0.1))left, right = int(round(dw - 0.1)), int(round(dw + 0.1))if shape[::-1] != new_unpad:  # resizeim = cv2.resize(im, new_unpad, interpolation=cv2.INTER_LINEAR)im = cv2.copyMakeBorder(im, top, bottom, left, right, cv2.BORDER_CONSTANT, value=color)  # add borderreturn imdef scale_boxes(boxes, shape):# Rescale boxes (xyxy) from input_shape to shapegain = min(input_shape[0] / shape[0], input_shape[1] / shape[1])  # gain  = old / newpad = (input_shape[1] - shape[1] * gain) / 2, (input_shape[0] - shape[0] * gain) / 2  # wh paddingboxes[..., [0, 2]] -= pad[0]  # x paddingboxes[..., [1, 3]] -= pad[1]  # y paddingboxes[..., :4] /= gainboxes[..., [0, 2]] = boxes[..., [0, 2]].clip(0, shape[1])  # x1, x2boxes[..., [1, 3]] = boxes[..., [1, 3]].clip(0, shape[0])  # y1, y2return boxesdef draw(image, box_data):box_data = scale_boxes(box_data, image.shape)boxes = box_data[...,:4].astype(np.int32) scores = box_data[...,4]classes = box_data[...,5].astype(np.int32)for box, score, cl in zip(boxes, scores, classes):top, left, right, bottom = boxcv2.rectangle(image, (top, left), (right, bottom), (255, 0, 0), 1)cv2.putText(image, '{0} {1:.2f}'.format(class_names[cl], score), (top, left), cv2.FONT_HERSHEY_SIMPLEX, 0.6, (0, 0, 255), 1)if __name__=="__main__":logger = trt.Logger(trt.Logger.WARNING)with open("yolox.engine", "rb") as f, trt.Runtime(logger) as runtime:engine = runtime.deserialize_cuda_engine(f.read())context = engine.create_execution_context()h_input = cuda.pagelocked_empty(trt.volume(context.get_binding_shape(0)), dtype=np.float32)h_output0 = cuda.pagelocked_empty(trt.volume(context.get_binding_shape(1)), dtype=np.float32)h_output1 = cuda.pagelocked_empty(trt.volume(context.get_binding_shape(2)), dtype=np.float32)h_output2 = cuda.pagelocked_empty(trt.volume(context.get_binding_shape(3)), dtype=np.float32)d_input = cuda.mem_alloc(h_input.nbytes)d_output0 = cuda.mem_alloc(h_output0.nbytes)d_output1 = cuda.mem_alloc(h_output1.nbytes)d_output2 = cuda.mem_alloc(h_output2.nbytes)stream = cuda.Stream()image = cv2.imread('bus.jpg')input = letterbox(image, input_shape)input = input[:, :, ::-1].transpose(2, 0, 1).astype(dtype=np.float32)  #BGR2RGB和HWC2CHWinput = np.expand_dims(input, axis=0)  np.copyto(h_input, input.ravel())with engine.create_execution_context() as context:cuda.memcpy_htod_async(d_input, h_input, stream)context.execute_async_v2(bindings=[int(d_input), int(d_output0), int(d_output1), int(d_output2)], stream_handle=stream.handle)cuda.memcpy_dtoh_async(h_output0, d_output0, stream)cuda.memcpy_dtoh_async(h_output1, d_output1, stream)cuda.memcpy_dtoh_async(h_output2, d_output2, stream)stream.synchronize()  h_output = []h_output.append(h_output2.reshape(1, 3549, 4))h_output.append(h_output1.reshape(1, 3549))h_output.append(h_output0.reshape(1, 3549, 80))boxes = filter_box(h_output)draw(image, boxes)cv2.imwrite('result.jpg', image)
使用mmdeploy的api推理:
from mmdeploy.apis import torch2onnx
from mmdeploy.backend.sdk.export_info import export2SDKimg = 'bus.jpg'
work_dir = './work_dir/onnx/yolox'
save_file = './end2end.onnx'
deploy_cfg = 'mmdeploy/configs/mmdet/detection/detection_onnxruntime_dynamic.py'
model_cfg = 'mmdetection/configs/yolox/yolox_tiny_8xb8-300e_coco.py'
model_checkpoint = 'checkpoints/yolox_tiny_8x8_300e_coco_20211124_171234-b4047906.pth'
device = 'cpu'# 1. convert model to onnx
torch2onnx(img, work_dir, save_file, deploy_cfg, model_cfg, model_checkpoint, device)# 2. extract pipeline info for sdk use (dump-info)
export2SDK(deploy_cfg, model_cfg, work_dir, pth=model_checkpoint, device=device)
或者
from mmdeploy_runtime import Detector
import cv2# 读取图片
img = cv2.imread('bus.jpg')# 创建检测器
detector = Detector(model_path='work_dir/trt/yolox', device_name='cuda')# 执行推理
bboxes, labels, _ = detector(img)
# 使用阈值过滤推理结果,并绘制到原图中
indices = [i for i in range(len(bboxes))]
for index, bbox, label_id in zip(indices, bboxes, labels):[left, top, right, bottom], score = bbox[0:4].astype(int),  bbox[4]if score < 0.3:continuecv2.rectangle(img, (left, top), (right, bottom), (0, 255, 0))
cv2.imwrite('result.jpg', img)


)


)

