文章目录
- 一、使用CloudFormation创建堡垒机
- 二、安装AWS CLI命令行工具
- 三、安装eksctl命令行工具
- 四、创建集群角色
- 4.1 集群服务角色创建
- 4.2 集群节点组角色创建
- 五、创建 EKS集群
- 六、登录EKS控制台
- 七、参考链接
一、使用CloudFormation创建堡垒机
导航至
CloudFormation,点击创建堆栈。

上传创建
EC2的yaml文件。
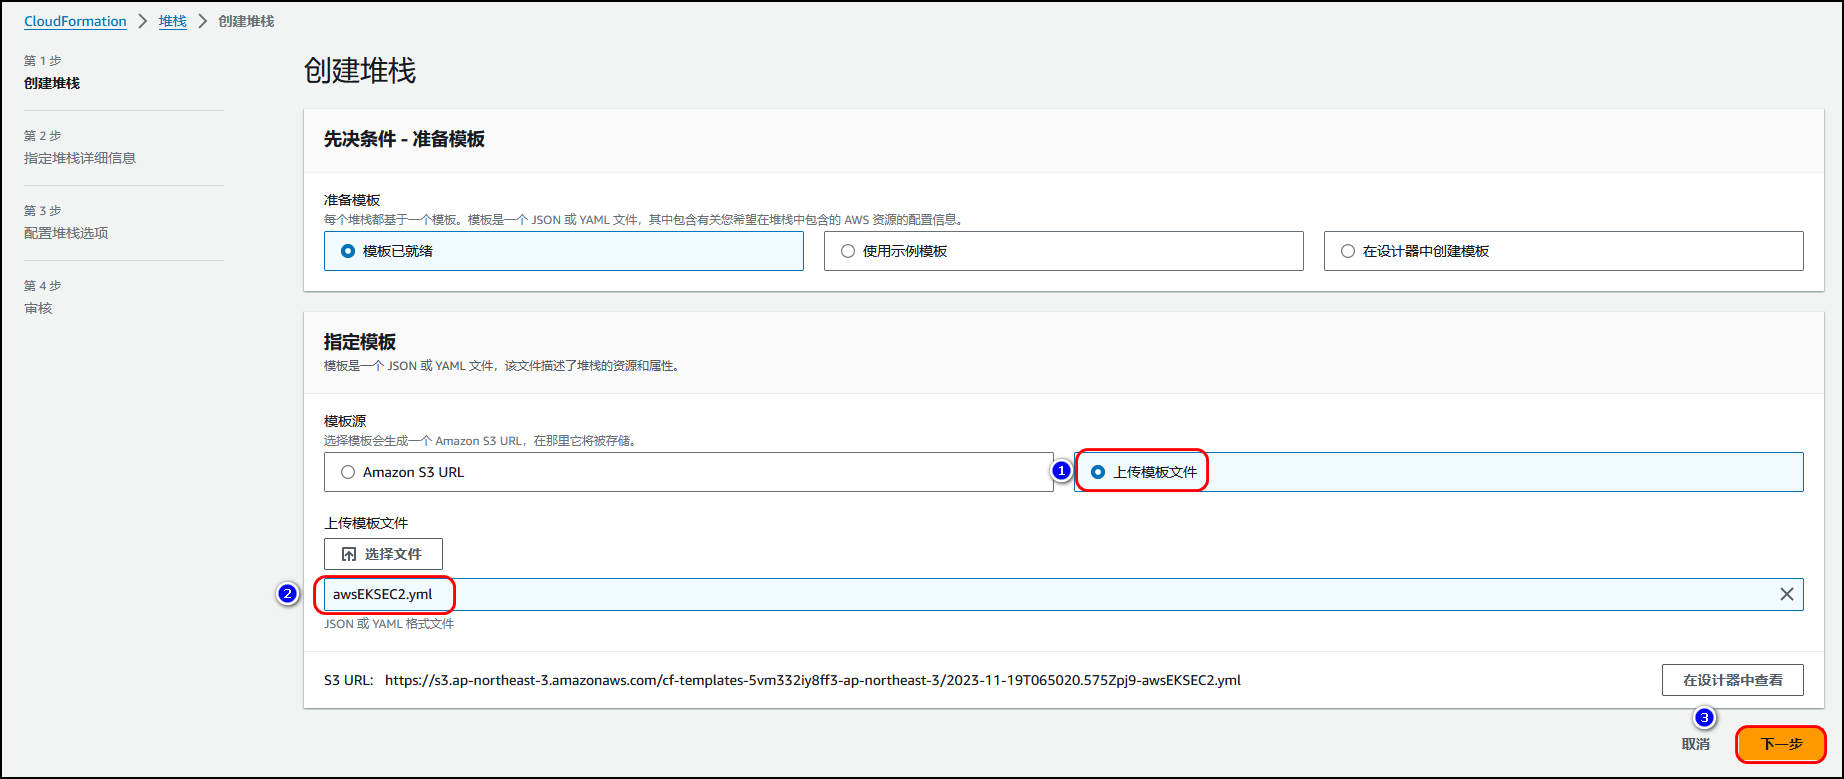
选择登录
堡垒机的密钥。

配置标签
Name:awsEKSEC2。

确认。

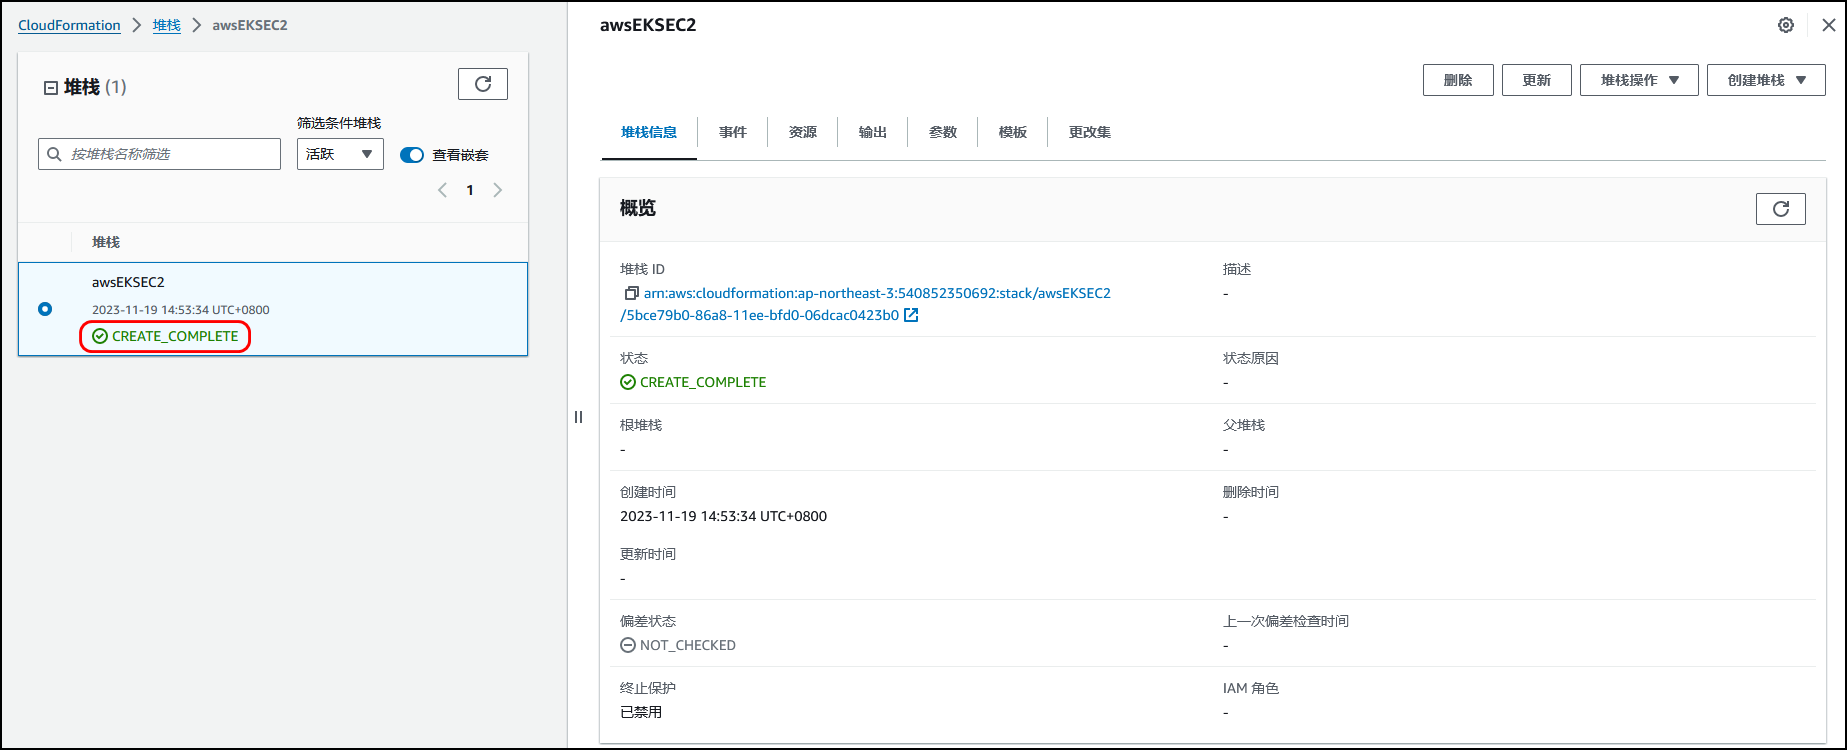
显示
CREATE_COMPLETE创建完成。
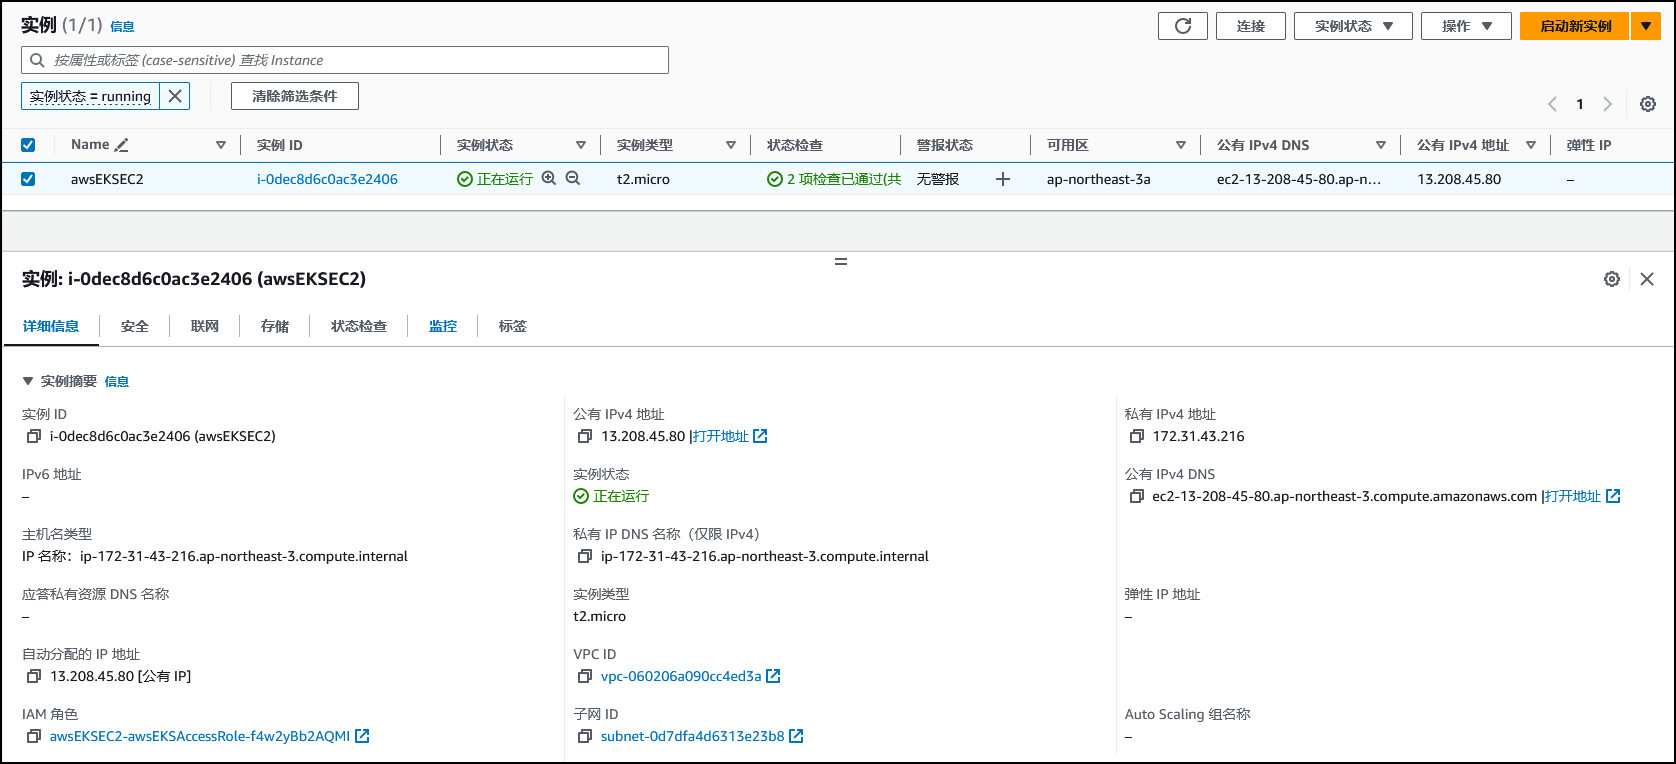
导航至
EC2控制面板,查看此堡垒机的相关信息。
二、安装AWS CLI命令行工具
# 下载压缩包
$ sudo curl "https://awscli.amazonaws.com/awscli-exe-linux-x86_64.zip" -o "awscliv2.zip"# 解压
$ sudo unzip awscliv2.zip# 执行命令安装
$ sudo sudo ./aws/install# 查看aws cli版本信息,确认是否安装成功。
$ sudo aws --version# 配置aws
$ sudo aws configure
# 配置信息如下:
AWS Access Key ID [None]: AKIAXxxxxxxxxx3GB
AWS Secret Access Key [None]: xxxxxxxxxxxxxxxxxxxxxxxxxxxxxxx
Default region name [None]: ap-northeast-3
Default output format [None]: json
三、安装eksctl命令行工具
# for ARM systems, set ARCH to: `arm64`, `armv6` or `armv7`
ARCH=amd64
PLATFORM=$(uname -s)_$ARCHcurl -sLO "https://github.com/eksctl-io/eksctl/releases/latest/download/eksctl_$PLATFORM.tar.gz"# (Optional) Verify checksum
curl -sL "https://github.com/eksctl-io/eksctl/releases/latest/download/eksctl_checksums.txt" | grep $PLATFORM | sha256sum --checktar -xzf eksctl_$PLATFORM.tar.gz -C /tmp && rm eksctl_$PLATFORM.tar.gzsudo mv /tmp/eksctl /usr/local/bin# 添加环境变量
# vim .bashrc
export PATH=/usr/local/bin:$PATH
# source .bashrceksctl version
四、创建集群角色
4.1 集群服务角色创建
{"Version": "2012-10-17","Statement": [{"Effect": "Allow","Action": ["autoscaling:DescribeAutoScalingGroups","autoscaling:UpdateAutoScalingGroup","ec2:AttachVolume","ec2:AuthorizeSecurityGroupIngress","ec2:CreateRoute","ec2:CreateSecurityGroup","ec2:CreateTags","ec2:CreateVolume","ec2:DeleteRoute","ec2:DeleteSecurityGroup","ec2:DeleteVolume","ec2:DescribeInstances","ec2:DescribeRouteTables","ec2:DescribeSecurityGroups","ec2:DescribeSubnets","ec2:DescribeVolumes","ec2:DescribeVolumesModifications","ec2:DescribeVpcs","ec2:DescribeDhcpOptions","ec2:DescribeNetworkInterfaces","ec2:DescribeAvailabilityZones","ec2:DetachVolume","ec2:ModifyInstanceAttribute","ec2:ModifyVolume","ec2:RevokeSecurityGroupIngress","ec2:DescribeAccountAttributes","ec2:DescribeAddresses","ec2:DescribeInternetGateways","elasticloadbalancing:AddTags","elasticloadbalancing:ApplySecurityGroupsToLoadBalancer","elasticloadbalancing:AttachLoadBalancerToSubnets","elasticloadbalancing:ConfigureHealthCheck","elasticloadbalancing:CreateListener","elasticloadbalancing:CreateLoadBalancer","elasticloadbalancing:CreateLoadBalancerListeners","elasticloadbalancing:CreateLoadBalancerPolicy","elasticloadbalancing:CreateTargetGroup","elasticloadbalancing:DeleteListener","elasticloadbalancing:DeleteLoadBalancer","elasticloadbalancing:DeleteLoadBalancerListeners","elasticloadbalancing:DeleteTargetGroup","elasticloadbalancing:DeregisterInstancesFromLoadBalancer","elasticloadbalancing:DeregisterTargets","elasticloadbalancing:DescribeListeners","elasticloadbalancing:DescribeLoadBalancerAttributes","elasticloadbalancing:DescribeLoadBalancerPolicies","elasticloadbalancing:DescribeLoadBalancers","elasticloadbalancing:DescribeTargetGroupAttributes","elasticloadbalancing:DescribeTargetGroups","elasticloadbalancing:DescribeTargetHealth","elasticloadbalancing:DetachLoadBalancerFromSubnets","elasticloadbalancing:ModifyListener","elasticloadbalancing:ModifyLoadBalancerAttributes","elasticloadbalancing:ModifyTargetGroup","elasticloadbalancing:ModifyTargetGroupAttributes","elasticloadbalancing:RegisterInstancesWithLoadBalancer","elasticloadbalancing:RegisterTargets","elasticloadbalancing:SetLoadBalancerPoliciesForBackendServer","elasticloadbalancing:SetLoadBalancerPoliciesOfListener","kms:DescribeKey"],"Resource": "*"},{"Effect": "Allow","Action": "iam:CreateServiceLinkedRole","Resource": "*","Condition": {"StringEquals": {"iam:AWSServiceName": "elasticloadbalancing.amazonaws.com"}}}]
}
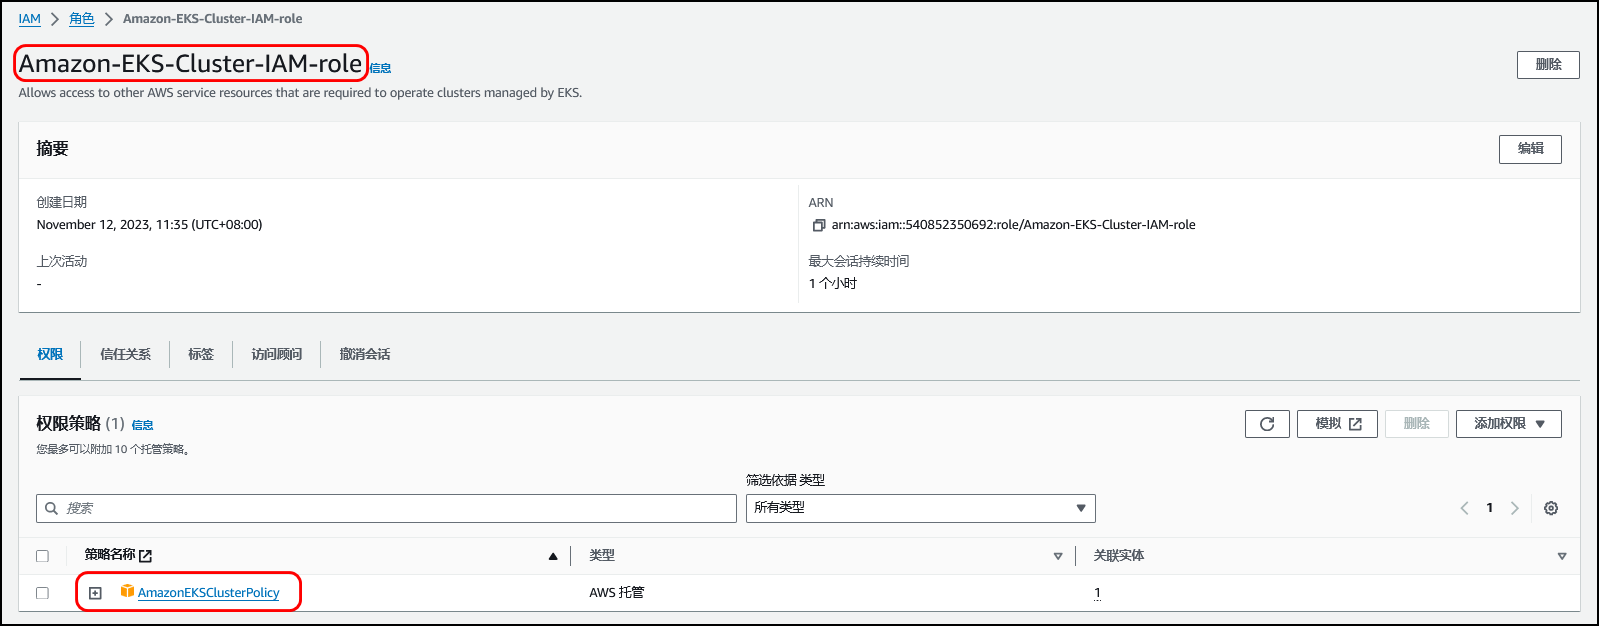
创建集群服务角色,显示权限策略如下:
4.2 集群节点组角色创建
# AmazonEC2ContainerRegistryReadOnly策略
{"Version": "2012-10-17","Statement": [{"Effect": "Allow","Action": ["ecr:GetAuthorizationToken","ecr:BatchCheckLayerAvailability","ecr:GetDownloadUrlForLayer","ecr:GetRepositoryPolicy","ecr:DescribeRepositories","ecr:ListImages","ecr:DescribeImages","ecr:BatchGetImage","ecr:GetLifecyclePolicy","ecr:GetLifecyclePolicyPreview","ecr:ListTagsForResource","ecr:DescribeImageScanFindings"],"Resource": "*"}]
}
# AmazonEKS_CNI_Policy策略
{"Version": "2012-10-17","Statement": [{"Effect": "Allow","Action": ["ec2:AssignPrivateIpAddresses","ec2:AttachNetworkInterface","ec2:CreateNetworkInterface","ec2:DeleteNetworkInterface","ec2:DescribeInstances","ec2:DescribeTags","ec2:DescribeNetworkInterfaces","ec2:DescribeInstanceTypes","ec2:DetachNetworkInterface","ec2:ModifyNetworkInterfaceAttribute","ec2:UnassignPrivateIpAddresses"],"Resource": "*"},{"Effect": "Allow","Action": ["ec2:CreateTags"],"Resource": ["arn:aws:ec2:*:*:network-interface/*"]}]
}
# AmazonEKSWorkerNodePolicy策略
{"Version": "2012-10-17","Statement": [{"Effect": "Allow","Action": ["ec2:DescribeInstances","ec2:DescribeInstanceTypes","ec2:DescribeRouteTables","ec2:DescribeSecurityGroups","ec2:DescribeSubnets","ec2:DescribeVolumes","ec2:DescribeVolumesModifications","ec2:DescribeVpcs","eks:DescribeCluster"],"Resource": "*"}]
}
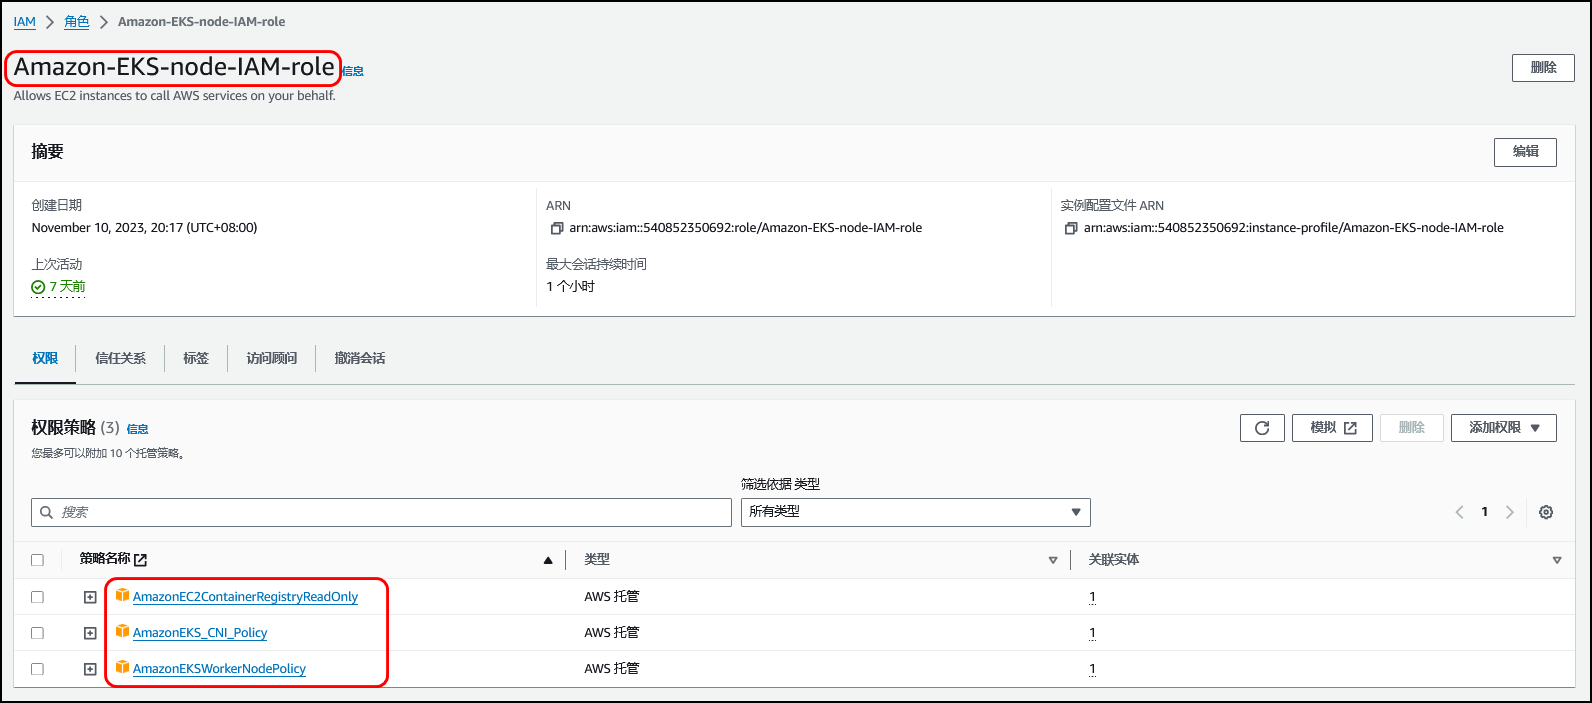
创建集群节点组角色,显示权限策略如下:
五、创建 EKS集群
编写
cluster.yaml。
[root@awseksec2 ~]# vim cluster.yaml
[root@awseksec2 ~]# cat cluster.yaml
apiVersion: eksctl.io/v1alpha5
kind: ClusterConfigmetadata:name: xybeks-clusterregion: ap-northeast-3managedNodeGroups:
- name: xybaws-ngsdesiredCapacity: 2instanceType: t3.mediumvolumeSize: 50iam:withAddonPolicies:autoScaler: trueavailabilityZones: ["ap-northeast-3a", "ap-northeast-3c"]availabilityZones: ["ap-northeast-3a", "ap-northeast-3c"]
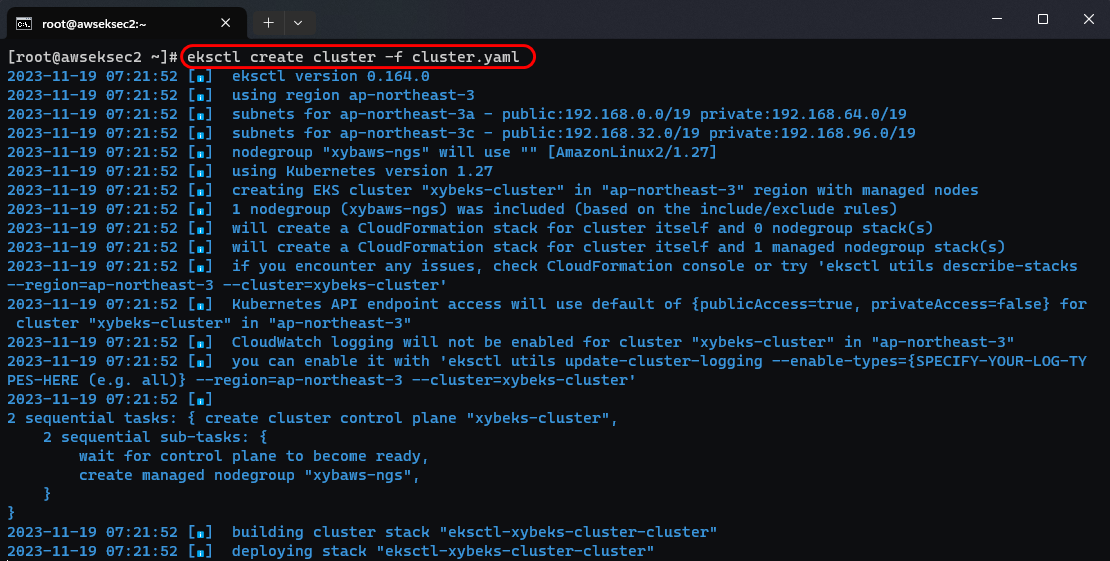
执行命令创建eks集群。
eksctl create cluster -f cluster.yaml
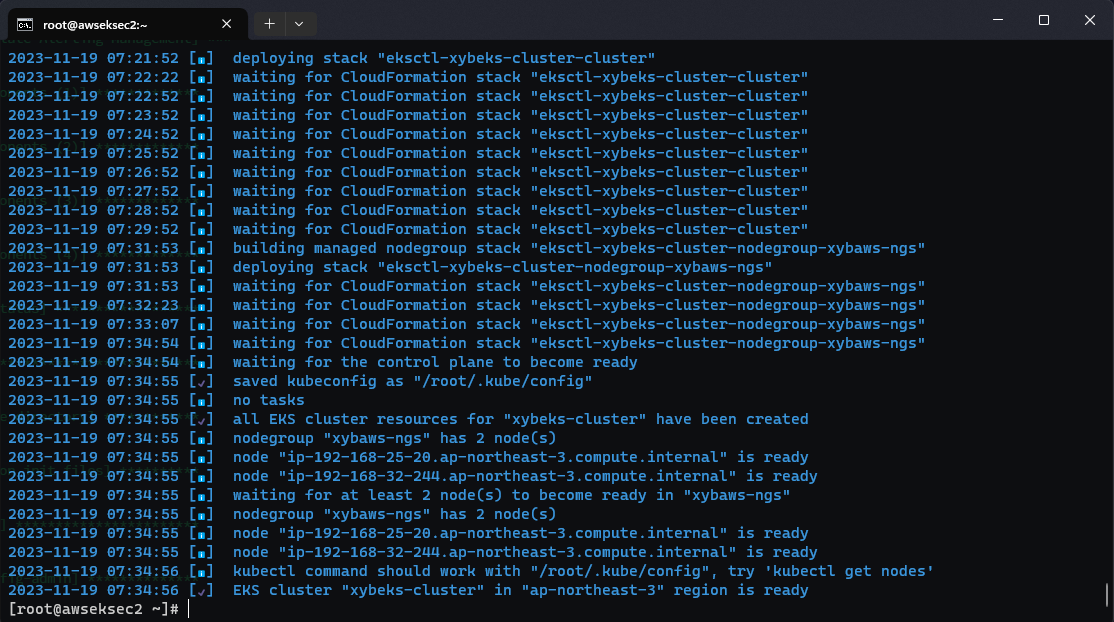
等待一段喝杯咖啡☕️的时间,即可部署完成。
[root@awseksec2 ~]# kubectl get nodes -A
NAME                                                STATUS   ROLES    AGE     VERSION
ip-192-168-25-20.ap-northeast-3.compute.internal    Ready    <none>   9m36s   v1.27.7-eks-e71965b
ip-192-168-32-244.ap-northeast-3.compute.internal   Ready    <none>   9m42s   v1.27.7-eks-e71965b
[root@awseksec2 ~]# kubectl get pods -A
NAMESPACE     NAME                       READY   STATUS    RESTARTS   AGE
kube-system   aws-node-cvmjf             1/1     Running   0          9m49s
kube-system   aws-node-rs98c             1/1     Running   0          9m43s
kube-system   coredns-847b5d4fc5-csb75   1/1     Running   0          16m
kube-system   coredns-847b5d4fc5-j47xr   1/1     Running   0          16m
kube-system   kube-proxy-7m9ll           1/1     Running   0          9m43s
kube-system   kube-proxy-lvmvk           1/1     Running   0          9m49s
六、登录EKS控制台
点击
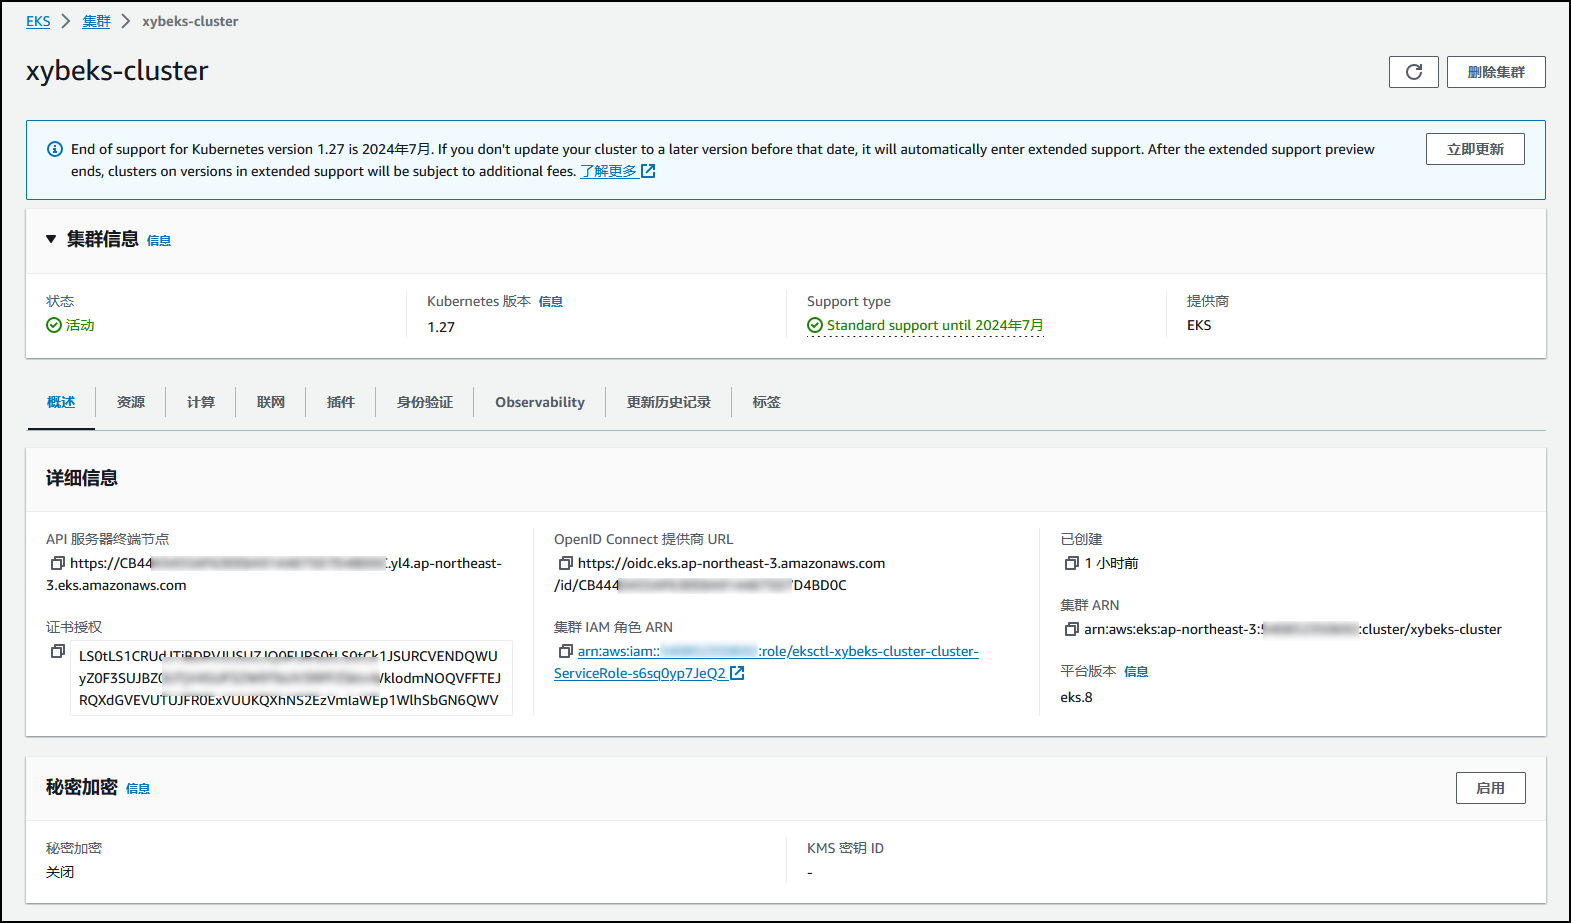
xybeks-cluster集群名称,查看详细信息参考。

集群详细信息如下:
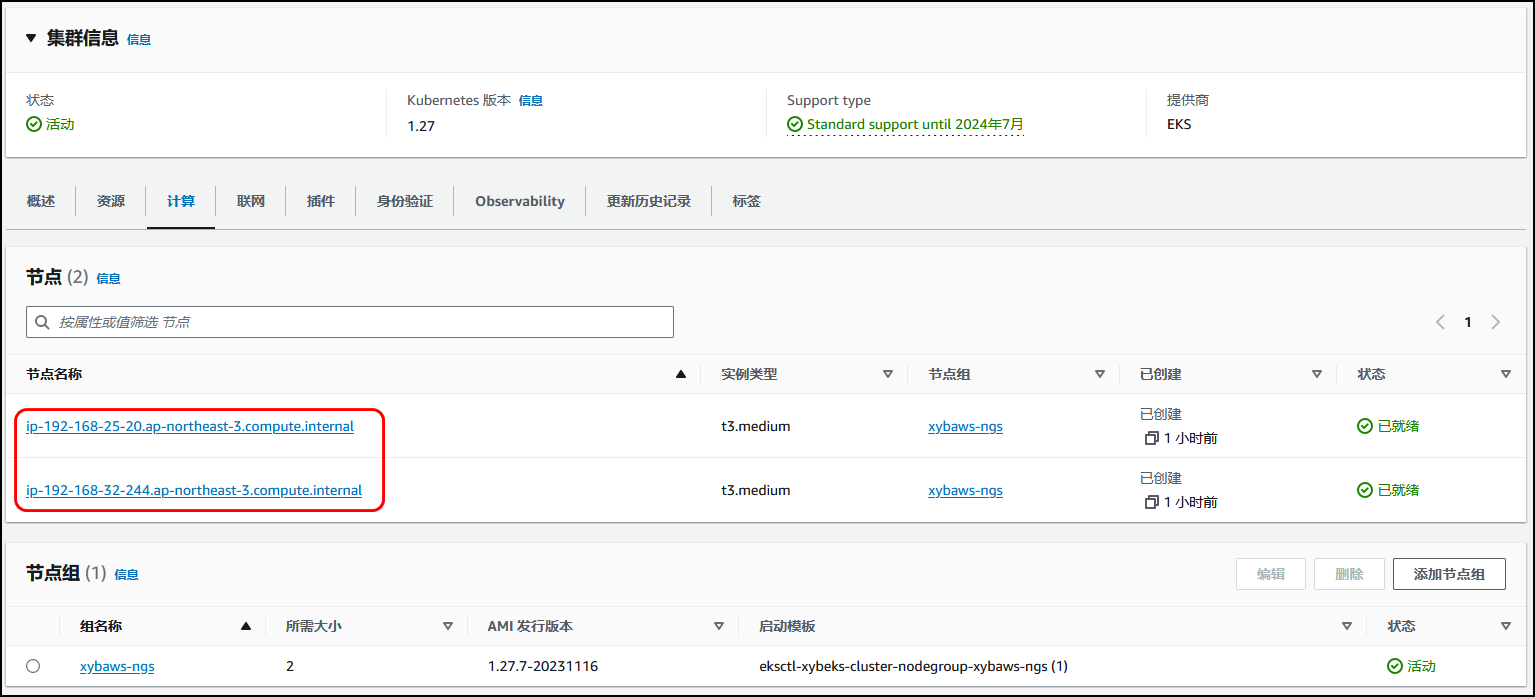
查看该集群下的一个名为
xybaws-ngs的节点组,有两个创建好的节点。
查看网络配置信息。

七、参考链接
🎉 什么是 Amazon EKS? - Amazon EKS
在WSL搭建Schema Registry)


-LarkMidTable)


)


:CF1896-D. Ones and Twos)


)


![[ruby on rails] array、jsonb字段](http://pic.xiahunao.cn/[ruby on rails] array、jsonb字段)


