目录
一、SpringBoot简介
1.1 Spring优缺点
1.1.1 Spring的优点
1.1.2 Spring的缺点
1.2 SpringBoot的概述
1.2.1 SpringBoot概述
1.2.2 SpringBoot的核心功能
二、SpringBoot快速入门
2.1 创建Maven工程
2.2 添加起步依赖
2.3 编写Controller
2.4 编写SpringBoot引导类
三、SpringBoot的配置文件
3.1 yml配置文件
3.1.1 yml配置文件的语法
1)配置普通数据
2)配置对象数据
3)配置Map数据
4)配置数组(List、Set)数据
3.2 修改默认配置
3.3 配置信息查询
3.4 配置多个Profile
3.4.1 配置多文档块Profile
3.4.2 配置yml多profile
四、SpringBoot自动配置原理
4.1 起步依赖原理
4.1.1 版本锁定
4.1.2 起步依赖
4.2 自动配置原理
4.2.1 @SpringBootApplication源码
4.2.2 @SpringBootConfiguration源码
4.2.3 @EnableAutoConfiguration源码
1)Registrar
2)AutoConfigurationImportSelector
4.2.4 @ComponentScan
1)AutoConfigurationExcludeFilter
2)TypeExcludeFilter
3)自定义排除器
4.3 自动配置类
4.3.1 自动配置类说明
4.3.2 @Conditional派生注解
4.3.3 自定义自动配置类
4.4 属性配置类
4.4.1 属性配置类说明
4.4.2 自定义属性配置类
4.5 自定义场景启动器
4.5.1 场景启动器包含内容
4.5.2 搭建自动配置工程
4.5.2.1 依赖
4.5.2.2 自动配置类
4.5.2.3 属性配置类
4.5.2.4 具体配置的类
4.5.2.5 spring.factories
4.5.3 搭建测试工程
4.5.3.1 依赖
4.5.2.2 Controller
4.5.2.3 application.yml
4.5.2.4 引导类
五、SpringBoot与整合其他技术
5.1 SpringBoot整合Mybatis
5.1.1 搭建工程
1)依赖:
2)创建表
3)创建实体Bean
4)application.yml
5)UserMapper
6)UserMapper.xml
5.1.2 测试
5.1.3 MyBatis自动配置
1)MybatisAutoConfiguration
2)MybatisProperties
5.2 SpringBoot整合Junit
5.2.1 添加Junit的场景启动器
5.2.2 编写测试类
5.3 SpringBoot整合Spring Data JPA
5.3.1 添加Spring Data JPA的起步依赖
5.3.2 jpa相关配置
5.3.3 建立映射
5.3.3 编写UserDao
5.3.4 编写测试类
5.4 SpringBoot整合Redis
5.4.1 添加Redis的起步依赖
5.4.2 Redis相关配置
5.4.3 测试类
一、SpringBoot简介
1.1 Spring优缺点
1.1.1 Spring的优点
Spring是Java企业版(Java Enterprise Edition,JEE,也称J2EE)的轻量级代替品。无需开发重量级的Enterprise JavaBean(EJB),Spring为企业级Java开发提供了一种相对简单的方法,通过依赖注入和面向切面编程
简单来说,Spring是一个JavaEE轻量级的一站式开发框架。
1.1.2 Spring的缺点
虽然Spring的组件代码是轻量级的,但它的配置却是重量级的。我们在整合MyBatis时需要配置SqlSessionFactory以及一些其他的配置,整合Jpa时需要配置LocalContainerEntityManagerFactoryBean等....
所有配置都代表了开发时的损耗。因为在思考Spring特性配置和解决业务问题之间需要进行思维切换,所以编写配置挤占了编写应用程序逻辑的时间。和所有框架一样,Spring实用,但与此同时它要求的回报也不少。
除此之外,项目的依赖管理也是一件耗时耗力的事情。在环境搭建时,需要分析要导入哪些库的坐标,而且还需要分析导入与之有依赖关系的其他库的坐标,一旦选错了依赖的版本,随之而来的不兼容问题就会严重阻碍项目的开发进度。
总结:
- 1)项目的配置编写占据了我们大量的时间(能否默认配置?)
- 2)jar包的依赖管理非常不便(能否有专人帮我们管理?)
1.2 SpringBoot的概述
1.2.1 SpringBoot概述
Spring Boot 是由 Pivotal 团队提供的全新框架。Spring Boot 是所有基于 Spring Framework 5.0 开发的项目的起点。Spring Boot 的设计是为了让你尽可能快的跑起来 Spring 应用程序并且尽可能减少你的配置文件。
SpringBoot提倡"约定大于配置"的理念让你的项目快速运行起来,即所有配置都是基于约定的(采用默认配置),这种开箱即用的方式大大提高了我们开发的效率,缩短了项目周期。
SpringBoot不是对Spring功能上的增强,而是提供了一种快速使用Spring的方式
1.2.2 SpringBoot的核心功能
- 1)起步依赖(场景启动器)
起步依赖本质上是一个Maven项目对象模型(Project Object Model,POM),定义了对其他库的传递依赖,这些东西加在一起即支持某项功能。
简单的说,起步依赖就是将具备某种功能的坐标打包到一起,并提供一些默认的功能。
- 2)自动配置
Spring Boot的自动配置是一个运行时的过程,考虑了众多因素,才决定Spring配置应该用哪个,不该用哪个。该过程是Spring自动完成的。
二、SpringBoot快速入门
2.1 创建Maven工程
创建一个普通的Mave工程(模块/项目)

2.2 添加起步依赖
SpringBoot项目要继承SpringBoot的起步依赖spring-boot-starter-parent
<parent><groupId>org.springframework.boot</groupId><artifactId>spring-boot-starter-parent</artifactId><version>2.0.1.RELEASE</version>
</parent>
引入相关场景依赖:
<dependencies><dependency><groupId>org.springframework.boot</groupId><artifactId>spring-boot-starter-web</artifactId></dependency>
</dependencies>
2.3 编写Controller
package com.dfbz.controller;import org.springframework.stereotype.Controller;
import org.springframework.web.bind.annotation.GetMapping;
import org.springframework.web.bind.annotation.ResponseBody;/*** @author lscl* @version 1.0* @intro:*/
@Controller
public class HelloController {@GetMapping("/hello")@ResponseBodypublic String hello(){return "Hello SpringBoot!";}
}
2.4 编写SpringBoot引导类
package com.dfbz;import org.springframework.boot.SpringApplication;
import org.springframework.boot.autoconfigure.SpringBootApplication;/*** @author lscl* @version 1.0* @intro:*/
@SpringBootApplication          // 标注这是一个引导类
public class HelloApplication {public static void main(String[] args) {SpringApplication.run(HelloApplication.class);}
}
访问:http://localhost:8080/hello

就这样,我们就搭建完成了一个SpringMVC的环境;
三、SpringBoot的配置文件
SpringBoot是基于约定的,所以很多配置都有默认值,但是我们可以修改SpringBoot的默认配置
SpringBoot支持三种配置文件:
- 1)application-{profile}.yml;
- 2)application-{profile}.yaml;
- 3)application-{profile}.properties;
SpringBoot启动时默认会从classes目录以及classes/config目录下加载这三种配置文件
其中properties配置文件优先级高,其次yml,优先级最低的为yaml
3.1 yml配置文件
YML文件格式是YAML (YAML Aint Markup Language)编写的文件格式,YAML是一种直观的能够被电脑识别的的数据数据序列化格式,并且容易被人类阅读,容易和脚本语言交互的,可以被支持YAML库的不同的编程语言程序导入,比如: C/C++, Ruby, Python, Java, Perl, C#, PHP等。YML文件是以数据为核心的,比传统的xml方式更加简洁。
YML文件的扩展名可以使用.yml或者.yaml;
3.1.1 yml配置文件的语法
1)配置普通数据
语法: key: value
示例代码:
book: 《孙子兵法》注意:value之前必须有一个空格
2)配置对象数据
语法:
key:key1: value1key2: value2或者:
key: {key1: value1,key2: value2}示例代码:
book:name: 《聊斋志异》author: 蒲松龄#或者
book: {name: 《聊斋志异》,author: 蒲松龄}
3)配置Map数据
book:name: 《三国志》author: 陈寿4)配置数组(List、Set)数据
语法:
key:- value1- value2或者:
key: [value1,value2]示例代码:
books:- 《三国演义》- 《西游记》- 《红楼梦》- 《水浒传》
#或者
cities: [武汉,长沙,南昌,合肥]
#集合中的元素是对象形式
books:- name: 《三国演义》author: 罗贯中- name: 《西游记》author: 吴承恩- name: 《红楼梦》addr: 曹雪芹- name: 《水浒传》author: 施耐庵
注意:value与之间的 - 之间存在一个空格
3.2 修改默认配置
我们可以通过配置application.poperties 或者 application.yml 来修改SpringBoot的默认配置
例如:
application.properties文件
server.port=8888
server.servlet.context-path=/demo
application.yml文件
server:port: 8888servlet:context-path: /demo3.3 配置信息查询
SpringBoot的配置文件,主要的目的就是对配置信息进行修改的,但在配置时的key从哪里去查询呢?我们可以查阅SpringBoot的官方文档
文档URL:
Spring Boot Reference Guide
常用的配置摘抄如下:```properties
# QUARTZ SCHEDULER (QuartzProperties)
spring.quartz.jdbc.initialize-schema=embedded # Database schema initialization mode.
spring.quartz.jdbc.schema=classpath:org/quartz/impl/jdbcjobstore/tables_@@platform@@.sql # Path to the SQL file to use to initialize the database schema.
spring.quartz.job-store-type=memory # Quartz job store type.
spring.quartz.properties.*= # Additional Quartz Scheduler properties.# ----------------------------------------
# WEB PROPERTIES
# ----------------------------------------
# EMBEDDED SERVER CONFIGURATION (ServerProperties)
server.port=8080 # Server HTTP port.
server.servlet.context-path= # Context path of the application.
server.servlet.path=/ # Path of the main dispatcher servlet.# HTTP encoding (HttpEncodingProperties)
spring.http.encoding.charset=UTF-8 # Charset of HTTP requests and responses. Added to the "Content-Type" header if not set explicitly.# JACKSON (JacksonProperties)
spring.jackson.date-format= # Date format string or a fully-qualified date format class name. For instance, `yyyy-MM-dd HH:mm:ss`.# SPRING MVC (WebMvcProperties)
spring.mvc.servlet.load-on-startup=-1 # Load on startup priority of the dispatcher servlet.
spring.mvc.static-path-pattern=/ # Path pattern used for static resources.
spring.mvc.view.prefix= # Spring MVC view prefix.
spring.mvc.view.suffix= # Spring MVC view suffix.# DATASOURCE (DataSourceAutoConfiguration & DataSourceProperties)
spring.datasource.driver-class-name= # Fully qualified name of the JDBC driver. Auto-detected based on the URL by default.
spring.datasource.url= # JDBC URL of the database.
spring.datasource.username= # Login username of the database.
spring.datasource.password= # Login password of the database.# JEST (Elasticsearch HTTP client) (JestProperties)
spring.elasticsearch.jest.password= # Login password.
spring.elasticsearch.jest.proxy.host= # Proxy host the HTTP client should use.
spring.elasticsearch.jest.proxy.port= # Proxy port the HTTP client should use.
spring.elasticsearch.jest.read-timeout=3s # Read timeout.
spring.elasticsearch.jest.uris=http://localhost:9200 # Comma-separated list of the Elasticsearch instances to use.
spring.elasticsearch.jest.username= # Login username.
3.4 配置多个Profile
SpringBoot默认支持的配置文件有.yml、.yaml、.properties,其命名格式都为application-{profile},我们可以配置多档环境,在开发过程中可以轻松切换
3.4.1 配置多文档块Profile
server:port: 8080
spring:profiles:active: test		# 激活test环境---
server:port: 8081
spring:profiles: dev			# 指定所属环境---
server:port: 8082
spring:profiles: prod---
server:port: 8083
spring:profiles: test
3.4.2 配置yml多profile
- application-dev.yml:
server:port: 8081
spring:profiles: dev
application-prod.yml:
server:port: 8082
spring:profiles: prod- application-test.yml:
server:port: 8083
spring:profiles: test- application.yml:
server:port: 8080
spring:profiles:active: dev     # 激活dev
Tips:当多个配置文件产生互补配置;即application.yml配置与被激活的yml配置同时生效,如有冲突则以被激活的yml文件为准;
四、SpringBoot自动配置原理
SpringBoot能够快速项目运行起来,不需要我们自己来搭建框架所属的环境,其核心原因是SpringBoot在项目启动时即帮我们搭建好了所需环境,做到开箱即用,接下来我们重点探究一下SpringBoot是如何做到让项目快速运行起来的!
4.1 起步依赖原理
4.1.1 版本锁定
SpringBoot项目都是继承于spring-boot-starter-parent工程的,我们点进去看看这个工程中配置了什么?
<parent><groupId>org.springframework.boot</groupId><artifactId>spring-boot-dependencies</artifactId><version>2.0.1.RELEASE</version><relativePath>../../spring-boot-dependencies</relativePath>
</parent>...
<properties><project.reporting.outputEncoding>UTF-8</project.reporting.outputEncoding><java.version>1.8</java.version><resource.delimiter>@</resource.delimiter><maven.compiler.source>${java.version}</maven.compiler.source><project.build.sourceEncoding>UTF-8</project.build.sourceEncoding><maven.compiler.target>${java.version}</maven.compiler.target>
</properties><pluginManagement><plugins><plugin><groupId>org.jetbrains.kotlin</groupId><artifactId>kotlin-maven-plugin</artifactId><version>${kotlin.version}</version></plugin>...</plugins>
</pluginManagement>我们发现spring-boot-starter-parent工程是继承于spring-boot-dependencies工程,在spring-boot-starter-parent工程中锁定了部分插件使用的版本:

我们继续点进spring-boot-dependencies工程:
<properties><activemq.version>5.15.3</activemq.version><antlr2.version>2.7.7</antlr2.version><appengine-sdk.version>1.9.63</appengine-sdk.version><artemis.version>2.4.0</artemis.version><aspectj.version>1.8.13</aspectj.version><assertj.version>3.9.1</assertj.version><atomikos.version>4.0.6</atomikos.version><bitronix.version>2.1.4</bitronix.version>.....
</properties><dependencyManagement><dependencies><dependency><groupId>org.springframework.boot</groupId><artifactId>spring-boot</artifactId><version>2.0.1.RELEASE</version></dependency><dependency><groupId>org.springframework.boot</groupId><artifactId>spring-boot-test</artifactId><version>2.0.1.RELEASE</version></dependency><dependency><groupId>org.springframework.boot</groupId><artifactId>spring-boot-test-autoconfigure</artifactId><version>2.0.1.RELEASE</version></dependency><dependency><groupId>org.springframework.boot</groupId><artifactId>spring-boot-actuator</artifactId><version>2.0.1.RELEASE</version></dependency>....</dependencies>
</dependencyManagement>
从上面的spring-boot-starter-dependencies的pom.xml中我们可以发现,一部分坐标的版本、依赖管理、插件管理已经定义好,所以我们的SpringBoot工程继承spring-boot-starter-parent后已经具备版本锁定等配置了(解决了版本冲突问题)。
这些版本的搭配经过了SpringBoot官方团队的测试,我们在使用过程中,采用SpringBoot搭配的版本匹配,就避免了版本冲突、不稳定等因素;
4.1.2 起步依赖
在继承的父工程中我们并没有看到依赖的引入(只是版本的锁定),真正的依赖是在我们引入场景启动器时引入的,我们点击spring-boot-starter-web场景启动器查看:
<dependencies><dependency><groupId>org.springframework.boot</groupId><artifactId>spring-boot-starter</artifactId><version>2.0.1.RELEASE</version><scope>compile</scope></dependency><dependency><groupId>org.springframework.boot</groupId><artifactId>spring-boot-starter-json</artifactId><version>2.0.1.RELEASE</version><scope>compile</scope></dependency><dependency><groupId>org.springframework.boot</groupId><artifactId>spring-boot-starter-tomcat</artifactId><version>2.0.1.RELEASE</version><scope>compile</scope></dependency><dependency><groupId>org.hibernate.validator</groupId><artifactId>hibernate-validator</artifactId><version>6.0.9.Final</version><scope>compile</scope></dependency><dependency><groupId>org.springframework</groupId><artifactId>spring-web</artifactId><version>5.0.5.RELEASE</version><scope>compile</scope></dependency><dependency><groupId>org.springframework</groupId><artifactId>spring-webmvc</artifactId><version>5.0.5.RELEASE</version><scope>compile</scope></dependency>
</dependencies>我们发现在spring-boot-starter-web依赖中引入了大量web场景需要的依赖,如Spring-web、Spring-webmvc、json转换、tomcat等,SpringBoot中的场景启动器(starter)对场景的依赖进行"打包",这样以后我们的项目只需要引入对应场景的starter即可;
- 官方提供的场景命名规则为:
spring-boot-starter-xxx
- 第三方提供场景命名规则为:
xxx-spring-boot-starter
4.2 自动配置原理
我们在前面说到过,SpringBoot所有的配置基于约定理念,并不是不需要配置,而是SpringBoot在项目启动时帮我们配置了,所有的配置基于约定的参数已经配置好了;那么SpringBoot是如何做到"自动配置"的呢?
我们点击标注在引导类上的@SpringBootApplication注解:
@SpringBootApplication          // 标注这是一个引导类
public class HelloApplication {public static void main(String[] args) {SpringApplication.run(HelloApplication.class);}
}
4.2.1 @SpringBootApplication源码
@Target({ElementType.TYPE})
@Retention(RetentionPolicy.RUNTIME)
@Documented
@Inherited
@SpringBootConfiguration
@EnableAutoConfiguration
@ComponentScan(excludeFilters = {@Filter(type = FilterType.CUSTOM,classes = {TypeExcludeFilter.class}
), @Filter(type = FilterType.CUSTOM,classes = {AutoConfigurationExcludeFilter.class}
)}
)
public @interface SpringBootApplication {...}- 1)@Target({ElementType.TYPE}):元注解,标注这个注解只能在类上使用
- 2)@Retention(RetentionPolicy.RUNTIME):元注解,标注这个注解的生命周期是RUNTIME,可以在运行时解析到这个注解
- 3)@Documented :元注解,表明这个注解应该被 javadoc工具记录
- 4)@Inherited :元注解,标注在类上面时,该类的子类会自动继承此注解
4.2.2 @SpringBootConfiguration源码
@Target({ElementType.TYPE})
@Retention(RetentionPolicy.RUNTIME)
@Documented
@Configuration
public @interface SpringBootConfiguration {
}
上面三个都是元注解
@Configuration :Spring提供的注解,表示这是一个配置类
也就是说标注了@SpringBootApplication、@SpringBootConfiguration等注解的类都可以当做一个配置类使用
4.2.3 @EnableAutoConfiguration源码
@EnableAutoConfiguration是SpringBoot自动配置的核心;
@Target({ElementType.TYPE})
@Retention(RetentionPolicy.RUNTIME)
@Documented
@Inherited
@AutoConfigurationPackage
@Import({AutoConfigurationImportSelector.class})
public @interface EnableAutoConfiguration {String ENABLED_OVERRIDE_PROPERTY = "spring.boot.enableautoconfiguration";Class<?>[] exclude() default {};String[] excludeName() default {};
}标注了两个注解:@AutoConfigurationPackage、@Import({AutoConfigurationImportSelector.class})
1)Registrar
- 1)@AutoConfigurationPackage:在该注解上标注了@Import注解,导入了一个Registrar导入器,开启包的自动导入配置,扫描注解标注类所在的包及其下面的子包
@Target(ElementType.TYPE)
@Retention(RetentionPolicy.RUNTIME)
@Documented
@Inherited
@Import(AutoConfigurationPackages.Registrar.class)
public @interface AutoConfigurationPackage {
}往容器中注册了一个Registrar,查看Registrar:
static class Registrar implements ImportBeanDefinitionRegistrar, DeterminableImports {@Overridepublic void registerBeanDefinitions(AnnotationMetadata metadata,BeanDefinitionRegistry registry) {// 配置包注册(注册标注了AutoConfigurationPackage注解的类所在的全路径下面的所有类)register(registry, new PackageImport(metadata).getPackageName());}@Overridepublic Set<Object> determineImports(AnnotationMetadata metadata) {return Collections.singleton(new PackageImport(metadata));}}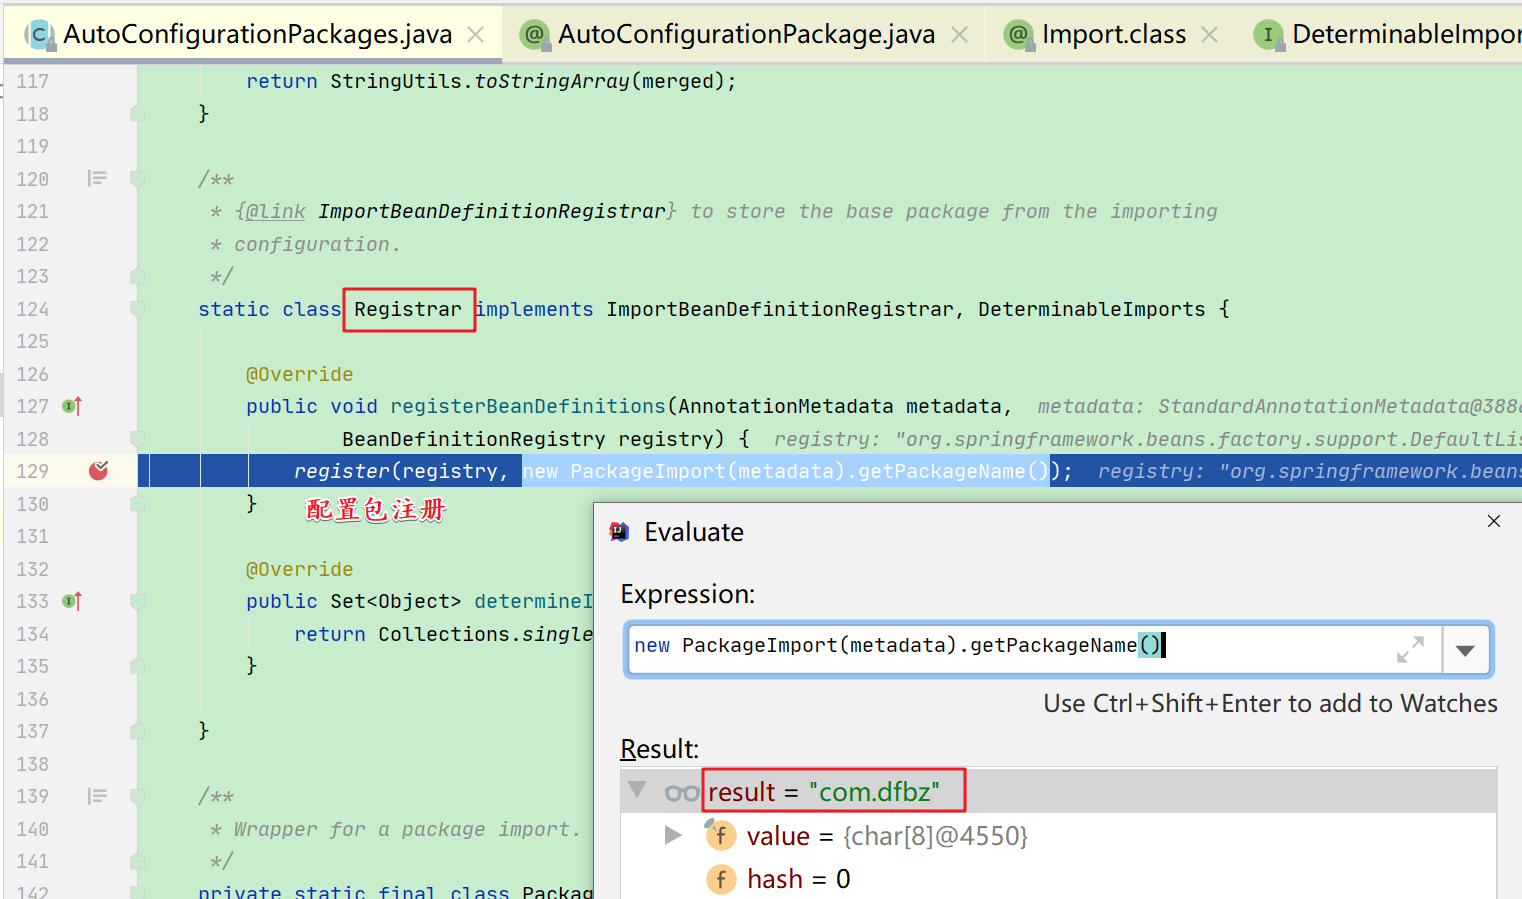
SpringBoot应用的默认扫描规则是只扫描主程序所在包及其子包
也可以通过指定参数让SpringBoot来扫描其他包(主程序所在包就不会扫描了)
@SpringBootApplication(scanBasePackages = "com.dfbz.controller")
public class HelloApplication {
}
2)AutoConfigurationImportSelector
在@EnableAutoConfiguration还标注了一个@Import(AutoConfigurationImportSelector.class),导入了一个AutoConfigurationImportSelector类;
查看继承体系:

发现AutoConfigurationImportSelector实现接口ImportSelector,在导入时,一定会调用selectImports进行Bean配置;
@Override
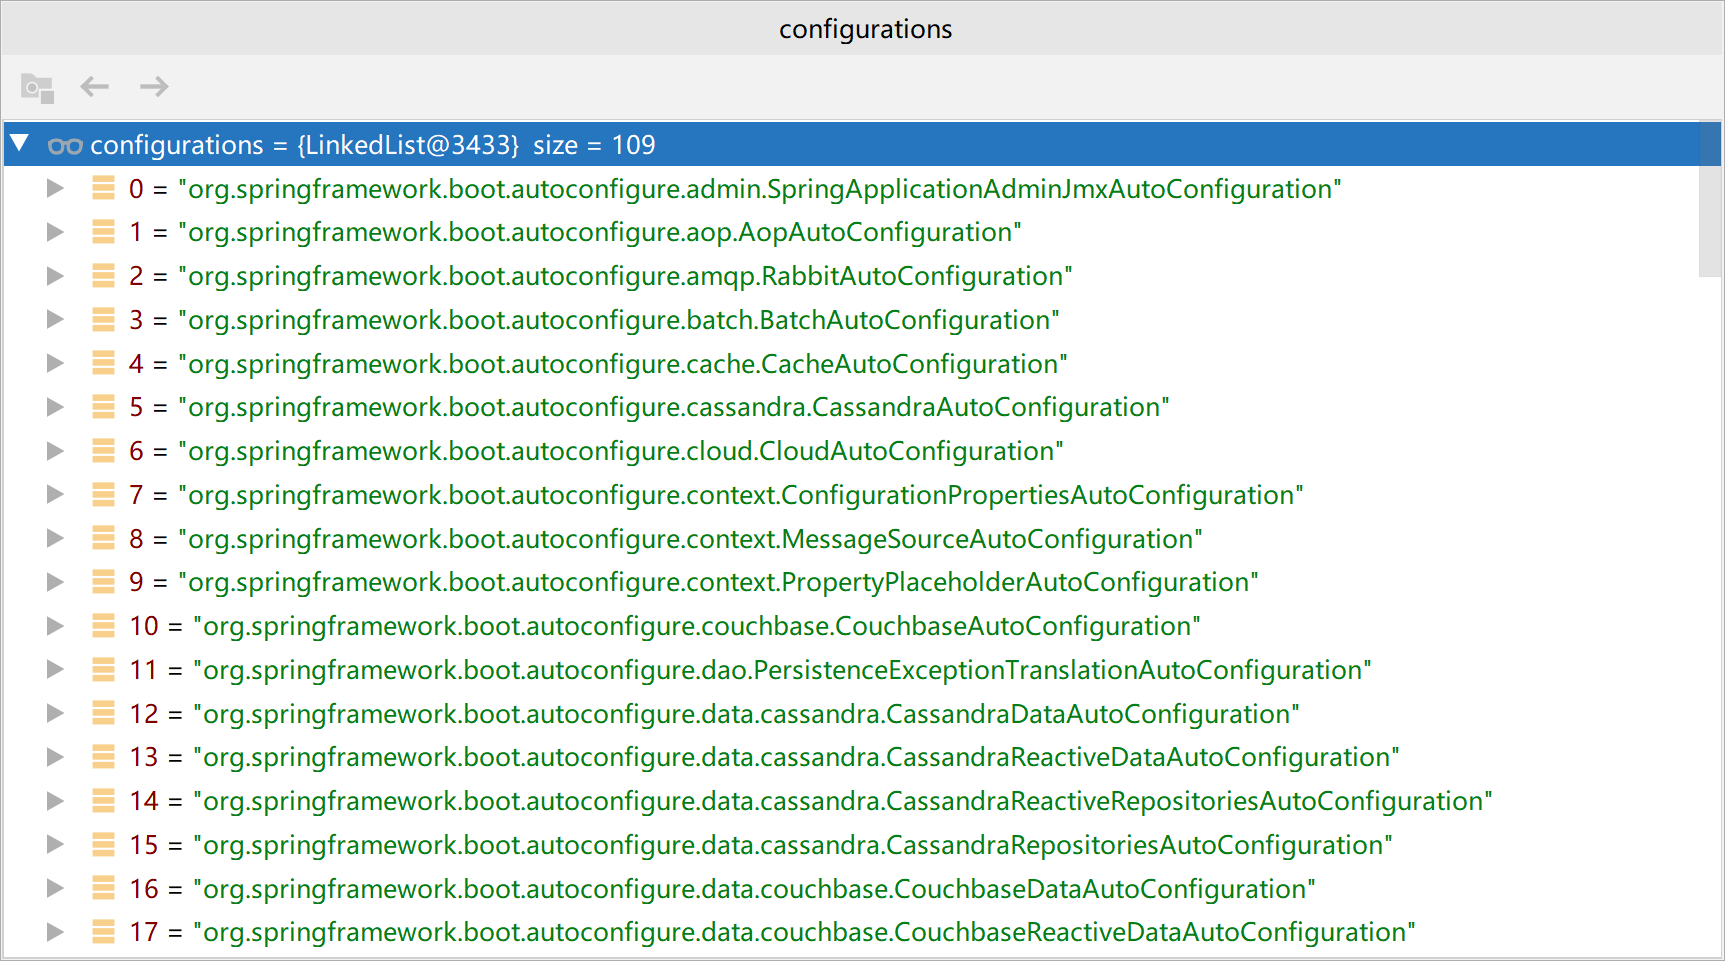
public String[] selectImports(AnnotationMetadata annotationMetadata) {if (!isEnabled(annotationMetadata)) {return NO_IMPORTS;}AutoConfigurationMetadata autoConfigurationMetadata = AutoConfigurationMetadataLoader.loadMetadata(this.beanClassLoader);AnnotationAttributes attributes = getAttributes(annotationMetadata);// 给容器中导入一批组件(xxxAutoConfiguration)List<String> configurations = getCandidateConfigurations(annotationMetadata,attributes);configurations = removeDuplicates(configurations);Set<String> exclusions = getExclusions(annotationMetadata, attributes);checkExcludedClasses(configurations, exclusions);configurations.removeAll(exclusions);// 过滤掉一些不生效的组件configurations = filter(configurations, autoConfigurationMetadata);fireAutoConfigurationImportEvents(configurations, exclusions);// 其他全部导入到IOC容器给中return StringUtils.toStringArray(configurations);
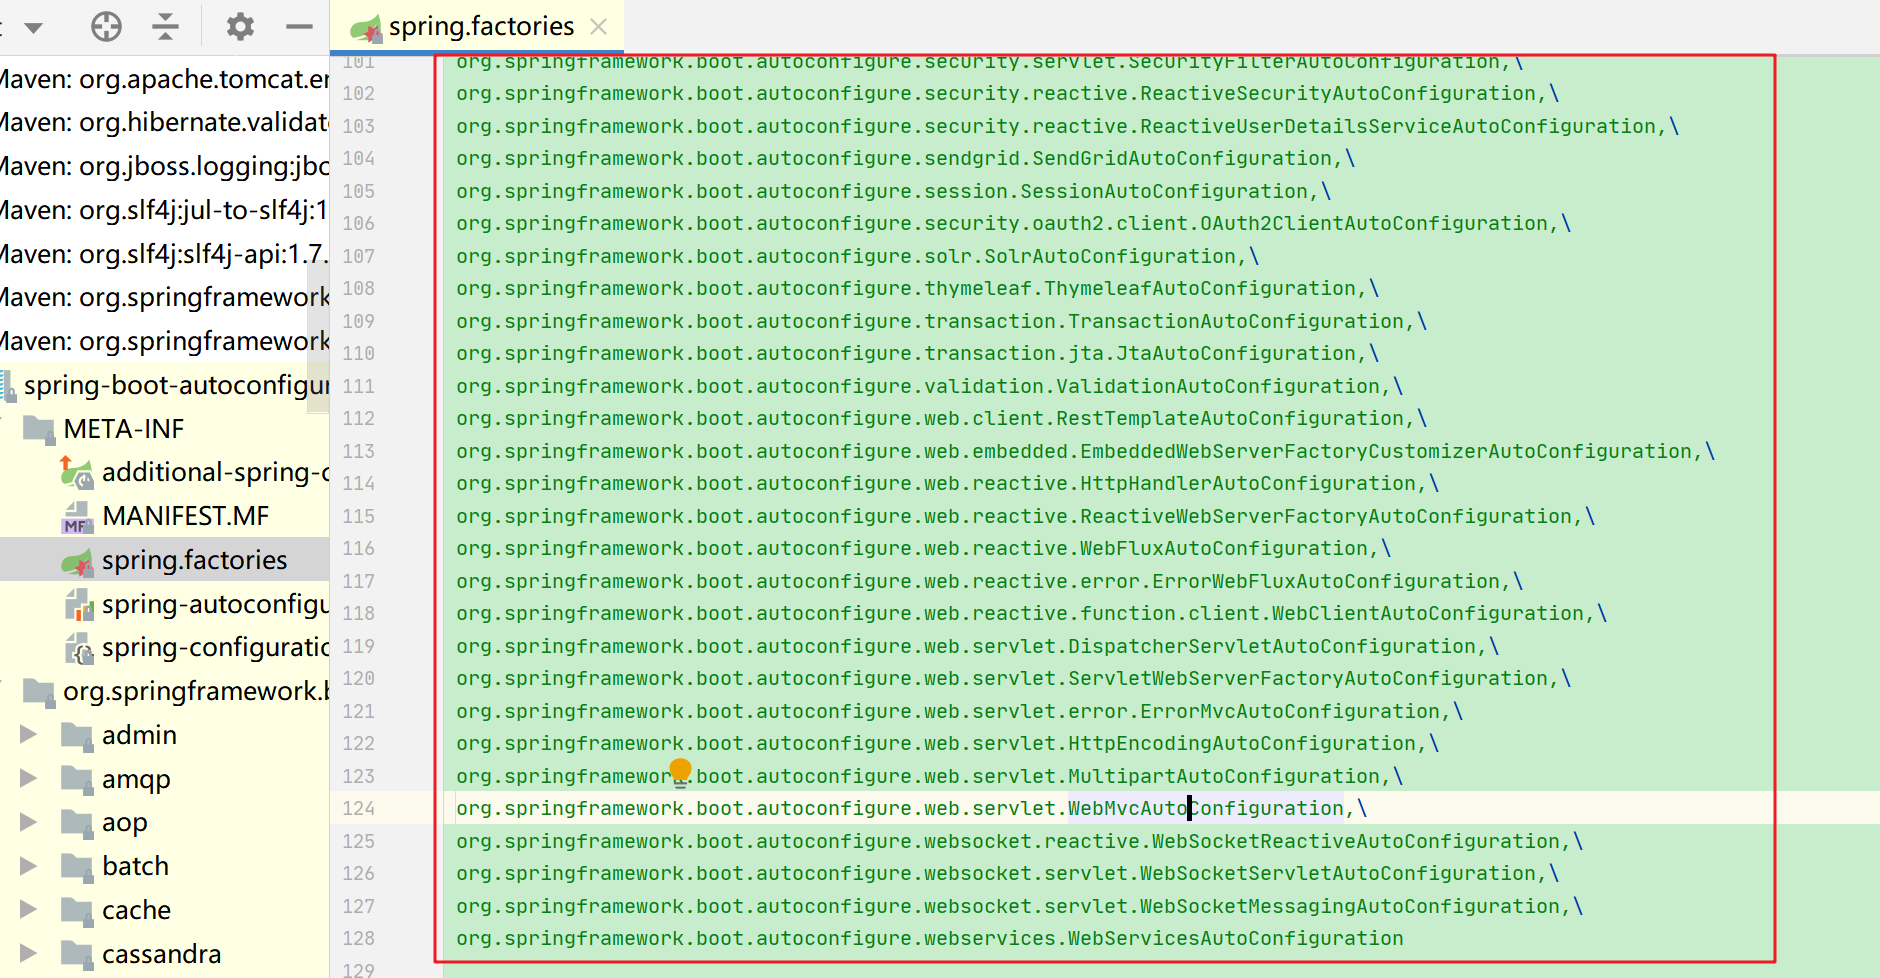
}protected List<String> getCandidateConfigurations(AnnotationMetadata metadata,AnnotationAttributes attributes) {List<String> configurations = SpringFactoriesLoader.loadFactoryNames(getSpringFactoriesLoaderFactoryClass(), getBeanClassLoader());Assert.notEmpty(configurations,"No auto configuration classes found in META-INF/spring.factories. If you "+ "are using a custom packaging, make sure that file is correct.");return configurations;
}configurations值:
- SpringFactoriesLoader源码:
public static List<String> loadFactoryNames(Class<?> factoryClass, @Nullable ClassLoader classLoader) {String factoryClassName = factoryClass.getName();return loadSpringFactories(classLoader).getOrDefault(factoryClassName, Collections.emptyList());
}private static Map<String, List<String>> loadSpringFactories(@Nullable ClassLoader classLoader) {MultiValueMap<String, String> result = cache.get(classLoader);if (result != null) {return result;}try {Enumeration<URL> urls = (classLoader != null ?// META-INF/spring.factoriesclassLoader.getResources(FACTORIES_RESOURCE_LOCATION) :ClassLoader.getSystemResources(FACTORIES_RESOURCE_LOCATION));result = new LinkedMultiValueMap<>();while (urls.hasMoreElements()) {URL url = urls.nextElement();UrlResource resource = new UrlResource(url);Properties properties = PropertiesLoaderUtils.loadProperties(resource);for (Map.Entry<?, ?> entry : properties.entrySet()) {List<String> factoryClassNames = Arrays.asList(StringUtils.commaDelimitedListToStringArray((String) entry.getValue()));result.addAll((String) entry.getKey(), factoryClassNames);}}cache.put(classLoader, result);return result;}catch (IOException ex) {throw new IllegalArgumentException("Unable to load factories from location [" +FACTORIES_RESOURCE_LOCATION + "]", ex);}
}
4.2.4 @ComponentScan
@SpringBootApplication注解上除了标注了上面两个注解外,还标注了一个@ComponentScan注解,其内容如下:
@ComponentScan(excludeFilters = {@Filter(type = FilterType.CUSTOM, classes = TypeExcludeFilter.class),@Filter(type = FilterType.CUSTOM, classes = AutoConfigurationExcludeFilter.class) })添加了两个排除过滤器,分别是TypeExcludeFilter和AutoConfigurationExcludeFilter;两个排除过滤器都继承与TypeFilter接口,并且是一个函数式接口;IOC容器启动时,会将被扫描的Bean的元数据信息传递到该match,由该方法的返回值来决定是否要排除这个Bean;
@FunctionalInterface
public interface TypeFilter {/*** 根据match方法的返回值来决定当前Bean是否要注册到IOC容器* @param metadataReader: 这个注解标注的目标类的元数据读取器* @param metadataReaderFactory: 获取元数据读取器的工厂*/boolean match(MetadataReader metadataReader, MetadataReaderFactory metadataReaderFactory)throws IOException;}
1)AutoConfigurationExcludeFilter
AutoConfigurationExcludeFilter:
package org.springframework.boot.autoconfigure;import java.io.IOException;
import java.util.List;import org.springframework.beans.factory.BeanClassLoaderAware;
import org.springframework.context.annotation.Configuration;
import org.springframework.core.io.support.SpringFactoriesLoader;
import org.springframework.core.type.classreading.MetadataReader;
import org.springframework.core.type.classreading.MetadataReaderFactory;
import org.springframework.core.type.filter.TypeFilter;/*** A {@link TypeFilter} implementation that matches registered auto-configuration classes.** @author Stephane Nicoll* @since 1.5.0*/
public class AutoConfigurationExcludeFilter implements TypeFilter, BeanClassLoaderAware {private ClassLoader beanClassLoader;private volatile List<String> autoConfigurations;@Overridepublic void setBeanClassLoader(ClassLoader beanClassLoader) {this.beanClassLoader = beanClassLoader;}// 作用: 当前这个类不能是一个配置类 并且 也不能是一个自动配置类(不能写在META-INF/spring.factroies文件中)@Overridepublic boolean match(MetadataReader metadataReader,MetadataReaderFactory metadataReaderFactory) throws IOException {return isConfiguration(metadataReader) && isAutoConfiguration(metadataReader);}// 当前这个类上是否标注了Configuration注解private boolean isConfiguration(MetadataReader metadataReader) {return metadataReader.getAnnotationMetadata().isAnnotated(Configuration.class.getName());}// 当前这个类是否是一个自动配置类private boolean isAutoConfiguration(MetadataReader metadataReader) {return getAutoConfigurations().contains(metadataReader.getClassMetadata().getClassName());}protected List<String> getAutoConfigurations() {if (this.autoConfigurations == null) {this.autoConfigurations = SpringFactoriesLoader.loadFactoryNames(EnableAutoConfiguration.class, this.beanClassLoader);}return this.autoConfigurations;}
}说明:SpringBoot项目启动后,通过@Import(AutoConfigurationImportSelector.class)加载每个jar包下的/META-INF/spring.factories文件中的org.springframework.boot.autoconfigure.EnableAutoConfiguration指定的自动配置类,因此如果我们编写的类上标注了@Configuration注解(确定是一个配置类)并且还写在了/META-INF/spring.factories文件中,那么这个类已经被加载过了,不需要重复再加载,通过该排除器对这个配置类进行排除;
如果我们自己想要自定义自动配置类让其生效,有两种方法:
- 1)在类上只标注一个
@Configuration注解,没有写在/META-INF/spring.factories文件中,不会被排除,但也被默认的规则扫描到了(Registrar导入器);
- 2)在类上只标注一个
@Configuration注解,写在/META-INF/spring.factories文件中,被排除(但被SpringBoot扫描到了),这是SpringBoot推荐的写法,标准的自动配置类
Tips:自动配置类和普通的配置类的作用都是一模一样的,只不过自动配置类一般用于加载某些场景,而且是写在/META-INF/spring.factories中的;
2)TypeExcludeFilter
TypeExcludeFilter:
package org.springframework.boot.context;import java.io.IOException;
import java.util.Collection;import org.springframework.beans.BeansException;
import org.springframework.beans.factory.BeanFactory;
import org.springframework.beans.factory.BeanFactoryAware;
import org.springframework.beans.factory.ListableBeanFactory;
import org.springframework.core.type.classreading.MetadataReader;
import org.springframework.core.type.classreading.MetadataReaderFactory;
import org.springframework.core.type.filter.TypeFilter;public class TypeExcludeFilter implements TypeFilter, BeanFactoryAware {private BeanFactory beanFactory;@Overridepublic void setBeanFactory(BeanFactory beanFactory) throws BeansException {this.beanFactory = beanFactory;}// 作用: 获取IOC容器中,所有有关于TypeExcludeFilter的后代类,然后执行这些后代类的match方法@Overridepublic boolean match(MetadataReader metadataReader,MetadataReaderFactory metadataReaderFactory) throws IOException {if (this.beanFactory instanceof ListableBeanFactory&& getClass() == TypeExcludeFilter.class) {// 从IOC容器中获取有关于TypeExcludeFilter的所有Bean(包括后代类)Collection<TypeExcludeFilter> delegates = ((ListableBeanFactory) this.beanFactory).getBeansOfType(TypeExcludeFilter.class).values();for (TypeExcludeFilter delegate : delegates) {// 调用TypeExcludeFilter后代类的所有match方法if (delegate.match(metadataReader, metadataReaderFactory)) {return true;}}}return false;}@Overridepublic boolean equals(Object obj) {throw new IllegalStateException("TypeExcludeFilter " + getClass() + " has not implemented equals");}@Overridepublic int hashCode() {throw new IllegalStateException("TypeExcludeFilter " + getClass() + " has not implemented hashCode");}
}TypeExcludeFilter过滤器是SpringBoot提供给我们用的排除过滤器,我们可以根据一些条件来决定是否要过滤某些Bean;
SpringBoot的引导类上面只配置了两个排除器,一个是AutoConfigurationExcludeFilter,另一个是TypeExcludeFilter,也就是说SpringBoot扫描到的Bean只会经过这个两个过滤器,那如果我们想要自定义排除器并且参与SpringBoot的Bean的过滤,那么就可以继承TypeExcludeFilter参与过滤;
3)自定义排除器
- 自定义排除器:
package com.dfbz;import com.dfbz.controller.HelloController;
import org.springframework.boot.context.TypeExcludeFilter;
import org.springframework.core.type.classreading.MetadataReader;
import org.springframework.core.type.classreading.MetadataReaderFactory;import java.io.IOException;/*** @author lscl* @version 1.0* @intro:*/
//@Component          // 不能用这种方式注册到IOC容器,因为这个排除器需要在Spring扫描组件之前生效
public class MyTypeExcludeFilter extends TypeExcludeFilter {@Overridepublic boolean match(MetadataReader metadataReader, MetadataReaderFactory metadataReaderFactory) throws IOException {// 排除HelloControllerreturn metadataReader.getClassMetadata().getClassName().equals(HelloController.class.getName());}
}排除器(MyTypeExcludeFilter)需要注册到IOC容器中才会生效,但不能使用@Component 注册,因为排除器在容器扫描之前就要生效
- 编写初始化器:
package com.dfbz;import org.springframework.context.ApplicationContextInitializer;
import org.springframework.context.ConfigurableApplicationContext;/*** @author lscl* @version 1.0* @intro:*/
public class MyApplicationContextInitializer implements ApplicationContextInitializer {@Overridepublic void initialize(ConfigurableApplicationContext applicationContext) {// 往IOC容器中注册一个单例Bean(在IOC容器初始化后,@ComponentScan组件扫描之前执行)applicationContext.getBeanFactory().registerSingleton("myTypeExcludeFilter",new MyTypeExcludeFilter());}
}- 让初始化器生效:
在resources目录下编写META-INF/spring.factories,内容如下:
# Initializers
org.springframework.context.ApplicationContextInitializer=\
com.dfbz.MyApplicationContextInitializer
4.3 自动配置类
4.3.1 自动配置类说明
通过刚刚的自动配置原理我们发现,SpringBoot在启动时,就加载了非常多的一些配置类(xxxAutoConfiguration),这些配置类中配置了非常多的信息,包括根据条件导入一些Bean、配置一些属性、绑定一些配置;
我们之所以能够启动SpringBoot环境就配置好了大量的环境(SpringMVC环境/MyBatis环境/JPA环境等)都是因为这些自动配置类在SpringBoot启动时帮我们在IOC容器里注册了大量的Bean;
Tips:配置类的地址在META-INF/spring.factories文件中org.springframework.boot.autoconfigure.EnableAutoConfigurationkey所指定的内容;
以DispatcherServletAutoConfiguration配置类举例:
// 配置顺序(数字越小,越优先加载,负数也可以)
@AutoConfigureOrder(Ordered.HIGHEST_PRECEDENCE)	// 标注这是一个配置类
@Configuration// 如果是web环境才配置此类
@ConditionalOnWebApplication(type = Type.SERVLET)// 如果系统中有DispatcherServlet类才配置此类(导入了这个依赖就配置这个类)
@ConditionalOnClass(DispatcherServlet.class)// 在ServletWebServerFactoryAutoConfiguration类加载之后再加载此类
@AutoConfigureAfter(ServletWebServerFactoryAutoConfiguration.class)
// 开启属性配置
@EnableConfigurationProperties(ServerProperties.class)
public class DispatcherServletAutoConfiguration {public static final String DEFAULT_DISPATCHER_SERVLET_BEAN_NAME = "dispatcherServlet";public static final String DEFAULT_DISPATCHER_SERVLET_REGISTRATION_BEAN_NAME = "dispatcherServletRegistration";// 标注这是一个配置类@Configuration// 满足DefaultDispatcherServletCondition的matches方法时配置该类@Conditional(DefaultDispatcherServletCondition.class)// 容器中有ServletRegistration类时配置该类@ConditionalOnClass(ServletRegistration.class)// 开启配置属性@EnableConfigurationProperties(WebMvcProperties.class)protected static class DispatcherServletConfiguration {private final WebMvcProperties webMvcProperties;public DispatcherServletConfiguration(WebMvcProperties webMvcProperties) {this.webMvcProperties = webMvcProperties;}// 往IOC容器中配置一个DispatcherServlet类@Bean(name = DEFAULT_DISPATCHER_SERVLET_BEAN_NAME)public DispatcherServlet dispatcherServlet() {DispatcherServlet dispatcherServlet = new DispatcherServlet();dispatcherServlet.setDispatchOptionsRequest(this.webMvcProperties.isDispatchOptionsRequest());dispatcherServlet.setDispatchTraceRequest(this.webMvcProperties.isDispatchTraceRequest());dispatcherServlet.setThrowExceptionIfNoHandlerFound(this.webMvcProperties.isThrowExceptionIfNoHandlerFound());return dispatcherServlet;}@Bean@ConditionalOnBean(MultipartResolver.class)@ConditionalOnMissingBean(name = DispatcherServlet.MULTIPART_RESOLVER_BEAN_NAME)public MultipartResolver multipartResolver(MultipartResolver resolver) {// Detect if the user has created a MultipartResolver but named it incorrectlyreturn resolver;}}@Configuration@Conditional(DispatcherServletRegistrationCondition.class)@ConditionalOnClass(ServletRegistration.class)@EnableConfigurationProperties(WebMvcProperties.class)@Import(DispatcherServletConfiguration.class)protected static class DispatcherServletRegistrationConfiguration {private final ServerProperties serverProperties;private final WebMvcProperties webMvcProperties;private final MultipartConfigElement multipartConfig;public DispatcherServletRegistrationConfiguration(ServerProperties serverProperties, WebMvcProperties webMvcProperties,ObjectProvider<MultipartConfigElement> multipartConfigProvider) {this.serverProperties = serverProperties;this.webMvcProperties = webMvcProperties;this.multipartConfig = multipartConfigProvider.getIfAvailable();}@Bean(name = DEFAULT_DISPATCHER_SERVLET_REGISTRATION_BEAN_NAME)@ConditionalOnBean(value = DispatcherServlet.class, name = DEFAULT_DISPATCHER_SERVLET_BEAN_NAME)public ServletRegistrationBean<DispatcherServlet> dispatcherServletRegistration(DispatcherServlet dispatcherServlet) {ServletRegistrationBean<DispatcherServlet> registration = new ServletRegistrationBean<>(dispatcherServlet,this.serverProperties.getServlet().getServletMapping());registration.setName(DEFAULT_DISPATCHER_SERVLET_BEAN_NAME);registration.setLoadOnStartup(this.webMvcProperties.getServlet().getLoadOnStartup());if (this.multipartConfig != null) {registration.setMultipartConfig(this.multipartConfig);}return registration;}}
}
4.3.2 @Conditional派生注解
我们已经知道了自动配置类的加载规则,只要配置在META-INF/spring.factories文件的org.springframework.boot.autoconfigure.EnableAutoConfigurationkey中的全类名,该配置类即可被加载,但有些时候我们并不希望这些配置类能够被立即加载,而是需要符合某些条件时这些配置类才会被加载;
SpringBoot内置了非常多的条件判断注解,这些注解可以帮助我们在符合条件的清空下,该配置类/方法才会生效;这些注解我们统一称为派生注解;为@ConditionalXxx;
- @Conditional表格:
| @Conditional扩展注解 | 作用(判断是否满足当前指定条件) |
| @ConditionalOnJava | 系统的java版本是否符合要求 |
| @ConditionalOnBean | 容器中存在指定Bean; |
| @ConditionalOnMissingBean | 容器中不存在指定Bean; |
| @ConditionalOnExpression | 满足SpEL表达式指定 |
| @ConditionalOnClass | 系统中有指定的类 |
| @ConditionalOnMissingClass | 系统中没有指定的类 |
| @ConditionalOnSingleCandidate | 容器中只有一个指定的Bean,或者这个Bean是首选Bean |
| @ConditionalOnProperty | 系统中指定的属性是否有指定的值 |
| @ConditionalOnResource | 类路径下是否存在指定资源文件 |
| @ConditionalOnWebApplication | 当前是web环境 |
| @ConditionalOnNotWebApplication | 当前不是web环境 |
| @ConditionalOnJndi | JNDI存在指定项 |
4.3.3 自定义自动配置类
自动配置类的加载说明:
- 1)必须是一个配置类
- 2)必须配置在
META-INF/spring.factories中的org.springframework.boot.autoconfigure.EnableAutoConfigurationkey中;
- 3)可能还会包含一些派生注解(@ConditionalXxx)
package com.dfbz.config;import com.dfbz.controller.HelloController;
import com.dfbz.entity.City;
import org.springframework.boot.autoconfigure.condition.ConditionalOnBean;
import org.springframework.boot.autoconfigure.condition.ConditionalOnJava;
import org.springframework.boot.autoconfigure.condition.ConditionalOnResource;
import org.springframework.boot.system.JavaVersion;
import org.springframework.context.annotation.Bean;
import org.springframework.context.annotation.Configuration;/*** @author lscl* @version 1.0* @intro:*/
@Configuration
@ConditionalOnJava(JavaVersion.EIGHT)           // Java版本必须是1.8
@ConditionalOnBean(HelloController.class)       // IOC容器中必须存在HelloController这个对象
@ConditionalOnResource(resources = "application.properties")        // 类路径下必须存在application.properties
public class MyAutoConfiguration {@Beanpublic City city() {return new City();}
}在META-INF/spring.factories文件中添加:
org.springframework.boot.autoconfigure.EnableAutoConfiguration=\
com.dfbz.MyAutoConfiguration
4.4 属性配置类
4.4.1 属性配置类说明
自动配置类中通常会绑定(通过EnableConfigurationProperties开启)一些属性配置类(xxxProperties.class),这些属性配置类通过@ConfigurationProperties注解标识;
在自动配置类中根据条件配置了大量的Bean,而这些Bean上面大都开启(@EnableConfigurationProperties)了属性配置类(xxxProperties.class),这些属性配置类是SpringBoot"基于约定配置"的保障;
- 查看DispatcherServletAutoConfiguration自动配置类:
@AutoConfigureOrder(Ordered.HIGHEST_PRECEDENCE)
@Configuration
@ConditionalOnWebApplication(type = Type.SERVLET)
@ConditionalOnClass(DispatcherServlet.class)
@AutoConfigureAfter(ServletWebServerFactoryAutoConfiguration.class)
@EnableConfigurationProperties(ServerProperties.class)			// 开启属性配置
public class DispatcherServletAutoConfiguration {- 查看ServerProperties属性配置类:
// 与配置文件进行绑定
@ConfigurationProperties(prefix = "server", ignoreUnknownFields = true)		// 与application.yml/properties配置文件进行绑定;
public class ServerProperties {private Integer port;private InetAddress address;@NestedConfigurationPropertyprivate final ErrorProperties error = new ErrorProperties();private Boolean useForwardHeaders;private String serverHeader;}
4.4.2 自定义属性配置类
- 自定义属性配置类:
package com.dfbz.entity;import lombok.AllArgsConstructor;
import lombok.Data;
import lombok.NoArgsConstructor;
import org.springframework.boot.context.properties.ConfigurationProperties;
import org.springframework.stereotype.Component;/*** @author lscl* @version 1.0* @intro:*/
@Data                       // 提供get/set/toString...
@AllArgsConstructor         // 有参构造
@NoArgsConstructor          // 无参构造@Component                              // 必须要放入IOC容器才能使用@ConfigurationProperties注解
@ConfigurationProperties(prefix = "com.dfbz.book")          // 绑定的前缀为: com.dfbz.book
public class Book {private String name;private Double price;
}- application.yml:
com:dfbz:book:name: 《Java入门到精通》price: 38.8- DemoController:
package com.dfbz.controller;import com.dfbz.entity.Book;
import org.springframework.beans.factory.annotation.Autowired;
import org.springframework.web.bind.annotation.GetMapping;
import org.springframework.web.bind.annotation.ResponseBody;
import org.springframework.web.bind.annotation.RestController;/*** @author lscl* @version 1.0* @intro:*/
@RestController
public class DemoController {@Autowiredprivate Book book;@GetMapping("/getBook")@ResponseBodypublic Book getBook() {return book;}
}
访问:http://localhost:8080/getBook:

也可以使用@EnableConfigurationProperties注解来指定要开启某个类上面的属性配置;该类会自动被加载到IOC容器
package com.dfbz;import com.dfbz.entity.Book;
import org.springframework.boot.SpringApplication;
import org.springframework.boot.autoconfigure.SpringBootApplication;
import org.springframework.boot.context.properties.EnableConfigurationProperties;/*** @author lscl* @version 1.0* @intro:*/
@SpringBootApplication
@EnableConfigurationProperties(Book.class)          // 开启Book类的属性配置功能
public class HelloApplication {public static void main(String[] args) {SpringApplication.run(HelloApplication.class);}
}注释Book类中的@Component注解;
重启服务器,再次访问:http://localhost:8080/getBook发现配置依旧可以;
4.5 自定义场景启动器
4.5.1 场景启动器包含内容
1)自动配置类;
xxxAutoConfiguration
2)开启属性配置,并绑定属性配置类;
xxxProperties
3)加入到META-INF/spring.factories中;
4.5.2 搭建自动配置工程
自动配置场景启动器名称规范:{name}-springboot-starter-autoconfigurer
4.5.2.1 依赖
<?xml version="1.0" encoding="UTF-8"?>
<project xmlns="http://maven.apache.org/POM/4.0.0"xmlns:xsi="http://www.w3.org/2001/XMLSchema-instance"xsi:schemaLocation="http://maven.apache.org/POM/4.0.0 http://maven.apache.org/xsd/maven-4.0.0.xsd"><modelVersion>4.0.0</modelVersion><groupId>com.dfbz</groupId><artifactId>02-mystarter-springboot-starter-autoconfigurer</artifactId><version>1.0-SNAPSHOT</version><parent><groupId>org.springframework.boot</groupId><artifactId>spring-boot-starter-parent</artifactId><version>2.0.1.RELEASE</version><relativePath/> <!-- lookup parent from repository --></parent><dependencies><!--springboot的启动器,包含所有starter的基本配置--><dependency><groupId>org.springframework.boot</groupId><artifactId>spring-boot-starter</artifactId></dependency></dependencies></project>
4.5.2.2 自动配置类
package com.mystarter.autoconfig;import com.mystarter.service.HelloService;
import org.springframework.boot.autoconfigure.condition.ConditionalOnWebApplication;
import org.springframework.boot.autoconfigure.web.ServerProperties;
import org.springframework.boot.context.properties.EnableConfigurationProperties;
import org.springframework.context.annotation.Bean;
import org.springframework.context.annotation.Configuration;/*** @author lscl* @version 1.0* @intro: 自动配置类*/
// 标注这是一个配置类
@Configuration
// 如果是web环境才配置此类
@ConditionalOnWebApplication
// 开启配置属性
@EnableConfigurationProperties(MyStarterProperties.class)
public class MyStarterAutoConfiguration {@Beanpublic HelloService helloService(){return new HelloService();}
}
4.5.2.3 属性配置类
package com.mystarter.properties;import org.springframework.boot.context.properties.ConfigurationProperties;/*** @author lscl* @version 1.0* @intro: 属性配置类,绑定配置文件,指定前缀*/
@ConfigurationProperties(prefix = "mystarter")
public class MyStarterProperties {private String text;public String getText() {return text;}public void setText(String text) {this.text = text;}
}
4.5.2.4 具体配置的类
package com.mystarter.service;import org.springframework.beans.factory.annotation.Value;/*** @author lscl* @version 1.0* @intro:*/
public class HelloService {@Autowiredprivate MyStarterProperties properties;public String sayHello() {return properties.getText();}
}
4.5.2.5 spring.factories
在/MATA-INF/目录下新建spring.factories文件;
org.springframework.boot.autoconfigure.EnableAutoConfiguration=\com.mystarter.autoconfig.MyStarterAutoConfiguration4.5.3 搭建测试工程
4.5.3.1 依赖
<?xml version="1.0" encoding="UTF-8"?>
<project xmlns="http://maven.apache.org/POM/4.0.0"xmlns:xsi="http://www.w3.org/2001/XMLSchema-instance"xsi:schemaLocation="http://maven.apache.org/POM/4.0.0 http://maven.apache.org/xsd/maven-4.0.0.xsd"><modelVersion>4.0.0</modelVersion><groupId>org.example</groupId><artifactId>03-MyStarterTest</artifactId><version>1.0-SNAPSHOT</version><parent><groupId>org.springframework.boot</groupId><artifactId>spring-boot-starter-parent</artifactId><version>2.0.1.RELEASE</version></parent><dependencies><!--导入我们自定义的starter--><dependency><groupId>com.dfbz</groupId><artifactId>02-mystarter-springboot-starter-autoconfigurer</artifactId><version>1.0-SNAPSHOT</version></dependency><!--web场景的starter--><dependency><groupId>org.springframework.boot</groupId><artifactId>spring-boot-starter-web</artifactId></dependency></dependencies></project>
4.5.2.2 Controller
package com.dfbz.controller;import com.mystarter.service.HelloService;
import org.springframework.beans.factory.annotation.Autowired;
import org.springframework.stereotype.Controller;
import org.springframework.web.bind.annotation.GetMapping;
import org.springframework.web.bind.annotation.ResponseBody;/*** @author lscl* @version 1.0* @intro:*/
@Controller
public class HelloController {@Autowiredprivate HelloService helloService;@GetMapping("/hello")@ResponseBodypublic String hello() {return helloService.sayHello();}
}
4.5.2.3 application.yml
mystarter:text: hello~4.5.2.4 引导类
package com.dfbz;import org.springframework.boot.SpringApplication;
import org.springframework.boot.autoconfigure.SpringBootApplication;/*** @author lscl* @version 1.0* @intro:*/
@SpringBootApplication
public class Application {public static void main(String[] args) {SpringApplication.run(Application.class);}
}
五、SpringBoot与整合其他技术
5.1 SpringBoot整合Mybatis
5.1.1 搭建工程
1)依赖:
<?xml version="1.0" encoding="UTF-8"?>
<project xmlns="http://maven.apache.org/POM/4.0.0"xmlns:xsi="http://www.w3.org/2001/XMLSchema-instance"xsi:schemaLocation="http://maven.apache.org/POM/4.0.0 http://maven.apache.org/xsd/maven-4.0.0.xsd"><modelVersion>4.0.0</modelVersion><groupId>com.dfbz</groupId><artifactId>04-SpringBoot-MyBatis</artifactId><version>1.0-SNAPSHOT</version><parent><artifactId>spring-boot-parent</artifactId><groupId>org.springframework.boot</groupId><version>2.0.1.RELEASE</version></parent><dependencies><dependency><groupId>org.springframework.boot</groupId><artifactId>spring-boot-starter-web</artifactId></dependency><!--mybatis起步依赖--><dependency><groupId>org.mybatis.spring.boot</groupId><artifactId>mybatis-spring-boot-starter</artifactId><version>1.1.1</version></dependency><!-- MySQL连接驱动 --><dependency><groupId>mysql</groupId><artifactId>mysql-connector-java</artifactId></dependency><dependency><groupId>org.projectlombok</groupId><artifactId>lombok</artifactId></dependency></dependencies>
</project>
2)创建表
/*Table structure for table `user` */
CREATE TABLE `user` (`id` INT(11) NOT NULL AUTO_INCREMENT,`username` VARCHAR(50) DEFAULT NULL,`password` VARCHAR(50) DEFAULT NULL,`name` VARCHAR(50) DEFAULT NULL,PRIMARY KEY (`id`)
) ENGINE=INNODB AUTO_INCREMENT=3 DEFAULT CHARSET=utf8;/*Data for the table `user` */
INSERT  INTO `user`(`id`,`username`,`password`,`name`) VALUES (1,'zhangsan','123','张三');
INSERT  INTO `user`(`id`,`username`,`password`,`name`) VALUES (2,'lisi','123','李四');
3)创建实体Bean
package com.dfbz.entity;import lombok.AllArgsConstructor;
import lombok.Data;
import lombok.NoArgsConstructor;
/**
* @author lscl
* @version 1.0
* @intro:
*/
@Data
@AllArgsConstructor
@NoArgsConstructor
public class User {private Integer id;private String username;private String password;private String name;
}
4)application.yml
spring:datasource:driver-class-name: com.mysql.jdbc.Driverurl: jdbc:mysql://localhost:3306/test?useUnicode=true&characterEncoding=utf8username: rootpassword: admin
#spring集成Mybatis环境
mybatis:type-aliases-package: com.dfbz.entity  #pojo别名扫描包#加载Mybatis映射文件mapper-locations: classpath:com/dfbz/mapper/*Mapper.xml
5)UserMapper
package com.dfbz.mapper;import com.dfbz.entity.User;
import org.apache.ibatis.annotations.Mapper;import java.util.List;/*** @author lscl* @version 1.0* @intro:*/
@Mapper
public interface UserMapper {public List<User> findAll();
}
6)UserMapper.xml
<?xml version="1.0" encoding="utf-8" ?>
<!DOCTYPE mapper PUBLIC "-//mybatis.org//DTD Mapper 3.0//EN""http://mybatis.org/dtd/mybatis-3-mapper.dtd" >
<mapper namespace="com.dfbz.mapper.UserMapper"><select id="findAll" resultType="user">select * from user</select>
</mapper>
5.1.2 测试
- UserController:
@RestController
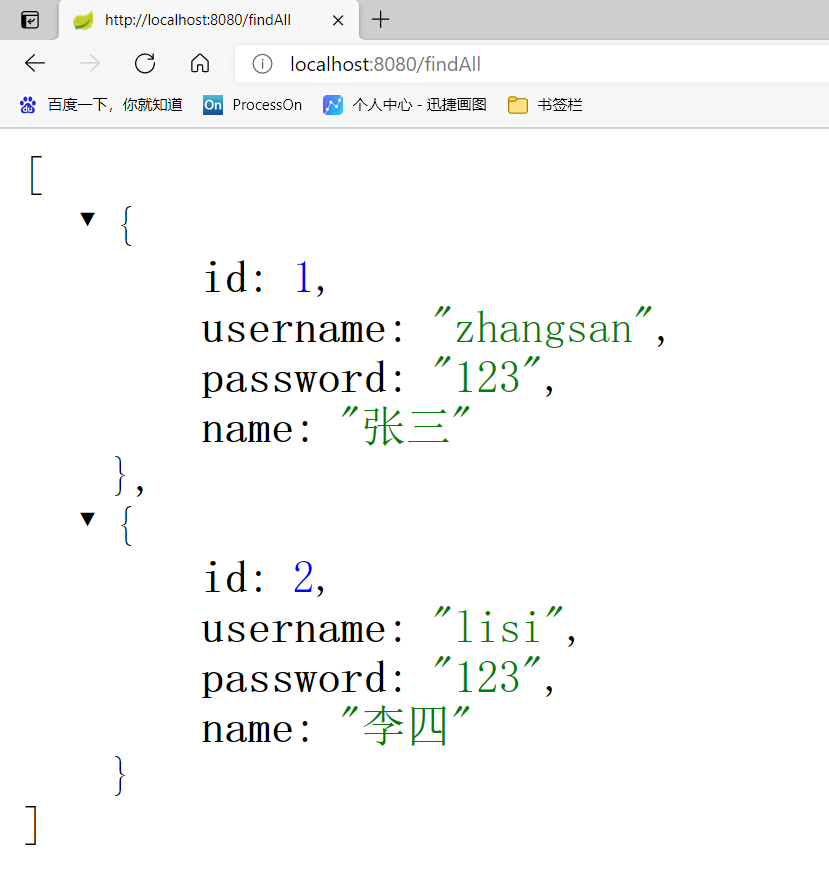
public class UserController {@Autowiredprivate UserMapper userMapper;@RequestMapping("/findAll")public List<User> findAll(){return userMapper.findAll();}
}访问:http://localhost:8080/findAll:
5.1.3 MyBatis自动配置
1)MybatisAutoConfiguration
在MybatisAutoConfiguration类中帮我们配置了开启了属性配置(MybatisProperties)、扫描带有@Mapper注解的类,以及在IOC容器中注册了SqlSessionFactory、SqlSessionTemplate等Bean;
package org.mybatis.spring.boot.autoconfigure;import java.util.List;import javax.annotation.PostConstruct;
import javax.sql.DataSource;import org.apache.commons.logging.Log;
import org.apache.commons.logging.LogFactory;
import org.apache.ibatis.annotations.Mapper;
import org.apache.ibatis.mapping.DatabaseIdProvider;
import org.apache.ibatis.plugin.Interceptor;
import org.apache.ibatis.session.ExecutorType;
import org.apache.ibatis.session.SqlSessionFactory;
import org.mybatis.spring.SqlSessionFactoryBean;
import org.mybatis.spring.SqlSessionTemplate;
import org.mybatis.spring.mapper.ClassPathMapperScanner;
import org.mybatis.spring.mapper.MapperFactoryBean;
import org.springframework.beans.BeansException;
import org.springframework.beans.factory.BeanFactory;
import org.springframework.beans.factory.BeanFactoryAware;
import org.springframework.beans.factory.annotation.Autowired;
import org.springframework.beans.factory.support.BeanDefinitionRegistry;
import org.springframework.boot.autoconfigure.AutoConfigurationPackages;
import org.springframework.boot.autoconfigure.AutoConfigureAfter;
import org.springframework.boot.autoconfigure.EnableAutoConfiguration;
import org.springframework.boot.autoconfigure.condition.ConditionalOnBean;
import org.springframework.boot.autoconfigure.condition.ConditionalOnClass;
import org.springframework.boot.autoconfigure.condition.ConditionalOnMissingBean;
import org.springframework.boot.autoconfigure.jdbc.DataSourceAutoConfiguration;
import org.springframework.boot.context.properties.EnableConfigurationProperties;
import org.springframework.context.ResourceLoaderAware;
import org.springframework.context.annotation.Bean;
import org.springframework.context.annotation.Configuration;
import org.springframework.context.annotation.Import;
import org.springframework.context.annotation.ImportBeanDefinitionRegistrar;
import org.springframework.core.io.DefaultResourceLoader;
import org.springframework.core.io.Resource;
import org.springframework.core.io.ResourceLoader;
import org.springframework.core.type.AnnotationMetadata;
import org.springframework.util.Assert;
import org.springframework.util.ObjectUtils;
import org.springframework.util.StringUtils;// 标注是一个配置类
@Configuration			// 当存在SqlSessionFactory和SqlSessionFactoryBean类时这个配置类才会生效
@ConditionalOnClass({ SqlSessionFactory.class, SqlSessionFactoryBean.class })// IOC容器中必须存在DataSource这个Bean
@ConditionalOnBean(DataSource.class)// 开启MybatisProperties的属性配置
@EnableConfigurationProperties(MybatisProperties.class)// 该配置类比DataSourceAutoConfiguration后生效
@AutoConfigureAfter(DataSourceAutoConfiguration.class)
public class MybatisAutoConfiguration {private static Log log = LogFactory.getLog(MybatisAutoConfiguration.class);@Autowiredprivate MybatisProperties properties;@Autowired(required = false)private Interceptor[] interceptors;@Autowiredprivate ResourceLoader resourceLoader = new DefaultResourceLoader();@Autowired(required = false)private DatabaseIdProvider databaseIdProvider;@PostConstructpublic void checkConfigFileExists() {if (this.properties.isCheckConfigLocation() && StringUtils.hasText(this.properties.getConfigLocation())) {Resource resource = this.resourceLoader.getResource(this.properties.getConfigLocation());Assert.state(resource.exists(), "Cannot find config location: " + resource+ " (please add config file or check your Mybatis " + "configuration)");}}// 配置SqlSessionFactory@Bean@ConditionalOnMissingBeanpublic SqlSessionFactory sqlSessionFactory(DataSource dataSource) throws Exception {SqlSessionFactoryBean factory = new SqlSessionFactoryBean();factory.setDataSource(dataSource);factory.setVfs(SpringBootVFS.class);if (StringUtils.hasText(this.properties.getConfigLocation())) {factory.setConfigLocation(this.resourceLoader.getResource(this.properties.getConfigLocation()));}factory.setConfiguration(properties.getConfiguration());if (!ObjectUtils.isEmpty(this.interceptors)) {factory.setPlugins(this.interceptors);}if (this.databaseIdProvider != null) {factory.setDatabaseIdProvider(this.databaseIdProvider);}if (StringUtils.hasLength(this.properties.getTypeAliasesPackage())) {factory.setTypeAliasesPackage(this.properties.getTypeAliasesPackage());}if (StringUtils.hasLength(this.properties.getTypeHandlersPackage())) {factory.setTypeHandlersPackage(this.properties.getTypeHandlersPackage());}if (!ObjectUtils.isEmpty(this.properties.resolveMapperLocations())) {factory.setMapperLocations(this.properties.resolveMapperLocations());}return factory.getObject();}// 配置SqlSessionTemplate@Bean@ConditionalOnMissingBeanpublic SqlSessionTemplate sqlSessionTemplate(SqlSessionFactory sqlSessionFactory) {ExecutorType executorType = this.properties.getExecutorType();if (executorType != null) {return new SqlSessionTemplate(sqlSessionFactory, executorType);} else {return new SqlSessionTemplate(sqlSessionFactory);}}// Mapper自动扫描器public static class AutoConfiguredMapperScannerRegistrarimplements BeanFactoryAware, ImportBeanDefinitionRegistrar, ResourceLoaderAware {private BeanFactory beanFactory;private ResourceLoader resourceLoader;@Overridepublic void registerBeanDefinitions(AnnotationMetadata importingClassMetadata, BeanDefinitionRegistry registry) {log.debug("Searching for mappers annotated with @Mapper'");// 扫描标注有@Mapper注解的类ClassPathMapperScanner scanner = new ClassPathMapperScanner(registry);try {if (this.resourceLoader != null) {scanner.setResourceLoader(this.resourceLoader);}List<String> pkgs = AutoConfigurationPackages.get(this.beanFactory);for (String pkg : pkgs) {log.debug("Using auto-configuration base package '" + pkg + "'");}scanner.setAnnotationClass(Mapper.class);scanner.registerFilters();scanner.doScan(StringUtils.toStringArray(pkgs));} catch (IllegalStateException ex) {log.debug("Could not determine auto-configuration " + "package, automatic mapper scanning disabled.");}}@Overridepublic void setBeanFactory(BeanFactory beanFactory) throws BeansException {this.beanFactory = beanFactory;}@Overridepublic void setResourceLoader(ResourceLoader resourceLoader) {this.resourceLoader = resourceLoader;}}@Configuration@Import({ AutoConfiguredMapperScannerRegistrar.class })@ConditionalOnMissingBean(MapperFactoryBean.class)public static class MapperScannerRegistrarNotFoundConfiguration {@PostConstructpublic void afterPropertiesSet() {log.debug(String.format("No %s found.", MapperFactoryBean.class.getName()));}}}
2)MybatisProperties
package org.mybatis.spring.boot.autoconfigure;import java.io.IOException;
import java.util.ArrayList;
import java.util.Arrays;
import java.util.List;import org.apache.ibatis.session.Configuration;
import org.apache.ibatis.session.ExecutorType;
import org.springframework.boot.context.properties.ConfigurationProperties;
import org.springframework.core.io.Resource;
import org.springframework.core.io.support.PathMatchingResourcePatternResolver;/*** Configuration properties for Mybatis.** @author Eddú Meléndez* @author Kazuki Shimizu*/
// 绑定的前缀
@ConfigurationProperties(prefix = MybatisProperties.MYBATIS_PREFIX)
public class MybatisProperties {public static final String MYBATIS_PREFIX = "mybatis";/*** MyBatis核心配置文件的位置*/private String configLocation;/*** Mapper.xml配置文件的位置*/private String[] mapperLocations;/*** 别名配置*/private String typeAliasesPackage;/*** 类型处理器*/private String typeHandlersPackage;/*** 检查MyBatis核心配置文件是否存在*/private boolean checkConfigLocation = false;/*** 执行器类型*/private ExecutorType executorType;/*** MyBatis核心配置文件中<setting>配置*/private Configuration configuration;}- application.yml:
#spring集成Mybatis环境
mybatis:type-aliases-package: com.dfbz.entity  #pojo别名扫描包#加载Mybatis映射文件mapper-locations: classpath:com/dfbz/mapper/*Mapper.xmlconfiguration:# 关闭二级缓存cacheEnabled: false# 开启驼峰命名mapUnderscoreToCamelCase: true# 一级缓存作用域localCacheScope: SESSION# 延迟加载lazyLoadingEnabled: true
# mybatis 日志打印
logging:level:com.dfbz.mapper: DEBUG
5.2 SpringBoot整合Junit
5.2.1 添加Junit的场景启动器
<!--springboot集成junit起步依赖-->
<dependency><groupId>org.springframework.boot</groupId><artifactId>spring-boot-starter-test</artifactId><scope>test</scope>
</dependency>
5.2.2 编写测试类
package com.dfbz.demo;import com.dfbz.Application;
import com.dfbz.entity.User;
import com.dfbz.mapper.UserMapper;
import org.junit.Test;
import org.junit.runner.RunWith;
import org.springframework.beans.factory.annotation.Autowired;
import org.springframework.boot.test.context.SpringBootTest;
import org.springframework.test.context.junit4.SpringRunner;import java.util.List;/*** @author lscl* @version 1.0* @intro:*/
@RunWith(SpringRunner.class)
@SpringBootTest(classes= Application.class)
public class Demo01 {@Autowiredprivate UserMapper userMapper;@Testpublic void test1(){List<User> userList = userMapper.findAll();for (User user : userList) {System.out.println(user);}}
}
5.3 SpringBoot整合Spring Data JPA
5.3.1 添加Spring Data JPA的起步依赖
<!-- springBoot JPA的起步依赖 -->
<dependency><groupId>org.springframework.boot</groupId><artifactId>spring-boot-starter-data-jpa</artifactId>
</dependency>
5.3.2 jpa相关配置
spring:datasource:driver-class-name: com.mysql.jdbc.Driverurl: jdbc:mysql://localhost:3306/test?useUnicode=true&characterEncoding=utf8username: rootpassword: admin#JPA 配置信息:jpa:properties:hibernate:format_sql: true # 格式化sqlshow_sql: true # 显示sqldatabase: mysql # 要操作的目标数据库类型,默认情况下系统可以自动检测generate-ddl: true # 可以让SpringDataJPA来生成DDLhibernate:ddl-auto: update # ddl的策略为updatenaming:physical-strategy: org.hibernate.boot.model.naming.PhysicalNamingStrategyStandardImpl # 允许映射 表中大写名称的字段5.3.3 建立映射
package com.dfbz.entity;import lombok.AllArgsConstructor;
import lombok.Data;
import lombok.NoArgsConstructor;import javax.persistence.*;/*** @author lscl* @version 1.0* @intro:*/
@AllArgsConstructor
@NoArgsConstructor
@Data@Entity         //标注实体类
@Table(name = "user")          //关联表
public class User {@Id@GeneratedValue(strategy = GenerationType.IDENTITY)@Columnprivate Integer id;@Columnprivate String username;@Columnprivate String birthday;@Columnprivate String sex;@Columnprivate String address;}
5.3.3 编写UserDao
public interface UserDao extends JpaRepository<User,Integer>{
}
5.3.4 编写测试类
package com.dfbz.demo;import com.dfbz.Application;
import com.dfbz.dao.UserDao;
import com.dfbz.entity.User;
import org.junit.Test;
import org.junit.runner.RunWith;
import org.springframework.beans.factory.annotation.Autowired;
import org.springframework.boot.test.context.SpringBootTest;
import org.springframework.test.context.junit4.SpringRunner;import java.util.List;/*** @author lscl* @version 1.0* @intro:*/
@RunWith(SpringRunner.class)
@SpringBootTest(classes= Application.class)
public class Demo02_JPA {@Autowiredprivate UserDao userDao;@Testpublic void test1(){List<User> userList = userDao.findAll();for (User user : userList) {System.out.println(user);}}
}
5.4 SpringBoot整合Redis
| Key类型操作 | |
| ValueOperations | Redis String/Value 操作 |
| ListOperations | Redis List 操作 |
| SetOperations | Redis Set 操作 |
| ZSetOperations | Redis Sort Set 操作 |
| HashOperations | Redis Hash 操作 |
| Value约束操作 | |
| BoundValueOperations | Redis String/Value key 约束 |
| BoundListOperations | Redis List key 约束 |
| BoundSetOperations | Redis Set key 约束 |
| BoundZSetOperations | Redis Sort Set key 约束 |
| BoundHashOperations | Redis Hash key 约束 |
- GenericJackson2JsonRedisSerializer:Value序列化
- StringRedisSerializer:Key序列化
5.4.1 添加Redis的起步依赖
<!-- 配置使用redis启动器 -->
<dependency><groupId>org.springframework.boot</groupId><artifactId>spring-boot-starter-data-redis</artifactId>
</dependency>
5.4.2 Redis相关配置
spring:redis:host: localhostport: 6379password: admin5.4.3 测试类
package com.dfbz.demo;import com.dfbz.Application;
import com.dfbz.entity.User;
import com.dfbz.mapper.UserMapper;
import com.fasterxml.jackson.core.JsonProcessingException;
import com.fasterxml.jackson.databind.JavaType;
import com.fasterxml.jackson.databind.ObjectMapper;
import com.fasterxml.jackson.databind.ObjectWriter;
import org.junit.Test;
import org.junit.runner.RunWith;
import org.springframework.beans.factory.annotation.Autowired;
import org.springframework.boot.test.context.SpringBootTest;
import org.springframework.data.redis.core.BoundValueOperations;
import org.springframework.data.redis.core.RedisTemplate;
import org.springframework.test.context.junit4.SpringRunner;import java.io.IOException;
import java.util.List;/*** @author lscl* @version 1.0* @intro:*/
@RunWith(SpringRunner.class)
@SpringBootTest(classes = Application.class)
public class Demo03_Redis {@Autowiredprivate UserMapper userMapper;@Autowiredprivate RedisTemplate<String, String> redisTemplate;@Testpublic void test1() throws IOException {BoundValueOperations<String, String> bvo = redisTemplate.boundValueOps("userList");String val = bvo.get();ObjectMapper om = new ObjectMapper();//第一次从数据库读取if (val == null) {List<User> userList = userMapper.findAll();val = om.writeValueAsString(userList);System.out.println("从数据库读出来的: " + val);bvo.set(val);} else {System.out.println("从redis读取:");System.out.println(val);}}
}


![前缀和的动态维护——树状数组[C/C++]](https://img-blog.csdnimg.cn/0df8e7cc4f244718a321b2e431e2c8f9.png)