准备素材:
1. openssl的版本: openssl-1.1.1w.tar.gz
2.curl的版本:curl-8.4.0.tar.gz
目标:
1.编译出openssl库;
2.编译出curl可执行文件及库;
步骤一:先解压压缩包
tar -zxvf openssl-1.1.1w.tar.gz
tar -zxvf curl-8.4.0.tar.gz
步骤二:编译openssl
首先需要配置config:
CC=/home/desheng/asj/ts-sdk/prebuilts/host/gcc/gcc-ts-10.3-2023.2-x86_64-arm-none-linux-uclibcgnueabihf/bin/arm-ts-linux-uclibcgnueabihf-gcc ./config no-asm no-shared no-async --prefix=/home/desheng/asj/libopenssl-out
CC就是编译器的路径, --prefix就是编译出的库文件及可执行文件存放的位置;no-shared表示编译出静态库
no-asm
Do not use assembler code. This should be viewed as
debugging/trouble-shooting option rather than production.
On some platforms a small amount of assembler code may
still be used even with this option.no-async
Do not build support for async operations.
再执行make;由于使用的是32bit的编译器,因此makefile里面产生的-m64需要去掉一下,等待编译完成后再安装,执行make install;
/*****************************************************************************************************/
声明:本博内容均由http://blog.csdn.net/edsam49原创,转载请注明出处,谢谢!
/*****************************************************************************************************/
步骤三:编译curl库
首先还是需要配置:
CPPFLAGS="-I/home/desheng/asj/libopenssl-out/lib/ -I/home/desheng/asj/libopenssl-out/include" LDFLAGS="-L/home/desheng/asj/libopenssl-out/lib" LIBS="-ldl -lssl -lcrypto" ./configure --host=arm-linux CC=/home/desheng/asj/ts-sdk/prebuilts/host/gcc/gcc-ts-10.3-2023.2-x86_64-arm-none-linux-uclibcgnueabihf/bin/arm-ts-linux-uclibcgnueabihf-gcc CXX=/home/desheng/asj/ts-sdk/prebuilts/host/gcc/gcc-ts-10.3-2023.2-x86_64-arm-none-linux-uclibcgnueabihf/bin/arm-ts-linux-uclibcgnueabihf-g++ --with-ssl --enable-static --disable-dict --disable-ftp --disable-imap --disable-ldap --disable-ldaps --disable-pop3 --disable-proxy --disable-rtsp --disable-smtp --disable-telnet --disable-tftp --disable-zlib --without-ca-bundle --without-gnutls --without-libidn --without-librtmp --without-libssh2 --without-nss --without-zlib --prefix=/home/desheng/asj/libcurl-out/
指定好openssl的头文件,库路径,编译器CC的全路径,CXX也配置上,其他就是一些小配置,--prefix是库文件和可执行文件输出的地方;
配置好,执行make,再执行make install,等待完成即可;
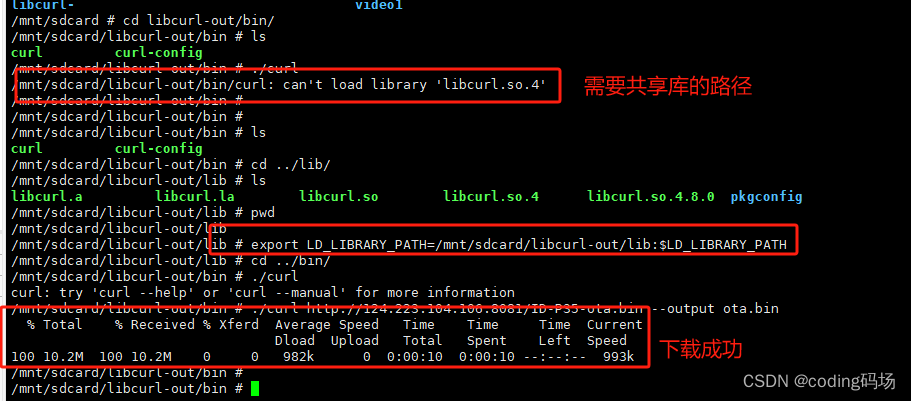
步骤四:放到板子上去跑一下curl
笔者把curl产生的文件都拷贝到SD卡里去,然后去执行,

这样curl工具我们就制作好,可以直接使用了。
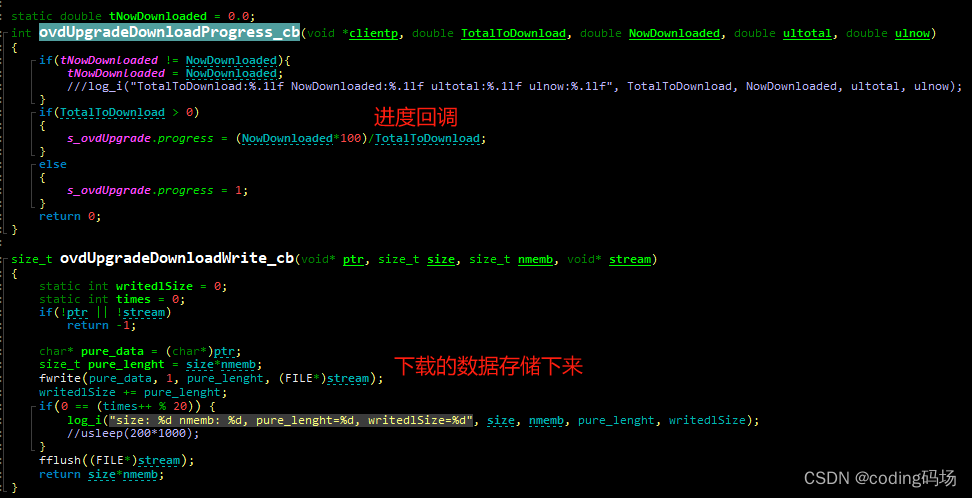
如果需要编程的来写下载程序的,可以调用curl的接口
int httpsApiDownloadFile(char *strURL, char *strFileName, https_download_progress_cb progress_cb, https_download_writedata_cb writedata_cb)
{int ret = -1;if(NULL == strURL) {return ret;}log_d("download %s > %s", strURL, strFileName);CURL *download_handle;CURLcode imgresult;FILE *fp = NULL;download_handle = curl_easy_init();if(download_handle) {fp = fopen(strFileName, "w+");if( fp == NULL ) {log_e(" File cannot be opened ! \n");curl_easy_cleanup(download_handle);return ret;}log_d(" File %s be opened ! \n", strFileName);curl_easy_setopt(download_handle, CURLOPT_URL, strURL);curl_easy_setopt(download_handle, CURLOPT_TIMEOUT, 100);curl_easy_setopt(download_handle, CURLOPT_USE_SSL, CURLUSESSL_ALL);curl_easy_setopt(download_handle, CURLOPT_SSL_VERIFYHOST, 0);curl_easy_setopt(download_handle, CURLOPT_SSL_VERIFYPEER, 0);
//      curl_easy_setopt(download_handle, CURLOPT_POST, 0);curl_easy_setopt(download_handle, CURLOPT_WRITEDATA, fp);curl_easy_setopt(download_handle, CURLOPT_NOSIGNAL, 1);curl_easy_setopt(download_handle, CURLOPT_FOLLOWLOCATION, 1);if(writedata_cb != NULL) {curl_easy_setopt(download_handle, CURLOPT_WRITEFUNCTION, writedata_cb);} else {curl_easy_setopt(download_handle, CURLOPT_WRITEFUNCTION, httpsDownloadWriteCb);}if(progress_cb != NULL) {curl_easy_setopt(download_handle, CURLOPT_NOPROGRESS, 0);curl_easy_setopt(download_handle, CURLOPT_PROGRESSFUNCTION, progress_cb);//设置进度回调函数} else {curl_easy_setopt(download_handle, CURLOPT_NOPROGRESS, 1);}imgresult = curl_easy_perform(download_handle);if(CURLE_OK != imgresult) {log_w("Cannot grab the File! \n");log_w("curl_easy_perform() failed:(%d) %s\n", imgresult, curl_easy_strerror(imgresult));ret = -1;} else {ret = 0;}fflush(fp);fclose(fp);}curl_easy_cleanup(download_handle);return ret;
}
用代码调用curl接口来下载,可以实时获取进度,更好掌控一点。当然根据自己项目需要来完成吧!怎么方便怎么来。


 无线安全环境搭建以及密码生成)


——TsExtractor)


