文章目录
问题引入
1:问题阐述
2:问题分析
一:从SpringBoot的自动装配
1:@SpringBootApplication介绍
2:自动装配的核心方法
3:核心方法的调用路径
4:SpringSecurity核心配置
5:SpringBoot...Configuration详解
6:总结一下
大神链接:作者有幸结识技术大神孙哥为好友,获益匪浅。现在把孙哥视频分享给大家。
孙哥链接:孙哥个人主页
作者简介:一个颜值99分,只比孙哥差一点的程序员
本专栏简介:话不多说,让我们一起干翻SpringSecurity6本文章简介:话不多说,让我们讲清楚SpringSecurity6中为什么在引入SpringSecurity之后所有的请求都需要先做登录认证才可以进行访问呢
问题引入
1:问题阐述
为什么在引入SpringSecurity之后所有的请求都需要先做登录认证才可以进行访问呢?
2:问题分析
分析清楚这个问题之前,我们先从自动装配开始研究。
一:从SpringBoot的自动装配
1:@SpringBootApplication介绍
这个注解的作用就是标志这个类是SpringBootApplication的启动类。
@SpringBootApplication
public class BigtreeApplication {public static void main(String[] args) {SpringApplication.run(BigtreeApplication.class, args);}
}
@Target({ElementType.TYPE})
@Retention(RetentionPolicy.RUNTIME)
@Documented
@Inherited
@SpringBootConfiguration
@EnableAutoConfiguration
@ComponentScan(excludeFilters = {@Filter(type = FilterType.CUSTOM,classes = {TypeExcludeFilter.class}
), @Filter(type = FilterType.CUSTOM,classes = {AutoConfigurationExcludeFilter.class}
)}
)
public @interface SpringBootApplication {@AliasFor(annotation = EnableAutoConfiguration.class)Class<?>[] exclude() default {};@AliasFor(annotation = EnableAutoConfiguration.class)String[] excludeName() default {};@AliasFor(annotation = ComponentScan.class,attribute = "basePackages")String[] scanBasePackages() default {};@AliasFor(annotation = ComponentScan.class, attribute = "basePackageClasses")Class<?>[] scanBasePackageClasses() default {};@AliasFor(annotation = ComponentScan.class,attribute = "nameGenerator")Class<? extends BeanNameGenerator> nameGenerator() default BeanNameGenerator.class;@AliasFor( annotation = Configuration.class)boolean proxyBeanMethods() default true;
}
这个注解是一个复合注解@SpringBootConfiguration这个注解的作用带表了这当前这个类是一个SpringBoot配置类,自动交给SpringIOC容器进行管理。
第二个注解是ComponentScan这个注解的作用是定义Spring的扫描路径的。通畅对应我们自己定义的组件例如:Controller,Service,Dao这些组件。
第三个注解是:@EnableAutoConfiguration这个注解是SpringBoot自动装配的关键注解,这个注解包含两个核心注解
第一个注解是:@Import({AutoConfigurationImportSelector.class})这个注解的作用就是在导入当前类的同时顺便导入AutoConfigurationImportSelector这个类也加载进来。
2:自动装配的核心方法
org.springframework.boot.autoconfigure.AutoConfigurationImportSelector#getCandidateConfigurations
protected List<String> getCandidateConfigurations(AnnotationMetadata metadata, AnnotationAttributes attributes) {List<String> configurations = ImportCandidates.load(AutoConfiguration.class, getBeanClassLoader()).getCandidates();Assert.notEmpty(configurations,"No auto configuration classes found in "+ "META-INF/spring/org.springframework.boot.autoconfigure.AutoConfiguration.imports. If you "+ "are using a custom packaging, make sure that file is correct.");return configurations;}
org.springframework.boot.context.annotation.ImportCandidates
public static ImportCandidates load(Class<?> annotation, ClassLoader classLoader) {Assert.notNull(annotation, "'annotation' must not be null");ClassLoader classLoaderToUse = decideClassloader(classLoader);String location = String.format(LOCATION, annotation.getName());Enumeration<URL> urls = findUrlsInClasspath(classLoaderToUse, location);List<String> importCandidates = new ArrayList<>();while (urls.hasMoreElements()) {URL url = urls.nextElement();importCandidates.addAll(readCandidateConfigurations(url));}return new ImportCandidates(importCandidates);}此方法执行完毕的返回值:

这个配置在:spring-boot-autoconfigure-3.0.12.jar包下!\META-INF\spring\包下的
org.springframework.boot.autoconfigure.AutoConfiguration.imports文件中,这里边就是Spring中的各种需要自动装配的组件。其中就有很多的配置组件。

3:核心方法的调用路径
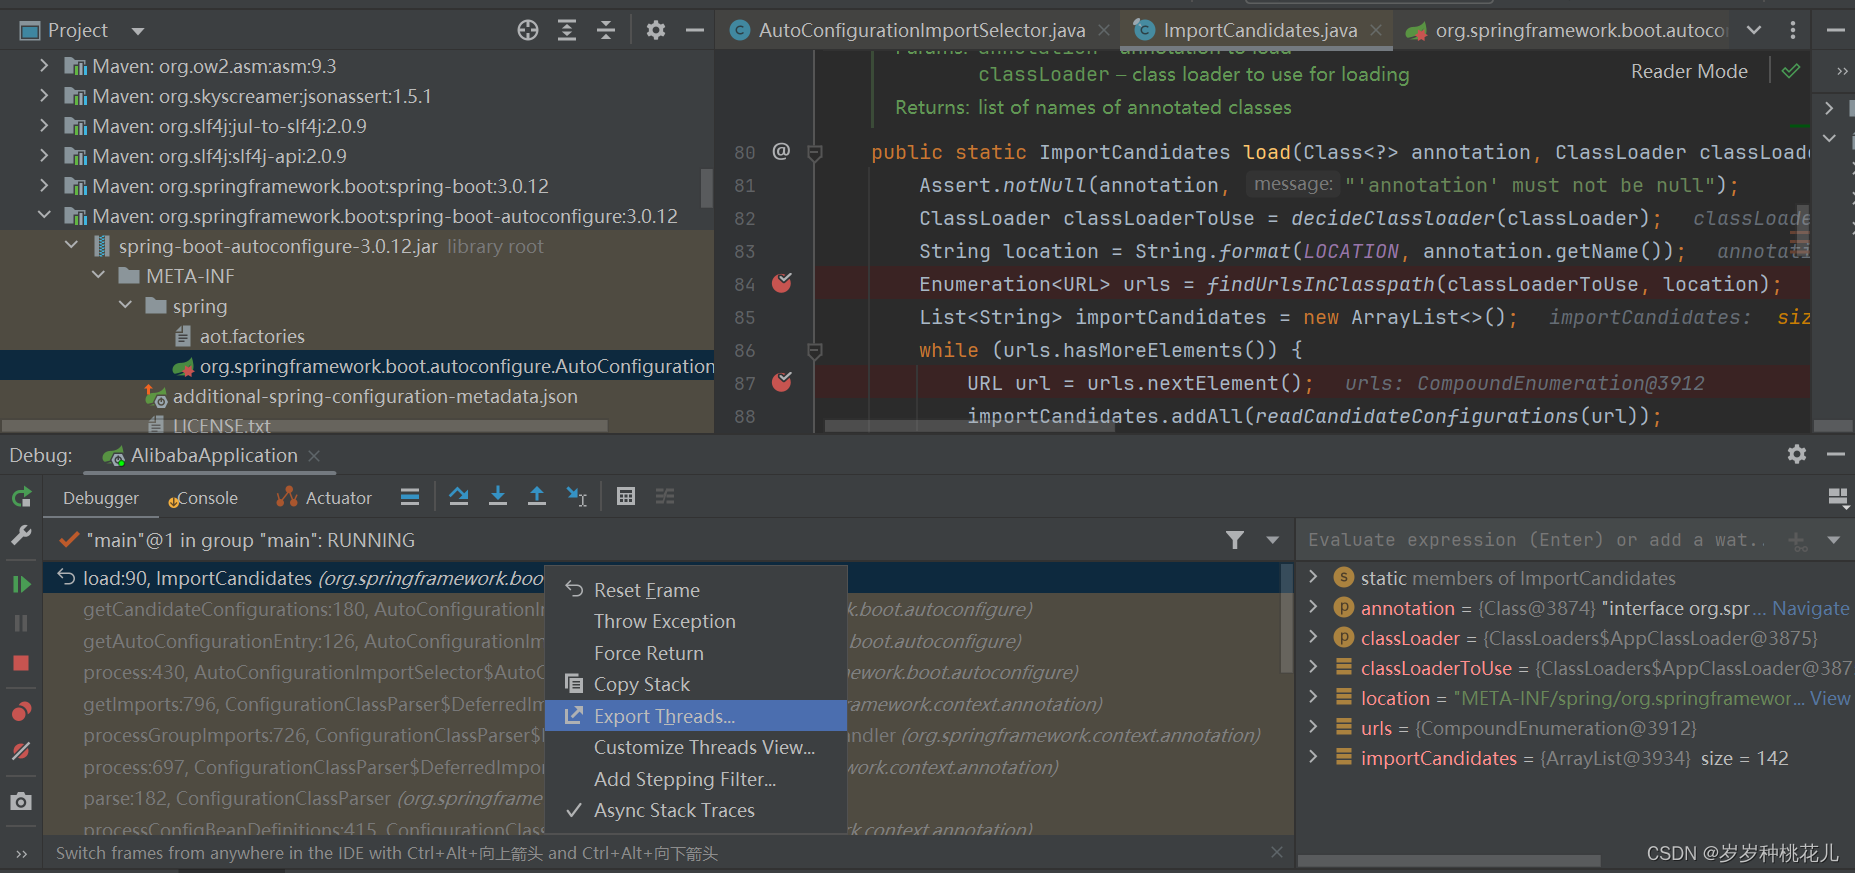
"main@1" prio=5 tid=0x1 nid=NA runnablejava.lang.Thread.State: RUNNABLEat org.springframework.boot.context.annotation.ImportCandidates.load(ImportCandidates.java:90)at org.springframework.boot.autoconfigure.AutoConfigurationImportSelector.getCandidateConfigurations(AutoConfigurationImportSelector.java:180)at org.springframework.boot.autoconfigure.AutoConfigurationImportSelector.getAutoConfigurationEntry(AutoConfigurationImportSelector.java:126)at org.springframework.boot.autoconfigure.AutoConfigurationImportSelector$AutoConfigurationGroup.process(AutoConfigurationImportSelector.java:430)at org.springframework.context.annotation.ConfigurationClassParser$DeferredImportSelectorGrouping.getImports(ConfigurationClassParser.java:796)at org.springframework.context.annotation.ConfigurationClassParser$DeferredImportSelectorGroupingHandler.processGroupImports(ConfigurationClassParser.java:726)at org.springframework.context.annotation.ConfigurationClassParser$DeferredImportSelectorHandler.process(ConfigurationClassParser.java:697)at org.springframework.context.annotation.ConfigurationClassParser.parse(ConfigurationClassParser.java:182)at org.springframework.context.annotation.ConfigurationClassPostProcessor.processConfigBeanDefinitions(ConfigurationClassPostProcessor.java:415)at org.springframework.context.annotation.ConfigurationClassPostProcessor.postProcessBeanDefinitionRegistry(ConfigurationClassPostProcessor.java:287)at org.springframework.context.support.PostProcessorRegistrationDelegate.invokeBeanDefinitionRegistryPostProcessors(PostProcessorRegistrationDelegate.java:344)at org.springframework.context.support.PostProcessorRegistrationDelegate.invokeBeanFactoryPostProcessors(PostProcessorRegistrationDelegate.java:115)at org.springframework.context.support.AbstractApplicationContext.invokeBeanFactoryPostProcessors(AbstractApplicationContext.java:779)at org.springframework.context.support.AbstractApplicationContext.refresh(AbstractApplicationContext.java:597)- locked <0x12a7> (a java.lang.Object)at org.springframework.boot.web.servlet.context.ServletWebServerApplicationContext.refresh(ServletWebServerApplicationContext.java:146)at org.springframework.boot.SpringApplication.refresh(SpringApplication.java:733)at org.springframework.boot.SpringApplication.refreshContext(SpringApplication.java:435)at org.springframework.boot.SpringApplication.run(SpringApplication.java:311)at org.springframework.boot.SpringApplication.run(SpringApplication.java:1301)at org.springframework.boot.SpringApplication.run(SpringApplication.java:1290)at com.dashu.AlibabaApplication.main(AlibabaApplication.java:10)这个调用路径是怎么获得的?方法很简单,只需要在这个核心方法的中间打上一个断点。
然后我们启动main方法,等线程执行过这个方法的断点。然后我们在idea上玩一个骚操作就可以了。

然后,我们在debug区域,找到最上层一个方法,然后我们右键Exports Thread即可。

4:SpringSecurity核心配置
org.springframework.boot.autoconfigure.security.servlet.SecurityAutoConfiguration@AutoConfiguration
@ConditionalOnClass(DefaultAuthenticationEventPublisher.class)
@EnableConfigurationProperties(SecurityProperties.class)
@Import({ SpringBootWebSecurityConfiguration.class, SecurityDataConfiguration.class })
public class SecurityAutoConfiguration {@Bean@ConditionalOnMissingBean(AuthenticationEventPublisher.class)public DefaultAuthenticationEventPublisher authenticationEventPublisher(ApplicationEventPublisher publisher) {return new DefaultAuthenticationEventPublisher(publisher);}}然后,就会加载这两个组件:SpringBootWebSecurityConfiguration.class, SecurityDataConfiguration.class 尤其是第一个。
5:SpringBoot...Configuration详解
这里边只有一个@Bean注解,最终会创建一个对象:SecurityFilterChain,为什么最终引入了SpringSecurity依赖之后就会所有的请求都会被拦截答案就在这个方法里边。
@Bean@Order(SecurityProperties.BASIC_AUTH_ORDER)SecurityFilterChain defaultSecurityFilterChain(HttpSecurity http) throws Exception {//任意Http请求都会被认证拦截http.authorizeHttpRequests().anyRequest().authenticated();//认证的时候支持form表单认证http.formLogin();//http的basic认证http.httpBasic();return http.build();}@Configuration(proxyBeanMethods = false)
@ConditionalOnWebApplication(type = Type.SERVLET)
class SpringBootWebSecurityConfiguration {@Configuration(proxyBeanMethods = false)@ConditionalOnDefaultWebSecuritystatic class SecurityFilterChainConfiguration {@Bean@Order(SecurityProperties.BASIC_AUTH_ORDER)SecurityFilterChain defaultSecurityFilterChain(HttpSecurity http) throws Exception {http.authorizeHttpRequests().anyRequest().authenticated();http.formLogin();http.httpBasic();return http.build();}}@Configuration(proxyBeanMethods = false)@ConditionalOnMissingBean(name = BeanIds.SPRING_SECURITY_FILTER_CHAIN)@ConditionalOnClass(EnableWebSecurity.class)@EnableWebSecuritystatic class WebSecurityEnablerConfiguration {}}6:总结一下
基于SpringBoot的自动装配,由于SpringSecurity的装配配置在SpringBoot配置环境中,所以它默认会被加载,加载完毕之后defaultSecurityFilterChain被调用,SecurityFilterChain对象被创创建。所有的方法都会被被鉴权。
具体的方法调用路径或者叫配置路径是这样的:首先是三个核心的注解:
@SpringBootApplication-> @EnableAutoConfiguration>@Import(AutoConfigurationImportSelector)这样的代码就会基于下面这个调用路径:
"main@1" prio=5 tid=0x1 nid=NA runnablejava.lang.Thread.State: RUNNABLEat org.springframework.boot.context.annotation.ImportCandidates.load(ImportCandidates.java:90)at org.springframework.boot.autoconfigure.AutoConfigurationImportSelector.getCandidateConfigurations(AutoConfigurationImportSelector.java:180)at org.springframework.boot.autoconfigure.AutoConfigurationImportSelector.getAutoConfigurationEntry(AutoConfigurationImportSelector.java:126)at org.springframework.boot.autoconfigure.AutoConfigurationImportSelector$AutoConfigurationGroup.process(AutoConfigurationImportSelector.java:430)at org.springframework.context.annotation.ConfigurationClassParser$DeferredImportSelectorGrouping.getImports(ConfigurationClassParser.java:796)at org.springframework.context.annotation.ConfigurationClassParser$DeferredImportSelectorGroupingHandler.processGroupImports(ConfigurationClassParser.java:726)at org.springframework.context.annotation.ConfigurationClassParser$DeferredImportSelectorHandler.process(ConfigurationClassParser.java:697)at org.springframework.context.annotation.ConfigurationClassParser.parse(ConfigurationClassParser.java:182)at org.springframework.context.annotation.ConfigurationClassPostProcessor.processConfigBeanDefinitions(ConfigurationClassPostProcessor.java:415)at org.springframework.context.annotation.ConfigurationClassPostProcessor.postProcessBeanDefinitionRegistry(ConfigurationClassPostProcessor.java:287)at org.springframework.context.support.PostProcessorRegistrationDelegate.invokeBeanDefinitionRegistryPostProcessors(PostProcessorRegistrationDelegate.java:344)at org.springframework.context.support.PostProcessorRegistrationDelegate.invokeBeanFactoryPostProcessors(PostProcessorRegistrationDelegate.java:115)at org.springframework.context.support.AbstractApplicationContext.invokeBeanFactoryPostProcessors(AbstractApplicationContext.java:779)at org.springframework.context.support.AbstractApplicationContext.refresh(AbstractApplicationContext.java:597)- locked <0x12a7> (a java.lang.Object)at org.springframework.boot.web.servlet.context.ServletWebServerApplicationContext.refresh(ServletWebServerApplicationContext.java:146)at org.springframework.boot.SpringApplication.refresh(SpringApplication.java:733)at org.springframework.boot.SpringApplication.refreshContext(SpringApplication.java:435)at org.springframework.boot.SpringApplication.run(SpringApplication.java:311)at org.springframework.boot.SpringApplication.run(SpringApplication.java:1301)at org.springframework.boot.SpringApplication.run(SpringApplication.java:1290)at com.dashu.AlibabaApplication.main(AlibabaApplication.java:10)调用到这个方法里边:AutoConfigurationImportSelector#getCandidateConfigurations最后查到核心组件的配置文件。这样加载到SpringSecurity的核心文件。最终调用到上边的方法,导致所有的方法都得进行登录认证。
二:默认认证方式的条件限制
1:@ConditionalOnDefaultWebSecurity
此注解显示了要想使用下面SpringSecurity的默认认证方式是有条件的。
也就是说,并不是所有的Http请求都必须走默认认证。进入这个注解:
@Target({ ElementType.TYPE, ElementType.METHOD })
@Retention(RetentionPolicy.RUNTIME)
@Documented
@Conditional(DefaultWebSecurityCondition.class)
public @interface ConditionalOnDefaultWebSecurity {}
这个注解上边还有一个注解:@Conditional(DefaultWebSecurityCondition.class)
class DefaultWebSecurityCondition extends AllNestedConditions {DefaultWebSecurityCondition() {super(ConfigurationPhase.REGISTER_BEAN);}@ConditionalOnClass({ SecurityFilterChain.class, HttpSecurity.class })static class Classes {}@ConditionalOnMissingBean({ SecurityFilterChain.class })static class Beans {}}在这个类当中我们定义了两种鉴权规则。第一种是基于Class,他是基于类作用,也就是说当前在classpath下如果有上述两个class的话,就可以走默认的认证方式。在SpringSecurity中肯定是有的,这也就是在引入SpringSecurity依赖之后就会走默认的配置。
第二种是基于丢失Bean的情况,如果丢失了,那么我们可以走默认的认证规则了。也就是说,如果没有了SecurityFilterChain这个对象的话,那么就不在使用默认的认证规则了。


![[量子计算与量子信息] 2.1 线性代数](http://pic.xiahunao.cn/[量子计算与量子信息] 2.1 线性代数)
)

 重磅更新!黑入工业PLC设备!)

)


——接口)


)