前言:
vue2项目可谓十分常见,国内大部分的前端码农应该都是用vue2技术在开发,虽然vue3和react等技术也有很多,但是占据绝大多数的中高级搬砖码农应该干的都是vue2技术的项目,就算现在很多人转战vue3技术了,但是维护原有vue2的项目应该也是很多的。
我本来是不打算写vue2的技术博客的,因为这种的博客实在太多了。但是我还是想了想,自己入坑就是靠vue2的,而且vue2虽然算不上先进的技术了,但依然占据很大的比例,而且很多人是看视频学习的,而不是官网.就算查东西,也是很少去官网,都是直接百度。
最主要的一点,其实不少人是没有从0到1对一个项目进行开发的,大部分都是接受原有的项目或者是省事直接用人家的模板,我决定从0搭建一个vue2的项目,这个项目主要是用来写vue2本身一些技术点的demo,因为我知道很多人就算用了2年的vue,也不见得能把官网的技术都看一遍,这里我对主要的技术进行一个总结,需要的小伙伴可以看看。
使用vue-cli下载脚手架:
vue-cli地址:介绍 | Vue CLI
安装:
方法1:
安装全局的vue:
npm install -g @vue/cli执行下载命令:
vue create vue2-test方法2:
npx vue create vue2-test这个脚手架会为你自动去配置依赖包node_modules的,安装成功之后可以直接运行项目
运行:
npm run serve关闭语法检查和配置src路径别名
关闭语法检查
语法检查对于没有精益求精的唯薪主义码农们,是一件很烦人的事情,那我们就果断干掉他(大佬不用看)
在vue.config.js中进行如下配置
const { defineConfig } = require('@vue/cli-service')
module.exports = defineConfig({transpileDependencies: true,lintOnSave: false
})
配置src路径别名
配置src的路径联想,可以让我们在项目文件较多时,可以快速精确的找到所需文件路径
创建jsconfig.json
{"compilerOptions": {"target": "es5","module": "esnext","baseUrl": "./","moduleResolution": "node","paths": {"@/*": ["src/*"]},"lib": ["esnext","dom","dom.iterable","scripthost"]}
}
ok了,重新运行项目,记得重新运行才回生效。
基础的router配置和创建对应组件:
vue-router是spa项目必须的东西,vue-router的配置项也不少,不过我们这里先进行最基础的配置
下载vue-router
npm i vue-router@3.1.2创建组件
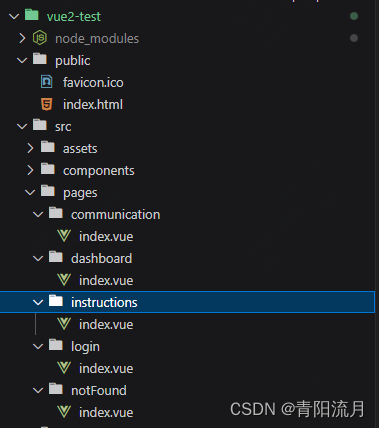
删除App.vue中的HelloWord组件和信息,在src下创建自己对应的pages文件夹,我这里创建目录结构如下:

vue文件的初始化内容我就不写那么明白了,参考App.vue
创建好了组件之后,记得给每个组件的name名字起好。
配置基础的router
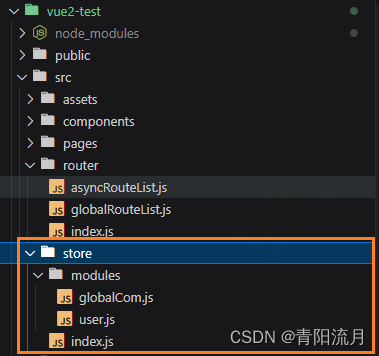
在src下创建router文件夹,内部包含三个文件
globalRouteList.js: 全局的路由数据
const globalRouteList = [{name:'login',path:'/login',meta:{name:'登录',},component:()=>import('@/pages/login/index.vue')},{name:'notFound',path:'/notFound',meta:{name:'空页面',},component:()=>import('@/pages/notFound/index.vue')},{redirect:'/login',path:'/'}
]
export default globalRouteList
asyncRouteList.js: 动态的路由数据
const list = [{name:'dashboard',path:'/dashboard',meta:{name:'主页',},component:()=>import('@/pages/dashboard/index.vue'),children:[{name:'communication',path:'/dashboard/communication',meta:{name:'组件通信',icon:'el-icon-phone'},component:()=>import('@/pages/communication/index.vue')},{name:'instructions',path:'/dashboard/instructions',meta:{name:'指令',icon:'el-icon-thumb'},component:()=>import('@/pages/instructions/index.vue')},]},]
export default list
index.js : 路由配置文件
import Vue from 'vue'
import Router from 'vue-router'
import asyncRouteList from './asyncRouteList'
import globalRouteList from './globalRouteList'const RouteList = [].concat(asyncRouteList).concat(globalRouteList)
console.log(RouteList,'???routeList')
Vue.use(Router)export default new Router({routes:RouteList,mode:'history'
})
然后再main.js中引入我们配置好的router
main.js中引入
import Vue from 'vue'
import App from './App.vue'
import router from './router/index'Vue.config.productionTip = falseVue.use(router)new Vue({router,render: h => h(App),
}).$mount('#app')
现在在vue组件中就能访问到this$router和this.$route了。
引入element-ui
element-ui地址:Element - The world's most popular Vue UI framework
下载element-ui
npm i element-uimain.js引入element-ui:
方法1.整体引入
import Vue from 'vue'
import App from './App.vue'
import router from './router/index'
import ElementUI from 'element-ui'
import 'element-ui/lib/theme-chalk/index.css'
Vue.config.productionTip = falseVue.use(router)
Vue.use(ElementUI)
new Vue({router,render: h => h(App),
}).$mount('#app')
方法2:分别引入(这块在后续的优化中写,这里就不说了,有需要的可以参考官网)
现在在组件中就可以使用饿了么组件
配置store
vuex虽然不是必须的,但是在常规的vue项目中,存储全局的一些数据vuex还是很简单灵性的,vue3很多人用pinia,但是我感觉vue2项目基本都有vuex,还是用上吧
vuex地址:Vuex 是什么? | Vuex
这里插一句:我其实有一段时间没有写vue2了,我现在做的这些配置都是自己一个一个用手敲的,而且都是参考我所引入的这些文档
下载vuex
src下创建store文件夹,内部文件如下
index.js : store的主要文件
import Vue from 'vue'
import Vuex from 'vuex'
Vue.use(Vuex)
import user from './modules/user'
const store = new Vuex.Store({modules:{user}
})
export default store
moudles/user.js : user模块化
const userMode = {state:()=>({userInfo:{name:'wjt',age:28}}),mutations:{CHANGE_USEINFO:(state,info)=>{state.userInfo = info}},actions:{changeUserInfo:(({commit},data)=>{commit('CHANGE_USEINFO',data)})}
}
export default userMode
modules/globalCom: 全局数据模块化
...暂无内容

main.js引入
import Vue from 'vue'
import App from './App.vue'
import router from './router/index'
import store from './store/index'
import ElementUI from 'element-ui'
import 'element-ui/lib/theme-chalk/index.css'
import '@/style/reset.css'
Vue.config.productionTip = falseVue.use(router)
Vue.use(store)
Vue.use(ElementUI)
new Vue({router,store,render: h => h(App),
}).$mount('#app')
引入样式初始化文件
在项目开发时,初始化样式文件还是很有必要的,能给后面省去一些麻烦,这里我就直接引入一个在网上拉下来的文件了,就没有必要自己手写
文件内容如下:
blockquote,body,button,dd,dl,dt,fieldset,form,h1,h2,h3,h4,h5,h6,hr,input,legend,li,ol,p,pre,td,textarea,th,ul {margin: 0;padding: 0
}body,button,input,select,textarea {font: 12px/1.5 tahoma,arial,'Hiragino Sans GB','\5b8b\4f53',sans-serif
}h1,h2,h3,h4,h5,h6 {font-size: 100%
}address,cite,dfn,em,var {font-style: normal
}code,kbd,pre,samp {font-family: courier new,courier,monospace
}small {font-size: 12px
}ol,ul {list-style: none
}a {text-decoration: none
}a:hover {text-decoration: underline
}sup {vertical-align: text-top
}sub {vertical-align: text-bottom
}legend {color: #000
}fieldset,img {border: 0
}button,input,select,textarea {font-size: 100%
}table {border-collapse: collapse;border-spacing: 0
}京东的reset* {margin: 0;padding: 0
}em,i {font-style: normal
}li {list-style: none
}img {border: 0;vertical-align: middle
}button {cursor: pointer
}a {color: #666;text-decoration: none
}a:hover {color: #c81623
}button,input {font-family: Microsoft YaHei,tahoma,arial,Hiragino Sans GB,\\5b8b\4f53,sans-serif
}body {-webkit-font-smoothing: antialiased;background-color: #fff;font: 12px/1.5 Microsoft YaHei,tahoma,arial,Hiragino Sans GB,\\5b8b\4f53,sans-serif;color: #666
}.hide,.none {display: none
}.clearfix:after {visibility: hidden;clear: both;display: block;content: ".";height: 0
}.clearfix {*zoom: 1
}百度的resetbody,h1,h2,h3,h4,h5,h6,hr,p,blockquote,dl,dt,dd,ul,ol,li,pre,form,fieldset,legend,button,input,textarea,th,td {margin: 0;padding: 0
}html {color: #000;overflow-y: scroll;overflow: -moz-scrollbars
}body,button,input,select,textarea {font: 12px arial
}h1,h2,h3,h4,h5,h6 {font-size: 100%
}em {font-style: normal
}small {font-size: 12px
}ul,ol {list-style: none
}a {text-decoration: none
}a:hover {text-decoration: underline
}legend {color: #000
}fieldset,img {border: 0
}button,input,select,textarea {font-size: 100%
}table {border-collapse: collapse;border-spacing: 0
}img {-ms-interpolation-mode: bicubic
}textarea {resize: vertical
}.left {float: left
}.right {float: right
}.overflow {overflow: hidden
}.hide {display: none
}.block {display: block
}.inline {display: inline
}.error {color: #F00;font-size: 12px
}label,button {cursor: pointer
}.clearfix:after {content: '\20';display: block;height: 0;clear: both
}.clearfix {zoom: 1
}.clear {clear: both;height: 0;line-height: 0;font-size: 0;visibility: hidden;overflow: hidden
}
在main.js中引入
配置基础页面
登录页:
login.vue
<template><div><el-button @click="login" type="primary">登录</el-button></div>
</template>
<script>export default {name:'login',data(){return{}},methods:{login(){this.$router.push('/dashboard')}}}
</script>
<style></style>
dashboard.vue页面(主要容器页面)
<template><div class="layout"><header class="header"><div class="logo"><h1>Vue2练习</h1></div> </header><content class="content"><div class="leftMenu"><el-menu:default-active="leftMenu[0].name"class="el-menu-vertical-demo"@open="handleOpen"@close="handleClose"background-color="#545c64"text-color="#fff"active-text-color="#ffd04b"><el-menu-item :index="item.name" v-for="(item,index) in leftMenu" :key="index" @click="changeMenuItem(item)"><i :class="item.meta.icon"></i><span slot="title">{{ item.meta.name }}</span></el-menu-item></el-menu></div><div class="rightbox"><router-view></router-view></div></content></div>
</template>
<script>export default {name:'dashboard',data(){return{leftMenu:[],}},methods: {handleOpen(key, keyPath) {console.log(key, keyPath);},handleClose(key, keyPath) {console.log(key, keyPath);},changeMenuItem(item){this.$router.push(item.path)}},created(){console.log(this.$router,'??路由信息')this.leftMenu = this.$router.options.routes.find(item=>item.name === 'dashboard').children || []}}
</script>
<style lang="less" scoped>
::v-deep(.el-menu){border:none;
}
.layout{height:100vh;width:100vw;.header{height:100px;width:100%;background-color:#535b65;.logo{background-color:#fff;height:100%;width:200px;color:#000;display:flex;h1{margin:auto;font-size:20px;font-weight:600;}}}.content{flex:1;display:flex;height:calc(~"100vh - 100px");background-color:#fff;.leftMenu{width:200px;height:100%;background-color:#535b65;}.rightbox{flex:1;height:100%;}}
}</style>
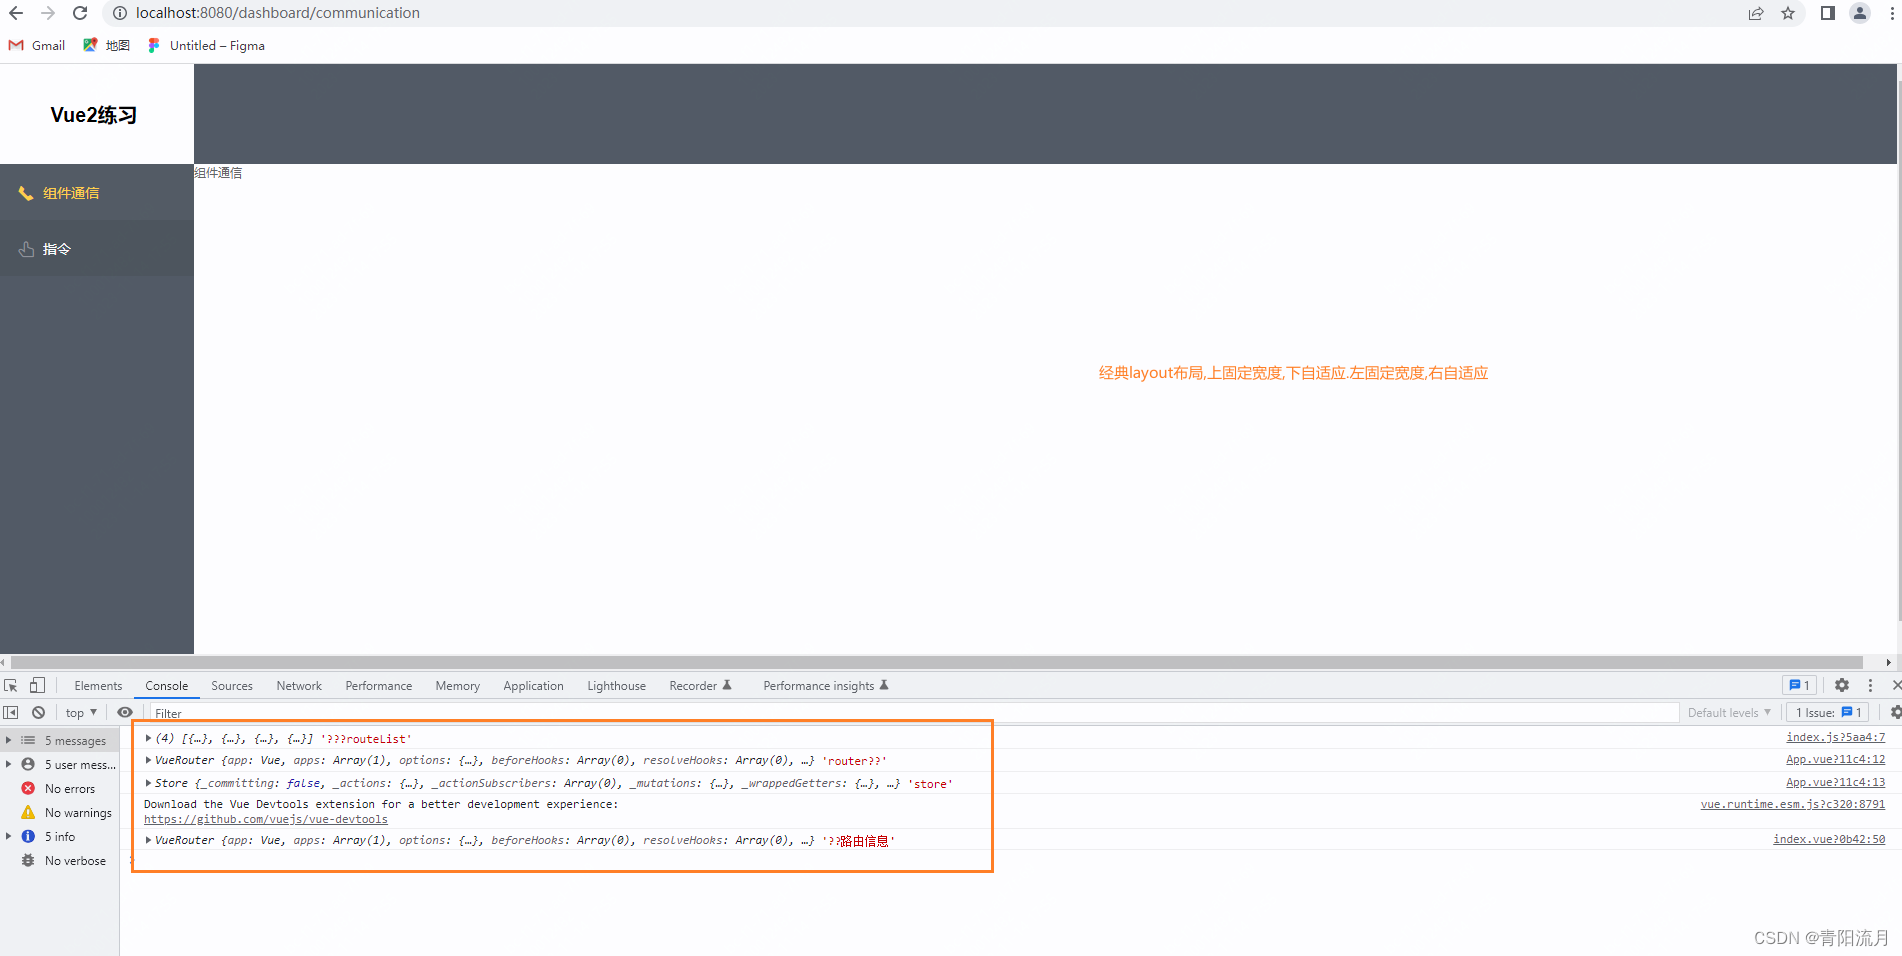
ok,这个最基本的配置也就完成了,效果如下:

也是可以查看到我们配置的store和router。
代码直接复制就可以了,项目的基础配置完成,后续的模块都是vue技术的demo,或者模拟具体业务的

—— Clickhouse监控)


通关思路)


对象结构型模式?)
详细安装和使用教程)


)