ffmepeg 4.4(亲测可用)
一、使用FFMPEG库封装264视频和acc音频数据到 mp4/flv 文件中
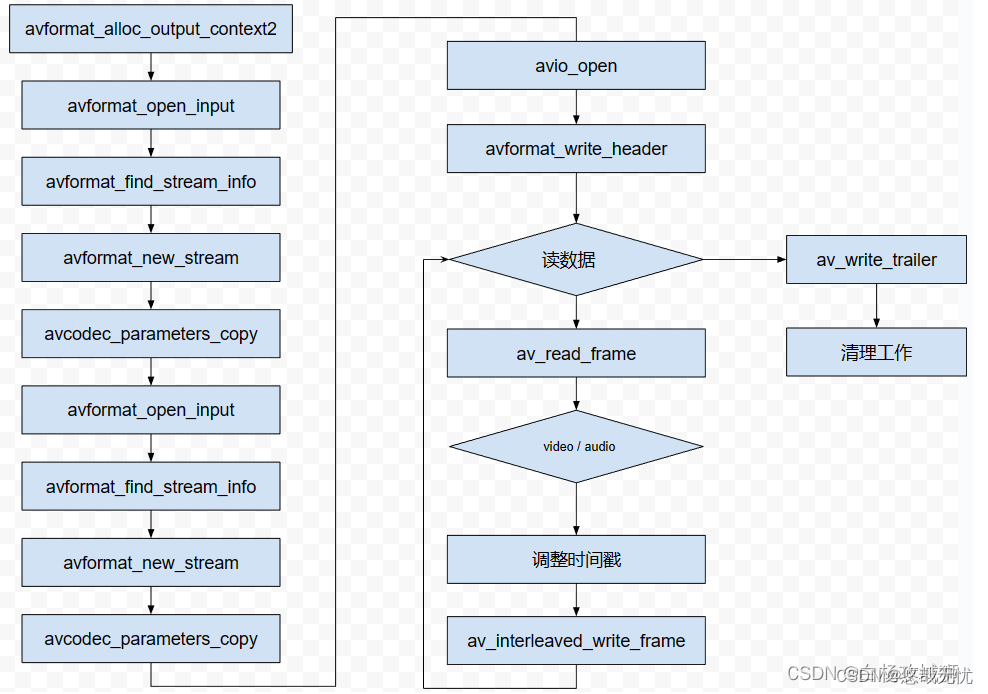
封装流程
1.使用avformat_open_input分别打开视频和音频文件,初始化其AVFormatContext,使用avformat_find_stream_info获取编码器基本信息
2.使用avformat_alloc_output_context2初始化输出的AVFormatContext结构
3.使用函数avformat_new_stream给输出的AVFormatContext结构创建音频和视频流,使用avcodec_parameters_copy方法将音视频的编码参数拷贝到新创建的对应的流的codecpar结构中
4.使用avio_open打开输出文件,初始化输出AVFormatContext结构中的IO上下文结构
5.使用avformat_write_header写入流的头信息到输出文件中
6.根据时间戳同步原则交错写入音视频数据,并对时间戳信息进行设置和校准
7.写入流预告信息到输出文件中(moov)
8.释放空间,关闭文件

【mp4_muxer.cpp】
#include <stdio.h>#define __STDC_CONSTANT_MACROS#ifdef _WIN32//Windows
extern "C"
{
#include "libavformat/avformat.h"
};
#else//Linux...
#ifdef __cplusplus
extern "C"
{
#endif
#include <libavformat/avformat.h>
#ifdef __cplusplus
};
#endif
#endifint main(int argc, char* argv[]) {const AVOutputFormat* ofmt = NULL;//Input AVFormatContext and Output AVFormatContextAVFormatContext* ifmt_ctx_v = NULL, * ifmt_ctx_a = NULL, * ofmt_ctx = NULL;AVPacket pkt;int ret;unsigned int i;int videoindex_v = -1, videoindex_out = -1;int audioindex_a = -1, audioindex_out = -1;int frame_index = 0;int64_t cur_pts_v = 0, cur_pts_a = 0;int writing_v = 1, writing_a = 1;const char* in_filename_v = "test.h264";const char* in_filename_a = "audio_chn0.aac";const char* out_filename = "test.mp4";//Output file URLif ((ret = avformat_open_input(&ifmt_ctx_v, in_filename_v, 0, 0)) < 0) {printf("Could not open input file.");goto end;}if ((ret = avformat_find_stream_info(ifmt_ctx_v, 0)) < 0) {printf("Failed to retrieve input stream information");goto end;}if ((ret = avformat_open_input(&ifmt_ctx_a, in_filename_a, 0, 0)) < 0) {printf("Could not open input file.");goto end;}if ((ret = avformat_find_stream_info(ifmt_ctx_a, 0)) < 0) {printf("Failed to retrieve input stream information");goto end;}//Outputavformat_alloc_output_context2(&ofmt_ctx, NULL, NULL, out_filename);if (!ofmt_ctx) {printf("Could not create output context\n");ret = AVERROR_UNKNOWN;goto end;}ofmt = ofmt_ctx->oformat;for (i = 0; i < ifmt_ctx_v->nb_streams; i++) {//Create output AVStream according to input AVStreamif (ifmt_ctx_v->streams[i]->codecpar->codec_type == AVMEDIA_TYPE_VIDEO) {AVStream* out_stream = avformat_new_stream(ofmt_ctx, nullptr);videoindex_v = i;if (!out_stream) {printf("Failed allocating output stream\n");ret = AVERROR_UNKNOWN;goto end;}videoindex_out = out_stream->index;//Copy the settings of AVCodecContextif (avcodec_parameters_copy(out_stream->codecpar, ifmt_ctx_v->streams[i]->codecpar) < 0) {printf("Failed to copy context from input to output stream codec context\n");goto end;}break;}}for (i = 0; i < ifmt_ctx_a->nb_streams; i++) {//Create output AVStream according to input AVStreamif (ifmt_ctx_a->streams[i]->codecpar->codec_type == AVMEDIA_TYPE_AUDIO) {AVStream* out_stream = avformat_new_stream(ofmt_ctx, nullptr);audioindex_a = i;if (!out_stream) {printf("Failed allocating output stream\n");ret = AVERROR_UNKNOWN;goto end;}audioindex_out = out_stream->index;//Copy the settings of AVCodecContextif (avcodec_parameters_copy(out_stream->codecpar, ifmt_ctx_a->streams[i]->codecpar) < 0) {printf("Failed to copy context from input to output stream codec context\n");goto end;}out_stream->codecpar->codec_tag = 0;if (ofmt_ctx->oformat->flags & AVFMT_GLOBALHEADER)ofmt_ctx->flags |= AV_CODEC_FLAG_GLOBAL_HEADER;break;}}/* open the output file, if needed */if (!(ofmt->flags & AVFMT_NOFILE)) {if (avio_open(&ofmt_ctx->pb, out_filename, AVIO_FLAG_WRITE)) {fprintf(stderr, "Could not open '%s': %d\n", out_filename,ret);goto end;}}//Write file headerif (avformat_write_header(ofmt_ctx, NULL) < 0) {fprintf(stderr, "Error occurred when opening output file: %d\n",ret);goto end;}//写入数据while (writing_v || writing_a){AVFormatContext* ifmt_ctx;int stream_index = 0;AVStream* in_stream, * out_stream;int av_type = 0;if (writing_v &&(!writing_a || av_compare_ts(cur_pts_v, ifmt_ctx_v->streams[videoindex_v]->time_base,cur_pts_a, ifmt_ctx_a->streams[audioindex_a]->time_base) <= 0)){av_type = 0;ifmt_ctx = ifmt_ctx_v;stream_index = videoindex_out;if (av_read_frame(ifmt_ctx, &pkt) >= 0){do {in_stream = ifmt_ctx->streams[pkt.stream_index];out_stream = ofmt_ctx->streams[stream_index];if (pkt.stream_index == videoindex_v){//FIX:No PTS (Example: Raw H.264)//Simple Write PTSif (pkt.pts == AV_NOPTS_VALUE){//Write PTSAVRational time_base1 = in_stream->time_base;//Duration between 2 frames (us)int64_t calc_duration = (double)AV_TIME_BASE / av_q2d(in_stream->r_frame_rate);//Parameterspkt.pts = (double)(frame_index * calc_duration) / (double)(av_q2d(time_base1) * AV_TIME_BASE);pkt.dts = pkt.pts;pkt.duration = (double)calc_duration / (double)(av_q2d(time_base1) * AV_TIME_BASE);frame_index++;printf("frame_index:  %d\n", frame_index);}cur_pts_v = pkt.pts;break;}} while(av_read_frame(ifmt_ctx, &pkt) >= 0);}else{writing_v = 0;continue;}}else{av_type = 1;ifmt_ctx = ifmt_ctx_a;stream_index = audioindex_out;if (av_read_frame(ifmt_ctx, &pkt) >= 0){do {in_stream = ifmt_ctx->streams[pkt.stream_index];out_stream = ofmt_ctx->streams[stream_index];if (pkt.stream_index == audioindex_a){//FIX:No PTS//Simple Write PTSif (pkt.pts == AV_NOPTS_VALUE){//Write PTSAVRational time_base1 = in_stream->time_base;//Duration between 2 frames (us)int64_t calc_duration = (double)AV_TIME_BASE / av_q2d(in_stream->r_frame_rate);//Parameterspkt.pts = (double)(frame_index * calc_duration) /(double)(av_q2d(time_base1) * AV_TIME_BASE);pkt.dts = pkt.pts;pkt.duration = (double)calc_duration / (double)(av_q2d(time_base1) * AV_TIME_BASE);frame_index++;}cur_pts_a = pkt.pts;break;}} while (av_read_frame(ifmt_ctx, &pkt) >= 0);}else{writing_a = 0;continue;}}//Convert PTS/DTSpkt.pts = av_rescale_q_rnd(pkt.pts, in_stream->time_base, out_stream->time_base,(AVRounding)(AV_ROUND_NEAR_INF | AV_ROUND_PASS_MINMAX));pkt.dts = av_rescale_q_rnd(pkt.dts, in_stream->time_base, out_stream->time_base,(AVRounding)(AV_ROUND_NEAR_INF | AV_ROUND_PASS_MINMAX));pkt.duration = av_rescale_q(pkt.duration, in_stream->time_base, out_stream->time_base);pkt.pos = -1;pkt.stream_index = stream_index;printf("Write 1 Packet. type:%d, size:%d\tpts:%ld\n", av_type, pkt.size, pkt.pts);//Writeif (av_interleaved_write_frame(ofmt_ctx, &pkt) < 0) {printf("Error muxing packet\n");break;}av_packet_unref(&pkt);}printf("Write file trailer.\n");//Write file trailerav_write_trailer(ofmt_ctx);end:avformat_close_input(&ifmt_ctx_v);avformat_close_input(&ifmt_ctx_a);/* close output */if (ofmt_ctx && !(ofmt->flags & AVFMT_NOFILE))avio_close(ofmt_ctx->pb);avformat_free_context(ofmt_ctx);if (ret < 0 && ret != AVERROR_EOF) {printf("Error occurred.\n");return -1;}return 0;
}
【Makefile】
CROSS_COMPILE = aarch64-himix200-linux-CC = $(CROSS_COMPILE)g++
AR = $(CROSS_COMPILE)ar
STRIP = $(CROSS_COMPILE)stripCFLAGS = -Wall -O2 -I../../source/mp4Lib/include
LIBS += -L../../source/mp4Lib/lib -lpthread
LIBS += -lavformat -lavcodec -lavdevice -lavutil -lavfilter -lswscale -lswresample -lzSRCS = $(wildcard *.cpp)
OBJS = $(SRCS:%.cpp=%.o)
DEPS = $(SRCS:%.cpp=%.d)
TARGET = mp4muxerall:$(TARGET)-include $(DEPS)%.o:%.cpp$(CC) $(CFLAGS) -c -o $@ $<%.d:%.c@set -e; rm -f $@; \$(CC) -MM $(CFLAGS) $< > $@.$$$$; \sed 's,\($*\)\.o[ :]*,\1.o $@ : ,g' < $@.$$$$ > $@; \rm -f $@.$$$$$(TARGET):$(OBJS)$(CC) -o $@ $^ $(LIBS)$(STRIP) $@ .PHONY:cleanclean:rm -fr $(TARGET) $(OBJS) $(DEPS)
二、使用FFMPEG分离mp4/flv文件中的264视频和aac音频
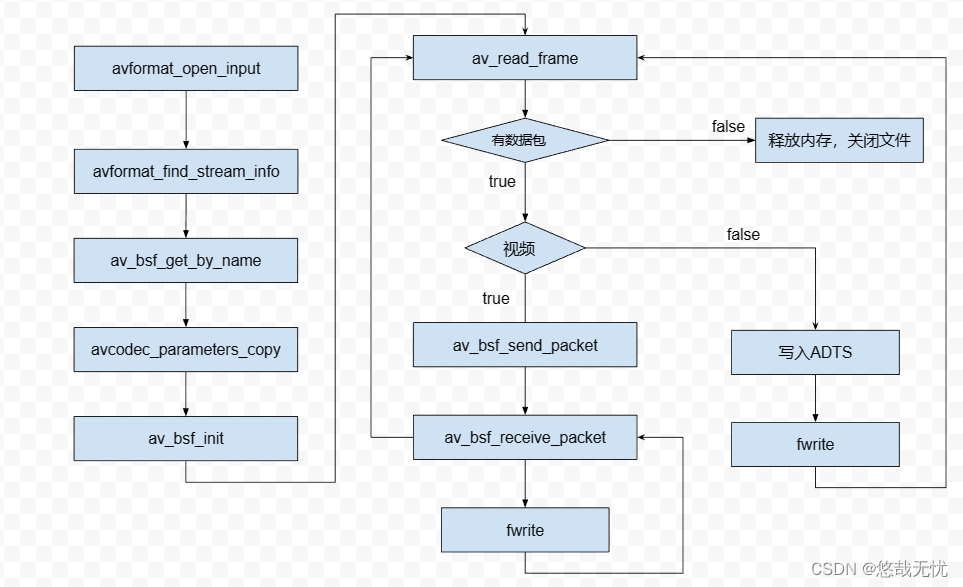
分离流程
1.使用avformat_open_input 函数打开文件并初始化结构AVFormatContext
2.查找是否存在音频和视频信息
3.构建一个h264_mp4toannexb比特流的过滤器,用来给视频avpaket包添加头信息
4.打开2个输出文件(音频, 视频)
5.循环读取视频文件,并将音视频分别写入文件
注意:音频需要手动添加头信息,没有提供aac的adts自动添加的过滤器

【mp4_demuxer.cpp】
#include <stdio.h>
extern "C"
{
#include <libavformat/avformat.h>
}/* 打印编码器支持该采样率并查找指定采样率下标 */
static int find_sample_rate_index(const AVCodec* codec, int sample_rate)
{const int* p = codec->supported_samplerates;int sample_rate_index = -1; //支持的分辨率下标int count = 0;while (*p != 0) {// 0作为退出条件,比如libfdk-aacenc.c的aac_sample_ratesprintf("%s 支持采样率: %dhz  对应下标:%d\n", codec->name, *p, count);if (*p == sample_rate)sample_rate_index = count;p++;count++;}return sample_rate_index;
}/// <summary>
/// 给aac音频数据添加adts头
/// </summary>
/// <param name="header">adts数组</param>
/// <param name="sample_rate">采样率</param>
/// <param name="channals">通道数</param>
/// <param name="prfile">音频编码器配置文件(FF_PROFILE_AAC_LOW  定义在 avcodec.h)</param>
/// <param name="len">音频包长度</param>
void addHeader(char header[], int sample_rate, int channals, int prfile, int len)
{uint8_t sampleIndex = 0;    switch (sample_rate) {case 96000: sampleIndex = 0; break;case 88200: sampleIndex = 1; break;case 64000: sampleIndex = 2; break;case 48000: sampleIndex = 3; break;case 44100: sampleIndex = 4; break;case 32000: sampleIndex = 5; break;case 24000: sampleIndex = 6; break;case 22050: sampleIndex = 7; break;case 16000: sampleIndex = 8; break;case 12000: sampleIndex = 9; break;case 11025: sampleIndex = 10; break;case 8000: sampleIndex = 11; break;case 7350: sampleIndex = 12; break;default: sampleIndex = 4; break;}uint8_t audioType = 2;  //AAC LCuint8_t channelConfig = 2;      //双通道len += 7;//0,1是固定的header[0] = (uint8_t)0xff;         //syncword:0xfff                          高8bitsheader[1] = (uint8_t)0xf0;         //syncword:0xfff                          低4bitsheader[1] |= (0 << 3);    //MPEG Version:0 for MPEG-4,1 for MPEG-2  1bitheader[1] |= (0 << 1);    //Layer:0                                 2bits header[1] |= 1;           //protection absent:1                     1bit//根据aac类型,采样率,通道数来配置header[2] = (audioType - 1) << 6;            //profile:audio_object_type - 1                      2bitsheader[2] |= (sampleIndex & 0x0f) << 2; //sampling frequency index:sampling_frequency_index  4bits header[2] |= (0 << 1);                             //private bit:0                                      1bitheader[2] |= (channelConfig & 0x04) >> 2;           //channel configuration:channel_config               高1bit//根据通道数+数据长度来配置header[3] = (channelConfig & 0x03) << 6;     //channel configuration:channel_config      低2bitsheader[3] |= (0 << 5);                      //original:0                               1bitheader[3] |= (0 << 4);                      //home:0                                   1bitheader[3] |= (0 << 3);                      //copyright id bit:0                       1bit  header[3] |= (0 << 2);                      //copyright id start:0                     1bitheader[3] |= ((len & 0x1800) >> 11);           //frame length:value   高2bits//根据数据长度来配置header[4] = (uint8_t)((len & 0x7f8) >> 3);     //frame length:value    中间8bitsheader[5] = (uint8_t)((len & 0x7) << 5);       //frame length:value    低3bitsheader[5] |= (uint8_t)0x1f;                    //buffer fullness:0x7ff 高5bitsheader[6] = (uint8_t)0xfc;
}int main() {AVFormatContext* ifmt_ctx = NULL;AVPacket pkt;int ret;unsigned int i;int videoindex = -1, audioindex = -1;const char* in_filename = "test.mp4";const char* out_filename_v = "test1.h264";const char* out_filename_a = "test1.aac";if ((ret = avformat_open_input(&ifmt_ctx, in_filename, 0, 0)) < 0) {printf("Could not open input file.");return -1;}if ((ret = avformat_find_stream_info(ifmt_ctx, 0)) < 0) {printf("Failed to retrieve input stream information");return -1;}videoindex = -1;for (i = 0; i < ifmt_ctx->nb_streams; i++) { //nb_streams:视音频流的个数if (ifmt_ctx->streams[i]->codecpar->codec_type == AVMEDIA_TYPE_VIDEO)videoindex = i;else if (ifmt_ctx->streams[i]->codecpar->codec_type == AVMEDIA_TYPE_AUDIO)audioindex = i;}printf("\nInput Video===========================\n");av_dump_format(ifmt_ctx, 0, in_filename, 0);  // 打印信息printf("\n======================================\n");FILE* fp_audio = fopen(out_filename_a, "wb+");FILE* fp_video = fopen(out_filename_v, "wb+");AVBSFContext* bsf_ctx = NULL;const AVBitStreamFilter* pfilter = av_bsf_get_by_name("h264_mp4toannexb");if (pfilter == NULL) {printf("Get bsf failed!\n");}if ((ret = av_bsf_alloc(pfilter, &bsf_ctx)) != 0) {printf("Alloc bsf failed!\n");}ret = avcodec_parameters_copy(bsf_ctx->par_in, ifmt_ctx->streams[videoindex]->codecpar);if (ret < 0) {printf("Set Codec failed!\n");}ret = av_bsf_init(bsf_ctx);if (ret < 0) {printf("Init bsf failed!\n");}//这里遍历音频编码器打印支持的采样率,并找到当前音频采样率所在的下表,用于后面添加adts头//本程序并没有使用,只是测试,如果为了程序健壮性可以采用此方式const AVCodec* codec = nullptr;codec  = avcodec_find_encoder(ifmt_ctx->streams[audioindex]->codecpar->codec_id);int sample_rate_index = find_sample_rate_index(codec, ifmt_ctx->streams[audioindex]->codecpar->sample_rate);printf("分辨率数组下表:%d\n", sample_rate_index);while (av_read_frame(ifmt_ctx, &pkt) >= 0) {if (pkt.stream_index == videoindex) {av_bsf_send_packet(bsf_ctx, &pkt);while (true){ret = av_bsf_receive_packet(bsf_ctx, &pkt);if (ret == AVERROR(EAGAIN) || ret == AVERROR_EOF)break;else if (ret < 0) {printf("Receive Pkt failed!\n");break;}printf("Write Video Packet. size:%d\tpts:%ld\n", pkt.size, pkt.pts);fwrite(pkt.data, 1, pkt.size, fp_video);}}else if (pkt.stream_index == audioindex) {printf("Write Audio Packet. size:%d\tpts:%ld\n", pkt.size, pkt.pts);char adts[7] = { 0 };addHeader(adts, ifmt_ctx->streams[audioindex]->codecpar->sample_rate, ifmt_ctx->streams[audioindex]->codecpar->channels, ifmt_ctx->streams[audioindex]->codecpar->profile,pkt.size);fwrite(adts, 1, 7, fp_audio);fwrite(pkt.data, 1, pkt.size, fp_audio);}av_packet_unref(&pkt);}av_bsf_free(&bsf_ctx);fclose(fp_video);fclose(fp_audio);avformat_close_input(&ifmt_ctx);return 0;if (ifmt_ctx)avformat_close_input(&ifmt_ctx);if (fp_audio)fclose(fp_audio);if (fp_video)fclose(fp_video);if (bsf_ctx)av_bsf_free(&bsf_ctx);return -1;
}
【Makefile】
CROSS_COMPILE = aarch64-himix200-linux-CC = $(CROSS_COMPILE)g++
AR = $(CROSS_COMPILE)ar
STRIP = $(CROSS_COMPILE)stripCFLAGS = -Wall -O2 -I../../source/mp4Lib/include
LIBS += -L../../source/mp4Lib/lib -lpthread
LIBS += -lavformat -lavcodec -lavdevice -lavutil -lavfilter -lswscale -lswresample -lzSRCS = $(wildcard *.cpp)
OBJS = $(SRCS:%.cpp=%.o)
DEPS = $(SRCS:%.cpp=%.d)
TARGET = mp4demuxerall:$(TARGET)-include $(DEPS)%.o:%.cpp$(CC) $(CFLAGS) -c -o $@ $<%.d:%.c@set -e; rm -f $@; \$(CC) -MM $(CFLAGS) $< > $@.$$$$; \sed 's,\($*\)\.o[ :]*,\1.o $@ : ,g' < $@.$$$$ > $@; \rm -f $@.$$$$$(TARGET):$(OBJS)$(CC) -o $@ $^ $(LIBS)$(STRIP) $@ .PHONY:cleanclean:rm -fr $(TARGET) $(OBJS) $(DEPS)


)


![轻量日志管理方案-[EFK]](http://pic.xiahunao.cn/轻量日志管理方案-[EFK])


特性)
)

)

