注解
@RestController
是SpringMVC框架中的一个注解,它结合了@Controller和@ResponseBody两个注解的功能,用于标记一个类或者方法,表示该类或方法用于处理HTTP请求,并将响应的结果直接返回给客户端,而不需要进行视图渲染
@Controller
是Spring Framework中的注解,用于标识一个类是控制器组件。在Spring MVC(Model-View-Controller)架构中扮演重要角色,负责处理来自客户端的HTTP请求,协调业务逻辑的处理,并根据请求返回适当的视图或数据
@ResponseBody
是Spring MVC框架中的注解,用于将Controller的方法返回的对象通过适当的转换器转换为指定的格式之后,写入到Response对象的Body区,通常用来返回JSON或XML数据。
@ResponseBody注解的作用是将方法的返回结果直接写入HTTP response body中,一般在异步获取数据时使用,例如AJAX。需要注意的是,如果使用了@RequestMapping注解,返回值通常会被解析为跳转路径,但加上@ResponseBody后返回结果不会被解析为跳转路径,而是直接写入HTTP response body中。例如,异步获取json数据,加上@ResponseBody后,会直接返回json数据。
@RequestMapping
是Spring框架中用于处理请求地址映射的注解,可用于类或方法上。当用于类上时,表示类中的所有响应请求的方法都是以该地址作为父路径;当用于方法上时,表示该方法处理请求的地址映射。
@RequestMapping
注解有六个属性,下面将其分成三类进行说明:
value:指定请求映射的URL路径。method:指定请求的方法类型,如GET、POST等。params:指定请求的参数,如查询参数等。headers:指定请求中必须包含某些指定的header值,才能让该方法处理请求。consumes:指定请求的内容类型,即消费的内容类型。produces:指定响应的内容类型,即生产的内容类型。
@GetMapping和@PostMapping是Spring框架中用于处理不同HTTP请求方法的注解。
@GetMapping
用于处理HTTP GET请求 是@RequestMapping(method = RequestMethod.GET)的缩写
@PostMapping
用于处理HTTP POST请求。是@RequestMapping(method = RequestMethod.POST)的缩写
这两个注解的作用是将HTTP请求映射到特定的处理方法上,使得在后端代码中可以针对不同的请求进行相应的处理
@RequestParam
如果是get请求 则使用 @RequestParam 注解直接接收参数

@RequestBody
如果是post请求则使用 @RequestBody 注解 接收json参数

@SpringBootApplication
是spring boot注解 标明当前是启动文件
@SpringBootApplication 是一个便利的注解,它包含了多个注解的组合:
- @Configuration:标识该类是一个配置类,提供配置信息。
- @EnableAutoConfiguration:开启 Spring Boot 的自动配置功能,根据添加的 jar 包自动配置项目。
- @ComponentScan:自动扫描并加载符合条件的组件或 bean,例如 @Controller、@Service 和 @Repository 等。
使用 @SpringBootApplication 注解会启用 Spring Boot 应用程序的自动配置和组件扫描,并通过它们设置应用程序上下文。
下面是一个简单的示例代码,演示了如何使用 @SpringBootApplication 注解:
@SpringBootApplication
public class MyApplication {public static void main(String[] args) {SpringApplication.run(MyApplication.class, args);}
}
在该示例代码中,我们创建了一个名为 MyApplication 的 Spring Boot 应用程序,并在 main 方法中使用 SpringApplication.run() 方法启动该应用程序。通过在 MyApplication 类上添加 @SpringBootApplication 注解,我们启用了 Spring Boot 应用程序的自动配置和组件扫描功能,Spring Boot 将会自动加载符合条件的组件或 bean。
需要注意的是,@SpringBootApplication 注解中包含了 @ComponentScan 注解,并在默认情况下会加载和扫描 MyApplication 类所在的包及其子包中所有符合条件的组件或 bean。
另外,Spring Boot 还提供了许多其他的注解,例如 @RestController、@RequestMapping 等,用于构建 Web 应用程序和 RESTful 服务。这些注解在使用 Spring Boot 进行 Web 开发时非常有用。
@Mapper
是MyBatis框架的注解,用于标识接口,这个接口定义了数据库操作的方法。
使用@Mapper注解的组件Model属性可以指定自动生成的接口实现类的组件类型,支持四种值:default、cdi、spring、jsr330。
@Data
是Lombok中的一个注解,主要用于简化代码,提高开发效率。
使用@Data注解可以省去代码中大量的get()、set()、toString()等方法,它会自动生成以下代码:所有字段的get和set方法、toString()方法,用于将对象转换成字符串形式,便于调试和日志输出、hashCode()方法,用于计算对象的哈希值、equals()方法,用于判断两个对象是否相等。此外,如果希望生成所有参数和指定参数的构造方法,可以使用@AllArgsConstructor或@RequiredArgsConstructor等其他Lombok注解。需要注意的是,如果在实体类中手动编写了一个带参数的构造方法,使用@Data注解会覆盖掉手动编写的构造方法
@Autowired
可以对成员变量、方法和构造函数进行标注,来完成自动装配的工作,@Autowired标注可以放在成员变量上,也可以放在成员变量的set方法上,也可以放在任意方法上表示,自动执行当前方法,如果方法有参数,会在IOC容器中自动寻找同类型参数为其传值。这里必须明确:@Autowired是根据类型进行自动装配的,如果需要按名称进行装配,则需要配合@Qualifier使用
@Configuration
用于定义配置类,可替换xml配置文件,被注解的类内部包含有一个或多个被@Bean注解的方法,这些方法将会被AnnotationConfigApplicationContext或AnnotationConfigWebApplicationContext类进行扫描,并用于构建bean定义,初始化Spring容器。
@Bean
是Spring框架中的注解,用于告诉Spring创建一个Bean对象,并将其放入Spring的IOC容器中管理。
使用@Bean注解可以有两种方式:
- 用在类上 。例如@Controller、@Service、@Component、@Configuration、@Repository等注解,这些注解通常用在类上,然后通过无参构造函数创建对象并放入容器中。这种方式是由Spring自动创建对象。
- 用在方法上 。将@Bean用在方法上,表示将该方法的返回值对象放到容器中。这种方式是由我们自己控制对象的创建。
使用@Bean注解的方法可以放在被@Controller、@Service、@Component、@Configuration、@Repository等注解的类中,这样在项目启动时,这些方法返回的对象也会被立即存入容器中。也可以直接用在启动类上。
@Component
是Spring框架中一个泛化的注解,通常是通过路径扫描来自动侦测以及自动装配到Spring容器中。
@Component注解作用于类,把普通pojo实例化到Spring容器中,相当于配置文件中的,泛指各种组件。比如当我们的类不属于各种归类的时候(不属于@Controller、@Services等的时候),就可以使用@Component来标注这个类。
@Resource
@Resource 注解是 Java EE 标准提供的注解,它用于消除代码中的硬编码,让开发人员能够轻松地将一个资源注入到代码中。它和 @Autowired 注解类似,可以自动装配 Spring 托管的 Bean,只是使用方式不同。
使用 @Resource 注解注入 Bean 时,可以指定 Bean 的名称或类型,示例如下:
@Component
public class UserServiceImpl implements UserService {@Resource(name = "userRepository")private UserRepository userRepository;...
}
在上面的示例中,我们使用 @Resource 注解将 UserRepository 类型的 Bean 注入到 UserServiceImpl 类中的 userRepository 属性中。通过指定 name 属性来指定注入的 Bean 名称,也可以通过指定 type 属性来指定 Bean 的类型。如果没有指定 name 或 type 属性,则会自动按照属性类型进行匹配。
需要注意的是,Spring 还提供了 @Inject 注解来实现依赖注入,它和 @Autowired 注解类似,但是它是 JSR-330 标准提供的注解,不是 Java EE 标准提供的,使用方式和 @Autowired 也略有不同。
@PreAuthorize
@PreAuthorize 是 Spring Security 框架提供的一个注解,用于在方法执行前进行权限判断。它可以放置在方法上或者类上,来限制用户对这个方法或者类的访问权限。
使用 @PreAuthorize 注解需要先在 Spring Security 的配置中启用注解支持,例如:
@Configuration
@EnableWebSecurity
@EnableGlobalMethodSecurity(prePostEnabled = true)
public class SecurityConfig extends WebSecurityConfigurerAdapter {...
}
@PreAuthorize 注解的使用方法如下:
@PreAuthorize("hasRole('ROLE_ADMIN')")
public void adminOnlyMethod() {...
}
上面的例子表示只有拥有 ADMIN 角色的用户才能调用 adminOnlyMethod 方法。@PreAuthorize 注解支持参数表达式,可以很灵活地进行权限校验。
需要注意的是,@PreAuthorize 注解仅起到对方法或者类的访问控制作用,需要在系统中配合其他安全措施一起使用,才能更好地保证系统的安全性。
@EnableGlobalMethodSecurity
@EnableGlobalMethodSecurity 是 Spring Security 中一个用于启用全局方法安全性的注解。它可以通过几个参数来配置方法拦截的细节,并增强 Spring Security 的授权功能。在启用方法安全之前,我们需要在应用程序中启用 Spring Security。具体做法是添加 @EnableWebSecurity 和扩展 WebSecurityConfigurerAdapter 类。
@EnableGlobalMethodSecurity 可以配置三个参数,它们是:
- prePostEnabled:启用 Spring Security 对使用 @PreAuthorize 和 @PostAuthorize 注解进行的方法调用的支持
- securedEnabled:启用 @Secured 注解的使用
- jsr250Enabled:启用 JSR-250 注解的使用(例如 @RolesAllowed)
这些参数可以以适当的方式组合使用。例如,如下代码启用了 prePostEnabled 和 securedEnabled:
@Configuration
@EnableGlobalMethodSecurity(securedEnabled = true, prePostEnabled = true)
public class MethodSecurityConfiguration extends GlobalMethodSecurityConfiguration {// 额外的配置}
在此配置类中,我们启用了 @Secured 和 @PreAuthorize、@PostAuthorize 注解,这意味着我们可以在使用方法注解时实现更细粒度的方法级别的访问控制。
需要注意的是,在启用 @Secured 注解时,需要引入 spring-aop 的依赖,否则会出现 NoClassDefFoundError 异常。
@ConfigurationProperties
@ConfigurationProperties是一个Spring Boot的注解,它是用来将一个前缀相同的properties属性映射到一个 JavaBean 对象中的,方便我们在 Spring Boot 中进行配置文件(application.yml或application.properties)的管理和使用。
通常情况下,我们需要在application.yml或者application.properties中为业务指定一些相关的参数,一些比较常见的如redis的host、port以及数据库的url等配置。而这种配置在应用中很可能是要被多次使用,而直接使用借口或者XML进行配置,会使得代码冗余严重,也不够灵活方便。
@ConfigurationProperties注解的使用步骤如下:
1.在application.yml中自定义属性,指定前缀
demo:name: jackage: 20
2.JavaBean注入@ConfigurationProperties属性
@Component
@ConfigurationProperties(prefix = "demo")
public class DemoProperties {private String name;private Integer age;//...get & set方法}
此时,DemoProperties中的属性就被自动赋为 application.yml 同名配置属性的值,并且可在任意类中注入DemoProperties,进行方便的使用。
错误
MYBATISE 类
resultMap 下的 result jdbcType属性中没有 INT 类型会报错 No enum constant org.apache.ibatis.type.JdbcType.INT 这表明在Mapper.xml文件中可能使用了JdbcType.INT,但实际上在org.apache.ibatis.type.JdbcType中没有这个枚举值。
jdbcType有26种类型有:REAL、VARCHAR、BINARY、BIT、FLOAT、CHAR、TIMESTAMP、OTHER、UNDEFINED、TINYINT、BLOB、NVARCHAR、SMALLINT、DOUBLE、DECIMAL、TIME、NULL、CURSOR、LONGVARCHAR、VARBINARY、CLOB、NCHAR、INTEGER、NUMERIC、DATE、LONGVARBINARY、BOOLEAN、NCLOB、BIGINT1。
程序类
Servlet.service() for servlet [dispatcherServlet] in context with path [] threw exception [Request processing failed; nested exc
问题是一个常见的Java NPE(空指针异常)。在Spring MVC框架中,当dispatcherServlet处理请求时,如果遇到空指针异常,就会出现这样的错误消息。
空指针异常可能由以下几种原因引起:
- 你在控制器的方法参数中使用了某个对象,但请求处理该方法时,该对象为空。
- 你的控制器返回的对象为空。
- 查询出来的数据是null就是没有数据。
- 或者是使用其他包的对象缺少注解 @Autowired
spring boot
HandlerInterceptor拦截器
在spring boot中 无论是filter 过滤器还是interceptor 拦截器都是无法使用自动注入获取属性的,无论是在拦截器类中注入还是在new的实例中有自动注入的属性都会报空值异常,无法找到类;想在拦截器中使用自定义类或者其他ioc容器中的bean,可以在InterceptorConfiguration构建Interceptor时中填入属性值,因为在配置类中是可以使用自动注入的
示例:
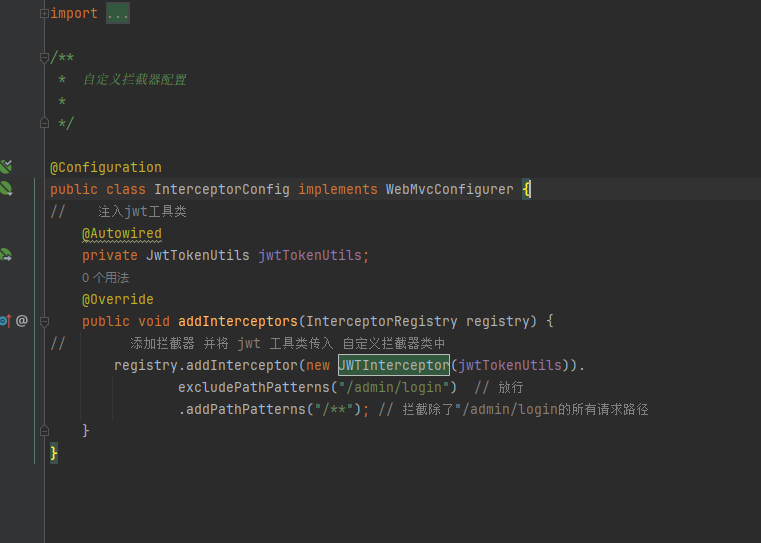
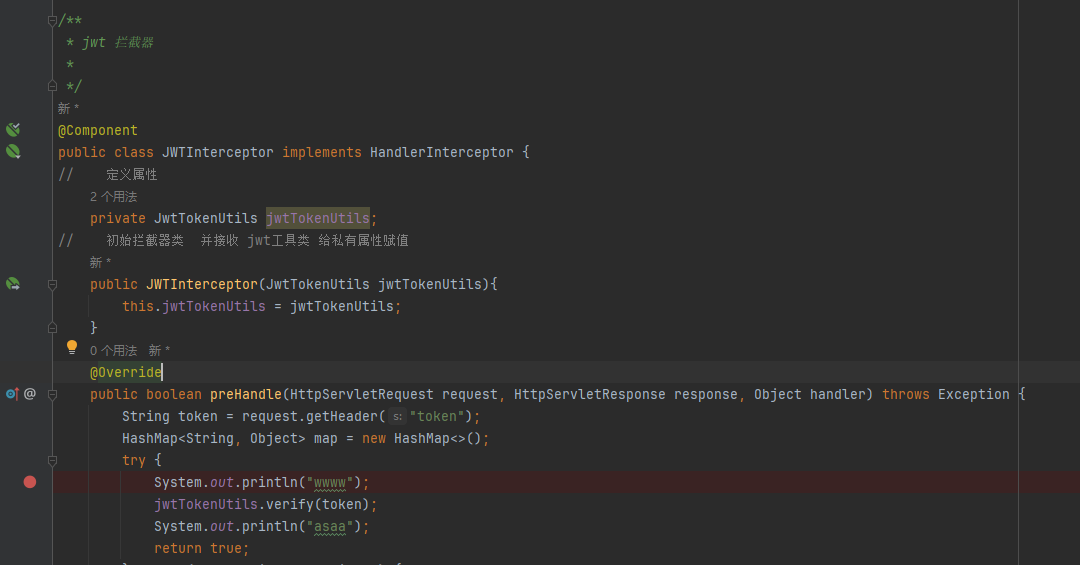
这样即可 使用自定义类或者其他ioc容器中的bean
注意内容
数据类型
long
long 长整型需要在 值后面加一个L 默认是通过int 整型隐式转换成 long 长整型 如果没有L 说明他是int 如果数值大于 int的最大字符就会报错
float
float 单精度浮点型 需要在值后面加一个F 默认是双精度浮点数 double 而双精度浮点类型 大于 float单精度浮点类型 不能进行转换所以 会报错
List
ArrayList
如果整型数据需要根据内容进行删除 则需要 new Integer(删除内容值) 已这种显示的形式删除
package com.example.demo.common;import java.util.ArrayList;
import java.util.List;public class Common {protected Common(){List auth = new ArrayList();
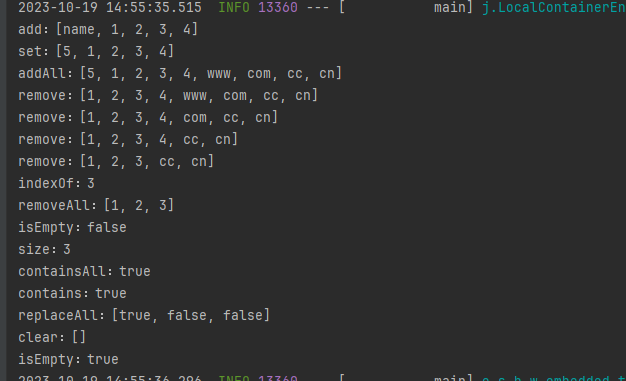
// 添加数据auth.add("name");auth.add(1);auth.add(2);auth.add(3);auth.add(4);System.out.println("add:"+auth);
// 更新数据 通过索引进行更新auth.set(0,5);System.out.println("set:"+auth);List auth1 = new ArrayList<>();auth1.add("www");auth1.add("com");auth1.add("cc");auth1.add("cn");
// 将其他集合所有内容 添加到当前内容auth.addAll(auth1);System.out.println("addAll:"+auth);
// 根据所有删除指定数据auth.remove(0);System.out.println("remove:"+auth);
// 根据内容删除指定数据auth.remove("www");System.out.println("remove:"+auth);
// 删除内容为4的数据 因为现在删除数据是默认根据索引进行删除 如果整型数据需要根据内容进行删除 则需要 new Integer(删除内容值) 已这种显示的形式删除auth.remove(4);System.out.println("remove:"+auth);auth.remove(new Integer(4));System.out.println("remove:"+auth);
// 根据查询的内容返回第一次出现的数据对应索引下标 如果找不到返回 -1System.out.println("indexOf:"+auth.indexOf("cc"));
// 清空指定集合的内容auth.removeAll(auth1);System.out.println("removeAll:"+auth);
// 判断集合是否为空System.out.println("isEmpty:"+auth.isEmpty());
// 获取当前集合的数据数量System.out.println("size:"+auth.size());List auth2 = new ArrayList<>();auth2.add(1);auth2.add(2);
// 判断当前集合是否包含另一个集合的全部内容System.out.println("containsAll:"+auth.containsAll(auth2));
// 判断当前集合是否 包含某个值System.out.println("contains:"+auth.contains(1));
// replaceAll方法用于替换列表中所有满足某个条件的元素
// 这个方法接受一个UnaryOperator<E>作为参数,这是一个函数接口,它接受列表中的每个元素,并返回一个新的元素来替换原来的元素。
// 这个例子中,replaceAll方法接受一个lambda表达式 s -> s.equals(1) 作为参数。这个lambda表达式对列表中的每个元素执行,将每个字符串进行判断是否等于1,如果等于1则替换成true否则falseauth.replaceAll(s->s.equals(1));System.out.println("replaceAll:"+auth);
// 清空数据auth.clear();System.out.println("clear:"+auth);
// 判断集合是否为空System.out.println("isEmpty:"+auth.isEmpty());}}
接口
OncePerRequestFilter过滤器接口
OncePerRequestFilter 是 Spring 框架提供的过滤器抽象类,用于在请求处理之前或之后执行一些通用的处理逻辑,常见的应用场景包括:
- 鉴权,判断用户是否有权限访问资源
- 全局异常处理
- 统一添加响应头等
OncePerRequestFilter 实现了 javax.servlet.Filter 接口,并在内部实现了doFilter()方法,封装了具体的 Filter 处理流程,保证每个 Request 只执行一次。我们只需要在派生类中实现doFilterInternal() 方法即可,该方法的参数是 HttpServletRequest 和 HttpServletResponse 对象。例如:
@Component
public class JwtAuthenticationFilter extends OncePerRequestFilter {@Autowiredprivate JwtTokenProvider jwtTokenProvider;@Overrideprotected void doFilterInternal(HttpServletRequest request, HttpServletResponse response, FilterChain filterChain)throws ServletException, IOException {// 从请求头中获取 Jwt TokenString token = jwtTokenProvider.resolveToken(request);// 验证 Jwt Token,并从中获取用户信息if (StringUtils.hasText(token) && jwtTokenProvider.validateToken(token)) {Authentication authentication = jwtTokenProvider.getAuthentication(token);SecurityContextHolder.getContext().setAuthentication(authentication);}// 继续处理请求filterChain.doFilter(request, response);}
}
在上面的代码中,我们实现了一个 JwtAuthenticationFilter 过滤器,用于从请求头中提取 JWT Token,并校验和解析 Token,将用户信息存储到 Spring Security 上下文中。这样在后续处理请求时,就可以通过 SecurityContextHolder 获取到用户信息。然后,我们将该过滤器定义为 Spring Bean,以便在 WebSecurityConfig 中进行配置:
@Configuration
@EnableWebSecurity
public class WebSecurityConfig extends WebSecurityConfigurerAdapter {@Autowiredprivate JwtAuthenticationFilter jwtAuthenticationFilter;@Overrideprotected void configure(HttpSecurity http) throws Exception {http// ....addFilterBefore(jwtAuthenticationFilter, UsernamePasswordAuthenticationFilter.class);}
}
在上面的代码中,我们使用 addFilterBefore() 方法将 JwtAuthenticationFilter 过滤器添加到 UsernamePasswordAuthenticationFilter 过滤器之前,这样就能够保证在 UsernamePasswordAuthenticationFilter 过滤器中对用户进行身份认证之前,先执行 JwtAuthenticationFilter 过滤器中的逻辑。
HandlerInterceptor拦截器
是 Spring 框架提供的拦截器接口,可用于在请求处理之前或之后执行一些通用的处理逻辑,例如:
- 认证用户请求的权限
- 记录请求日志
- 统计请求时长等
HandlerInterceptor 接口有三个方法:
preHandle():在请求处理之前执行。可以用来进行拦截请求等操作。postHandle():在请求处理之后执行。可以用来进行处理请求结果等操作。afterCompletion():在完成请求处理之后执行。用于清理资源等操作。
在 SpringMVC 的配置文件中,可以通过 addInterceptor() 方法注册一个 HandlerInterceptor 拦截器,并指定要拦截的 URL。例如:
@Configuration
@EnableWebMvc
public class WebMvcConfig implements WebMvcConfigurer {@Autowiredprivate LogInterceptor logInterceptor;@Overridepublic void addInterceptors(InterceptorRegistry registry) {registry.addInterceptor(logInterceptor).addPathPatterns("/**");}
}
在上面的代码中,我们定义了一个 LogInterceptor 拦截器,并注册到 InterceptorRegistry 中,然后使用 addPathPatterns() 方法指定要拦截的 URL(这里是所有 URL)。从而实现了在所有请求之前和之后均执行 LogInterceptor 中的业务逻辑。
WebMvcConfigurer配置接口
WebMvcConfigurer 是 Spring MVC 框架提供的一个配置接口,用于扩展和自定义 Spring MVC 的功能。通过实现 WebMvcConfigurer 接口,我们可以进行一些常见的配置操作,例如:
- 添加拦截器
- 修改视图解析器
- 自定义消息转换器等
当我们需要通过自定义配置来对 Spring MVC 进行特定的操作时,就可以实现 WebMvcConfigurer 接口,并在其中实现相应的方法。例如:
@Configuration
public class MvcConfig implements WebMvcConfigurer {@Overridepublic void addInterceptors(InterceptorRegistry registry) {registry.addInterceptor(new MyHandlerInterceptor()).addPathPatterns("/**").excludePathPatterns("/login");}@Overridepublic void configureViewResolvers(ViewResolverRegistry registry) {registry.jsp("/WEB-INF/views/", ".jsp");}@Overridepublic void configureMessageConverters(List<HttpMessageConverter<?>> converters) {converters.add(new MappingJackson2HttpMessageConverter());}
}
在上面的代码中,我们实现了一个 MvcConfig 类,并实现了 WebMvcConfigurer 接口中的几个方法。其中,addInterceptors() 方法用于添加拦截器,configureViewResolvers() 方法用于修改视图解析器,configureMessageConverters() 方法用于添加自定义的消息转换器。这样,就可以通过 MvcConfig 类来配置 Spring MVC 的相关功能。
需要注意的是,当我们实现 WebMvcConfigurer 接口时,可以只重写需要自定义的方法,而不需要全部重写。并且,在 Spring Boot 中,只需要将 WebMvcConfigurer 的实现类定义为 Spring Bean 即可,Spring Boot 会自动将其加入 Spring MVC 配置中。
Spring Security
过滤器和拦截器的优先级
在 Spring Boot 中使用 Spring Security 的时候,首先会触发过滤器链,再触发拦截器。这是因为 Spring Security 是基于过滤器的,而 Spring MVC 的拦截器是基于 HandlerInterceptor 的。
在 Spring Boot 中,Spring Security 的过滤器链由 FilterChainProxy 进行管理,它是一个 Spring Security 中内置的过滤器链,是在 WebSecurityConfigurerAdapter 中进行配置的。在过滤器链中,UsernamePasswordAuthenticationFilter(处理表单登录)是第一个过滤器,并且默认情况下是在前面,所以在进行登录认证时,先会进行 UsernamePasswordAuthenticationFilter 的处理。
经过过滤器处理后,请求将会交给 Spring MVC 框架进行处理。而在 Spring MVC 中,可以通过实现 HandlerInterceptor 接口来拦截请求,并在进入 Controller 前或返回响应前进行处理。这时 Spring Security 的自定义拦截器将会被调用。
综上所述,Spring Boot 中使用 Spring Security 时,会先触发过滤器链,再触发拦截器。在过滤器链中,UsernamePasswordAuthenticationFilter 是第一个处理用户认证的过滤器,而在拦截器中则可以实现一些更加细粒度的控制,如基于权限的访问控制等。
WebSecurityConfigurerAdapter Security 配置适配器
WebSecurityConfigurerAdapter 是一个方便地帮助用户进行自定义 Security 配置的适配器。在使用Spring Security进行Web应用程序的安全保护时,通常需要创建一个自定义的 WebSecurityConfigurerAdapter 类。
WebSecurityConfigurerAdapter 类提供了 configure 方法,通过重写该方法可以对 Spring Security 进行配置。在这里可以配置 Spring Security 相关的东西,包括如登录页面、登录请求处理、权限控制等等。
在一个 WebSecurityConfigurerAdapter 子类中可以使用各种各样的方法去配置 Spring Security,下面是一些常用的方法:
-
configure(HttpSecurity http):该方法用于配置 HTTP 请求安全处理。在这个方法中可以设置登录页面、登录请求处理、权限控制等;
-
configure(WebSecurity web):该方法用于配置 Filter 链,可以设置忽略某些 URL 不走 Spring Security 验证;
-
configure(AuthenticationManagerBuilder auth):该方法用于配置用户凭证存储和认证方式。
下面是一个简单的示例代码,展示了 WebSecurityConfigurerAdapter 的基本用法:
@Configuration
@EnableWebSecurity
public class SecurityConfig extends WebSecurityConfigurerAdapter {@Autowiredprivate MyUserDetailService userDetailsService;@Autowiredprivate MyPasswordEncoder passwordEncoder;@Overrideprotected void configure(HttpSecurity http) throws Exception {//定义访问权限http.authorizeRequests().antMatchers("/admin/**").hasRole("ADMIN").antMatchers("/**").permitAll().and()//登录相关配置.formLogin().loginPage("/login").defaultSuccessUrl("/index").failureUrl("/login/error").and()//注销相关配置.logout().logoutUrl("/logout").logoutSuccessUrl("/").and()//开启记住我功能.rememberMe().rememberMeParameter("remember-me").tokenValiditySeconds(86400);}@Overrideprotected void configure(AuthenticationManagerBuilder auth) throws Exception {//设置认证方式auth.userDetailsService(userDetailsService).passwordEncoder(passwordEncoder);}@Overridepublic void configure(WebSecurity web) throws Exception {//设置忽略静态资源web.ignoring().antMatchers("/css/**", "/js/**", "/images/**");}
}
在该示例代码中,我们继承 WebSecurityConfigurerAdapter 并重写了几个关键的方法。configure(HttpSecurity http) 用于定义访问权限、登录相关配置,注销相关配置以及开启记住我功能。configure(AuthenticationManagerBuilder auth) 用于设置认证方式。configure(WebSecurity web) 用于设置忽略静态资源。

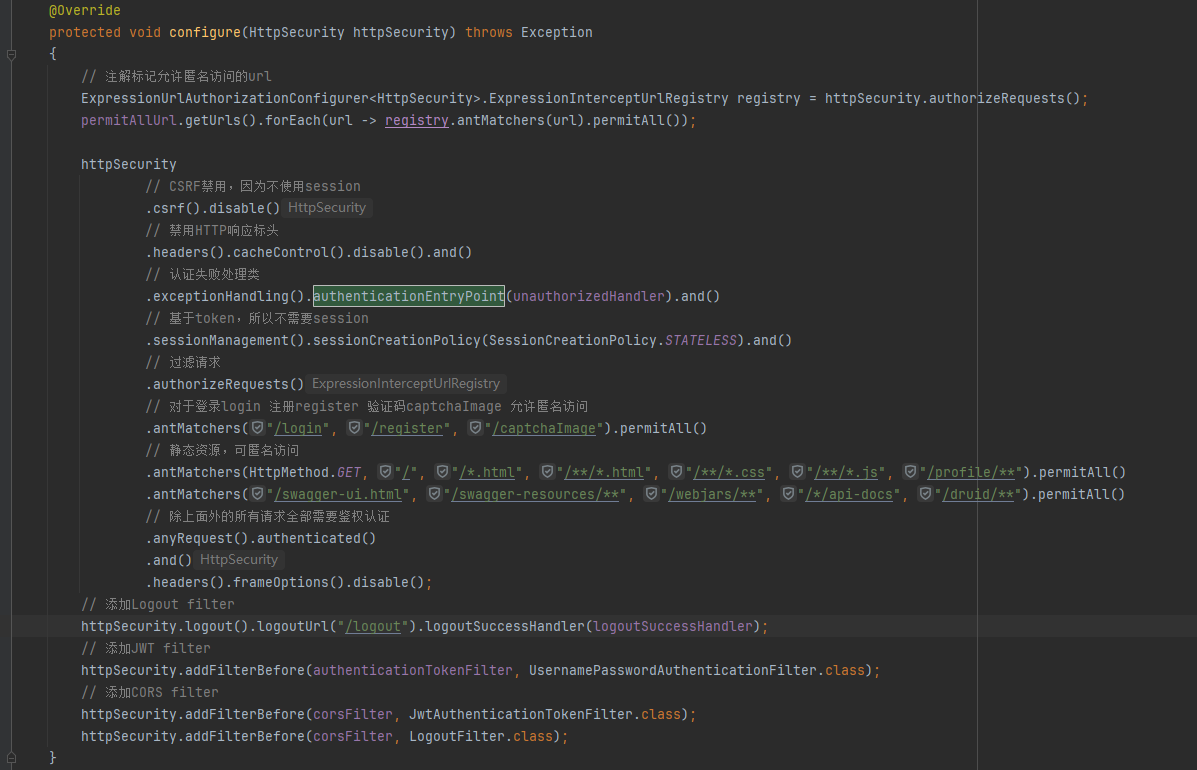
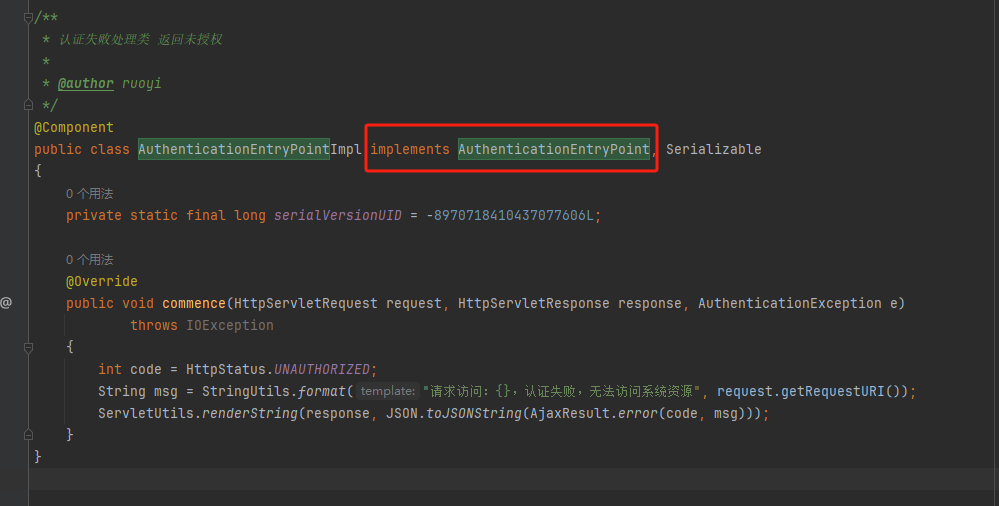
AuthenticationEntryPoint 接口
配置WebSecurityConfigurerAdapter Security 适配器

在 Spring Security 中,AuthenticationEntryPoint 接口表示在用户请求需要认证的资源时,Spring Security 将会调用其实现类的 commence 方法,该方法将决定如何处理未授权用户的请求。被ExceptionTranslationFilter用来作为认证方案的入口,即当用户请求处理过程中遇见认证异常时,被异常处理器(ExceptionTranslationFilter)用来开启特定的认证流程
如果用户请求需要认证的资源但未通过身份验证,将抛出一个 AuthenticationException 异常。默认情况下,Spring Security 将会重定向到登录页面以便用户登录。然而,如果你想要其他的表现形式,如直接返回错误信息或者进行其他的重定向等,就可以实现 AuthenticationEntryPoint 接口并重写其中的 commence 方法。
commence 方法的签名如下:
void commence(HttpServletRequest request, HttpServletResponse response,AuthenticationException authException)
方法中的 request 表示用户发送的请求,response 表示响应结果,authException 表示抛出的 AuthenticationException 异常。
因为 AuthenticationEntryPoint 可以定制化未授权用户的请求响应信息,所以在 Spring Security 中是非常重要的一个接口。比如可以在该方法中返回未授权的错误信息、跳转到其他网页等。同时也可以通过实现该接口自定义登录页面,如下示例:
public class MyAuthenticationEntryPoint implements AuthenticationEntryPoint {@Overridepublic void commence(HttpServletRequest request, HttpServletResponse response,AuthenticationException authException) throws IOException, ServletException {//设置响应状态码,代表用户没有授权response.setStatus(HttpServletResponse.SC_UNAUTHORIZED);response.setContentType(MediaType.TEXT_PLAIN_VALUE);//返回信息response.getWriter().write("您还没有登录,请先登录!");//跳转到登录页面//response.sendRedirect("/login");}
}
在该实现类中,如果用户请求未经认证的资源,返回响应状态码为 401(请求未授权),同时返回一个文本信息 "您还没有登录,请先登录!"。如果需要跳转到登录页面可以将响应流程改为注释掉的一行代码。
LogoutSuccessHandler 接口
配置WebSecurityConfigurerAdapter Security 适配器

在 Spring Security 中,LogoutSuccessHandler 接口用于处理用户注销成功后的逻辑。当用户成功注销时,Spring Security 将调用 LogoutSuccessHandler 的实现类,并调用其中的 onLogoutSuccess 方法来处理注销成功的逻辑。
在实现自定义的 LogoutSuccessHandler 时,需要实现以下 onLogoutSuccess 方法:
public interface LogoutSuccessHandler {void onLogoutSuccess(HttpServletRequest request, HttpServletResponse response,Authentication authentication) throws IOException, ServletException;
}
在方法中,request 表示用户发送的注销请求,response 表示注销响应结果,authentication 表示用户的认证信息。authentication 可以获取用户注销之前的认证信息,如用户对象、用户权限等。
下面是一个示例代码,展示如何实现 LogoutSuccessHandler 接口:
public class MyLogoutSuccessHandler implements LogoutSuccessHandler {@Overridepublic void onLogoutSuccess(HttpServletRequest request, HttpServletResponse response,Authentication authentication) throws IOException, ServletException {//获取用户信息UserDetails userDetails = (UserDetails)authentication.getPrincipal();String username = userDetails.getUsername();//记录退出日志//log.info("User {} logout success.", username);//跳转到主页面response.sendRedirect("/");}
}
在该示例代码中,我们实现了一个简单的 LogoutSuccessHandler,通过重写 onLogoutSuccess 方法实现了退出日志记录和跳转到主页面的逻辑。
在配置 Spring Security 的过程中,可以通过调用 logoutSuccessHandler 方法来设置注销成功后的处理逻辑,如下示例:
@Configuration
@EnableWebSecurity
public class SecurityConfig extends WebSecurityConfigurerAdapter {@Autowiredprivate MyUserDetailService userDetailsService;@Autowiredprivate MyPasswordEncoder passwordEncoder;@Autowiredprivate MyLogoutSuccessHandler logoutSuccessHandler;@Overrideprotected void configure(HttpSecurity http) throws Exception {//定义访问权限http.authorizeRequests().antMatchers("/admin/**").hasRole("ADMIN").antMatchers("/**").permitAll().and()//登录相关配置.formLogin().loginPage("/login").defaultSuccessUrl("/index").failureUrl("/login/error").and()//注销相关配置.logout().logoutUrl("/logout").logoutSuccessHandler(logoutSuccessHandler).and()//开启记住我功能.rememberMe().rememberMeParameter("remember-me").tokenValiditySeconds(86400);}@Overrideprotected void configure(AuthenticationManagerBuilder auth) throws Exception {//设置认证方式auth.userDetailsService(userDetailsService).passwordEncoder(passwordEncoder);}@Overridepublic void configure(WebSecurity web) throws Exception {//设置忽略静态资源web.ignoring().antMatchers("/css/**", "/js/**", "/images/**");}
}
以上示例代码中,我们在 configure(HttpSecurity http) 方法中设置了 .logoutSuccessHandler(logoutSuccessHandler) ,将我们自己编写的 MyLogoutSuccessHandler 设置为注销成功的处理类。
UsernamePasswordAuthenticationFilter
UsernamePasswordAuthenticationFilter 是 Spring Security 中的一个过滤器,在默认情况下会添加到基于表单的身份验证过滤器链中。它的作用是从 HTTP 请求中提取用户名和密码,并使用它们来进行身份验证。UsernamePasswordAuthenticationFilter 用于处理表单登录。
当用户提交登录表单时,表单数据将被 UsernamePasswordAuthenticationFilter 获取并将其封装在一个 Authentication 对象中。然后,该 Authentication 对象将被传递给 AuthenticationManager 进行身份验证。如果身份验证成功,AuthenticationManager 将返回一个已填充用户信息的 Authentication。如果身份验证失败,则将抛出 AuthenticationException 异常。
如果您想要修改默认的 UsernamePasswordAuthenticationFilter 的配置,您可以编写一个继承自 UsernamePasswordAuthenticationFilter 的类(可以根据需要添加或覆盖方法),然后使用 addFilterBefore() 方法将此自定义的过滤器添加到 Spring Security 过滤器链的适当位置。另外,您还可以使用 @Bean 注解创建一个 UsernamePasswordAuthenticationFilter 类型的 bean。
以下是示例代码:
public class CustomUsernamePasswordAuthenticationFilter extends UsernamePasswordAuthenticationFilter {@Overridepublic Authentication attemptAuthentication(HttpServletRequest request, HttpServletResponse response) throws AuthenticationException {//自定义的身份验证逻辑}
}@Configuration
@EnableWebSecurity
public class SecurityConfig extends WebSecurityConfigurerAdapter {@Autowiredprivate AuthenticationProvider authenticationProvider;@Beanpublic UsernamePasswordAuthenticationFilter usernamePasswordAuthenticationFilter() throws Exception {CustomUsernamePasswordAuthenticationFilter filter = new CustomUsernamePasswordAuthenticationFilter();filter.setAuthenticationManager(authenticationManagerBean());filter.setFilterProcessesUrl("/login");return filter;}@Overrideprotected void configure(HttpSecurity http) throws Exception {http.addFilterBefore(usernamePasswordAuthenticationFilter(), UsernamePasswordAuthenticationFilter.class).authorizeRequests().antMatchers("/login").permitAll().anyRequest().authenticated().and().formLogin().loginPage("/login").usernameParameter("username").passwordParameter("password").defaultSuccessUrl("/").and().logout().logoutUrl("/logout").logoutSuccessUrl("/login").invalidateHttpSession(true).deleteCookies("JSESSIONID");}@Overrideprotected void configure(AuthenticationManagerBuilder auth) throws Exception {auth.authenticationProvider(authenticationProvider);}}
在这个示例代码中,我们创建了一个 CustomUsernamePasswordAuthenticationFilter 类,继承自 UsernamePasswordAuthenticationFilter,并覆盖了 attemptAuthentication() 方法,实现了自定义的身份验证逻辑。我们还创建了一个 UsernamePasswordAuthenticationFilter 类型的 bean 并使用 addFilterBefore() 方法将其添加到 Spring Security 过滤器链中。在 configure() 方法中,我们配置了 Spring Security 的授权逻辑和表单登录相关的设置。同时,我们还通过 configure(AuthenticationManagerBuilder auth) 方法设置了身份验证管理器的配置。
UsernamePasswordAuthenticationToken
UsernamePasswordAuthenticationToken 是 Spring Security 中的一个身份验证令牌(Authentication Token),用于封装用户名和密码信息。
当用户进行身份验证时,UsernamePasswordAuthenticationFilter 会将从登录表单中获取到的用户名和密码封装在一个 UsernamePasswordAuthenticationToken 对象中,并将其传递给 AuthenticationManager 进行身份验证。
如果身份验证成功,AuthenticationManager 会返回一个 Authentication 对象,其中封装了用户名和密码以及用户角色等信息,这个对象最终会在 Spring Security 的上下文(SecurityContext)中存储。如果身份验证失败,AuthenticationManager 将抛出一个 AuthenticationException 异常。
下面是一个示例代码:
public class CustomUserDetailsService implements UserDetailsService {@Autowiredprivate UserRepository userRepository;@Overridepublic UserDetails loadUserByUsername(String username) throws UsernameNotFoundException {User user = userRepository.findByUsername(username);if (user == null) {throw new UsernameNotFoundException(String.format("No user found with username '%s'.", username));} else {return user;}}
}@Configuration
@EnableWebSecurity
public class SecurityConfig extends WebSecurityConfigurerAdapter {@Autowiredprivate CustomUserDetailsService userDetailsService;@Overrideprotected void configure(AuthenticationManagerBuilder auth) throws Exception {auth.userDetailsService(userDetailsService).passwordEncoder(passwordEncoder());}@Overrideprotected void configure(HttpSecurity http) throws Exception {http.authorizeRequests().antMatchers("/resources/**").permitAll().anyRequest().authenticated().and().formLogin().loginPage("/login").defaultSuccessUrl("/").permitAll().and().logout().logoutSuccessUrl("/").permitAll();}@Beanpublic PasswordEncoder passwordEncoder() {return new BCryptPasswordEncoder();}}
在这个示例代码中,我们首先实现了一个 CustomUserDetailsService 类,用于从数据库中获取用户信息。然后在 SecurityConfig 类中通过 configure(AuthenticationManagerBuilder auth) 方法将 CustomUserDetailsService 注册到 AuthenticationManager 中。
在 configure() 方法中,我们定义了不同 URL 的访问权限,并定义了表单登录相关的设置。在这里,我们通过实现 CustomUsernamePasswordAuthenticationFilter 类来自定义身份验证逻辑。
注意,在这个示例代码中,我们还定义了一个 PasswordEncoder bean,用于在认证时对密码进行加密处理,避免敏感信息泄露。
WebAuthenticationDetailsSource
WebAuthenticationDetailsSource 是 Spring Security 中的一个接口,用于创建 WebAuthenticationDetails 对象。WebAuthenticationDetails 是一个保存了 HTTP 请求的详细信息(如来源 IP、Session ID 等)的类,可以在进行身份验证时利用这个类来获取请求者的详细信息。
我们可以通过自定义 WebAuthenticationDetailsSource 实现来添加一些额外的信息到 WebAuthenticationDetails 中,然后在身份验证成功后使用这些信息进行日志记录、安全审计等操作。
下面是一个示例代码:
public class CustomWebAuthenticationDetailsSource implements WebAuthenticationDetailsSource {@Overridepublic WebAuthenticationDetails buildDetails(HttpServletRequest request) {return new CustomWebAuthenticationDetails(request);}}public class CustomWebAuthenticationDetails extends WebAuthenticationDetails {private String userAgent;public CustomWebAuthenticationDetails(HttpServletRequest request) {super(request);this.userAgent = request.getHeader("User-Agent");}public String getUserAgent() {return userAgent;}}
在这个示例代码中,我们首先实现了一个 CustomWebAuthenticationDetailsSource 类,用于创建自定义的 WebAuthenticationDetails 对象。在这个类中,我们通过实现 buildDetails() 方法来创建 CustomWebAuthenticationDetails 对象,并在其中添加了 userAgent 属性。
然后我们又定义了一个 CustomWebAuthenticationDetails 类,继承自 WebAuthenticationDetails,其中增加了一个 userAgent 属性,用于保存 User-Agent 的信息。
这样,在进行身份验证的时候,我们就可以通过自定义的 WebAuthenticationDetailsSource 实现来创建 CustomWebAuthenticationDetails 对象,并在其中保存 User-Agent 等信息,这些信息最终将保存在 Spring Security 的上下文(SecurityContext)中。
SecurityContextHolder
SecurityContextHolder 是 Spring Security 中的一个类,用于在各个组件之间传递当前用户的安全上下文(SecurityContext)信息。SecurityContextHolder 有两种模式:MODE_THREADLOCAL 和 MODE_INHERITABLETHREADLOCAL。
MODE_THREADLOCAL 模式表示将安全上下文信息保存在当前线程中,只能在当前线程中访问。在这种模式下,每个 HTTP 请求每次都会创建一个新的线程,因此可以保证每个请求的安全上下文信息相互隔离,不会交叉。
MODE_INHERITABLETHREADLOCAL 模式表示将安全上下文信息保存在当前线程及其子线程中。在这种模式下,子线程可以继承父线程中的安全上下文信息,从而可以方便地实现异步处理等功能。
我们可以通过如下代码来获取当前用户的安全上下文信息:
SecurityContext context = SecurityContextHolder.getContext();
Authentication authentication = context.getAuthentication();
其中,SecurityContext 实例保存着当前用户的安全上下文信息,包括已认证的用户信息等。我们可以通过调用实例的 getAuthentication() 方法来获取当前用户的 Authentication 对象,从而获取用户的角色、用户名等信息。
在使用 SecurityContextHolder 时需要注意以下几点:
-
如果你使用了异步处理,建议使用 MODE_INHERITABLETHREADLOCAL 模式,以确保子线程可以继承父线程中的安全上下文信息。
-
在处理完请求后,需要显式地清除当前线程的安全上下文信息,以避免安全上下文信息泄露到其他请求中。可以使用如下代码来清除安全上下文信息:
SecurityContextHolder.clearContext(); -
如果需要在整个应用程序中共享安全上下文信息,可以考虑使用共享的存储方法(如 Redis)来存储安全上下文信息
AuthenticationManager 身份认证管理器
AuthenticationManager 是 Spring Security 框架提供的身份认证管理器,用于管理认证对象的验证和授权。它处理 Authentication 类型的对象,也就是待验证的身份信息。
AuthenticationManager 接口定义了一个方法 authenticate(),该方法用于验证并返回一个经过身份验证的 Authentication 对象。身份验证过程分为两个步骤:
- 首先根据用户输入构造一个 Authentication 对象;
- 然后通过 authenticate() 方法对其进行验证。
当身份验证成功时,authenticate() 方法将返回一个身份验证信息 Authentication 对象,并将其传递给 Spring Security 框架。这个对象包含了用户基本信息、用户的权限信息等。
AuthenticationManager 接口提供了多个实现类,包括 ProviderManager、DaoAuthenticationProvider 和 RemoteAuthenticationProvider 等。开发者也可以自己实现 AuthenticationManager 接口,以满足自己的特定需求。
在 Spring Security 中,用户验证信息、授权信息和其他相关配置信息都存储在 Authentication 对象中,AuthenticationManager 就是用来管理这些 Authentication 对象的验证和授权过程的。
在 Spring Security 中,authenticationManager.authenticate 方法在验证身份信息时,需要调用 UserDetailsService 的 loadUserByUsername 方法获取用户的基本信息和权限等信息。这是因为在 Spring Security 中,身份验证的过程需要使用到用户的基本信息和权限等数据,而用户的基本信息和权限等数据存储在数据库或其他数据源中,需要通过 loadUserByUsername 方法获取。
在默认情况下,使用的是 DaoAuthenticationProvider 提供的身份验证服务。DaoAuthenticationProvider 内部包含了一个 UserDetailsService 对象,会在身份验证时自动调用该对象的 loadUserByUsername 方法从数据库中获取用户信息。在 authenticate() 方法中,会通过 Authentication 对象的 getPrincipal() 方法获取用户名,然后将其传入 UserDetailsService 的 loadUserByUsername 方法中进行验证。
如果你使用自定义的身份验证服务,那么你需要自己实现 AuthenticationManager 和 UserDetailsService 接口,从而实现身份验证和用户信息获取逻辑。

getPrincipal
authentication.getPrincipal() 是 Spring Security 中的一个方法,用于获取认证用户的身份信息。在执行身份认证时,Spring Security 将验证信息封装在 Authentication 对象中,并保存在 SecurityContext 上下文中。
在 Spring Security 中,Authentication 对象包含了认证的用户身份信息(Principal)、用户的权限信息、以及其他有关用户身份认证的信息。其中,认证的用户身份信息保存在 Authentication 对象的 principal 属性中,通常是一个实现了 UserDetails 接口的对象。
我们可以通过如下代码来获取认证用户的身份信息:
SecurityContext context = SecurityContextHolder.getContext();
Authentication authentication = context.getAuthentication();
if (authentication != null && authentication.getPrincipal() instanceof UserDetails) {UserDetails userDetails = (UserDetails) authentication.getPrincipal();// 获取用户认证信息
}
在这段代码中,我们首先通过 SecurityContextHolder 获取当前用户的安全上下文信息,然后通过上下文信息获取当前用户的 Authentication 对象。如果 Authentication 对象不为空,并且其 principal 属性是一个 UserDetails 对象,则我们可以通过类型转换获取认证用户的信息。
通过这种方式,我们就可以轻松获取已经认证的用户身份信息,进而进行相关的业务处理。


)


函数)


)

