此文参考官方文档一步一步记录安装到正常运行全过程
安装环境:centos7
mysql版本:8.0.35
安装过程主要参考下面两边文章:
1.官方文档
https://dev.mysql.com/doc/refman/8.0/en/linux-installation-yum-repo.html
2.linux yum安装mysql8
安装过程大概有以下几步:
1.查找mysql源链接
2.安装mysql源(仓库)
3.安装mysql服务
4.启动mysql服务
5.获取并修改密码
6.防火墙放行、远程登录和设置
因为我的这个centos之前用宝塔装过mysql5.6版本,所以走了一点弯路,过程也记录下来了。如果也是同样情况,建议一开始就卸载旧版本再安装8.0版本。
另外,我避开下面的坑,又重新记录了在一台centosh上mysql8.0过程,可以参考下面我写的另外一篇文章:
《在CentOS上用yum方式安装MySQL8真实全过程记录(顺利版本)》
一、查找mysql源链接
(MySQL Yum Repository,找MySQL官方yum仓库地址并下载)
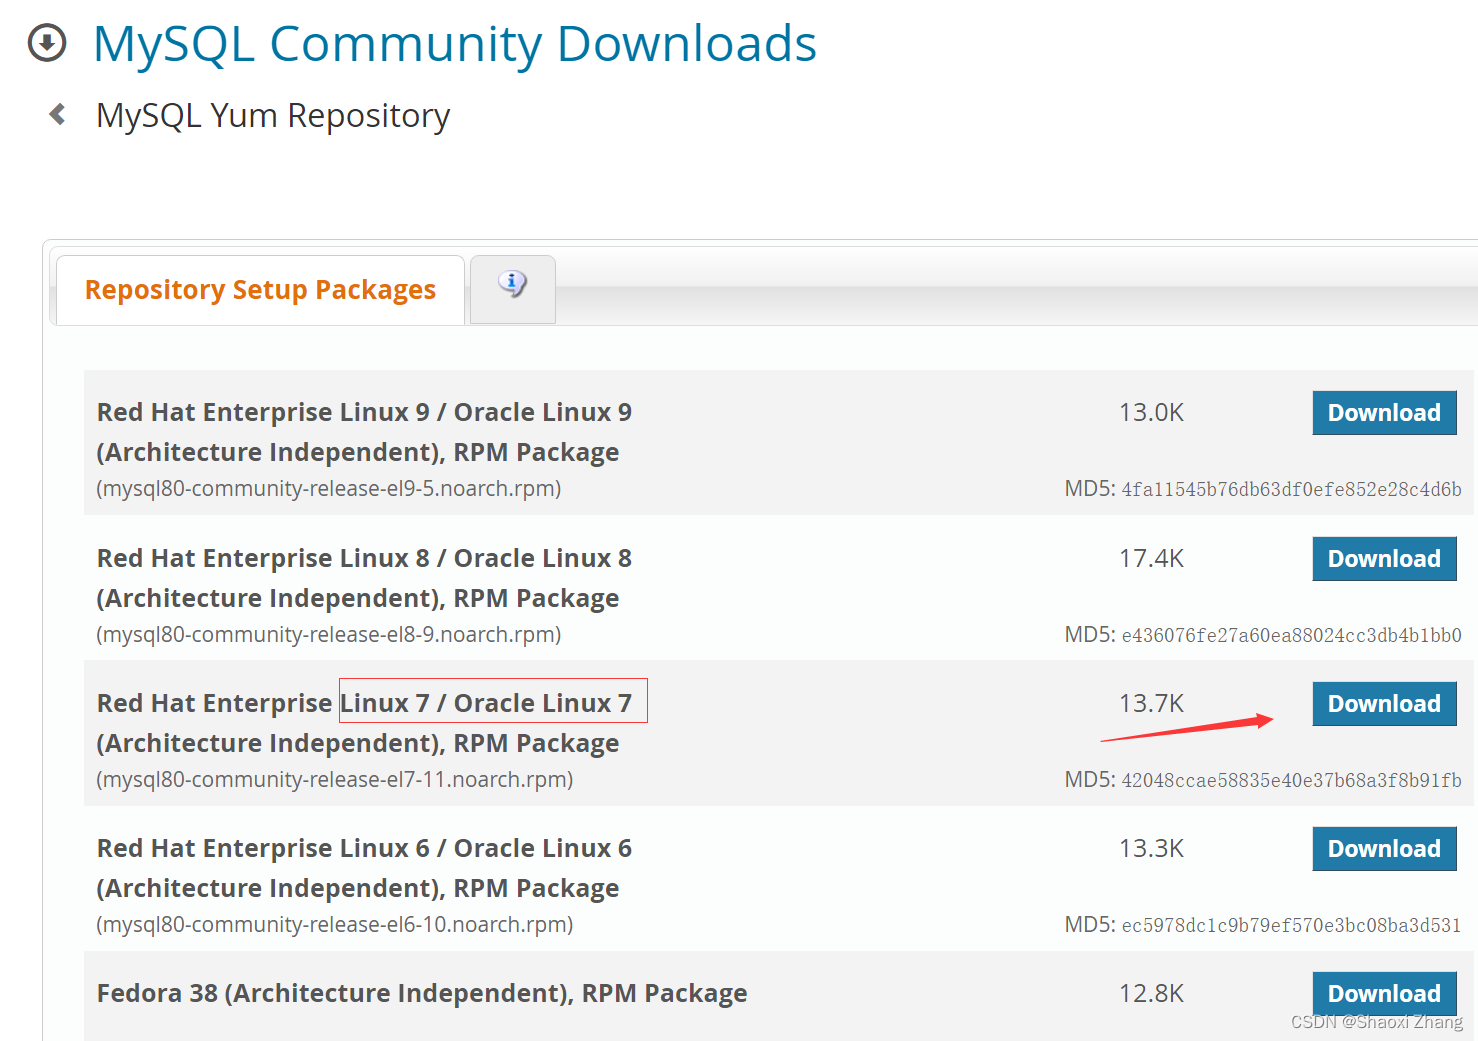
根据官方文档提示,进入到mysql yum仓库的下载页面(如下图)
https://dev.mysql.com/downloads/repo/yum/

因为我的CentOS版本是7,所以选择对应的版本,点击download进入下载页面(如下图)

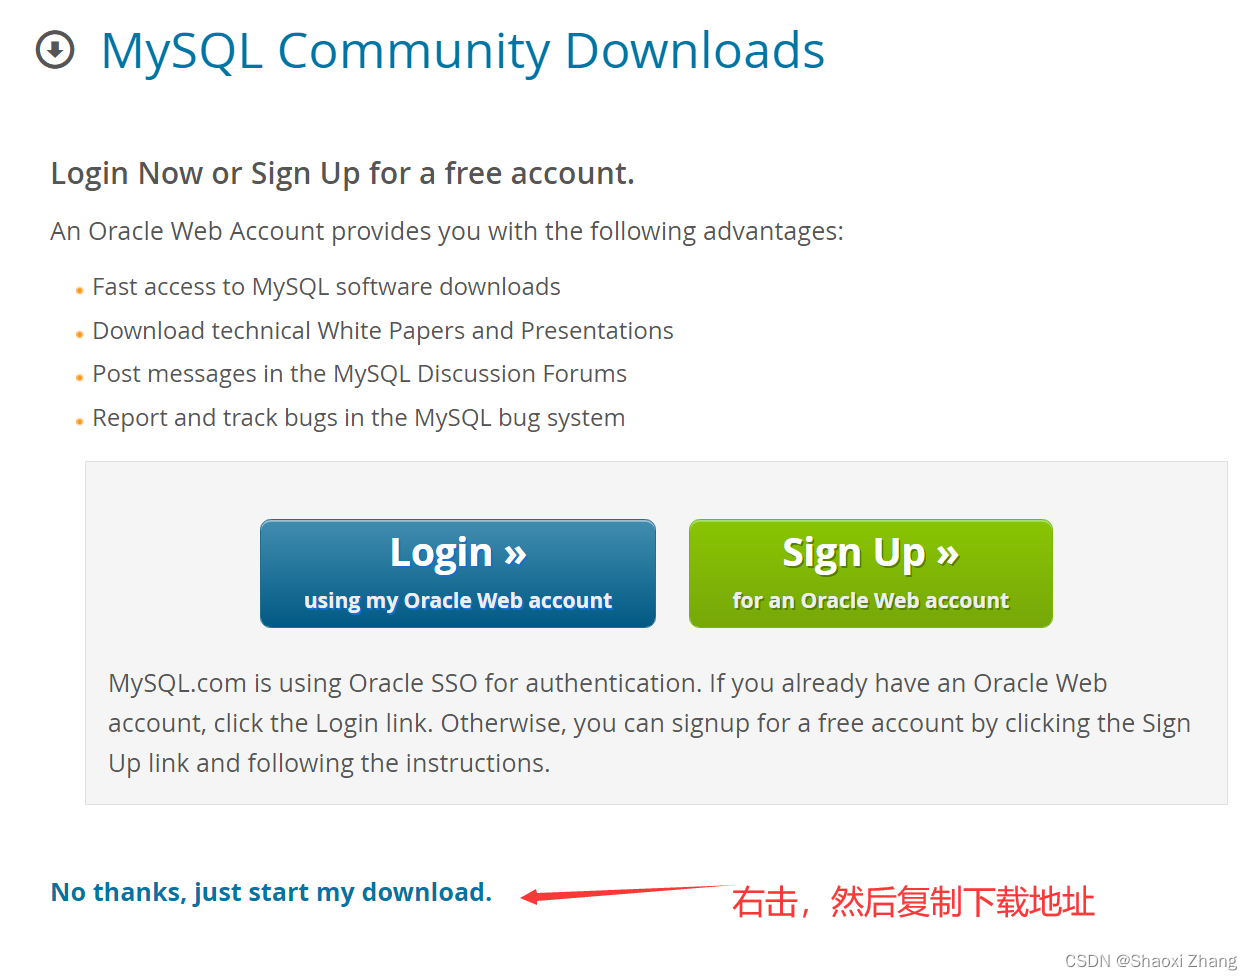
提示注册,不需要注册,我们直接复制下面的下载地址即可。
复制到的地址为:
https://repo.mysql.com//mysql80-community-release-el7-11.noarch.rpm
二、安装mysql源(仓库)
[root@szaliyun ~]# yum localinstall https://repo.mysql.com//mysql80-community-release-el7-11.noarch.rpm
已加载插件:fastestmirror
mysql80-community-release-el7-11.noarch.rpm                                                                                                                             |  14 kB  00:00:00
正在检查 /var/tmp/yum-root-hMU7pD/mysql80-community-release-el7-11.noarch.rpm: mysql80-community-release-el7-11.noarch
/var/tmp/yum-root-hMU7pD/mysql80-community-release-el7-11.noarch.rpm 将被安装
正在解决依赖关系
--> 正在检查事务
---> 软件包 mysql80-community-release.noarch.0.el7-11 将被 安装
--> 解决依赖关系完成依赖关系解决===============================================================================================================================================================================================Package                                            架构                            版本                               源                                                                 大小
===============================================================================================================================================================================================
正在安装:mysql80-community-release                          noarch                          el7-11                             /mysql80-community-release-el7-11.noarch                           17 k事务概要
===============================================================================================================================================================================================
安装  1 软件包总计:17 k
安装大小:17 k
Is this ok [y/d/N]: y
Downloading packages:
Running transaction check
Running transaction test
Transaction test succeeded
Running transaction正在安装    : mysql80-community-release-el7-11.noarch                                                                                                                                    1/1 验证中      : mysql80-community-release-el7-11.noarch                                                                                                                                    1/1 已安装:mysql80-community-release.noarch 0:el7-11                                                                                                                                                    完毕!
过程中提问是否安装,输入y后回车。
三、安装mysql服务
列出已启用的包含 “mysql.-community.” 关键字的软件包仓库
[root@szaliyun ~]# yum repolist enabled
已加载插件:fastestmirror
Loading mirror speeds from cached hostfile
源标识                                                                               源名称                                                                                            状态
base/7/x86_64                                                                        CentOS-7                                                                                          10,070+2
epel/x86_64                                                                          Extra Packages for Enterprise Linux 7 - x86_64                                                    13,788+2
extras/7/x86_64                                                                      CentOS-7                                                                                               518
mysql-connectors-community/x86_64                                                    MySQL Connectors Community                                                                             234
mysql-tools-community/x86_64                                                         MySQL Tools Community                                                                                  102
mysql80-community/x86_64                                                             MySQL 8.0 Community Server                                                                             446
updates/7/x86_64                                                                     CentOS-7                                                                                           5,359+8
repolist: 30,517
[root@szaliyun ~]# yum repolist enabled | grep "mysql.*-community.*"
mysql-connectors-community/x86_64 MySQL Connectors Community                 234
mysql-tools-community/x86_64      MySQL Tools Community                      102
mysql80-community/x86_64          MySQL 8.0 Community Server                 446
[root@szaliyun ~]#
yum repolist enabled 用于列出已启用的软件包仓库,grep “mysql.-community.” 用于过滤出包含 “mysql.-community.” 关键字的软件包仓库。
安装
[root@szaliyun ~]# yum install mysql-community-server
已加载插件:fastestmirror
Loading mirror speeds from cached hostfile
base | 3.6 kB 00:00:00
epel | 4.7 kB 00:00:00
extras | 2.9 kB 00:00:00
mysql-connectors-community | 2.6 kB 00:00:00
mysql-tools-community | 2.6 kB 00:00:19
mysql80-community | 2.6 kB 00:00:04
updates | 2.9 kB 00:00:00
正在解决依赖关系
--> 正在检查事务
---> 软件包 mysql-community-server.x86_64.0.8.0.35-1.el7 将被 安装
--> 正在处理依赖关系 mysql-community-common(x86-64) = 8.0.35-1.el7,它被软件包 mysql-community-server-8.0.35-1.el7.x86_64 需要
--> 正在处理依赖关系 mysql-community-icu-data-files = 8.0.35-1.el7,它被软件包 mysql-community-server-8.0.35-1.el7.x86_64 需要
--> 正在处理依赖关系 mysql-community-client(x86-64) >= 8.0.11,它被软件包 mysql-community-server-8.0.35-1.el7.x86_64 需要
--> 正在检查事务
---> 软件包 mysql-community-client.x86_64.0.8.0.35-1.el7 将被 安装
--> 正在处理依赖关系 mysql-community-client-plugins = 8.0.35-1.el7,它被软件包 mysql-community-client-8.0.35-1.el7.x86_64 需要
--> 正在处理依赖关系 mysql-community-libs(x86-64) >= 8.0.11,它被软件包 mysql-community-client-8.0.35-1.el7.x86_64 需要
---> 软件包 mysql-community-common.x86_64.0.8.0.35-1.el7 将被 安装
---> 软件包 mysql-community-icu-data-files.x86_64.0.8.0.35-1.el7 将被 安装
--> 正在检查事务
---> 软件包 mariadb-libs.x86_64.1.5.5.68-1.el7 将被 取代
--> 正在处理依赖关系 libmysqlclient.so.18()(64bit),它被软件包 2:postfix-2.10.1-9.el7.x86_64 需要
--> 正在处理依赖关系 libmysqlclient.so.18(libmysqlclient_18)(64bit),它被软件包 2:postfix-2.10.1-9.el7.x86_64 需要
---> 软件包 mysql-community-client-plugins.x86_64.0.8.0.35-1.el7 将被 安装
---> 软件包 mysql-community-libs.x86_64.0.8.0.35-1.el7 将被 舍弃
--> 正在检查事务
---> 软件包 mysql-community-libs-compat.x86_64.0.8.0.35-1.el7 将被 舍弃
--> 解决依赖关系完成依赖关系解决===============================================================================================================================================================================================Package 架构 版本 源 大小
===============================================================================================================================================================================================
正在安装:mysql-community-libs x86_64 8.0.35-1.el7 mysql80-community 1.5 M替换 mariadb-libs.x86_64 1:5.5.68-1.el7mysql-community-libs-compat x86_64 8.0.35-1.el7 mysql80-community 669 k替换 mariadb-libs.x86_64 1:5.5.68-1.el7mysql-community-server x86_64 8.0.35-1.el7 mysql80-community 64 M
为依赖而安装:mysql-community-client x86_64 8.0.35-1.el7 mysql80-community 16 Mmysql-community-client-plugins x86_64 8.0.35-1.el7 mysql80-community 3.5 Mmysql-community-common x86_64 8.0.35-1.el7 mysql80-community 665 kmysql-community-icu-data-files x86_64 8.0.35-1.el7 mysql80-community 2.2 M事务概要
===============================================================================================================================================================================================
安装 3 软件包 (+4 依赖软件包)总下载量:89 M
Is this ok [y/d/N]: y
Downloading packages:
mysql-community-client-8.0.35- FAILED 0% [ ] 1.1 kB/s | 46 kB 23:13:17 ETA
http://repo.mysql.com/yum/mysql-8.0-community/el/7/x86_64/mysql-community-client-8.0.35-1.el7.x86_64.rpm: [Errno 12] Timeout on http://repo.mysql.com/yum/mysql-8.0-community/el/7/x86_64/mysql-community-client-8.0.35-1.el7.x86_64.rpm: (28, 'Operation too slow. Less than 1000 bytes/sec transferred the last 30 seconds')
正在尝试其它镜像。
mysql-community-client-plugins FAILED 0% [ ] 1.4 kB/s | 280 kB 18:15:11 ETA
http://repo.mysql.com/yum/mysql-8.0-community/el/7/x86_64/mysql-community-client-plugins-8.0.35-1.el7.x86_64.rpm: [Errno 12] Timeout on http://repo.mysql.com/yum/mysql-8.0-community/el/7/x86_64/mysql-community-client-plugins-8.0.35-1.el7.x86_64.rpm: (28, 'Operation too slow. Less than 1000 bytes/sec transferred the last 30 seconds')
正在尝试其它镜像。
mysql-community-common-8.0.35- FAILED 0% [ ] 2.1 B/s | 434 kB 12427:49:49 ETA
http://repo.mysql.com/yum/mysql-8.0-community/el/7/x86_64/mysql-community-common-8.0.35-1.el7.x86_64.rpm: [Errno 12] Timeout on http://repo.mysql.com/yum/mysql-8.0-community/el/7/x86_64/mysql-community-common-8.0.35-1.el7.x86_64.rpm: (28, 'Operation too slow. Less than 1000 bytes/sec transferred the last 30 seconds')
正在尝试其它镜像。
mysql-community-icu-data-files FAILED 0% [ ] 5.4 B/s | 68 kB 4752:59:45 ETA
http://repo.mysql.com/yum/mysql-8.0-community/el/7/x86_64/mysql-community-icu-data-files-8.0.35-1.el7.x86_64.rpm: [Errno 12] Timeout on http://repo.mysql.com/yum/mysql-8.0-community/el/7/x86_64/mysql-community-icu-data-files-8.0.35-1.el7.x86_64.rpm: (28, 'Operation too slow. Less than 1000 bytes/sec transferred the last 30 seconds')
正在尝试其它镜像。
mysql-community-libs-8.0.35-1. FAILED 0% [ ] 0.8 B/s | 184 kB 31857:32:53 ETA
http://repo.mysql.com/yum/mysql-8.0-community/el/7/x86_64/mysql-community-libs-8.0.35-1.el7.x86_64.rpm: [Errno 12] Timeout on http://repo.mysql.com/yum/mysql-8.0-community/el/7/x86_64/mysql-community-libs-8.0.35-1.el7.x86_64.rpm: (28, 'Operation too slow. Less than 1000 bytes/sec transferred the last 30 seconds')
正在尝试其它镜像。
mysql-community-libs-compat-8. FAILED 0% [ ] 9.6 B/s | 550 kB 2674:52:24 ETA
http://repo.mysql.com/yum/mysql-8.0-community/el/7/x86_64/mysql-community-libs-compat-8.0.35-1.el7.x86_64.rpm: [Errno 12] Timeout on http://repo.mysql.com/yum/mysql-8.0-community/el/7/x86_64/mysql-community-libs-compat-8.0.35-1.el7.x86_64.rpm: (28, 'Operation too slow. Less than 1000 bytes/sec transferred the last 30 seconds')
正在尝试其它镜像。mysql-community-server-8.0.35- FAILED
http://repo.mysql.com/yum/mysql-8.0-community/el/7/x86_64/mysql-community-server-8.0.35-1.el7.x86_64.rpm: [Errno 12] Timeout on http://repo.mysql.com/yum/mysql-8.0-community/el/7/x86_64/mysql-community-server-8.0.35-1.el7.x86_64.rpm: (28, 'Operation too slow. Less than 1000 bytes/sec transferred the last 30 seconds')
正在尝试其它镜像。
mysql-community-client-8.0.35- FAILED 0% [- ] 5.6 B/s | 804 kB 4605:51:37 ETA
http://repo.mysql.com/yum/mysql-8.0-community/el/7/x86_64/mysql-community-client-8.0.35-1.el7.x86_64.rpm: [Errno 12] Timeout on http://repo.mysql.com/yum/mysql-8.0-community/el/7/x86_64/mysql-community-client-8.0.35-1.el7.x86_64.rpm: (28, 'Operation too slow. Less than 1000 bytes/sec transferred the last 30 seconds')
正在尝试其它镜像。
警告:/var/cache/yum/x86_64/7/mysql80-community/packages/mysql-community-client-plugins-8.0.35-1.el7.x86_64.rpm: 头V4 RSA/SHA256 Signature, 密钥 ID 3a79bd29: NOKEYkB/s | 3.3 MB 00:01:59 ETA
mysql-community-client-plugins-8.0.35-1.el7.x86_64.rpm 的公钥尚未安装
(1/7): mysql-community-client-plugins-8.0.35-1.el7.x86_64.rpm | 3.5 MB 00:00:02
(2/7): mysql-community-common-8.0.35-1.el7.x86_64.rpm | 665 kB 00:00:00
(3/7): mysql-community-icu-data-files-8.0.35-1.el7.x86_64.rpm | 2.2 MB 00:00:00
(4/7): mysql-community-libs-8.0.35-1.el7.x86_64.rpm | 1.5 MB 00:00:00
(5/7): mysql-community-libs-compat-8.0.35-1.el7.x86_64.rpm | 669 kB 00:00:00
(6/7): mysql-community-server-8.0.35-1.el7.x86_64.rpm | 64 MB 00:00:10
(7/7): mysql-community-client-8.0.35-1.el7.x86_64.rpm | 16 MB 00:00:02
-----------------------------------------------------------------------------------------------------------------------------------------------------------------------------------------------
总计 71 kB/s | 89 MB 00:21:14
从 file:///etc/pki/rpm-gpg/RPM-GPG-KEY-mysql-2023 检索密钥
导入 GPG key 0xA8D3785C:用户ID : "MySQL Release Engineering <mysql-build@oss.oracle.com>"指纹 : bca4 3417 c3b4 85dd 128e c6d4 b7b3 b788 a8d3 785c软件包 : mysql80-community-release-el7-11.noarch (@/mysql80-community-release-el7-11.noarch)来自 : /etc/pki/rpm-gpg/RPM-GPG-KEY-mysql-2023
是否继续?[y/N]:从 file:///etc/pki/rpm-gpg/RPM-GPG-KEY-mysql-2022 检索密钥
导入 GPG key 0x3A79BD29:用户ID : "MySQL Release Engineering <mysql-build@oss.oracle.com>"指纹 : 859b e8d7 c586 f538 430b 19c2 467b 942d 3a79 bd29软件包 : mysql80-community-release-el7-11.noarch (@/mysql80-community-release-el7-11.noarch)来自 : /etc/pki/rpm-gpg/RPM-GPG-KEY-mysql-2022
是否继续?[y/N]:y
从 file:///etc/pki/rpm-gpg/RPM-GPG-KEY-mysql 检索密钥
导入 GPG key 0x5072E1F5:用户ID : "MySQL Release Engineering <mysql-build@oss.oracle.com>"指纹 : a4a9 4068 76fc bd3c 4567 70c8 8c71 8d3b 5072 e1f5软件包 : mysql80-community-release-el7-11.noarch (@/mysql80-community-release-el7-11.noarch)来自 : /etc/pki/rpm-gpg/RPM-GPG-KEY-mysql
是否继续?[y/N]:y
Running transaction check
Running transaction test
Transaction test succeeded
Running transaction正在安装 : mysql-community-common-8.0.35-1.el7.x86_64 1/8 正在安装 : mysql-community-client-plugins-8.0.35-1.el7.x86_64 2/8 正在安装 : mysql-community-libs-8.0.35-1.el7.x86_64 3/8 正在安装 : mysql-community-client-8.0.35-1.el7.x86_64 4/8 正在安装 : mysql-community-icu-data-files-8.0.35-1.el7.x86_64 5/8 正在安装 : mysql-community-server-8.0.35-1.el7.x86_64 6/8
warning: /etc/my.cnf created as /etc/my.cnf.rpmnew正在安装 : mysql-community-libs-compat-8.0.35-1.el7.x86_64 7/8 正在删除 : 1:mariadb-libs-5.5.68-1.el7.x86_64 8/8 验证中 : mysql-community-client-plugins-8.0.35-1.el7.x86_64 1/8 验证中 : mysql-community-common-8.0.35-1.el7.x86_64 2/8 验证中 : mysql-community-icu-data-files-8.0.35-1.el7.x86_64 3/8 验证中 : mysql-community-libs-8.0.35-1.el7.x86_64 4/8 验证中 : mysql-community-client-8.0.35-1.el7.x86_64 5/8 验证中 : mysql-community-libs-compat-8.0.35-1.el7.x86_64 6/8 验证中 : mysql-community-server-8.0.35-1.el7.x86_64 7/8 验证中 : 1:mariadb-libs-5.5.68-1.el7.x86_64 8/8 已安装:mysql-community-libs.x86_64 0:8.0.35-1.el7 mysql-community-libs-compat.x86_64 0:8.0.35-1.el7 mysql-community-server.x86_64 0:8.0.35-1.el7 作为依赖被安装:mysql-community-client.x86_64 0:8.0.35-1.el7 mysql-community-client-plugins.x86_64 0:8.0.35-1.el7 mysql-community-common.x86_64 0:8.0.35-1.el7 mysql-community-icu-data-files.x86_64 0:8.0.35-1.el7 替代:mariadb-libs.x86_64 1:5.5.68-1.el7 完毕!
[root@szaliyun ~]#
可以看到安装并不顺利,程序自动更换镜像后安装最终完成。
四、启动mysql服务
[root@szaliyun ~]# systemctl status mysqld
启动失败,查日志
[root@szaliyun ~]# journalctl -xe | grep mysql
查到说redo log格式不对
10月 26 07:14:54 szaliyun mysqld[19819]: 2023-10-25T23:14:53.988237Z 1 [ERROR] [MY-013090] [InnoDB] Unsupported redo log format (v0). The redo log was created before MySQL 5.7.9
按网上查了一下,说是需要将ib_logfile0和ib_logfile1移走
于是查找并移走这两个文件,重启依旧报错,说找不到目录
Neither found #innodb_redo subdirectory, nor ib_logfile* files in /www/server/data/
尝试了网上说的一些方法,也解决不了,估计是mysql5.7版本没卸载导致8.0不能正常运行。
实在没办法就卸载重装吧:
[root@szaliyun ~]# rpm -qa | grep -i mysql
bt-mysql56-5.6.50-1.el7.x86_64
mysql-community-libs-8.0.35-1.el7.x86_64
mysql-community-libs-compat-8.0.35-1.el7.x86_64
mysql-community-client-plugins-8.0.35-1.el7.x86_64
mysql-community-client-8.0.35-1.el7.x86_64
mysql-community-server-8.0.35-1.el7.x86_64
mysql80-community-release-el7-11.noarch
mysql-community-common-8.0.35-1.el7.x86_64
mysql-community-icu-data-files-8.0.35-1.el7.x86_64
[root@szaliyun ~]#
[root@szaliyun ~]# yum remove bt-mysql56-5.6.50-1.el7.x86_64
[root@szaliyun ~]# yum remove mysql-community-server-8.0.35-1.el7.x86_64
[root@szaliyun ~]# yum install mysql-community-server
启动mysql,继续报错:
[root@szaliyun ~]# cat /var/log/mysqld.log
2023-10-29T08:28:10.584709Z 0 [System] [MY-013169] [Server] /usr/sbin/mysqld (mysqld 8.0.35) initializing of server in progress as process 21123
2023-10-29T08:28:10.589908Z 0 [ERROR] [MY-010457] [Server] --initialize specified but the data directory has files in it. Aborting.
2023-10-29T08:28:10.589953Z 0 [ERROR] [MY-013236] [Server] The designated data directory /var/lib/mysql/ is unusable. You can remove all files that the server added to it.
2023-10-29T08:28:10.590006Z 0 [ERROR] [MY-010119] [Server] Aborting
关键是这一条:2023-10-29T08:28:10.589953Z 0 [ERROR] [MY-013236] [Server] The designated data directory /var/lib/mysql/ is unusable. You can remove all files that the server added to it.
大概是说指定的这个目录不可用,你可以删除所有这些文件。做好备份后删掉重新启动。
[root@szaliyun lib]# cp -r mysql/ mysql231029back
[root@szaliyun lib]# cd mysql
[root@szaliyun mysql]# ls
auto.cnf  binlog.index  ca-key.pem  ca.pem  client-cert.pem  client-key.pem  #innodb_redo  mysql-bin  private_key.pem  public_key.pem  server-cert.pem  server-key.pem
[root@szaliyun mysql]# rm -rf /var/lib/mysql/*
[root@szaliyun mysql]# ls
[root@szaliyun mysql]# systemctl start mysql
Failed to start mysql.service: Unit not found.
[root@szaliyun mysql]# systemctl start mysqld
[root@szaliyun mysql]#
[root@szaliyun mysql]# systemctl status mysqld
● mysqld.service - MySQL ServerLoaded: loaded (/usr/lib/systemd/system/mysqld.service; enabled; vendor preset: disabled)Active: active (running) since 日 2023-10-29 16:46:32 CST; 6s agoDocs: man:mysqld(8)http://dev.mysql.com/doc/refman/en/using-systemd.htmlProcess: 11202 ExecStartPre=/usr/bin/mysqld_pre_systemd (code=exited, status=0/SUCCESS)Main PID: 11369 (mysqld)Status: "Server is operational"CGroup: /system.slice/mysqld.service└─11369 /usr/sbin/mysqld10月 29 16:46:26 szaliyun systemd[1]: Starting MySQL Server...
10月 29 16:46:32 szaliyun systemd[1]: Started MySQL Server.
[root@szaliyun mysql]#
启动成功!
五、获取并修改密码
获取临时密码
[root@szaliyun mysql]# grep 'temporary password' /var/log/mysqld.log
2023-10-29T08:46:29.090680Z 6 [Note] [MY-010454] [Server] A temporary password is generated for root@localhost: giAufyacf3</
[root@szaliyun mysql]#
然后尝试登录
[root@szaliyun /]# mysql -u root -p
-bash: mysql: 未找到命令
[root@szaliyun mysql]# which mysql
/usr/bin/which: no mysql in (/usr/local/sbin:/usr/local/bin:/usr/sbin:/usr/bin:/root/bin)
[root@szaliyun mysql]#
没有找到mysql,经过几番测试,还是没找到mysql的安装目录,最后GPT让我重装。
[root@szaliyun mysql]# rpm -qa | grep mysql
mysql-community-libs-8.0.35-1.el7.x86_64
mysql-community-libs-compat-8.0.35-1.el7.x86_64
mysql-community-server-8.0.35-1.el7.x86_64
mysql-community-client-plugins-8.0.35-1.el7.x86_64
mysql-community-client-8.0.35-1.el7.x86_64
mysql80-community-release-el7-11.noarch
mysql-community-common-8.0.35-1.el7.x86_64
mysql-community-icu-data-files-8.0.35-1.el7.x86_64
[root@szaliyun mysql]# yum reinstall mysql-community-client-8.0.35-1.el7.x86_64
重装完之后就可以了
[root@szaliyun mysql]# which mysql
/usr/bin/mysql
然后就是修改密码:
[root@szaliyun /]# mysql -u root -p
Enter password:
Welcome to the MySQL monitor.  Commands end with ; or \g.
Your MySQL connection id is 11
Server version: 8.0.35Copyright (c) 2000, 2023, Oracle and/or its affiliates.Oracle is a registered trademark of Oracle Corporation and/or its
affiliates. Other names may be trademarks of their respective
owners.Type 'help;' or '\h' for help. Type '\c' to clear the current input statement.mysql>
mysql> ALTER USER 'root'@'localhost' IDENTIFIED BY 'New%Password4';
Query OK, 0 rows affected (0.15 sec)mysql>
至此修改密码完成。
六、防火墙放行、远程登录和设置
放开CentOS网络端口
[root@szaliyun ~]# firewall-cmd --zone=public --add-port=3306/tcp --permanent
[root@szaliyun ~]# firewall-cmd --reload
然后再在硬件防火墙上放开(如果需要),如果是使用云服务器(例如阿里云),则在云供应商的设置页面放开3306端口。
然后在公网上telnet ip 3306,端口通了。
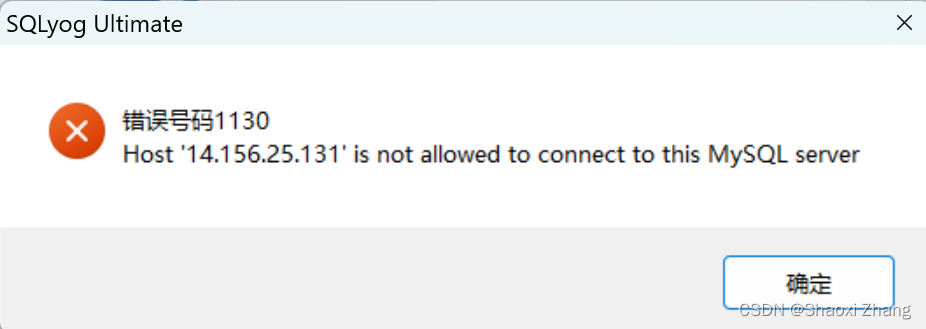
再使用SQLyog尝试连接数据库,显示 :

出现这个Host is not allowed to connect to this MySQL server很常见,就是我现在要连接的ip没有授权访问,授权就好。
mysql> use mysql;
Reading table information for completion of table and column names
You can turn off this feature to get a quicker startup with -ADatabase changed
mysql> update user set host = '%' where user = 'root';
Query OK, 1 row affected (0.02 sec)
Rows matched: 1  Changed: 1  Warnings: 0mysql> FLUSH PRIVILEGES;
Query OK, 0 rows affected (0.01 sec)mysql>
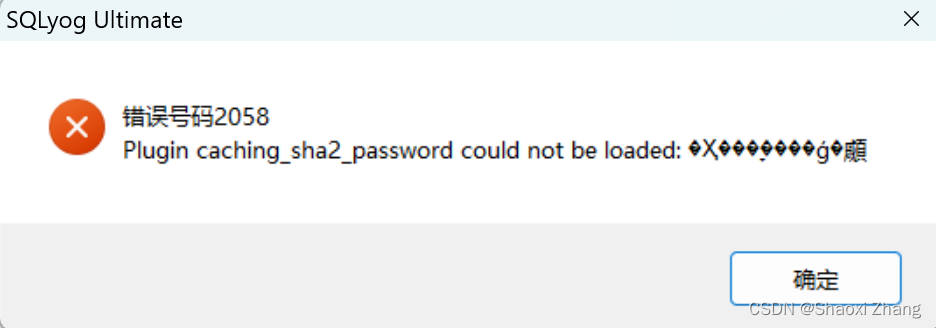
继续测试连接,报下面错误:

Plugin caching_sha2_password could not be loaded报错
这是因为MYSQL8.0版使用了新的密码机制。
为了方便,将密码机制改为mysql_native_password(安全性降低了)
mysql> select Host,User,Plugin from mysql.user;
+-----------+------------------+-----------------------+
| Host      | User             | Plugin                |
+-----------+------------------+-----------------------+
| %         | root             | caching_sha2_password |
| localhost | mysql.infoschema | caching_sha2_password |
| localhost | mysql.session    | caching_sha2_password |
| localhost | mysql.sys        | caching_sha2_password |
+-----------+------------------+-----------------------+
4 rows in set (0.00 sec)mysql> alter user root@'%' identified with mysql_native_password by 'New#password2';
Query OK, 0 rows affected (0.00 sec)mysql> FLUSH PRIVILEGES;
Query OK, 0 rows affected (0.00 sec)mysql> select Host,User,Plugin from mysql.user;
+-----------+------------------+-----------------------+
| Host      | User             | Plugin                |
+-----------+------------------+-----------------------+
| %         | root             | mysql_native_password |
| localhost | mysql.infoschema | caching_sha2_password |
| localhost | mysql.session    | caching_sha2_password |
| localhost | mysql.sys        | caching_sha2_password |
+-----------+------------------+-----------------------+
4 rows in set (0.00 sec)mysql>
再测试连接,成功!

七、命令记录
过程中敲过的一些命令:
#安装MYSQL8的yum源
[root@szaliyun ~]# yum localinstall https://repo.mysql.com//mysql80-community-release-el7-11.noarch.rpm
[root@szaliyun ~]# yum repolist enabled
[root@szaliyun ~]# yum repolist enabled | grep "mysql.*-community.*"
[root@szaliyun ~]# find / -name ib_logfile0  #查找文件
[root@szaliyun data]# mkdir ib_logfilebackup
[root@szaliyun data]# cp ib_logfile0 ib_logfilebackup/
#卸载mysql5.6
[root@szaliyun ~]# yum remove bt-mysql56-5.6.50-1.el7.x86_64
#卸载mysql-community-server
[root@szaliyun ~]# yum remove mysql-community-server-8.0.35-1.el7.x86_64
[root@szaliyun ~]# yum install mysql-community-server
[root@szaliyun ~]# systemctl start mysqld
[root@szaliyun ~]# systemctl status mysqld
[root@szaliyun ~]# cat /var/log/mysqld.log
[root@szaliyun ~]# which mysql
#重装mysql客户端
[root@szaliyun mysql]# yum reinstall mysql-community-client-8.0.35-1.el7.x86_64
[root@szaliyun ~]# firewall-cmd --zone=public --add-port=3306/tcp --permanent
[root@szaliyun ~]# firewall-cmd --reload
[root@szaliyun /]# mysql -u root -p
#修改密码
mysql> ALTER USER 'root'@'localhost' IDENTIFIED BY 'New%Password4';
#放开所有地址访问数据库
mysql> update user set host = '%' where user = 'root';
#修改密码规则
mysql> alter user root@'%' identified with mysql_native_password by 'New#password2'; 


)


)


