一、 redux理解
1、学习文档
英文文档:https://redux.js.org/
中文文档:http://www.redux.org.cn/
Github: https://github.com/reactjs/redux
2、redux是什么
redux 是一个专门用于做状态管理的 JS 库(不是 react 插件库)。
它可以用在 react,angular,vue等项目中,但基本与react配合使用。
作用:集中式管理 react 应用中多个组件共享的状态。
3、什么情况下需要使用 redux
某个组件的状态,需要让其他组件可以随时拿到(共享)。
一个组件需要改变另一个组件的状态(通信)。
总体原则:能不用就不用,如果不用比较吃力才考虑使用。
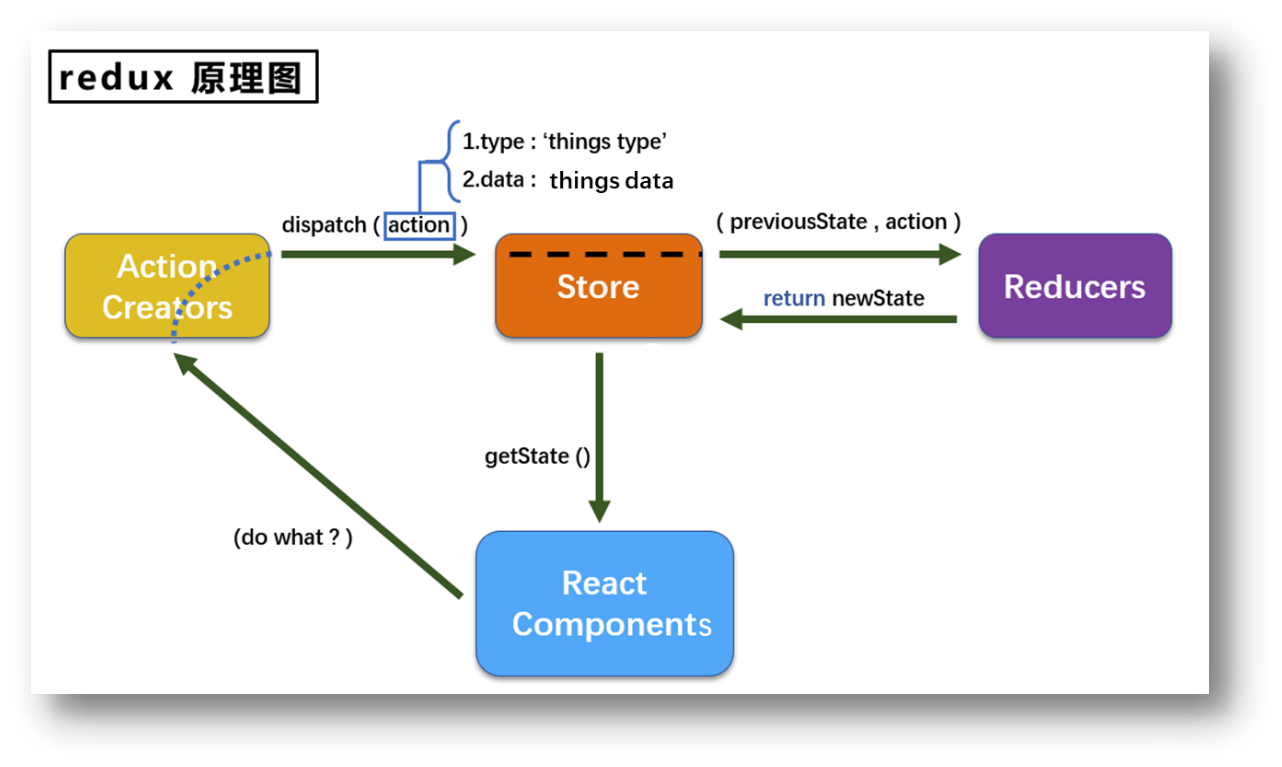
4、redux 工作流程

二、redux 的三个核心概念
1、action
动作的对象,包含 2 个属性:
type:标识属性,值为字符串,唯一,必要属性
data:数据属性,值类型任意,可选属性
例子:{ type: 'ADD_STUDENT', data: {name:'tom',age:18} }
2、 reducer
用于初始化状态、加工状态。
加工时,根据旧的 state 和 action, 产生新的 state 的纯函数。
3、store
将 state、action、reducer 联系在一起的对象
如何得到此对象?
import { createStore } from 'redux'
import reducer from './reducers'
const store = createStore(reducer)
此对象的功能?
getState():得到 state
dispatch(action):分发action,触发 reducer 调用,产生新的 state
subscribe(listener):注册监听,当产生了新的 state 时,自动调用
三、redux 的核心 API
1、createstore()
作用:创建包含指定 reducer 的 store 对象
2、store 对象
作用:redux 库最核心的管理对象
它内部维护着: state、reducer
核心方法:
(1)getState() 例如:store.getState()
(2)dispatch(action) 例如:store.dispatch({ type: 'INCREMENT', number })
(3)subscribe(listener) 例如:store.subscribe(render)
3、applyMiddleware()
作用:应用上基于 redux 的中间件(插件库)
4、combineReducers()
作用:合并多个 reducer 函数
四、redux 异步编程
概念:
redux 默认是不能进行异步处理的,某些时候应用中需要在 redux 中执行异步任务(ajax、定时器等)。
明确:
延迟的动作不想交给组件自身,想交给 action。。
何时需要异步 action:
想要对状态进行操作,但是具体的数据靠异步任务返回。
具体编码:
安装异步中间件 redux-thunk :$ yarn add redux-thunk 或者 $ npm install --save redux-thunk ,并在 store 中配置。
创建 action 的函数不再返回一般对象,而是一个函数,该函数中写异步任务。
异步任务有结果后,分发一个同步的 action 去真正操作数据。
备注:异步 action 不是必须要写的,完全可以自己等待异步任务的结果了再去分发同步 action。
五、react-redux

1、理解
一个 react 插件库
专门用来简化 react 应用中使用 redux
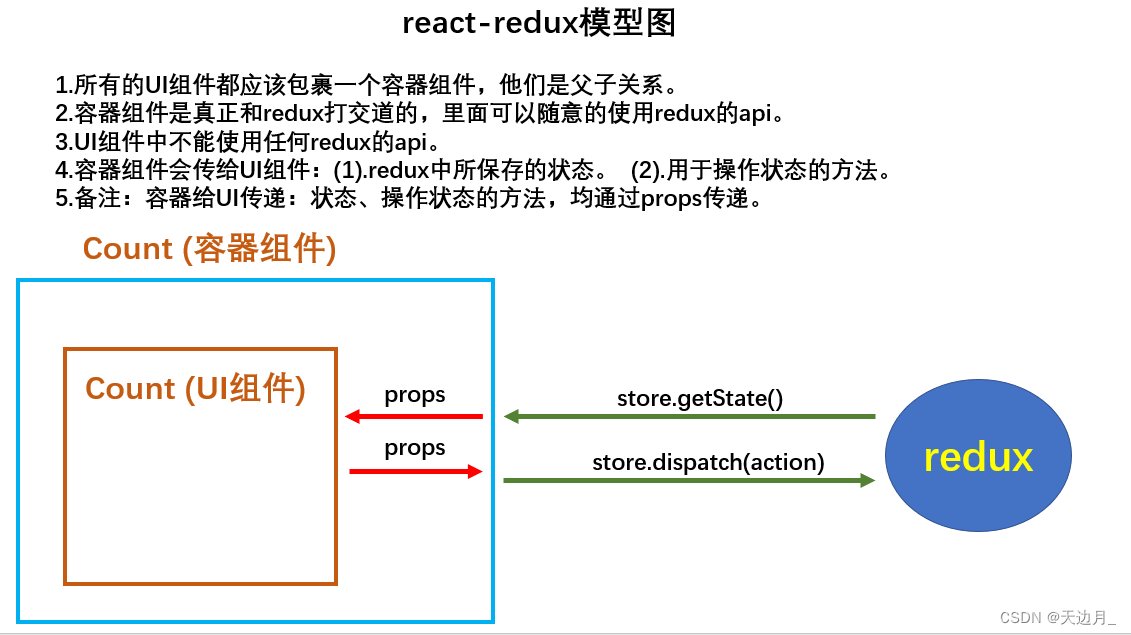
2、 react-redux 将所有组件分成两大类
UI 组件:
(1)只负责 UI 的呈现,不带有任何业务逻辑
(2)通过 props 接收数据(一般数据和函数)
(3)不使用任何 redux 的 API
(4)一般保存在 components 文件夹下
容器组件:
(1)负责管理数据和业务逻辑,不负责 UI 的呈现
(2)使用 Redux 的 API
(3)一般保存在 containers 文件夹下
3、相关API
(1)Provider:让所有组件都可以得到 state 数据
<Provider store={store}><App />
</Provider>
(2)connect:用于包装 UI 组件生成容器组件
import { connect } from 'react-redux'connect(mapStateToprops, mapDispatchToProps)(Counter)
(3)mapStateToprops:将外部的数据(即 state 对象)转换为 UI 组件的标签属性
const mapStateToprops = function (state) {return {value: state}
}
(4)mapDispatchToProps:将分发 action 的函数转换为 UI 组件的标签属性
六、求和案例

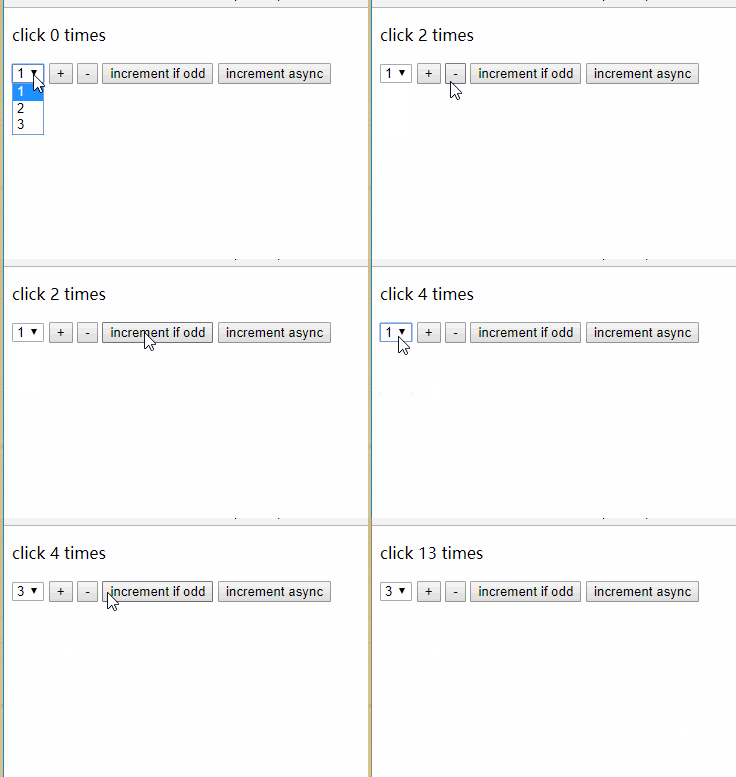
1、纯 react 版
Count 组件,index.jsx
import React, { Component } from 'react'export default class Count extends Component {// 初始化状态state = { count: 0 }// 加increment = () => {const { count } = this.stateconst { value } = this.selectNumberthis.setState({ count: count + value * 1 })}// 减decrement = () => {const { count } = this.stateconst { value } = this.selectNumberthis.setState({ count: count - value * 1 })}// 奇数再加incrementIfOdd = () => {const { count } = this.stateconst { value } = this.selectNumberif (count % 2 !== 0) {this.setState({ count: count + value * 1 })}}// 异步加incrementAsync = () => {const { count } = this.stateconst { value } = this.selectNumbersetTimeout(() => {this.setState({ count: count + value * 1 })}, 500)}render() {const { count } = this.statereturn (<><h1>当前求和为:{count}</h1><select ref={c => this.selectNumber = c}><option value="1">1</option><option value="2">2</option><option value="3">3</option></select> <button onClick={this.increment}>+</button> <button onClick={this.decrement}>-</button> <button onClick={this.incrementIfOdd}>当前求和为奇数再加</button> <button onClick={this.incrementAsync}>异步加</button> </>)}
}
2、redux 精简版
(1)安装 redux:$ yarn add redux 或者 $ npm install --save-dev redux
(2)src 目录下建立 redux
新建 store.js
引入 redux 中的 createStor e函数,创建一个 store;createStore 调用时要传入一个为其服务的 reducer;向外暴露 store 对象。
/* 该文件专门用于暴露一个 store 对象,整个应用只有一个 store 对象
*/// 引入 createStore,专门用于创建 redux 中最为核心的 store 对象
// 新版本中,redux 的 createStore 方法已废弃
// import { createStore } from 'redux'
import { legacy_createStore as createStore } from 'redux'
// 引入为 Count 组件服务的 reducer
import countReducer from './count_reducer'// 暴露 store
export default createStore(countReducer)
新建 count_reducer.js
reducer 的本质是一个函数,接收:prevState、action,返回加工后的状态;
reducer 有两个作用:初始化状态,加工状态;
reducer 被第一次调用时,是 store 自动触发的;传递的 preState 是 undefined,传递的 action 是:{ type: ‘@@REDUX/INIT_a.2.b.4’ }
/* 1、该文件用于创建一个为 Count 组件服务的 reducer,reducer 的本质是一个函数2、reducer 函数会接到两个参数,分别为:之前的状态 prevState、动作对象 action
*/
const initState = 0
export default function countReducer(prevState = initState, action) {// if (prevState === undefined) prevState = 0console.log('prevState-action', prevState, action)// 从 action 对象中获取:type、dataconst { type, data } = action// 根据 type 决定如何加工数据switch (type) {case 'increment': // 加return prevState + datacase 'decrement': // 减return prevState - datadefault: // 初始化return prevState}
}/*reducer 初始化值三种写法1、default 中直接 return 初始化的值2、default 中 return prevState,函数头部判断 prevState===undefined,赋初始化的值3、指定形参默认值 prevState = 初始化值
*/
(3)在 Count 组件中使用 redux
import React, { Component } from 'react'
// 引入 store,用于获取 redux 中保存状态
import store from '../../redux/store'export default class Count extends Component {// 初始化状态(自身状态,不包含redux)state = { self: '仅为演示' }// 每个组件都需要单独引入,改为index.js中统一渲染(示例)/* componentDidMount() { // 组件挂载后// 监听 redux 中状态的变化,只要变化,就触发视图更新store.subscribe(() => { // 订阅 redux 中状态变化this.setState({})})} */// 加increment = () => {const { value } = this.selectNumber// 通知 redux 加 value (redux 只负责数据改变,不会触发视图更新)store.dispatch({ type: 'increment', data: value * 1 })}// 减decrement = () => {const { value } = this.selectNumberstore.dispatch({ type: 'decrement', data: value * 1 })}// 奇数再加incrementIfOdd = () => {const count = store.getState()const { value } = this.selectNumberif (count % 2 !== 0) {store.dispatch({ type: 'increment', data: value * 1 })}}// 异步加incrementAsync = () => {const { value } = this.selectNumbersetTimeout(() => {store.dispatch({ type: 'increment', data: value * 1 })}, 500)}render() {return (<><h1>当前求和为:{store.getState()}</h1><select ref={c => this.selectNumber = c}><option value="1">1</option><option value="2">2</option><option value="3">3</option></select> <button onClick={this.increment}>+</button> <button onClick={this.decrement}>-</button> <button onClick={this.incrementIfOdd}>当前求和为奇数再加</button> <button onClick={this.incrementAsync}>异步加</button> </>)}
}
(4)触发页面渲染
redux 只负责管理状态,至于状态的改变驱动着页面的展示,要靠我们自己写。
在 index.js 中监测 store 中状态的改变,一旦发生改变重新渲染 <App/>
import React from 'react'
import ReactDOM from 'react-dom/client'
import App from './App'
import store from './redux/store'ReactDOM.createRoot(document.getElementById('root')).render(<App />)// 订阅 redux 中状态变化,就重新 render 页面(diff算法)
store.subscribe(() => { ReactDOM.createRoot(document.getElementById('root')).render(<App />)
})
3、redux 完整版
通过 action 对象,触发 reducer 调用,产生新的 state
(1)redux 目录下 新增文件:
count_action.js 专门用于创建 action 对象
/*该文件专门为 Count 组件生成 action 对象
*/// 引入定义的常量
import { INCREMENT, DECREMENT } from './constant'export const createIncrementAction = data => ({ type: INCREMENT, data })
export const createDecrementAction = data => ({ type: DECREMENT, data })
constant.js 放置容易写错的 type 值
/* 该模块是用于定义 action 对象中type类型的常量值常量一般全大写目的是:便于管理的同时防止单词写错 (变量引入,写错编译会报错)
*/
export const INCREMENT = 'increment'
export const DECREMENT = 'decrement'
(2)修改 count_reducer.js 中 type 为常量形式
import { INCREMENT, DECREMENT } from './constant'const initState = 0
export default function countReducer(prevState = initState, action) {// 从 action 对象中获取:type、dataconst { type, data } = action// 根据 type 决定如何加工数据switch (type) {case INCREMENT: // 加return prevState + datacase DECREMENT: // 减return prevState - datadefault: // 初始化return prevState}
}
(3)在 Count 组件中使用 actionCreator
import React, { Component } from 'react'
// 引入 store,用于获取 redux 中保存状态
import store from '../../redux/store'
// 引入 actionCreator,专门用于创建 action 对象
import { createIncrementAction, createDecrementAction } from '../../redux/count_action'export default class Count extends Component {// 加increment = () => {const { value } = this.selectNumber// 通知 redux 加 value (redux 只负责数据改变,不会触发视图更新)store.dispatch(createIncrementAction(value * 1))}// 减decrement = () => {const { value } = this.selectNumberstore.dispatch(createDecrementAction(value * 1))}// 奇数再加incrementIfOdd = () => {const count = store.getState()const { value } = this.selectNumberif (count % 2 !== 0) {store.dispatch(createIncrementAction(value * 1))}}// 异步加incrementAsync = () => {const { value } = this.selectNumbersetTimeout(() => {store.dispatch(createIncrementAction(value * 1))}, 500)}render() {return (<><h1>当前求和为:{store.getState()}</h1><select ref={c => this.selectNumber = c}><option value="1">1</option><option value="2">2</option><option value="3">3</option></select> <button onClick={this.increment}>+</button> <button onClick={this.decrement}>-</button> <button onClick={this.incrementIfOdd}>当前求和为奇数再加</button> <button onClick={this.incrementAsync}>异步加</button> </>)}
}
4、异步 action 版
(1)store.js 中引入 redux-thunk,并配置
// 引入 createStore,专门用于创建 redux 中最为核心的 store 对象;用于添加中间件
import { legacy_createStore as createStore, applyMiddleware } from 'redux'
// 引入为 Count 组件服务的 reducer
import countReducer from './count_reducer'
// 引入 redux-thunk,用于支持异步 action (返回值为函数)
import thunk from 'redux-thunk'// 暴露 store
export default createStore(countReducer, applyMiddleware(thunk))
创建异步 action
// 引入定义的常量
// import store from './store'
import { INCREMENT, DECREMENT } from './constant'// 同步 action,函数返回值 为 Objcet 类型的一般对象。
export const createIncrementAction = data => ({ type: INCREMENT, data })
export const createDecrementAction = data => ({ type: DECREMENT, data })// 异步 action,函数返回值 为 Function。
// 异步 action 中一般都会调用同步 action,异步 action 不是必须要用的。
export const createIncrementAsyncAction = (data, time) => {return dispatch => {setTimeout(() => {// 此函数本身由 store 调用,不需要再引入 store,通过 store.dispatch() 调用// store.dispatch(createIncrementAction(data))// 直接调用 return dispatch => {}dispatch(createIncrementAction(data))}, time)}
}
Count 组件中修改为使用异步 Action
// 引入 actionCreator,专门用于创建 action 对象
import { createIncrementAction, createIncrementAsyncAction } from '../../redux/count_action'export default class Count extends Component {...// 异步加incrementAsync = () => {const { value } = this.selectNumber// 组件自身等待 500ms// setTimeout(() => {// 	store.dispatch(createIncrementAction(value * 1))// }, 500)// 交给 action 等待 500msstore.dispatch(createIncrementAsyncAction(value * 1, 500))}
}
5、react-redux 的基本使用
(1)安装 react-redux:$ yarn add react-redux 或者 $ npm install --save react-redux
(2)新建 containers 目录,目录下新建 Count 容器组件
connect(mapStateToProps, mapDispatchToProps)(UI组件)
- mapStateToProps:映射状态,返回值是一个对象
- mapDispatchToProps:映射操作状态的方法,返回值是一个对象
// 引入 UI 组件 Count
import CountUI from '../../components/Count'
// 引入 connect 用于连接 UI 组件和 redux
import { connect } from 'react-redux'
// 引入 action
import { createIncrementAction, createDecrementAction, createIncrementAsyncAction } from '../../redux/count_action'/*** mapStateToProps 用于传递状态* @param {*} state 容器组件本身已经传入了 store,不需要再引入,mapStateToProps 接收的参数就是 state* @returns mapStateToProps 函数返回的是一个对象* 1、返回的对象中的 key 就作为传递给 UI 组件 props 的 key* 2、返回的对象中的 value 就作为传递给 UI 组件 props 的 value*/
function mapStateToProps(state) {return { count: state }
}/*** mapDispatchToProps 用于传递操作状态的方法* @param {*} dispatch 容器组件本身已经传入了 store,不需要再引入,mapDispatchToProps 接收的参数就是 dispatch* @returns mapDispatchToProps 函数返回的是一个对象* 1、返回的对象中的 key 就作为传递给 UI 组件 props 的 key* 2、返回的对象中的 value 就作为传递给 UI 组件 props 的 value*/
function mapDispatchToProps(dispatch) {return { // 通知 redux 执行方法add: number => dispatch(createIncrementAction(number)),reduce: number => dispatch(createDecrementAction(number)),addAsync: (number, time) => dispatch(createIncrementAsyncAction(number, time))}
}// 使用 connect()() 创建并暴露一个 Count 的容器组件
export default connect(mapStateToProps, mapDispatchToProps)(CountUI)
(3)向容器组件传入 store:将 Count组件 替换为 Count 容器组件, 并传入 store
// 引入 store
import Count from './containers/Count'
import store from './redux/store'<Count store={store} />
(4)在 UI 组件 Count 中 使用状态或者操作状态
操作状态:this.props.add()
使用状态:this.props.count
6、react-redux 优化
(1)mapDispatchToProps 可以简单的写成一个对象
// 引入 UI 组件 Count
import CountUI from '../../components/Count'
// 引入 connect 用于连接 UI 组件和 redux
import { connect } from 'react-redux'
// 引入 action
import { createIncrementAction, createDecrementAction, createIncrementAsyncAction } from '../../redux/count_action'// 使用 connect()() 创建并暴露一个 Count 的容器组件
export default connect(state => ({ count: state }), // mapStateToProps 简写/* dispatch => ( // mapDispatchToProps 一般简写{add: number => dispatch(createIncrementAction(number)),reduce: number => dispatch(createDecrementAction(number)),addAsync: (number, time) => dispatch(createIncrementAsyncAction(number, time))}) */{ // mapDispatchToProps 的简写 (react-redux 会自动分发 action)add: createIncrementAction,reduce: createDecrementAction,addAsync: createIncrementAsyncAction,}
)(CountUI)
(2)使用了 react-redux 后也不用再自己检测 redux 中状态的改变了,容器组件可以自动完成这个工作。
(3)无需自己给容器组件传递 store,给 <App/> 包裹一个 <Provider store={store}> 即可
import React from 'react'
import ReactDOM from 'react-dom/client'
import App from './App'
import store from './redux/store'
import { Provider } from 'react-redux'ReactDOM.createRoot(document.getElementById('root')).render(<Provider store={store}><App /></Provider >
)
(4)容器组件和 UI 组件整合一个文件
总结:一个组件要和 redux “打交道” 要经过哪几步?
定义好 UI 组件,不暴露
引入 connec t生成一个容器组件,并暴露,写法如下:
connect(state => ({ key: value }), // 映射状态{ key: xxxxxAction } // 映射操作状态的方法
)(UI组件)
在 UI 组件中通过 this.props.xxx 读取和操作状态
7、react-redux 数据共享版
(1)redux 下创建目录 actions、reducers,将不同数据的 action(动作对象)、reducer (初始化状态加工状态)放在统一规范的目录下
(2)多个数据的 reducer 要使用 combineReducers 进行合并,合并后的总状态是一个对象,交给 store 的是总 reducer
注意:最后注意在组件中取出状态的时候,记得 “取到位”。
store.js
// 引入 createStore,专门用于创建 redux 中最为核心的 store 对象;用于添加中间件;用于合并 reducer
import { legacy_createStore as createStore, applyMiddleware, combineReducers } from 'redux'
// 引入 redux-thunk,用于支持异步 action (返回值为函数)
import thunk from 'redux-thunk'
// 引入为 Count 组件服务的 reducer
import countReducer from './reducers/count'
// 引入为 Person 组件服务的 reducer
import personReducer from './reducers/person'// 汇总所有的 reducer 变为一个总的 reducer
const allReducer = combineReducers({he: countReducer,rens: personReducer
})// 暴露 store
export default createStore(allReducer, applyMiddleware(thunk))
组件中取值,以 Count 组件为例
export default connect(// 由于在 store 中合并了 reducer。此时 state 为对象,取值要使用 obj.key 形式state => ({ personList: state.rens, count: state.he }),{add: createIncrementAction,reduce: createDecrementAction,addAsync: createIncrementAsyncAction,}
)(Count)
8、react-redux 开发者工具的使用
(1)安装:yarn add redux-devtools-extension 或者 npm install --save-dev redux-devtools-extension
(2)store 中进行配置
import { composeWithDevTools } from 'redux-devtools-extension'
const store = createStore(allReducer, composeWithDevTools(applyMiddleware(thunk)))
9、最终版
(1)所有变量名字要规范,尽量触发对象的简写形式
(2)reducers 文件夹中,编写 index.js 专门用于汇总并暴露所有的 reducer
/* 该文件用于汇总所有的 reducer 为一个总的 reducer */// 引入 combineReducers,用于汇总多个 reducer
import { combineReducers } from 'redux'
// 引入为 Count 组件服务的 reducer
import count from './count'
// 引入为 Person 组件服务的 reducer
import persons from './person'// 汇总所有的 reducer 变为一个总的 reducer
export default combineReducers({count,persons
})
七、纯函数和高阶函数
1、纯函数
一类特别的函数: 只要是同样的输入(实参),必定得到同样的输出(返回)
必须遵守以下一些约束 :
(1)不得改写参数数据 例如 function(a) { a=9 }
(2)不会产生任何副作用,例如网络请求,输入和输出设备
(3)不能调用 Date.now() 或者 Math.random() 等不纯的方法
(4)redux 的 reducer 函数必须是一个纯函数
2、高阶函数
高阶函数是对其他函数进行操作的函数,他接收函数作为参数或将函数作为返回值输出
作用:能实现更加动态,更加可扩展的功能
常见的高阶函数:
(1)定时器设置函数
(2)数组的 forEach() / map() /filter() / reduce() / find() / bind()
(3)promise
(4)react-redux 中的 connect 函数
八、项目打包运行
打包:
指令:$ npm run build
打包后生成 build 文件夹,为打包后的代码;不能直接访问,需要部署到服务器上。
前端测试部署:
借助 serve 库,以指定文件夹快速开启一个服务器
安装:npm install serve -g
运行服务:$ serve build 或者 $ serve (在 build 目录下)


)

)
挂载iso文件和配置apt本地源)


)


