【Introduction】
The Photoshop ICO plug-in is a file format plug-in developed for Photoshop, which allows Photoshop to directly read and write ICO format files. Because Photoshop has powerful pixel bitmap editing functions, it has many users and a good user base, which makes it convenient, simple and fast to use Photoshop to create icons. And basically reduces the need for multiple software to work together. In other words, you can use Photoshop to complete most of the work. The remaining small tasks, such as merging icon files, are relatively simple tasks, and the corresponding software is easier to develop and provide.
After a period of intense development, after 13 years (version 2.0 was released in 2010) I can finally release the latest version (V3.0) of the ICO file format plug-in. I have made a lot of functional upgrades in this update. The most important new features include:
(1) A new X64 version is added, which is almost zero cost for development, but is a very important requirement for users. Because today's software and PCs have generally entered the x64 era.
(2) Added support for icons containing PNG format images. This format was introduced and supported by Windows Vista. PNG format images use zlib compression, which can greatly reduce the file size, but some older software may not support. When saving the icon, the user can choose whether to use PNG format to compress the 32 BPP image.
(3) Added support for reading and writing mouse cursor files (cursor), and supports setting hotspot.
(4) Provide stronger and more friendly UI support on the read and write options dialog box, especially when saving icons, users can preview automatically generated images of other sizes and qualities in real time. Users are free to select the images they want to include in the file. Especially when generating other low-quality icons based on 32 BPP, the alpha threshold parameter provided by the original V2.0 version cannot be visually previewed, making the setting of this parameter very blind. Now users can see generated image in real time by dragging the slider control.
(5) Use a better quality full-pixel interpolation image reduction algorithm written by myself. The resulting small image quality is better than the 4-pixel interpolation of version 2.0.
(6) The oct-tree algorithm is still used to generate indexed-color images. To generate a mono-bitmap of 1 BPP image, a relatively simple grayscale threshold method is used.
(7) Added UI multi-language support. The plug-in has built-in Chinese and English language resources. Click the national flag icon on the dialog box to switch the interface language. Users can also easily add third-party language support to plug-ins through language resource template files. Or if the user is dissatisfied with the built-in language, they can "override" the plug-in's built-in language resources by adding an XML file of language resources, because external language resource files have a higher priority than the plug-in's built-in language resources. Implementing multiple languages adds a lot of development effort. Although this function is of little significance to Chinese people, it is a feature that I value very much, so I tried my best to implement it.
(8) Added support for inserting BPP16 R5G6B5 format images. The V2.0 version of the plug-in already supports the reading of BPP16 images. Although images in this format should be very rare in reality, and some image reading software may not support this format, images in this format still exist. , mainly in order to reduce the image file size on special devices (such as older mobile phones) or historical periods. Therefore, the plug-in supports both BPP 16 support of R5G5B5 (555) and R5G6B5 (565) inserted into BPP16. But it can be selected only when reading or when the user chooses to insert a new image. When saving, the plug-in will not insert BPP16 images by default.
[Download link] The following is the download link for the new version of ICO plug-in V3.0:
ICO-V3.0.2.zip
The x86 (32-bit) version is the version I mainly debug, using Photoshop CS (8.0.1) for testing. The x64 version is simply tested with Photoshop CS4 (11.0, 64 bit).
【Function introduction】
(1) Extract the icon or cursor file from a PE file (EXE, DLL, etc).
This is a function that has been available since ICO 2.0, and it is also a distinguished feature: it can extract icons directly from PE files without resorting to third-party software, which makes it simple and easy to obtain and edit icons or cursors in other PE files.
Open a PE file containing icons and cursor files. Note that if the file has an EXE suffix, you need to change the file suffix to DLL before it can be opened. This is the same as the requirement in V2.0 (because when opening a file with an EXE suffix directly , Photoshop will not be called with the file format plug-in). For example, when opening shell32.dll, a list of icon resources will pop up. If there are both icon and cursor resources, they are displayed in groups, where the first group is icons and the second group is cursors, as shown in the following figure:
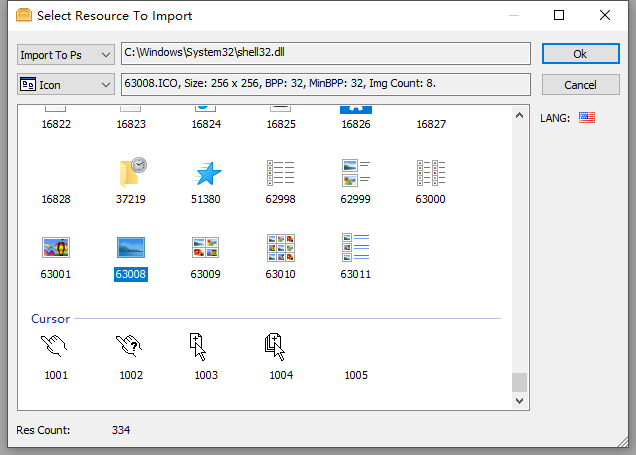
Users can select a resource and import it into PS for editing. However, since only one PS resource can be imported at a time, and each resource can only import one image, it will be different from the resources in the PE file when saving, or it will be saved in a lossy manner. In order to avoid this, you can also choose not to go through PS, but directly export the icon to the hard disk file as it is in PE. Users can select all icons and cursors in a PE file at one time, then select a folder and click "OK" to export all icons and cursors in the PE file as they are.
In newer Windows versions, some DLL icons and other immutable resources are separated into another file with the suffix ".mun" (essentially also a DLL file, but with a different suffix) and placed in "C:\Windows\SystemResources". It may be because these DLLs can have multiple versions for different languages, but resources such as these icons are unchanged. Therefore, in order to avoid having these resources form multiple copies with the DLL, these unchanged resources are removed from the original DLL. Strip it into another DLL for "sharing". Therefore, the ICO plug-in has added support for opening files with the "mun" suffix.
(2) When the user selects an icon file, or selects an icon to export from PE, if the resource contains multiple images, an image selection dialog box will pop up, asking the user to select the image to be read:
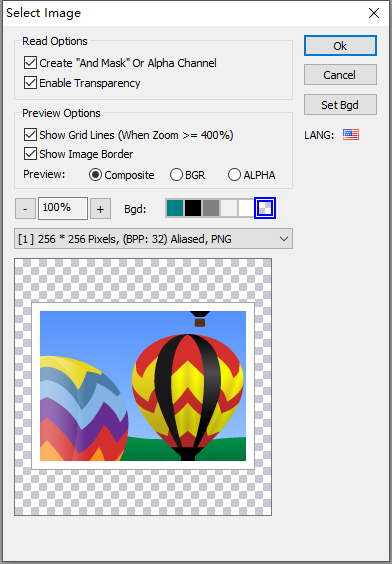
Here, the user can select an image, zoom in and out of the image, set the background of the icon, and view the effect of combining the icon with different background colors. Pixel grid lines can also be displayed (pixel grid lines are only displayed for zoom percents >= 400%). By default, the plugin will select the best quality image among the images first. If the icon has only one image, this dialog box will not be displayed and the only image will be opened directly into the Photoshop document. After opening the icon, if the image has AND MASK (non-PNG image), the AND MASK is added to a new channel in Photoshop. Previously in V2.0, this channel was consistent with the data in the icon, but it would be different from the user's intuition (white in AND MASK represents transparent pixels, black represents opaque pixels), so in order to be more close to user intuition, in V3.0, I inverted this channel. Now the Alpha channel corresponding to the selection will be a subset of the selection generated from AND MASK channel.
The user can chooses to preview the composite effect and Alpha channel information. When the mouse moves in the image, the bottom of the dialog box will display the mouse position in image coordinates and pixel's BGRA information.
(3) When the user opens a cursor (CURSOR) file, this dialog box will also add an option: "Highlight Cursor Hotspot". When turned on, the cursor hotspot will use a red cross to indicate its location, as shown in the figure below :
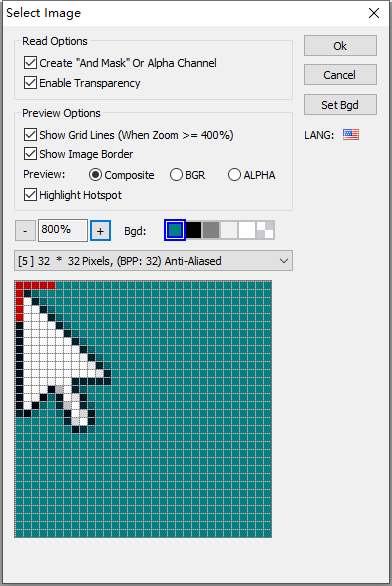
When the cursor file is opened, the hotspot will be added to the Photoshop document as an independent channel, and the user can view the hotspot position of the cursor through the channel.
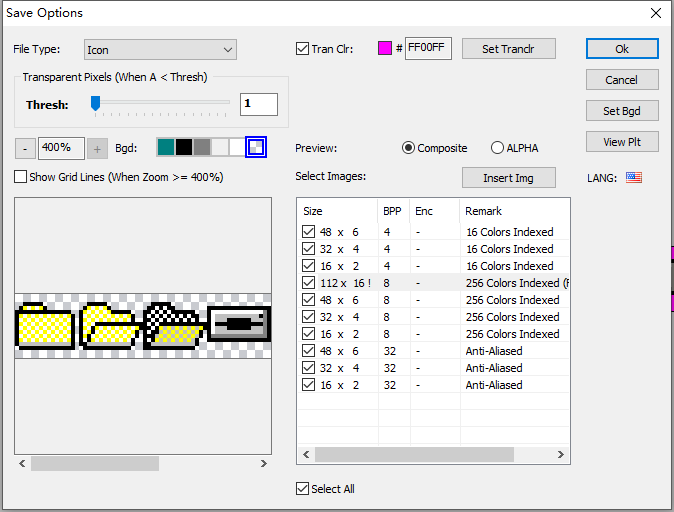
(4) When saving the icon, the save options dialog box will pop up:
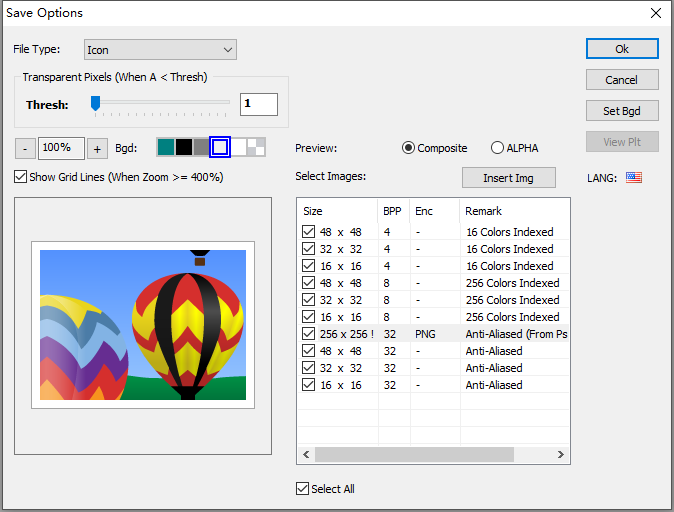
This dialog box is one of the extremely important functional enhancements of version 3.0 plug-in compared to V2.0. First, the dialog box has been inserted with other recommended images of size and quality. Users can check the images they need and preview each generated image. If these images do not meet user needs, you can also click the "Insert Image" button to insert images of other sizes and qualities (including 16BPP: R5G5B5 or R5G6B5). The most important thing here is that when generating other BPP images from a 32 BPP image, it is equivalent to generating an aliased image from an anti-aliased image. A very important parameter here is the parameter that distinguishes transparent pixels from opaque pixels: "Alpha threshold". In a 32 BPP image, each pixel has an alpha information (between 0 - 255) that controls alpha compositing with the background. 0 represents fully transparent, 255 represents fully opaque, and values in between are composites of translucencies. When downgrading to a BPP less than 32, these pixels with an alpha value between 0 and 255 must choose to either become transparent or opaque. This is the role of the alpha threshold parameter. The logic of the plug-in is to ask the user to set an alpha threshold:
If the pixel's ALPHA value < AlphaThreshold, then the pixel becomes a transparent pixel, otherwise the pixel is opaque.
The schematic code is as follows:
// The following code takes the generated target image as 24 BPP as an example.
if (pSrc[ 3 ] < AlphaThresh) {// When Alpha < AlphaThresh, make the pixel transparent. pAND[col / 8 ] |= ( 1 << ( 7 - (col & 7 )));pXOR[ 0 ] = 0 ; // explicit make XOR black. (won't change bkgnd); pXOR[ 1 ] = 0 ;pXOR[ 2 ] = 0 ;
} else  {// When Alpha >= AlphaThresh, make the pixel opaque. pXOR[ 0 ] = pSrc[ 0 ];pXOR[ 1 ] = pSrc[ 1 ];pXOR[ 2 ] = pSrc[ 2 ];
}
So if AlphaThreshold = 0, the image will be completely opaque. If AlphaThreshold = 256, the image will be completely transparent.
The alpha threshold slider is provided on the dialog box. Users can drag the slider to see the impact of changes in this parameter on the generated image results in real time. Many 32 BPP images may have a fading shadow, so its most important role is to control the size of the black edge of this shadow in the jagged image. We can see the impact of the alpha threshold parameter on the generated image from the following figure:
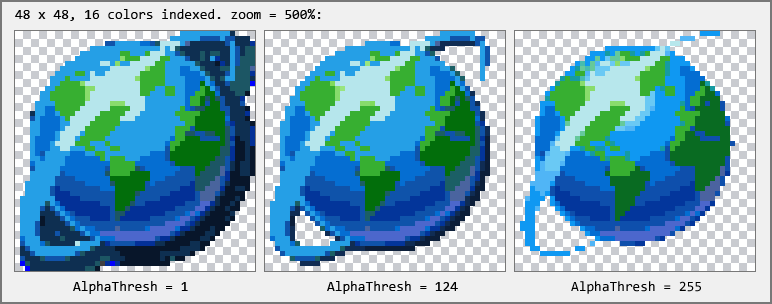
We can see that when AlphaThresh = 1 (default value), the generated image retains the most pixels of the original image, which makes the shadow larger. As AlphaThresh is increased, the shadow portion of the image will gradually shrink. When dragging the adjustment slider, the user will be able to see the effect of the generated image in real time, so the quality of the generated image can be better adjusted. In the v2.0 version of the plug-in, this parameter cannot be previewed in real time, so it can only be set based on feeling, making the generated image effect difficult to control.
(5) When saving the cursor file, the user can set the cursor hotspot:
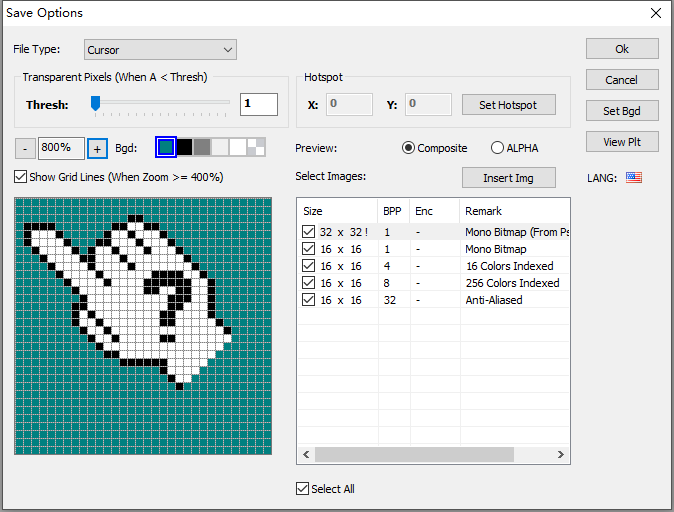
The user can select the file type to save to. When the "Cursor" type is selected, the dialog box will display a button for "Hotspot" settings. Click the Set Hotspot button to set the hotspot by pressing the mouse on the image (this operation Same as in Visual Studio), or directly enter the corresponding value in the text box. But I don't provide the option to highlight hotspots here, because it's not that important.
(6) The concept of main image.
When saving, there is one image among all images that comes directly from the Photoshop document. This image is called the main image, or source image. All other images are based on the data of this main image and then generated. from. Therefore, the main image plays a very important role. It is in the listview list, and an exclamation mark is added after the size. The remarks also specifically indicate "from PS document" to indicate that this is the main image. The main function of the main image is that the alpha threshold and hot spot settings of the main image will be automatically propagated to other "sub-images" (where the hot spot is set in equal proportions in other images). Therefore, when the main image is selected, the controls corresponding to alpha threshold and hotspot will be displayed in bold font, which means that the settings at this time will be automatically propagated to all other images. When a non-main image is selected, these settings will only be effective for the currently selected image, and other images will not be affected. In other words, the main image acts as a general control over the parameters of other images, and each image can have its own individual settings.
(7) For images without transparency information, a button to set the transparent color will be displayed when saving. The difference here with the V2.0 version is that I have simplified the transparent settings here, because the options for setting transparent colors here in the V2.0 version are a bit fancy, but they are not very useful because this requirement is not commonly used, so in the V3.0 version, I simplified this function to only provide the function of setting a transparent color. The user sets a transparent color to make the image partially transparent, because some resources used in development are bitmaps with a transparent color, so they can be easily converted into icons.
(8) For each 32 BPP image, the user can choose whether to use PNG encoding. The recommendation here is to use PNG encoding for images exceeding 48 pixels in size to make the image size smaller. However, some image software may not support PNG-encoded images, so users need to consider this. To modify the image encoding settings, just double-click the encoding column of the corresponding image, and a combobox will pop up. The user can switch the encoding. If PNG encoding is not selected, the plug-in uses the uncompressed BI_RGB (Windows bitmap format) method for encoding.
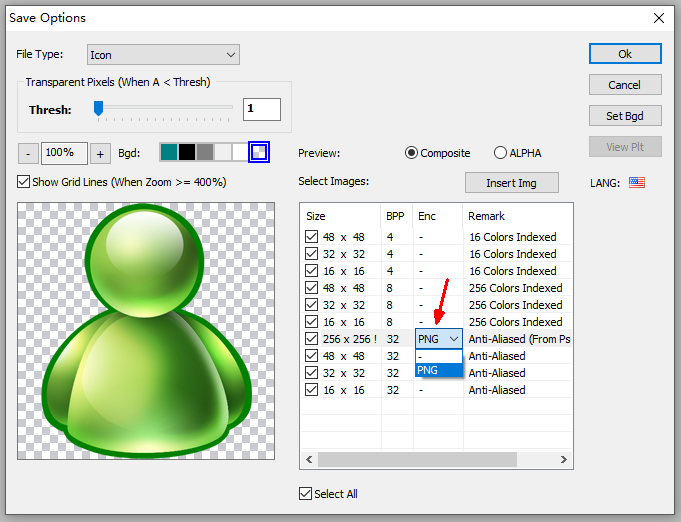
It should be noted that only 32 BPP images can be modified for encoding. Non-32 BPP images can only be stored in BMP. This is because if you use PNG encoding for BPP1 - BPP 24 images (although they can be saved in PNG encoding), the transparent information carried in the icon AND MASK will be lost. Therefore, other BPPs (smaller then 32 and has no alpha channel) do not support compressed with PNG format.
(9) Comparison of the results of the full-pixel interpolation reduction algorithm used by ICO 3.0 and the color-on-color (delete pixels) or four-pixel interpolation algorithm used by ICO 2.0, as shown in the figure below:
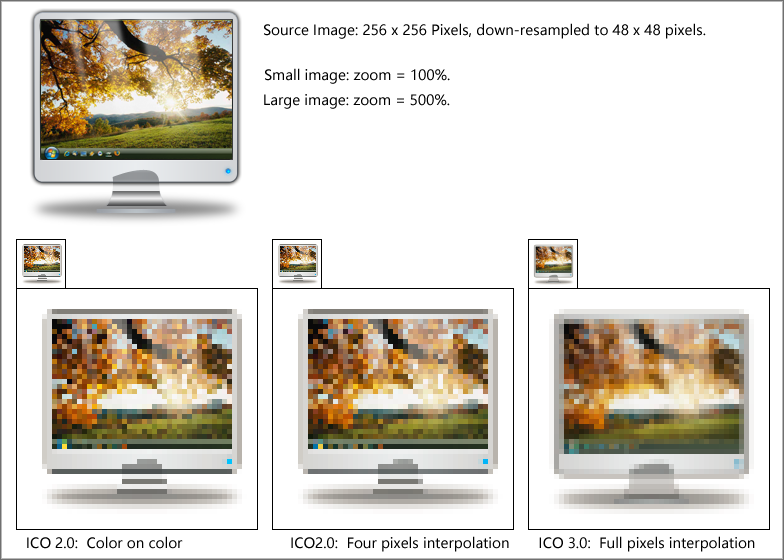
The algorithm here is to reduce a 256 x 256 32 BPP image to a 48 x 48 pixel 32 BPP small image. The comparison effect here may not be very obvious in distinguishing "good from bad", but it can explain some problems. That is, whether the ICO 2.0 algorithm uses pixel deletion (COLOR ON COLOR) or four-pixel interpolation, it loses a large amount of color information of intermediate pixels, resulting in a "sharpened" sense. If a specific image If it is not coincident with a certain scaling ratio, important color information will be lost, making the results unsatisfactory. Since ICO 3.0 participates in interpolation of all pixels of the original image, the result will still appear smooth, the visual effect will be more natural, and the subjective feeling will be closer to the original image.
(10) When the ICO plugin is using English (flag = "us") language, it can set the language's strcase, it has 4 options: None, LowerCase, UpperCase, TitleCase. "None" means use terms as it is in the language resource, "TitleCase" means capitalized the first Alphabet Character of a word. To change this setting, you can only by means of opening ICO plugin's About Dialogbox, It will display a combobox at the bottom of about dialogbox, you can change this setting. Note: this setting is only available to the lanuage that its flag attributes is "us", other lanuages does not have this option and not affected.
【common problem】
(1) When saving, why does the ICO format not appear in the file type?
Answer: Because the maximum size of ICO and CURSOR files is 256 x 256 pixels. Therefore, if any of the height and width of the Photoshop document exceeds 256 pixels, the ICO file format will be automatically hidden by Photoshop when saving. This is because the maximum size of the document is specified in the PIPL attribute of the plug-in to be 256 X 256 pixels. . Therefore, if you want to save it in ICO format, please first scale the image size of the Photoshop document to less than 256 x 256 pixels. Then you can choose ICO format when saving.
(2) When saving as ICO, how to change the image encoding to PNG encoding, or disable the use of PNG encoding?
Answer: Only images with BPP = 32 support saving in PNG encoding. For 32 BPP images, double-click the "Encoding" column of the ListView in the lower right corner of the save options dialog box with the mouse, select the encoding in the pop-up combo box, "-" means not to use PNG encoding, and then click the mouse elsewhere to make the combo box disappear. Entering focus completes the settings for encoding the image. Encoding settings can be set for each 32 BPP image. Note that some older software may not support decoding ICO files containing PNG-encoded images.
(3) Can I directly edit the color and Alpha value of a certain pixel of an image on the save options dialog box, or select a file as the inserted image?
Answer: The current version (ICO V3.0.2) is not supported yet. In the future, similar functions may be introduced if the requirements are evaluated and the implementation is reasonable.
(4) How to add new language support to the plug-in?
Answer: Edit "ICO_LANG_TEMPL.xml" in the compressed package, translate the Text of the elements in the file to the corresponding language, then rename the file to "ICO.LANG.<your-language>.xml', and copy it to the plug-in The directory where it is installed. If the file content can be loaded correctly, click the flag icon on the dialog box and you will see that the corresponding menu item is added, then you can switch to this language. The language ID is also id of corrisponding national flag. The ID can be obtained by checking files such as FLAGS_00_3F.png in the compressed package. The plug-in has built-in flag icons for more than 200 countries or regions. The LangID defines mainly depends on ISO_3166-1_alpha-2, you can also refer to iso-3166-country-codes. With few exceptions that are 3 or 4 chars, so when you set LangID in xml, you must obey the LangID defines list in the png images (while its string case is not sensitive, for eg: you can use either "us" or "US"). Here is some language IDs maybe commonly used for localization:
| LangID | Country or Region |
| cn | China |
| gb | United Kingdom of Great Britain and Northern Ireland |
| hk | Hong Kong |
| jp | Japan |
| kr | Korea, Republic of |
| tw | TaiWan, Province of China |
| us | United States of America |
Notice that I did not consider right-to-left writing languages, because I am not familar with these kind of lanuages, and I do not know what the effect is if use them.
【Reference】
(1) A Simple Method for Color Quantization: Octree Quantization. (Octree algorithm for generating indexed images)
(2) famfamfam flag icons (by mjames@gmail.com).

 使用生态开发接口详情5(云公共模块))


)


